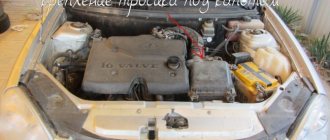
First of all, I would like to note that such a malfunction is far from critical, so it requires elimination only at the moment when the car owner needs to gain access to the engine compartment.
If the cable breaks in the lock area, the problem of opening the hood can be temporarily resolved by pulling the remaining cable through a special hole in the hood of the car. It is covered with a grill made of plastic.
Nevertheless, constantly using this method will be quite problematic, and therefore the cable break will still have to be eliminated. The first thing you need to do is, of course, purchase a new cable, and then proceed to replace the old one. Experts recommend carefully inspecting the locking mechanism before installing a new cable. The fact is that if it is in poor condition, then this particular part could cause the cable to break. Without eliminating this cause, you should be prepared for the fact that the new cable will soon have to be replaced.
To replace the hood cable with a new one, you will need the following tools:
After the hood has been opened, the procedure is as follows:
- it is necessary to remove the ends of the plastic clamps from the existing holes. This is done using a flat-head screwdriver. Thus, the old cable is freed from its fastenings on the metal partition located between the space under the hood and the interior;
- The bent end of the cable should be straightened and the sleeve that secures it should be moved away. Thanks to this action, the cable will be disconnected from the mechanism;
- Taking the 10mm wrench in your hands, unscrew the two nuts that secure the mechanism to the body. Attention! Before performing this work, we recommend marking the position of the lock on the partition. This is done so that after replacing the cable the lock does not have to be adjusted;
- Inside the car, we remove the torn piece of cable that sticks out of the handle responsible for opening the hood. It is located on the right under the dashboard.
- in the partition between the engine compartment and the passenger compartment, remove the casing.
After the entire procedure described above has been completed without deviations, you can begin assembly.
By the way, it is done in the opposite direction:
- the cable is inserted all the way from the passenger compartment into the hole located in the lock control handle;
- The cable is put into the casing from the side of the engine compartment;
- the mechanism is put on the studs and fixed with two nuts in exactly the position in which it was noted earlier;
- the tip of the cable is connected into a single unit with the mechanism. You can fix it in this position using a special bushing, but only when it is in a tense state;
- the rest of the cable is bent in such a way as to prevent its spontaneous loosening.
The work of replacing the hood cable on a VAZ-2107 can be considered completed. The only thing left to do is to check whether the cable was tensioned properly. To do this, with the hood open, you must first pull and then release the hood release handle several times. If after this the movement in the lock tongue has decreased somewhat, the cable will have to be tightened again.
HOOD VAZ 2107 - WHY IS IT NEEDED
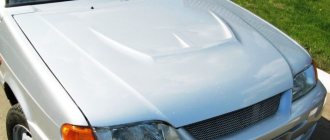
The part of the VAZ 2107 body that covers the engine compartment is called the hood. The main purpose of the engine compartment cover is not only to cover, but also to protect the engine compartment from various external factors, increasing the aerodynamics of the car and absorbing noise from the engine. The material used for the hood is the same metal that is used for the entire body.
The connection of the cover to the body is ensured through hinges and bolted connections. The body part itself is made of two panels, which are connected to each other by rolled edges and fastened by welding. The joints and seams are sealed with mastic. To adjust the hood on the “seven” there are holes in the hinges, which are larger in diameter than the fastening elements.
A car hood is a part that covers the engine compartment and protects it from environmental influences.
HOW IS THE HOOD SOUND INSULATION DONE?
The hood is soundproofed for obvious reasons - to reduce the level of noise that spreads from the engine not only to the outside, but also penetrates into the car interior. To soundproof the hood of a “Seven” or any other classic car, you will need the following tools and materials:
- construction hair dryer;
- stitching roller;
- rags;
- cutting knife;
- scissors and a piece of cardboard;
- vibration isolation;
- sound insulation.
Vibroplast or Vizomat MP, Bimast Super can be used as a vibration-absorbing material; Splen 4–8 mm thick can serve as a noise insulator. Before starting work, it is necessary to clean the inner surface of the hood from dirt and degrease it, for example, with white spirit. If there is rust, it is cleaned down to the metal, then a layer of primer is applied and waited for it to dry. When performing sound insulation of body elements, you should always adhere to the following rule: use vibration-absorbing material as the first layer.
Vibration-insulating material is applied between the hood stiffeners on the prepared surface
To cover the surface most accurately, you should make patterns from cardboard: cut out the material from them, remove the film and roll the elements with a roller. Vibration insulation is applied only between the stiffening ribs of the engine compartment cover. What can be noted about the second layer (soundproofing): as a rule, there is no special need for it, since the first layer copes with the task perfectly. NOISE insulation is mostly used as a heat insulator.
The noise insulation layer is used as a heat insulator
INSTALLING AN AIR INTAKE ON THE HOOD
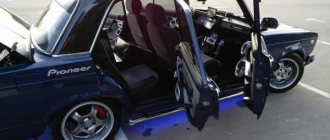
Installing an air intake on the hood of a VAZ 2107 allows you to solve two problems simultaneously: the first of them has a functional meaning, and the second relates to changing the appearance of the car, i.e. tuning. When installing a part such as an air intake, a greater air flow is provided, which allows you to not turn on the heater fan when the car is moving, regardless of the time of year. In addition, the element improves the design of not only the hood, but also the entire car as a whole. Whether to install this accessory on your car or not is up to you.
Air intakes made of plastic are the most common. Some craftsmen make such parts with their own hands. The installation of the element in question will require a minimum of time: installation is carried out using self-tapping screws through the ventilation grille on the hood. First, the fasteners are simply attached, the plastic part is aligned, and then finally screwed on. Since there are two grilles on the hood of the VAZ 2107, the same number of air intakes will be needed.
Installing an air intake provides better air flow into the cabin and improves the appearance of the car
Detailed instructions for replacing the hood cable on a VAZ
The engine compartment lock is not a VAZ unit that requires much attention, and some car owners can drive their car for years without ever encountering such a problem as replacing the VAZ 2107 hood cable.
A broken VAZ cable does not in any way affect the technical characteristics of the car, but repairs will have to be carried out: access to the engine must be unobstructed. During replacement, the locking mechanism should also be inspected to avoid double repairs if the rope breaks not due to broken steel cord threads, but due to damage to the lock.
Hood lock device
VAZ classics from 2101 to 2107 provide for opening the lid in the direction from the windshield. Starting from the VAZ 2108, the unit opens in the opposite direction. These modifications to the cover did not affect the design of the lock: both the VAZ 2115 and the “kopek” are supposed to have the same parts of the locking mechanism with minimal changes.
The same standard cables are suitable for VAZs up to and including model 7. From the eighth model onwards, the length of the standard cable has been increased by 90%.
Main details (using example 2109):
- pin;
- cup lower, upper;
- safety hook;
- lock washer;
- latch spring;
- lock spring;
- hook axis;
- cable jacket;
- cable;
- pen.
The operating principle is extremely simple. When the lid is closed, the locking pin fits into the frame hole and is held in place by a spring. With the help of a cable from the handle of the assembly in the cabin, the pin is released, the hood bounces slightly, held by the safety hook. A second press on the cover removes the hook and the engine compartment opens.
Causes of malfunction
The most common cause of cable breakage is wear of the part. Over time, the plastic shell falls off, kinks appear on the cord, the cable threads burst, and tension is lost. The second reason is that the running parts of the lock have rusted and lost their mobility. Due to the greater forces on the handle, the rod experiences increased loads, which reduces its service life.
Is the headlight sweating? Two ways to remove moisture and water from a lantern
The cable may fly off the hook axis due to wear of the part or breakdown of the locking mechanism. If, along with a torn cord, a lock is found to be broken, it is recommended to dismantle it, sort it out and install it in its original place. If the locking mechanism is not damaged, you can replace the rod on a VAZ 2107 without removing the lock.
How to open a car hood if the cable is damaged
There are several ways to open the engine compartment, depending on where the hood release cable breaks. The simplest case is if the cable breaks at the base of the handle and part of it is visible through the hole. It is enough to hook it with pliers and release the lock latch.
It is more difficult if the rod breaks in the lock area. To open the hood, you will need to lift the corner of the lid, pressing (twisting) the rubber band as tightly as possible. Insert the handle of a screwdriver or any other wedge into the gap. Move the wedge as close to the lock as possible.
Insert the used rope with a loop wound at the end into the resulting gap and place the loop on the locking hook. Remove the wedge to make the lock move easier and, pressing the lid, pull the cable. The corner is raised on the driver's side.
How to replace the cable
Tools you will need:
- pliers;
- flat blade screwdriver;
- key to 10.
Replacing the hood cable on a VAZ 2114 requires first disconnecting the additional bushings in the hood; the rod is fixed to half the perimeter of the cover. You can replace the VAZ 2106 cable with your own hands in stages.
- From the side of the engine compartment, use a screwdriver to pry off the plastic plug through which the cable passes, exiting into the passenger compartment. The procedure is similar for the VAZ 2109.
- Remove the fixing sleeve from the cable. You can bite the used rod for easy removal.
- Remove the used rope from the interior handle.
- To install, the plastic shell is first removed from the part.
- Push the end of the rope through the hole in the handle, bringing the part into the engine compartment.
- A plastic shell is put on the rod, and a plug is inserted between the hood and the interior.
- The formed loop is fixed with a sleeve, the end of the cord is cut and pressed against the clamped sleeve.
- The loop is fixed on the locking mechanism, the lock is installed in its original place.
To avoid additional adjustment of the lock after replacement, the mechanism can be removed by unscrewing the two fixing nuts. This procedure is carried out more often on the VAZ 2108. In 80% of cases, replacing the hood cable of a VAZ 2107 does not involve removing the lock.
After installing the cable, the rigidity of the traction is checked. The lid should open after the first press of the handle. Simultaneously with replacing the rod, it is recommended to check the quality of the spring for compression. If the spring is stretched, it is replaced.
ADJUSTING THE HOOD
If the hood on a VAZ 2107 is located with a different gap around the perimeter, the part needs adjustment. To do this, you need to outline the contours of the hinges and disconnect the stop from the bracket, and then loosen the fastening of the hinges. Enlarged holes in the hinges make it possible to adjust the position of the hood. After the procedure, tighten the fasteners and install the stop in place.
To adjust the position of the hood you will need to loosen the hinges and move the cover in the desired direction
Withdrawal procedure
How to correctly replace the hood cable on a VAZ-2107
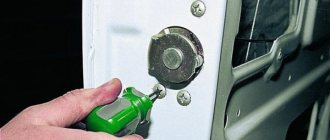
1. First of all, remove the wire from the negative terminal of the battery.
2. After this, to access the hood lock, you need to remove the radiator trim.
3. When starting to replace the rod, the first thing you need to do is mark the position of the washers. This will make it easier to adjust the lock in the future.
4. Now you need to unscrew the two bolts on both sides of the lock
Please note that there are spring washers underneath
5. Now we remove the lock from under the bracket and unbend the end of the rod. After this, we remove the end of the rod from the bushing and disconnect it from the lock lever. After this, you can remove the bushing from the rod.
6. After the bushing is removed, you need to move the rod end and remove the cable from the lock.
6
Please note that there may be shims on the end of the rod shell. try not to lose
7. Now you need to remove the end of the cable sheath.
9. The next step is to unscrew the nut securing the cable holder. After this, you need to remove the holder from the stud, and then from the rod shell itself.
10. Now you need to push the rod sheath holder inward and remove it from the cable sheath.
11. To make it easier to install a new rod, you need to tie a rope slightly longer than the rod itself to the end of the cable.
12. Open the cover of the mounting block and press the handle that opens the hood all the way.
13. Raise the tip of the sheath and remove the cable from the slot.
14. Now you need to disconnect the cable end from the hood release handle. To remove the cable, you need to slide it in the L-shaped slot and pull it out.
15. Now you can pull the rod deep into the cabin so that the rope fits into the place of the rod.
HOOD STOP
A part such as a stop allows you to hold the hood in the open position when repairing or maintaining the car. The rod is attached to the body and hood using special brackets. In the upper part, the stop is fixed with a cotter pin, and in the lower part, thanks to a rubber tube, it fits tightly into the bracket. If there is a need to dismantle the rod, you need to remove the cotter pin with pliers, remove the washer and rubber bushing.
The hood stop allows you to hold the engine compartment lid in the open position when repairing or maintaining the vehicle.
Some owners of "sevens", improving their car, install a gas stop, for example, from a VAZ 21213, instead of the standard one.
PHOTO GALLERY: INSTALLING A GAS STOP ON A VAZ 2107
On the hood, the gas stop is mounted in the hole of the standard stop.
The gas stop is attached to the bottom using a homemade bracket
The gas stop holds the engine compartment lid in place perfectly.
Its fastening does not cause any difficulties: on the hood it is fixed into the factory hole, and a homemade bracket is installed on the radiator frame.
VIDEO: INSTALLING A HOOD GAS STOP ON A VAZ 2107
HOOD SEAL
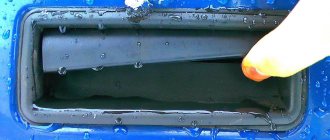
The hood seal on the seventh model Zhiguli, as well as on other “classics”, is designed to tightly fit the body element and eliminate its vibration while driving. The standard seal is a soft rubber product with a metal insert inside to provide rigidity. Replacement of the element in question is required if it is worn out and comes down to removing the old seal from the special side and installing a new one. Many motorists are faced with situations where water accumulates in the air duct cavity, flowing under the hood during precipitation. Moisture, as you know, does not lead to anything good. To avoid this unpleasant situation, you can use a seal from the “seven” doors, which is secured along the upper edge of the engine compartment.
To prevent water from entering the air duct cavity during precipitation, some VAZ 2107 car owners install an additional seal
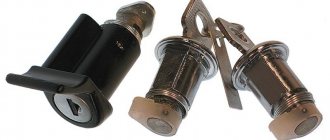
LOCK DEVICE
The hood lock of the "seven" has a fairly simple structure and consists of a housing, a spring, an ejector, a cable and a handle. Despite the simplicity of the design, sometimes there is a need to adjust or replace the mechanism. Adjustment is usually needed when closing the hood is problematic. A new lock has to be installed if its elements are worn out, i.e. when the car is far from new. In addition, there are situations when the cable breaks, resulting in its replacement. All these points are worth dwelling on in more detail.
Design of the hood lock of the VAZ 2107: 1 - lock body; 2 - spring; 3 — ejector; 4 - cable; 5 - handle
HOW TO ADJUST THE HOOD LOCK
The main goal that is pursued when adjusting the hood lock on a VAZ 2107 is to achieve its high-quality operation, i.e., there should not be any difficulties when closing and opening. If the mechanism does not lock the hood securely or requires a lot of force to open it, then adjustment will help correct the situation. The procedure boils down to the following steps:
- Using a marker, outline the contours of the hood lock.
- Loosen the two nuts securing the mechanism with a 10mm wrench.
- Move the lock body in the desired direction, tighten the nuts and check the operation of the device.
- If necessary, the sequence of actions is repeated.
The adjustment process on the selected car model
The device of the hood lock VAZ 2108/2109/21099
To begin with, open and fix the hood
Let's pay attention to the lock and try to understand the principle of its operation.
The photo shows the main elements of the castle:
- Lock latch spring
- Lock-nut
- Latch
- Safety hook
- Safety hook handle.
From what we saw, it follows that after we pulled the opening handle in the cabin, the cable opens the latch, which releases the lock latch. Thanks to the latch spring, the hood “jumps” up, but it is still held half-open by the safety hook. And only by pressing the handle of the safety hook, we can fully open it and gain access to the engine compartment. Quite a reliable system. At first sight…
Vertical adjustment of the lock
If the hood does not want to close normally (you slam it, put pressure on it, but it still closes with difficulty, or does not lock in the closed position at all), or a rattling noise appears when driving on our perfectly smooth roads (sometimes it is noticeable even just when the engine), then adjustment in the vertical direction is necessary. Namely, adjusting the length of the lock latch.
To do this, use a 19 mm wrench to loosen the lock nut on the latch, holding the latch itself from turning with a flat-head screwdriver.
If the hood is poorly or not at all fixed in the closed position, then you need to slightly increase the length of the latch, which we will achieve by unscrewing it with a screwdriver.
If the hood rattles, on the contrary, you need to shorten the latch by tightening it several turns inward. The required latch length is determined experimentally.
Got rid of the problem? Then tighten the locknut (don’t forget to hold the latch with a screwdriver), check it again and rejoice!
Horizontal adjustment of the lock
If there are problems with opening, or if there is a metallic knock when closing, the lock requires horizontal adjustment.
To do this, we also loosen the lock nut and slightly move (not twist, but move) the latch in the desired direction.
When adjusted correctly, everything should close and open well. Without any effort. Ideally, the hood should slam shut completely when released from a height of 20-30 cm and snap open when pulled by the drive handle in the cabin, only being secured by a safety hook.
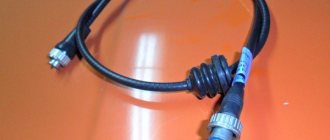
HOOD CABLE
The cable transmits the force applied by the driver from the hood opening handle to the lock. There are situations when the cable needs to be replaced:
- the cable moves with difficulty in the braid;
- several threads of the lock drive have broken;
- the lock rusted, which subsequently led to the cable breaking.
They usually resort to replacing the hood cable if it breaks.
Purpose and causes of malfunction
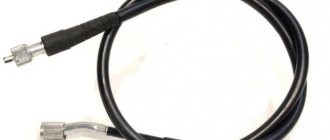
Hood lock cable for VAZ 2107
Hood locking mechanism diagram
The cable transmits the force applied by the driver from the hood release lever to the hood lock. Situations in which replacement is necessary are listed below.
- Over time, the cable began to move poorly inside the plastic jacket.
- Several threads of the cable broke, as a result of which it became longer and the force simply did not reach the hood lock.
- The hood latch is rusty, its parts have lost mobility, as a result, the driver is forced to pull the hood opening lever harder, which ultimately leads to a break.
HOW TO REMOVE THE CABLE
Before you begin replacing the hood cable, you will need to prepare the following list of necessary items:
- socket head or wrench 10;
- flat screwdriver;
- narrow nose pliers;
- marker.
Direct replacement of the engine compartment lid cable on a “classic” is carried out in the following order:
- Open the hood.
- The lock is circled with a marker so that upon completion of the work its location can be seen.
- Remove the two clamps that secure the cable to the body. It is best to use a flat-head screwdriver for these purposes.
- The edge of the cable is aligned with narrow-nose pliers, after which the fixing sleeve located on the flexible element is moved.
- Remove the cable from the fastener on the lock.
- The lock is dismantled by unscrewing two 10mm nuts with a key or socket and removing the mechanism.
- Inside the car, use narrow-nose pliers to remove the cable from the braid.
- Find a rubber seal in the engine compartment and remove it using a flat screwdriver. Next, remove the cable sheath.
- The hood cable that had become unusable was removed.
VIDEO: REPLACING THE HOOD CABLE ON THE SEVEN
Main stages of repair
Before moving on to the instructions, we will tell beginners that if time is short, the broken cable can be pulled through the hole in the hood, covered with a plastic grill. Of course, the method is artisanal, but with such non-standard methods our ancestors won the war against the Germans. In this way, you can open the hood constantly and save 50–70 rubles on repairs. But if the “innovative” method is not for you, we won’t languish any longer. Here are the promised step-by-step instructions. As an example, we take the VAZ-2109 car. We will conditionally divide all activities into two stages - disassembly and installation.
To work, you will need a 10mm wrench and a flathead screwdriver.
- We remove the ends of the clamps from the holes and release the cable from the fastenings.
- We move the sleeve and disconnect the cable from the mechanism.
- Pull the cable out of the handle.
- We remove the casing.
Assembly and installation stage:
- Insert the cable all the way into the handle hole.
- We put on the casing.
- We fix the end of the cable with a sleeve and bend it.
We check the operation of the entire mechanism. We pull and release the handle several times. If the amplitude of the lock has changed, we adjust the mechanism. At the end of the work, we treat all parts with machine oil.
The unanswered question remains: how to change the hood cable of a VAZ-2107? The disassembly and installation procedure is the same as for the VAZ-2109 car.
Before you begin replacing the cable, inspect the location of the damage. Perhaps the break occurred due to a defect in the lock itself; if so, change that too.
HOW TO INSTALL THE CABLE
After completing the dismantling of the hood cable on the VAZ 2107, you can install a new part. The whole process is done in reverse order:
- The lock drive is inserted into the hole in the lock control handle.
The hood lock cable is installed in a special hole in the handle
- From the engine compartment side, the shell is pushed onto the flexible part.
In the engine compartment, a sheath is pulled over the cable
- The lock is mounted on studs and secured with nuts in the position marked with a marker during dismantling.
Install the lock on the studs and secure with nuts
- The edge of the cable is connected to the lock element. It is fixed only in a tense state using a special bushing.
After securing the edge of the cable with the lock element, it is fixed using a special sleeve
- The remaining part of the cable is bent in such a way as to prevent it from weakening.
The remaining part of the cable must be bent in such a way as to prevent it from weakening
How to replace the cable
- The hood of the car opens.
- The hood lock is outlined with a marker so that after its removal it can be seen in what position it was originally.
We outline the lock on the hood of the VAZ 2107 with a marker
The hood cable clamps of the VAZ 2107 are removed with a screwdriver
Using narrow-nose pliers, move the cable locking sleeve
Removing the VAZ 2107 hood cable from the jacket
Video: how to change the hood release cable on a VAZ 2107
As can be seen from the article, replacing a broken hood cable is not particularly difficult. The main thing to remember is that a plastic shirt must be handled carefully, since it is not durable. If it is damaged, the cable will eventually begin to get stuck again, and the work of replacing it will have to be done again.
HOW TO OPEN THE HOOD IF THE CABLE IS BROKEN
A broken hood cable on a 7 is one of the unpleasant moments that can take the owner by surprise. The situation is difficult, but solvable. There are several options that will resolve this problem, so let's look at each of them.
- Broken cable near the lock drive handle. This type of breakdown is one of the simplest, since using pliers you can pull the flexible element and open the lock.
- If the cable does not break near the lock or lever, you can try to remove it through the grille in the hood. To open the lock, you need to bend a hook made of stiff wire, thread it through the grille and pull the lock drive with pliers. To make the procedure easier, it is recommended to press the hood down in the area of the locking mechanism.
- The lock drive can be pulled not through the air duct, but into the space between the body and the hood. In this case, the engine compartment lid is raised as much as possible, for which you can use a wooden block of suitable size: it will prevent the hood from returning to its place. To avoid damaging the paint coating, the wooden part is wrapped in rags. After removing the cable, all that remains is to pull it.
- If the lock drive breaks directly next to the mechanism, then attempts to remove it will not give any result. Since the hood lock on the VAZ 2107 is located near the windshield, the only thing left to do is to try to hook the lock mechanism with a wire loop at the place where the cable is attached and pull this part. The procedure is not easy, but sometimes in the current situation there is no other way out.
How to replace a cable
No special measures are required prior to the replacement itself. The only tools you need to prepare are a 10mm wrench and a flat-head screwdriver.
Next, fold back the hood lid and lock it in this position. Now you need to remove the plastic clamps from the holes intended for them. This is done with a screwdriver. As a result, the cable will be released in the area between the engine compartment and the car interior. Do not use much force to avoid damaging the paint layer.
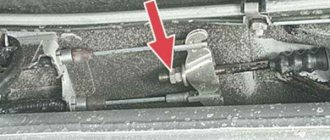
Now go to the castle. Here, move to the side the bushing that prevents the bent tail of the cable from straightening
Carefully align the tip of the latter and release
Using a 10mm socket wrench, remove the pair of nuts holding the lock in place. Before removing, be sure to outline the housing with a marker - this will avoid the need to adjust it after reinstallation.
In the engine compartment, find the end of the handle that opens the hood. Slide the protective cover and disconnect the cable in the same way as described above.
Now nothing prevents you from removing the damaged flexible rod.