VAZ 2114 lock from viburnum on
Can a Kalina trunk lock be installed on a VAZ 2109 or not?
And why should this mechanism be chosen? In this article we will try to shed light on all these questions. The trunk lock on the VAZ 2109 at one point became a real problem. And it all started unexpectedly - a hole opened on the bumps, and as it turned out, a tooth broke off. It was very early in the morning, so I tied the door to the body and drove on; I installed the new lock (and its counterpart) a little later that day. But then problems began - I changed the trunk locks every six months or a year, and once I got one so bad that his tooth fell apart after a couple of weeks. The problem, it would seem, is not very serious, but how annoying it is is beyond words. And a couple of months ago it all started all over again - the Lyada knocks on the body, and on bumps it’s generally unbearable. While it was cold, I didn’t start repairs, but at the first rays of the spring sun I decided to get out to the car and see what was going on. This is where the story begins about how I managed to solve (so far partially) this problem.
electric trunk lock
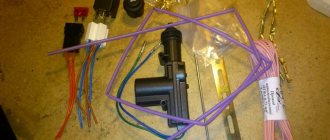
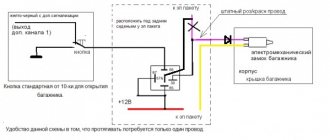
so, to make an electric trunk lock, we need:
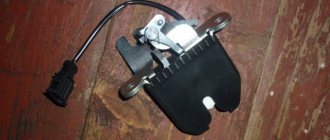
- Two-wire door actuator for 6 KG
- Fuse 10A
- Trunk button from VAZ 2110
- Relay 90.37.47-10
- Wire 10 m (6 m is possible, but I took it with reserve)
- Female terminals 10 pcs.
- Sheathed hood cable
For those who are not well versed in electrical circuits:
Since I installed the relay next to the lock, I also powered the mass coming from the relay and the activator to the housing (right on the lock, there was already some mass there) As for the connection. I used a 3-pin button, it is called “Button for opening the trunk lid 2110”. The switching of the button is as follows: when the button is pressed, contacts 1 and 2 are switched, and when the button is pressed, contacts 1 and 3 are switched.
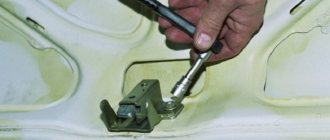
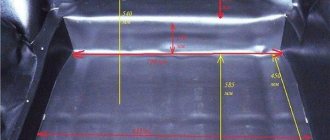
All that remains is to install everything in the car. Let's start with the back door. The installation diagram for the rear door can be seen in the photo below (collective farm, well, it’s still not visible):
Stuffing everything into the back door is not a problem, but running the wire into the cabin is difficult. Further along the cabin the wire is not so difficult to stretch, we just push it under the ceiling. I used a metal wire as a conductor. The most difficult thing is to get through the rubber corrugation between the trunk door and the passenger compartment. In the cabin, I ran a wire along the ceiling and down the left windshield pillar. As it turned out, at the bottom, next to the hood release handle, there was a plug for a button to open the trunk. Under the steering wheel there was a free block with a permanent plus, I bought a counterpart and powered the radio and trunk to it. Here is my conductor))) the hood cable remains:
And here is the ominous corrugation through which the wire has to be pulled. Let's just say it wasn't a very convenient place. Probably a prepared person will say that it’s easy. But when the wire goes through this corrugation for the first time, it causes difficulties.
As I wrote above, I found a plug under the steering wheel for a button to open the trunk. Why they did it is not clear, but thank you)))
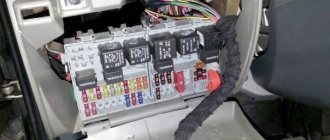
Even when I installed the radio, I found a free block. There was a fuse on the block, a permanent positive one that opened when you started it. Because You won’t have to use the button often; you can safely set it to 1 plus with the radio.
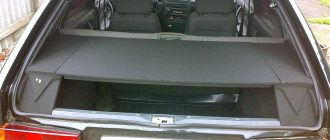
Having done everything described above, you should get a working mechanism for automatically opening the trunk. Now you can deal with the aesthetic side of the issue. Everything in the interior is fine, the button is in its normal place and looks as if it had always been there. But the trim from the trunk lid does not fit back. The second stage of our refinement is the modernization of the trunk trim.
First, cut a hole in the middle of the casing so that it can then be installed in place.
Accuracy is not needed here; all this will not be visible anyway.
Now we fill it with construction foam on top, while covering the hole with newspaper from the inside. Foam will help give you the necessary head start.
Trim off excess foam. We create the form we need. The main thing is not to leave too much foam, otherwise it will interfere with closing the trunk door later.
Having made the desired shape, you need to try it on by machine. If everything falls into place well, you can continue. Next you need to cover the foam with fiberglass. I didn’t have glass fabric, so I twisted it using improvised methods. I took a piece of carpet, glued it on top of the foam and treated it with starch glue.
When everything has hardened, you can make a hole in the foam.
Finally covered it with carpet, it turned out very nice.
Having completed the hood lock, I decided that I would no longer need the key. Therefore, I decided to modify the lock so that nothing would stick out from the outside. There are two points:
- Having pulled out the lock, a hole remains and you need to decide how to seal it. You can, of course, just drive with a hole)))) You can weld it and paint it over. However, this is time-consuming and expensive, especially if you cannot do it yourself. I decided to take the easy route and just put a (dragon nameplate) sticker there.
- Automation is good, but you need to leave yourself an escape route and make the trunk opening mechanical, otherwise you risk someday not getting into your own trunk.
Adjustment and repair of the trunk lid and hood lock of the VAZ fourteenth model
If the trunk opens by itself, it means that there is a ghost in the car or it’s time to get the lock in order. More likely the latter than the former, so if the lid does not fit well or opens when the car hits a bump, it needs to be adjusted and the locking “lock tooth” checked. This is an element that, when closed, jumps inside the lock, due to which the part is blocked.
If there is abrasion at the place where the part is located, then you can replace it completely with the support platform. If the trunk makes strange noises, such as wobbling, the seal may have failed.
So, the reasons for the malfunction are as follows:
- it is necessary to tighten or dismantle the seals;
- the locking platform or rod is in an awkward position;
- Gaps have appeared or the core of the device has burst.
It must be remembered that replacing the trunk lock is carried out completely, because the door and hood unlocking structure cannot be disassembled (the author of the video is Dima Prokofiev).
Description
The fiberglass trunk lid “ AVR ” is designed for tuning Lada Samara cars, the main advantage of which is its extremely low weight, which has a positive effect on the weight distribution of the car.
The AVR trunk lid for VAZ 2108, 2109, 2113, 2114 is a lightweight trunk lid made of fiberglass, which does not differ in shape from the standard one and has good strength.
Technical specifications:
— Manufacturing material — fiberglass
— Material thickness — 2.3 mm.
— Door weight — 2.8 kg.
— The hinges are fastened from the factory.
— Installation of the lock — there is a place for installing the factory door lock.
— Installation of glass — the possibility of installing glass in factory seals is provided, as well as the possibility of installing lightweight plastic.
The manufacturer reserves the right to change the characteristics of the product, its appearance and completeness without prior notice to the seller.
| Automobile model | VAZ 2113 Samara 2, VAZ 2114 Samara 2 |
How to adjust the trunk lock on a VAZ 2112, 2110, 2111
- Loosen the lock nuts.
- Remove the protection cover from the lock.
- Move the lock in the required direction and tighten the screws.
- Now we check whether the lock can be easily slammed.
- If necessary, the adjustment process can be repeated again. But if the lock closes well, tighten the fastening bolts.
If the lock on the body does not fit into the lock on the lid when closing, then loosen the bolts securing it and move it in the required direction, after which we tighten the bolts back.
Key programming instructions for Lada Kalina, Priora, Granta, etc.
- Close all doors. Turn on the ignition with the training key and wait in the on state for at least 6 seconds.
- Turn off the ignition. The indicator light in the warning lamp unit should flash quickly (at a frequency of 5 times per second) while the learning procedure is being carried out correctly. If the lamp stops flashing quickly, it indicates an incorrect operation, an out-of-time interval, or a malfunction. Remove the training key from the ignition switch.
- While the warning lamp is flashing (about 6 seconds), insert the remote control and turn on the ignition. The immobilizer buzzer should emit three beeps. If the buzzer does not sound and the indicator has stopped flashing, this means: - the time interval of 6 seconds has been exceeded and it is necessary to repeat the learning procedure, starting from step 1; -immobilizer is faulty
- Wait 6 seconds for the buzzer to emit two more beeps and turn off the ignition.
- If it is necessary to train the second remote control, then you should perform steps 3...4 again, using the second learning remote control to turn on the ignition. If not, continue from step 6.
- After turning off the ignition for no more than 6 seconds, while the indicator is flashing, remove the remote control, insert the learning key and turn on the ignition. The buzzer should beep three times. Wait 6 seconds until the buzzer beeps two more times.
- Turn off the ignition without removing the training key, wait 6 seconds until the buzzer sounds a single sound signal. The indicator should flash twice as fast. If the sound signal does not sound and the flashing indicator stops, you should return to step 1 and repeat the learning procedure. If a repeated failure occurs when performing step 7, this means that the ECM was previously trained with a different key, in which case the controller should be replaced.
- After the buzzer gives a single sound signal, no later than 3 seconds, turn on the ignition for 2...3 seconds and then turn it off (after turning on the ignition, the buzzer will sound three times and the indicator will stop flashing). The hazard warning lights should flash and the car horn should beep.
- Remove the learning key. Wait with the ignition off for at least 10 seconds. Insert the working key and turn on the ignition. Wait 6 seconds, if the indicator does not flash, test start the engine, the engine should start. If the indicator flashes, turn off the ignition and wait at least 10 seconds. Turn on the ignition. The warning light should not flash and the engine should start. If, after turning on the ignition, after 6 seconds the indicator lights up with a constant light, then the learning procedure must be repeated, starting from step 1.
Dismantling the old castle
Before replacing, you will have to dismantle the old closing mechanism, and this is not so easy.
The VAZ 2114 model will be taken as an example.
The following tools will be useful in your work:
- set of Phillips screwdrivers;
- key to 8.
The replacement sequence is as follows:
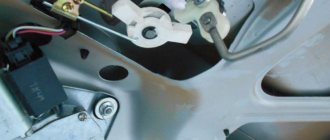
- First of all, in order not to damage the interior lining of the trunk, we remove ten plastic fasteners, and then the plastic casing from the lock.
- We remove the casing, then unscrew the nut that secures the lock in place.
- Unscrew the wires that are in the way.
- Next, you need to unscrew the right fastening nut and remove the inner part of the lock from the fastenings.
- You can inspect the integrity of the spring and core. If these parts are defective, then the problem is in the mechanism. In any case, everything will have to be changed.
If you prefer the economical option of replacing it with a new mechanical lock, then install it in the reverse order as described.
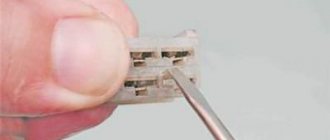
Installation of the larva
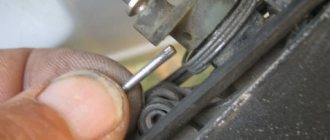
So, you have removed the lock, and now you need to remove the plate securing the main spring from it. There will be no special problems with this, as well as with dismantling the guide. Difficulties arise when removing the repelling mechanism. It is held on a hinge. To pull the latter out, you need to drill a hole with a diameter of no more than 3.5 millimeters on the side, against its end.
The pin is simply knocked out with a hammer through the resulting hole. Only after this will you be able to gain access to the larva itself.
The named element of the locking device is fixed with a special pin. Since you won’t need the old cylinder, you can safely knock it out without worrying about its integrity.
Place a new one in place of the old one. Secure it with a 50 mm nail shortened to the required size - it fits easily into the pin hole. This circumstance can subsequently create problems - an improvised pin can spontaneously fall out due to vibration. After this, the castle will, of course, need repairs again. To save yourself the trouble of wasting time, coat the nail fragment with silicone sealant.
Basic faults
The main trunk problems that the owner of a VAZ car may encounter include:
- inability to close the trunk - the reason for this is most often the misalignment of the guides or the locking platform;
- inability to lock the trunk - the reason for this, as a rule, is the bursting of the lock mate, made of silumin;
- the appearance of cracks - can occur either due to skewed fasteners or due to damage to the door frame itself;
- the appearance of squeaks during opening/closing - occurs, most often, due to wear of the seal.
To eliminate them, you need to dismantle the trunk and replace worn elements (and in some cases, for example, with a general misalignment, a simple door adjustment is sufficient - we will tell you how to adjust the trunk on a VAZ 2114 at the end of the article).
Kit selection
Installation will not be possible if you do not have at your disposal a set of equipment necessary for installation. Buying it is not difficult, but you need to think about which specific option is best for you.
In total, 2 solutions to the current situation are being considered. Namely.
- Factory set. Purchased from trusted and reputable manufacturers. The kit contains almost everything you need, so you don’t have to assemble different elements. But the price is naturally higher;
- Amateur kit. Here we are talking about independently preparing all the necessary components. The motorist is faced with the question of where exactly to get them and how to choose a set so that everything fits. It is difficult to do this without relevant experience and certain knowledge. But you can save a lot of money financially.
I don’t know what exactly you will choose, but I want to give one piece of advice. Buy an electric drive equipped with an inertia mechanism. This will allow you to turn off the drive when an obstacle appears in the path of the luggage compartment lid. Roughly speaking, the drive will not pinch your hand or head when you poke around in the trunk.
So the inertial mechanism is a very useful thing.
If we talk about assembling a homemade kit, then it is important to collect several basic elements. These include:
- power window module 2 pieces;
- 2 mechanisms for lifting glass;
- wires;
- diodes;
- electromagnetic relay;
- five-pin relays;
- four-pin relays;
- Relay connection block;
- springs for the lid lock;
- power tools;
- wiring;
- nuts, bolts;
- Bulgarian, etc.
As you can see, the set is quite impressive. Therefore, consider whether it is worth trying to assemble the kit yourself. Sometimes it is much easier and even more economical to purchase a ready-made factory kit with a guarantee and all the associated benefits. Price does not always play a key role.
Replacement options
The first option is banal to the point of impossibility - buy a similar lock. Moreover, you will need to buy the entire lock, and not a separate part, because the design of the mechanism is non-separable. Replacement is carried out when the old lock is completely dismantled. This solution should be considered temporary, since the production technology is the same and the problems will remain. Over time, a new lock will have to be replaced. The only positive side of this solution is that it is quite cheap.
The second option involves completely replacing the mechanical lock with an electrically controlled drive. What does this give?
- Secure trunk closure.
- Possibility to control the position of the rear door from the driver's seat.
Installing such a system is not the cheapest pleasure, but the final result will really please the user. The electronic drive is much more convenient to use and is a reliable replacement for its mechanical counterpart.
Occurrence of a problem
The new-fashioned body design of many VAZ models was the beginning of problems. In many cars, owners notice unpleasant noises and pops from the rear of the body. These loud noises occur when the car goes over bumps and the trunk door begins to knock. Most likely, this defect resulted from the fact that the car was tested in conditions suitable for travel - on a flat road surface. Under ideal conditions, it is difficult to notice that the locking plate or stem is not in the correct position. In addition, the gap usually appears only after driving on poor-quality surfaces due to vibration that occurs at the joints.
Another reason is wear of the closing mechanism. Because of this problem, the trunk of the VAZ 2114 opens while driving. The same situation occurs in other models. This happens because the locking tooth of the lock is either broken or almost completely worn out. It would seem that what’s wrong with this, because you can go and change the lock for a new one. But the problem will remain unless the approach to it is changed. The main locking mechanism must be replaced with a different type of device.
Also, the reasons that the trunk opens spontaneously while the car is moving may be the breakdown of silumin parts or wear of the seal.
In any case, the mechanism will have to be changed, but to what?