The camshaft, like any important component of an engine's design, affects its performance. Even minor defects in this device can negatively affect the engine power and its traction characteristics. This may also lead to unreasonably high gas mileage, and in the long run will lead to serious breakdowns requiring expensive repairs.
Next, we will discuss why a distribution valve is needed on the VAZ 2107, how to diagnose it and troubleshoot it yourself.
Camshaft VAZ 2107
The timing shaft is the main element of the throttle head mechanism in a car engine. This is an element made entirely of metal, in the form of a cylinder with bearings and cams built into it.
Purpose
The camshaft is used to open/close valves in the combustion chambers of the engine. In other words, they synchronize the operating cycles of the drive unit, injecting a mixture of fuel air into the combustion chambers and releasing the exhaust. The Siódemki camshaft is driven by the rotation of its star (gear), which is connected to the crankshaft with a chain.
Where is it located?
Depending on the engine design, the camshaft is located at the top or bottom. In the lower position it is installed directly in the cylinder block, and in the upper position in the cylinder head. The camshaft is located at the top of the cylinder head. This structure mainly provides easy access for repair or replacement, as well as valve slot adjustment. To get to the camshaft, simply remove the valve cover.
Operating principle
As mentioned above, the camshaft is driven by the crankshaft. At the same time, its rotation speed, due to the different sizes of the propulsion mechanism, is reduced by half. A complete cycle of engine operation occurs during two revolutions of the crankshaft, but the camshaft performs only one rotation, during which time it has time to direct the air-fuel mixture to the cylinders and exhaust outlet.
The opening (closing) of individual valves occurs by influencing the chamber on the valve pusher. It looks more or less like this. As the chamber rotates, the pusher is pressed, which exerts strength on the spring valve. The latter opens the inlet (outlet) combustion mixture. The valve is closed by a spring with further rotation.
Where is it located?
There are two types of motors. These are units with an overhead camshaft, as well as with a lower one. On older cars before 1950, mainly lower valve engines were installed. The camshaft was located at the bottom, the valve plates were directed upward. Motors of this design were cheaper to manufacture, but their performance was low. Then it was decided to move away from this scheme, and as a result, engineers and designers switched to the classic engine scheme with an overhead timing mechanism. However, it must be said that lower camshaft engines are still produced today.
The difference between the bottom-mounted internal combustion engine and the traditional one is that the timing mechanism additionally has rods to compensate for the distance from the shaft cams to the valve tappets in the cylinder head.
Is it possible to increase the power of a VAZ 2107 engine by installing a different camshaft?
Probably every Siódemka owner wants the engine of his car to work not only unsuccessfully, but also with maximum efficiency. Therefore, some craftsmen try different methods to adjust the drive units. One such method is to mount a different, more “advanced” camshaft.
The essence of tuning
Theoretically, it is possible to increase engine power by increasing the phase width and increasing the intake valve. The first indicator determines the time interval in which the intake valve is open and is expressed in the angle of rotation of the camshaft. At seven, it's 232 rpm. The intake valve height indicates the opening surface through which the air/fuel mixture will be introduced into the combustion chamber. In the case of VAZ-A 2107 it is 9.5 mm. So, again, in theory, by increasing these numbers, we get a larger volume of flammable mixture in the cylinders, which can actually have a positive effect on the power of the drive unit.
Increasing the intake valve phase width and height can be achieved by changing the configuration of suitable cams on the distributor. Because such work cannot be performed in a workshop, it is better to use a ready-made part from another vehicle for such tuning.
Camshaft from Niva
There is only one car whose camshaft is suitable for the "seven". This is a VAZ 21213 Niva. Its camshaft has a chamfer width of approximately 283 and the intake valve lift is 10.7 mm. Does installing such a part on a VAZ 2107 engine really give anything? Practice shows that yes, there is a slight improvement in the power performance of the unit. The power gain is about 2 hp, but only at low revs. Yes, the “seven” reacts a little more sharply to the gas pedal when starting from a stop, but after gaining speed its power is the same.
Sports camshafts
In addition to the Niva camshaft, the VAZ 2107 can be equipped with any of the shafts specially created for “sports” tuning of power units. Such parts are produced by a number of domestic enterprises. Their cost ranges from 4,000 to 1,000 rubles. Let's look at the characteristics of such camshafts.
Timing gears
This is worth talking about separately. The gas distribution mechanism requires very precise gear adjustment. Often it is enough to align the gears according to the camshaft marks on the VAZ-2106. But for more precise adjustment there is a special split gear. The teeth in it are fixed with bolts to the base. If the bolts are unscrewed, the position of the gear can be adjusted up to 10 degrees. You can find its most optimal position.
More expensive cars have modern engines where this process is automated. Instead of a camshaft gear (as on the VAZ-2106), hydraulically controlled clutches are used. The sensor knows the current shaft angle as well as the engine speed. In this way, the gas distribution phases are adjusted for different engine operating modes.
Malfunctions of the VAZ 2107 camshaft, their symptoms and causes
Due to the fact that the camshaft is subjected to constant dynamic and thermal loads, it cannot last forever. Even a specialist finds it difficult to say that this particular device is inoperative without detailed diagnostics and flaw detection. There are only two signs of a malfunction: loss of power and a slight knock, which mainly appear under load.
The main malfunctions of the camshaft include:
- Wear of cam tips;
- wear of supporting surfaces;
- deformation of the entire element;
- shaft fracture.
Wear of cams and journals
Wear is a natural occurrence for constantly rotating parts, but in some cases it can be excessive and premature. This is caused by:
- Insufficient oil pressure in the system, as a result of which lubricant does not flow to stressed areas or less is supplied;
- low-quality or unsuitable engine oil;
- defects in the manufacture of the shaft or its bed.
If the cams are worn, engine power will drop significantly because worn cams cannot provide either the proper chamfer width or the required intake valve lift.
Deformation
Camshaft deformation occurs as a result of severe overheating due to malfunctions in the lubrication or cooling system. Initially, this malfunction may manifest itself as a rattling sound. If this defect is suspected, further operation of the vehicle is not recommended, as this may lead to damage to the entire engine gas distribution mechanism.
Fracture
A crack in the camshaft may be a consequence of its deformation, as well as inconsistent operation of the gas distribution mechanism. In the event of this malfunction, engine operation stops. In parallel with this problem, there are others: destruction of the shaft “bed”, deformation of valves, guides, damage to part of the piston group.
Malfunctions
Let's look at typical malfunctions of the VAZ-2106 camshaft. This element, like other friction pairs, is subject to natural wear. Bearings and seals also wear out or are destroyed. A broken camshaft can also damage other engine components.
Among the causes of malfunctions are natural wear, low quality oil, insufficient pressure in the lubrication system, low lubrication level, overheating, and mechanical damage. All these malfunctions entail the need for repairs.
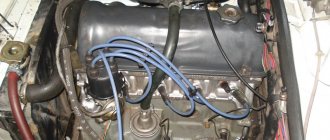
Removing the camshaft VAZ 2107
To accurately determine the malfunction of the camshaft, check its condition, repair and replace the part must be removed from the engine. To do this you will need the following tools:
- 10 mm socket wrench;
- 13 mm socket wrench;
- 17 mm combination wrench;
- Wrench;
- pliers.
Dismantling procedure:
- Park the car on a level surface.
- Remove the air filter housing.
- Use pliers to disconnect the throttle cable from the carburetor and the throttle cable.
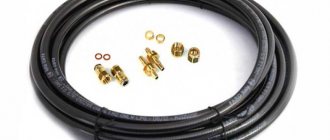
- Move the fuel line hose aside.
- Using a socket wrench or a 10 mm socket with an extension, unscrew the two nuts that secure the chain tensioner to the cylinder head and remove it.
Replacement
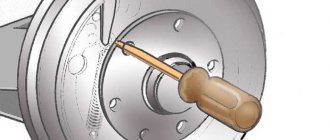
It must be borne in mind that this is a serious procedure, and it is better to perform it if you have experience in engine repair. The replacement process is performed as follows. Remove the air filter housing along with the filter. Next, remove the valve cover. Then bend the edge of the camshaft lock washer. It is necessary to loosen the timing chain - use a pry bar to loosen the tensioner nut and fix its position with a nut.
The crankshaft is installed in a position when the compression stroke ends in the fourth cylinder. The camshaft sprocket mark must match the one on the bed. Next, remove the camshaft sprocket bolt. The chain together with the sprocket is tied with wire and placed in a block.
The camshaft housing is unscrewed and removed from the studs. Then remove the fasteners, dismantle the thrust flange, and remove the camshaft from its housing.
All components and parts are assembled in the reverse order. The tightening of the camshaft on the VAZ-2106 is strictly controlled using a torque wrench.
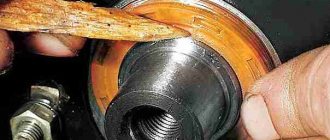
Troubleshooting the VAZ 2107 timing shaft
When the camshaft is removed from the cradle, its condition should be assessed. First this is done visually. The camshaft must be replaced if its working surfaces (cams and bearing journals) are present.
- scratches;
- scoring;
- burrs; — end wear (on the cams);
- aluminum casing on the saddle (on the support journals).
In addition, the camshaft must be replaced if even the slightest sign of deformation is detected.
The degree of wear of the bearing journals and supports is determined using a micrometer and caliper. The table below shows the permissible diameters of the bearing journals and bearing surfaces.
Table: permissible diameters of the camshaft journals and its “bed” supports for VZ 2107
| Bearing journal (shank) numbers, starting from the front | Allowable dimensions, mm | |
| Minimum | Maximum. | |
| Auxiliary stores | ||
| 1 | 45,91 | 45,93 |
| 2 | 45,61 | 45,63 |
| 3 | 45,31 | 45,33 |
| 4 | 45.01 | 45,03 |
| 5 | 43,41 | 43,43 |
| Supports | ||
| 1 | 46.00 | 46,02 |
| 2 | 45,70 | 45,72 |
| 3 | 45,40 | 45,42 |
| 4 | 45,10 | 45,12 |
| 5 | 43,50 | 43,52 |
If upon inspection it turns out that the dimensions of the working surfaces of the parts do not correspond to those specified, the camshaft or “bed” must be replaced.
Repair and diagnostics
A faulty camshaft will cause noise during operation. Experienced specialists identify a worn bearing among the causes of noise, which requires replacement.
If there are knocks from the camshaft, then, most likely, the working surfaces have worn out and, as a result, critical backlash has formed. There are often tolerances for wear and distortion. When knocking, take measurements and see if the VAZ-2106 camshaft needs to be replaced. Installing a new one is not always necessary. Now these parts can be restored.
A decrease in pressure in the oil system can also be a consequence of critical wear of the mechanism.
Installing a new camshaft
To install a new camshaft, you will need the same tools as to remove it. The assembly order is as follows:
- The cam surfaces should always be lubricated with engine oil, auxiliary magazines and support.
- Place the camshaft in bed.
- Use a 10mm wrench to tighten the thrust ring bolts.
- Check how the shaft rotates. It should rotate easily around its axis.
- Align the shaft so that its pin aligns with the hole in the mounting flange.
- Place the bed on the studs, tighten the nuts and tighten them down. It is important to follow this order. The tightening torque ranges from 18.3 to 22.6 Nm.
Do-it-yourself removal and repair of the Niva 2121 camshaft - step-by-step instructions
In order to remove and replace the camshaft on a Niva 2121, you must perform the following procedure:
- Prepare the necessary tool Preparation for replacement consisting of: wrenches; torque wrench; chisels; socket heads for 10, 13 and 17.
- At the first stage of work on removing the shaft, the following actions are performed: Removing the negative terminal from the Niva 21213 car battery (2121 and any other domestic modification of this car); Removing the cylinder head cover; Install the camshaft in a position where the mark on its sprocket coincides with the corresponding protrusion on the bearing housing. And the mark on the pulley is with the protruding part of the shaft drive. Using a chisel to bend the blades around the lock washer of the bolt securing the sprocket.
- Next Unscrew the sprocket bolt of the part being removed (key “17”) and remove it from the hole;
- Dismantling the timing chain tensioner;
- Removing the camshaft sprocket (it is recommended to tie a chain to it - this will ensure that there is no jumping);
- Uniformly unscrew (using a 13mm wrench) all the nuts securing the shaft bearing housing and remove it from the cylinder head studs along with the camshaft.
- Unscrewing, using a 10mm socket wrench, the fastenings of the thrust flange to the bearing housing;
- Removing the flange and then the camshaft.
- If it is necessary to replace the valve levers, these parts are also removed immediately after dismantling the shaft. To do this you should:
- Move the presser spring legs to the side;
- Remove the lever;
- Remove the spring.
- At the same stage, diagnostics of the condition is performed. If there are noticeable damages (cams are worn by 0.5 mm or more, scratches, grooves and nicks are visible on the surface), indicating the impossibility of repair, proceed to the process of installing a new part. The camshaft, which can be repaired, is brought back into working condition. If the question about the need to replace the camshaft of any Niva model (including 2131 and more modern versions) receives a positive answer, you should purchase a new part. As a rule, they are sold complete with cases. It is worth noting that installing a new shaft requires replacing its rockers and hydraulic compensators, which increases the cost of repairs by approximately one and a half times.
- Before installing the shaft inside the bearing box, lubricate the working surfaces of the journals and cams with engine oil.
Now you should install the camshaft so that its pin is located exactly opposite a certain reference point - the upper hole of the thrust flange. The part is fixed and the fasteners are tightened, adhering to certain rules: the nuts must be tightened, trying to maintain a force of 19 Nm; • twisting is carried out in a certain sequence, which can be seen in the diagram: - Now unfasten the wire that secured the timing chain to the sprocket (leaving marks for ease of installation), and install both of these parts on the shaft. Having unscrewed the fastening bolt, bend the petals of the lock washer. And as a final stage:
- installing a tensioner for the timing chain (observing the marks made);
- returning previously removed parts to their place in the reverse sequence;
- adjustment of thermal clearances of old or newly installed valves.
- The result of the replacement is a new camshaft installed on your Niva 21214, 2121 or 2131, which can last at least another 100 thousand km - without the appearance of knocking and most other problems with the engine. At the same time, funds are saved that could have been spent on paying for repair services, and relatively little time is spent.
Help us evaluate the usefulness of this post. You found what you were looking for?
Setting ignition timing (valve timing) by marks
After repair, set the correct ignition timing. To do this, do the following:
- Install the camshaft sprocket with chain, secure with a bolt without tightening.
- Install the chain tensioner.
- Install the chain on the crankshaft, auxiliary shaft and camshaft gears.
- Using a 36mm wrench on the crankshaft pulley nut, rotate the crankshaft until the mark on the pulley is aligned with the mark on the engine cover.
Repair and operation
This part is considered quite reliable. With reasonable operation, the VAZ-2106 camshaft can run until the engine is overhauled. If the power unit does not have hydraulic compensators (and the VAZ-2106 does not have them), then every 15 thousand kilometers you need to check the clearances of the camshaft with rockers. These gaps also need to be adjusted. This operation is carried out using special measuring probes. Each of them has its own thickness, according to which the gap is set.
In all types of engines, it is necessary to control the tension of the timing belt or chain. Both the chain and belt have a certain service life. After a certain mileage, they tend to stretch or tear.
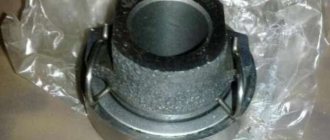
Independent Wheel Bearing Clearance Repair
If you feel or feel vibration in the steering column while driving, then most likely the clearance on the front wheels in the bearings of the hub itself has increased, so their service life will be reduced, and the tires will begin to wear unevenly. And if there is no gap at all, then the hub will rotate tightly, which will also lead to a decrease in service life, so its gap should be greater than zero fifteen ml. Adjustment of the front bearings is carried out using a wheelbrace wrench, a twenty-seven wrench and a hammer.
- A wheel that is in a suspended state should be rocked; if there is play, the gap must be adjusted. After this, press the brake pedal and rock the wheel; if there is no play, then there is a gap in the bearings.
- It is necessary to dismantle the decorative cap and unscrew the lock nut from the hub, and hold it with a wrench to prevent it from turning. When repairing the chassis while adjusting the hub, it is advisable to install new hub nuts, since even after adjustment there is a high probability that the old ones will take their original place, which will not allow them to be properly locked. If this is not possible, then you can take the nut from Drugov’s car.
- Then you need to twist the hub nut so that the torque is 19.6 Nm. turning the hub several times, ninety degrees in two directions, will install the bearing itself. After this, loosen the adjusting nut and tighten it to 6.8 Nm. Having done all this, simply unscrew the nut twenty-five degrees.
- After everything is done, change the collar of the nut on the pin of the external drive joint.
- After the adjustment is made, check how the wheels rotate; if they rotate easily, then everything is fine. The final check can be made only after driving several kilometers without braking, assessing how the hub heats up.
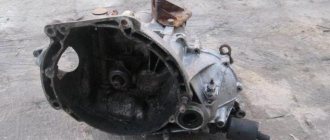
Also interesting: Do-it-yourself Niva 2121 elevator: drawings, dimensions
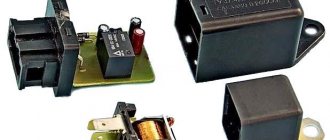
Self-tightening of VAZ 2108 cylinder head bolts instructions, photos and videos
In order for a car to always work correctly, all its components must function properly. This is especially true for the power unit. If you want to know how the VAZ 2108 cylinder head bolts are tightened, why is this necessary and what is needed for this? Our resource will help you understand these issues.
In what cases is tightening needed?
Most domestic drivers do not understand for what purpose this procedure needs to be performed, what order must be followed and what the tightening torque should be. However, every driver should know that incorrect actions during this process can damage the cylinder block. Accordingly, this procedure should be treated with all care and responsibility.
Just a few years ago, vehicle manufacturers were required to tighten the cylinder head bolts during the first maintenance of the vehicle. But now this need has disappeared and now it falls entirely on the shoulders of the drivers. If you are the owner of a VAZ 2108, then this procedure should be carried out from time to time. In what cases is it needed:
- If an oil stain appears in the place where the cylinder head connects to the block itself. This indicates a leakage of consumable fluid, which can be a consequence of both wear of the gasket itself and loosening of the pins.
- If you have done engine repairs. Sometimes even qualified specialists can make such mistakes. Therefore, the owner of a VAZ 2108 may find this information useful.
- For verification purposes. Experienced car enthusiasts recommend tightening the bolts at least every 2 thousand kilometers. In practice, there are cases when during the operation of the VAZ 2108 the pins loosen on their own.
Thus, if you notice a leak of engine fluid in the place where the head connects to the cylinder block, first of all you need to check the tightening torque of the pins.
Procedure and diagram
We advise you to tighten the torque of the screws if you have ever encountered such a process. The following will describe the general procedure for the Lada 2108, but it should be noted that each engine has its own operating nuances that need to be taken into account.
Necessary tools
You will need a torque wrench for this procedure. This tool is needed specifically for tightening screws and determining torque. It can be purchased at any specialized store, and its price fluctuates around 1,300 rubles (approximately 400 hryvnia).
Sometimes so-called “masters” say that it is not necessary to use a torque wrench for this procedure. They say that an ordinary wrench will work just fine, and in general, you can tighten the screws “by eye.” Naturally, it will be possible to tighten the screws, but it will be incorrect, and later this may cause other problems.
Stages
If you feel that the quality of the head screw is poor, then do not even try to tighten it. Replace it immediately to protect yourself from possible problems. In addition, before the actual procedure, you should check the quality of the thread. It is also advisable to lubricate it. Do not forget that reusing spring parts is unacceptable, since in this case you will not achieve normal tension.
The stages of tensioning the pins on the Lada 2108 are similar to those performed on classic car models. The diagram is provided below. The process itself should begin with the central bolts. It takes place in four steps.
- Using the above tool, all cylinder head bolts must first be tightened to a torque of 2.0 kgf*m. First, the two middle elements are tensioned, then the two lower and two upper ones, which are located on the sides of the middle bolts. Then you need to tighten the two leftmost and two rightmost screws, starting with the bottom ones. The order should be exactly like this. The numbers on the diagram indicate the order of the components.
- Then, in the same order, using the same tool, you need to tighten the components with a torque of 7.5 - 8.5 kgf*m.
- After this, all pins must be tightened 90 degrees.
- Then they should be turned again, again by 90 degrees.
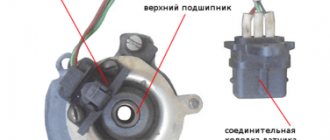
How to understand that the camshaft needs to be changed?
You can determine a camshaft malfunction without opening the hood by two signs:
- knock;
- reduction in engine oil pressure.
The main reason for malfunctions in the camshaft is the appearance of gaps. They appear between the shaft bearing journals and the bed bearings on which the camshaft rests. The cracks are formed due to the fact that parts of the camshaft are worn away. Gaps cause the shaft to move in the vertical or horizontal axis. If the shaft play is 1 mm, then this affects the operation of the engine. Reasons for gaps:
- the camshaft was not replaced in a timely manner;
- do not change the oil on time;
- use of low-quality oil;
- the driver drives at low speeds, so little oil enters the timing belt and parts wear out faster.
The camshaft also needs to be changed if the oil channels in it are clogged. Before changing the part, look for any play, fracture, deformation or scuffing of the shaft.