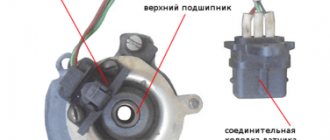
Despite the fact that Bukhanka is a fairly old car that has been on the market for several decades, starting in the 60s of the last century, the car still has many components. Moreover, each system requires appropriate care, timely maintenance and repair as necessary. Among the important components whose role becomes most noticeable in winter is the heater. It cannot be said that the stove on Bukhanka is somehow modern or highly efficient. Many complain about its low level of effectiveness. Moreover, this applies to the rear and front stoves to the same extent. Therefore, equipment is changed quite often. But it would not be amiss to study the structure and design of the Bukhanka oven equipment, as well as study the connection diagram of the electrical component, since the installation itself does not cause much difficulty.
Design of the UAZ Bukhanka stove.
Reasons for replacing the heater
Before you start removing the stove from the UAZ Bukhanka, you should figure out exactly why such manipulations are carried out, and whether they make sense. Some motorists and experienced owners of this car recommend removing and installing a new stove even when the old standard system is working normally. And if forced replacement is required, then it is even better to dismantle the old equipment and install a more efficient and modern system. In total, experts identify several main reasons for replacing the heater:
- Performance. The standard system demonstrates performance of only 4 kW. This is quite small for a car of this size and volume of internal space. It can provide warmth to the driver and front passenger, but rear passengers may experience a heating deficiency;
- Air flow. The maximum air flow rate in a standard system is 150 m3. With OUR this value is 3 times higher, that is, equal to 450 m3 per hour of operation. Therefore, heating will be carried out faster and more efficiently;
- Cabin filter. The standard equipment installed on the Bukhanka from the factory simply does not have a cabin air filter. This forces people inside the car to breathe dirty, unpurified air. The new heater has a filter;
- Noisy. If we compare the factory system and the new interior and body heater, the low noise level during operation also speaks in favor of the latter. This is an additional plus for comfort;
- Recirculation mode. A pleasure that the factory heater does not have. Due to the recirculation of cabin air, the stove will work better and with fresh air.
These reasons are more than enough to start removing the old stove from your UAZ Bukhanka and install new NAMI equipment.
Disadvantages of the system
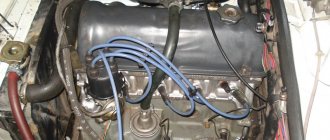
The standard system has only one plus - it works. The owners cannot say that it is impeccably reliable. It's all about the quality of spare parts. But all the other advantages that this system has can be safely written off as disadvantages. The 402nd motor has a too low-speed fan - its number of revolutions is strictly limited by the pump. To have enough of them, you need a large radiator. In winter, you have to close this radiator to prevent the engine from freezing. There are also problems with the operation of the heater. Without additional artificial pumping of antifreeze, there is no need to wait for heat.
All these problems can be solved by modernizing the cooling system 402 of the UAZ “Loaf” engine (replacing the radiator with a multi-section one, installing a second stove, and so on). Many owners modify it, increasing its efficiency.
So, we examined the design of the UAZ Bukhanka engine cooling system with the engine of the 409th and 402nd models. The device is very simple, but the reliability of the system leaves much to be desired, as the owners say. Therefore, many owners will have to independently repair the cooling system, either themselves or in a specialized car service center.
Source
Dismantling works
You should start with how to remove the stove on a UAZ Bukhanka. The procedure is not the simplest, but many car enthusiasts do an excellent job with their own hands. Here you will need to adhere to a certain sequence, act carefully and simply take your time. Otherwise, you risk breaking something that will be useful to you on your Loaf.
- The first step is to get rid of the existing antifreeze or antifreeze in the stove. To do this, at the bottom point of the bracket for fixing the pipes leading to the stove, you need to unscrew the drain plug. Prepare an empty container for draining in advance;
- The remaining coolant is drained through the cooling system. On modern radiators installed on the Bukhanka, there may be no drain valve. Then you will have to drain it by disconnecting the lower pipe on the radiator. Also place a container under it;
- The standard loaf heater is fixed by using 4 M6 bolts. To unscrew them you will need a regular size 10 wrench;
- The designers have not thought everything out perfectly, so unscrewing these bolts yourself will be problematic. They obviously saved money on the cage nuts. Therefore, you need to hold it on one side and twist it on the other. The solution may be the help of a friend, or the use of a handy device to protect against rotation;
- When you manage to unscrew the mounting bolts of the standard heater, you can also remove the buttons on the additional panel. In principle, remove the panel itself, since everything you need comes with the new stove. Plus, during the reinstallation process it will interfere. Even if you plan to install the same panel, it is better to temporarily dismantle it;
- The connector responsible for power supply should be disconnected from the heater. Additional resistance is also removed, since it will not be needed in the future;
- Disconnect all cooling fluid supply pipes, after which the standard heater can finally be completely removed from the Loaf;
- Don't forget to also remove the device that controls your air intake. Get rid of the flaps in the same way.
At this point, the dismantling stage of work on replacing and connecting a new stove for the UAZ Bukhanka can be considered completed. Next, you will have to install new equipment to create a more efficient heating system inside the car. Before you start, we recommend that you additionally clean all accessible areas from possible contaminants, treat metal surfaces with anti-corrosion compounds, and remove rust where it has already appeared. Preventive maintenance will only extend the life of not only the heating, but also the entire car.
Purpose and design
Before getting acquainted with the diagram of the UAZ Bukhanki stove, you should study the main functions and design features of this equipment. It is important to note that in the case of the Loaf, a pair of ovens is used, which are divided into a back and a front. Since most motorists drive alone or only with a front passenger, they pay most attention to the front system. As for the rear equipment, it is preferable to replace it with an autonomous heater, which copes with its tasks much more efficiently. The task of the heater on the Bukhanka is no different from the heaters on any other car. That is, here the system exists to maintain optimal temperature inside the vehicle. It is responsible for heating mainly in winter, and also works as a ventilation system, supplying air under the set due to the operation of fans and a motor. Currently, most Loaves are operated with the NAMI heating system, which is characterized by increased productivity and decent efficiency indicators. Structurally, there are 3 main components of furnace equipment. The loaf heater consists of:
- radiator;
- fan;
- a device designed to distribute air flows.
The heater faucet deserves special attention, allowing you to turn on and off the circulation of coolant through the furnace equipment, thereby switching from the heat supply mode to normal blowing of the interior with a fan. The stove system can operate in 2 modes:
- intake and supply of fresh air;
- recycling.
In the second mode, the temperature inside the cabin increases. To achieve an increase in temperature, it is necessary to close the air intakes, and then open the damper or heater tap. If the motorist only needs fresh air, then the manipulations are carried out in the reverse order. You need to turn off the stove tap and open the air intakes.
The corresponding control unit is responsible for controlling the furnace system. The adjustment is entrusted to the stove tap, which can become acidic, jam and leak. In this regard, it often has to be changed. Moreover, it is not uncommon that instead of a conventional automotive faucet designed for the UAZ Bukhanka, motorists use plumbing equipment assembled according to a special design using adapters. In practice, it works better, longer and more efficiently than a standard crane.
Modernization of new equipment
Now comes the turn of installing a new heating system suitable for Soviet and domestic Bukhanka. We will consider installation using NAMI as an example. This design will weigh a total of about 7.6 kilograms. At the same time, standard equipment with much lower performance and characteristics weighs almost 9 kilograms. The NAMI heater is designed to use a plastic housing. The main weight comes from the engine and radiator of the heating system. Before starting installation, it is worth performing certain upgrades. The thing is that for some reason they decided to use a sealant made from foam rubber on the new stove from NAMI. This is an extremely short-lived material that can soon wear out, lose its characteristics and simply collapse. Plus, foam rubber instantly absorbs water, and getting rid of it will be problematic. Instead of foam rubber, it is best to use technical polyurethane foam. Refinement involves performing the following procedures:
- All foam rubber used by the manufacturer should be removed from the heater;
- a blank from more practical and effective polyurethane foam is cut to the size of the old seal;
- a new seal is glued using waterproof glue;
- depending on the thickness of the polyurethane foam sheet itself, 1 or 2 layers may be required;
- if another layer is needed, glue it on top of the first after it has had time to set.
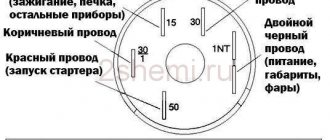
Features of electrical equipment
So, what features does the UAZ 452 electrical wiring diagram have? At the time of the start of production, the most difficult moment for the engineers and designers of the enterprise was the search for the highest quality elements and components.
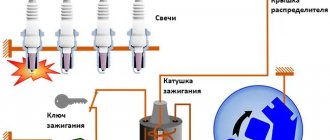
In particular, we are talking about parts for the vehicle lighting system, as well as ignition, which is especially clearly seen in how the car’s cabin is filled:
- control elements for various transport systems;
- control devices for monitoring the condition of components and mechanisms.
External optics
At that time, designers had to resort to many freelance solutions in order to establish mass production of cars.
- The UAZ electrical circuit includes an optics switch, which was borrowed from the GAZ 69. By the way, the latter is the predecessor of the Bukhanka.
- In addition, almost all the optics were borrowed from the GAZ 64 - these are lights, etc.
Installation process
In practice, dismantling and removing is always much easier than installing. Therefore, this process should be approached as responsibly and carefully as possible. In fact, drainage is a must. But it's better with him than without him. If you decide to go the no-drain route, then the first step is to install an air intake flap. It is much easier to tighten it while the stove is removed. The complete installation process will be considered, including the organization of the drainage system.
- Make a mark for drilling a hole in the body to install a drain pipe. The holes should be immediately treated with anti-corrosion compounds so as not to create a hotbed for the spread of rust throughout the body with your own hands;
- The new heater is screwed into its rightful place in the Loaf;
- Cut out a small tube. One end will need to be flared to obtain a wide enough base that looks like a funnel. To do this, you can take a metal rod, the diameter of which is slightly larger than the diameter of the tube, heat it and insert it;
- Automotive sealant is applied around the hole. The tube is installed with a funnel in the upward direction, and the joint is again coated with another layer of sealing compound. On the reverse side you will also need to secure the tube with sealant;
- After hardening, the sealing agent polymerizes, that is, it becomes durable and resistant to mechanical stress. Plus everything will be quite sealed;
- The NAMI stove comes with a pair of aluminum plates. They are needed due to the fact that you dismantled the air intake control system at the previous stage. Therefore, the air intake itself will be rigidly fixed on these plates. When the stove is installed, this will not be very convenient, but it is possible;
- The installation should be carried out in such a way that there is space in the form of a small gap around the perimeter between the edges of the car body and the hatch of your air intake. A gap of 1 centimeter will be more than enough. This gap will allow oncoming air to enter the interior of the Loaf;
- This is not the most optimal option, since in such a situation the outside air will actually not be able to flow by gravity. The way out of the situation would be to modernize the air intake flap. Or you will have to constantly turn on the stove motor;
- Now you can lay a line to supply coolant to the heater. The problem with the Bukhanka is that it was created as a car for army needs, and therefore all the comfort is provided only for those sitting in the cabin. And residual heat enters the cabin;
- This modernization needs to ensure comfort for the driver and front passenger. Here you will need to route the hoses accordingly;
- First, a hose is led from the engine to the lower pipe on the front heater. A stove valve is also installed here, blocking the flow of moving cooling liquid. The faucet used is a standard one, but you can also install some kind of swivel type tap. The crane itself is first dismantled and transferred to the cabin in order to be able to control its operation without leaving the car;
- When installing the faucet, consider the location of the control levers. When you turn the lever to the right, the tap should open;
- The upper tube, which removes coolant from the Bukhanka cabin heater, is connected to the lower pipe of the cabin heater. Since we will eventually get the highest point in the line in this way, to eliminate air from the system we will need to additionally install a valve to release excess air;
- A similar tap should be installed at the outlet of the interior heater. This will be the second highest point in the system. It is better for such purposes to use an outlet valve such as a tee of the cooling system. GAZ produces excellent faucets suitable for these tasks;
- The inlet of the engine pump will need to be connected to the upper pipe of the interior heater.
The installation is almost complete. But the work is not finished yet, since the electrical component remains.
Electrical work
To finally install the system, you will need to make a connection, providing power to the new heating.
- First of all, connect the ground. It is always marked with a black wire, so it will be difficult to confuse it;
- The mass is fixed to any metal part of the car body. It is optimal to secure it somewhere under the Loaf's torpedo. But here you can choose another option;
- It is recommended to enclose the positive wire in a sheath of corrugated material and extend it to the left side of the machine, where the fuse box (fuse block) is located;
- In total, the block provides for the presence of 4 fuses. The fourth of them is distinguished by the fact that it is under constant voltage. And the first 3 are controlled through the ignition switch;
- Since the heating equipment has its own fuse, it can be connected with a positive wire to any of the first 3 terminals on the block. But it is imperative that the connection be from above, that is, to the standard loaf fuse;
- Start the ignition to check the functionality of the heater motor. If everything is functioning, then you can install the panel;
- Do not forget to first connect the rod for controlling the stove faucet directly to the faucet itself;
- Once connected, check operation. When the tap lever is positioned to the left, it should be open, and when turned to the right, it should close. If this is not the case for you, you will have to turn the faucet over;
- Try on the panel and choose the best way to place it. The best solution here would be to make 3 holes in the panel from the new stove for additional buttons. Moreover, it is recommended to place the holes slightly below the middle of the panel so that they do not rest against the heating system motor;
- Make two holes in the bottom of the dashboard and a couple more holes in the floor tunnel of the Loaf. This will be required to fix the new panel;
- Connect the stove rod control unit to your panel, fix it in its new place with self-tapping screws;
- Now you need to install the rheostat of the stove motor control system, put plastic covers on the control levers and insert all the buttons.
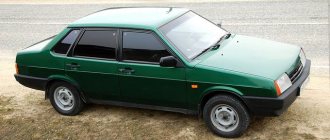
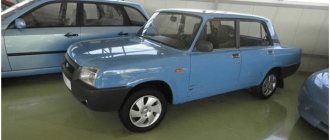
UAZ-390945 Farmer
The frame was reinforced at the power steering mounting points and around the body supports - these areas are highlighted in color. The frame was reinforced at the power steering mounting points and around the body supports - these areas are highlighted in color.
Compared to the previous Farmer, the new one starts calmly, without convulsions or shudders - it picks up speed happily. The clutch, however, grabs at the very top. But it’s okay, I got used to it. I also got used to the sweeping shifts of the five-speed manual.
The ride quality and energy efficiency of the suspension are impressive. The Farmer passes even the monstrous-looking pit with barely noticeable swaying. That’s why in regions with bad roads Ulyanovsk cars are so valued! They also love UAZs for their excellent cross-country ability. I was running around like crazy through the back streets of the factory territory in order to park the car. In vain. He overcame all the proposed obstacles using only rear-wheel drive. I only had to connect the front axle a couple of times, and it didn’t even come down to downshifting.
For those for whom the all-terrain qualities of the UAZ are not enough (there are some), starting in July they will be offered a version with a rear cross-axle differential lock. A jeeper's dream! It will apparently raise the level of cross-country ability to a very high level. I hope in the summer, when a car with a lock falls into our hands, we will find a worthy obstacle for it.
Updated UAZ-390945 Farmer: forever young
Diagram of the UAZ Bukhanka heating system
The embodied diagram of the UAZ Bukhanka heating system attracts special attention from the owners of this car when upgrading the car’s interior. After all, all car owners understand that the interior of this off-road car is very far from its foreign counterparts in terms of comfort, although this model was originally designed for use by special services, and what can one expect for such an affordable price.
Possible options for tuning the UAZ Bukhanka interior
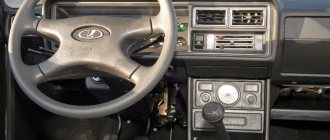
As already indicated, the UAZ 452 car was created to meet the high requirements of specialized transport for the Ministry of Emergency Situations, military and medical services. True, this fact is absolutely not a statement that the performance of this car can be considered impeccable. That is why, when tuning the interior of the Loaf, not only the heating system is modernized, but also many other parts and elements.
First of all, when modifying the interior of the UAZ Bukhanka, most car owners replace the standard hard seats with more modern and soft analogues, since the basic seats can shake out the soul when moving, which is especially typical for off-road driving. Moreover, some craftsmen even integrate heated and electric chairs, for which the existing electrical equipment connection diagram is adjusted.
At the next stage, attention is paid to soundproofing the interior of the UAZ 452 and fixing the elements of the dashboard, however, before fastening the elements, the heating system of the Bukhanka is modernized, which will be discussed further. In terms of style, the interior can be decorated with leather, the dashboard can be decorated with wooden inserts or wood-look details.
Often, a variety of additional accessories appear in the interior of the UAZ Bukhanka, including shelves, glove compartments and ashtrays. The steering wheel is often replaced with a modern imported analogue with soft upholstery made of leather or other material.
Of course, there are other options for modifying the interior of this car, which depends on the imagination of the car owner, but one of the key aspects of tuning the interior is still the upgraded circuit of the Bukhanka heating system, since the standard heater simply cannot cope with its immediate responsibilities.
How Bukhanka's heating system can be upgraded
When the UAZ Bukhanka heating system diagram is being finalized, the following aspects must be taken into account.
The heater radiator should be located below the level of coolant present in the cooling system, so that this substance is pumped through it more efficiently and is always present in it. To do this, you can make the cooling system closed by integrating an atmospheric valve in the expansion tank cap. In this case, in the latter, the coolant level should always be higher than the installed heater radiator.
Air must be pumped with a less noisy centrifugal fan, which should be located along the air flow to the radiator. This approach will further reduce the noise level.
The air flow through the radiator must pass solely due to the pressure generated by the fan, and not through kinetic energy. In this case, the fan nozzle should not blow directly into the radiator honeycomb, since the air will pass unevenly through the radiator.
The temperature of the discharge air should be regulated by a damper that mixes cold and hot air flows, and not by a tap. When using a tap, the temperature will greatly depend on the operating mode of the power unit, and the damper can be used to regulate the ratio of both air flows.
The driver and passenger of the UAZ 452 will feel more comfortable when a higher temperature develops in the legs and lumbar region, and colder air should be present at face level to prevent drowsiness. To do this, the heating system circuit must be constructed in such a way that hot air is forcedly supplied to the feet and glass, and colder air must flow to the face, which can be achieved by additional selection of cold air masses between the radiator and the fan, as well as by means of an adjustable air mixing damper streams.
One of the options for modernizing the heating system of the Loaf could be the following sequence of actions, which consists in integrating a pair of snails onto a standard stove body:
- one snail is taken from the Bukhanka salon stove, the body of the second must be borrowed from the MTZ-82, and the fan and motor are installed from another UAZ stove;
- you need to stick a turbine from the Volga into the snail, since the standard one is very small and does not inspire confidence;
- then hoses are connected to the volute, for which a plate with a pair of holes is simply made, which is the easiest solution;
- after this you need to take ordinary sewer bends with a dimension of 50 * 45, which are attached to the plate. Mounting them is also very simple. It is necessary to take plugs from the 50 pipes and make holes in them to form a ring with a side. The entire structure is then inserted into the plate;
- To rotate the outlet, you need to put a pair of rubber rings on it, which can be borrowed from tractor hydraulics. Then the entire structure is applied to the snail, and as a result you need to get a similar design with the second snail. Don't forget about integrating diffusers;
- The work is completed by fastening the snail to the plate using bolts, rivets and welding, after which the product is painted. It is important to remember that the heater body cannot be removed without first draining the antifreeze and disconnecting the hoses from the radiator.
Conclusion
Concluding our discussion of our topic, we note that if you invest certain funds and effort into the Loaf, you can get an SUV that is quite comfortable for movement. At the same time, the design of the UAZ Bukhanka heating system must be modernized without fail, since the basic heater is unlikely to live up to its name in the cold season.
Thermostat is stuck
This device is a thermal valve that opens when the cooling liquid reaches a certain temperature and closes when it cools. The valve, in turn, redistributes coolant flows between the large and small circuits. If the engine is cold, antifreeze circulates in a small circle, without entering the main radiator. Thanks to the shorter distance, the liquid does not have time to cool down and heats up to operating temperature much faster, providing faster warm-up of the engine, which is especially important in the cold season.
But as a result of natural aging, hard deposits form on the walls of the thermostat, which begin to create problems when the rod moves, acting on the valve. Eventually, the valve stops moving at all, which disrupts the normal circulation of antifreeze in the system. The result is the same - overheating of the engine and deterioration in the operation of the stove.
A thermostat malfunction is diagnosed as follows: open the hood, start the engine and observe the temperature of the pipe leading to the cooling radiator. If it remains cold after the antifreeze reaches operating temperature, or begins to heat up immediately after starting the power unit, we can confidently say that the valve is jammed. In such cases, the thermostat must be replaced, which is performed according to the following algorithm:
- drain the coolant (by unscrewing the cap on the main radiator);
- loosen the clamps and remove both thermostat pipes;
- disconnect the temperature sensor wire connector;
- unscrew the bolt securing the thermostat housing and remove the device along with the sealing ring;
- we clean the seat from the remnants of the gasket, making sure that nothing falls inside;
- install a new thermostat (usually they come complete with an o-ring, if not, we purchase the gasket separately);
- fill in antifreeze and perform the standard procedure for getting rid of air pockets.
Usually, after replacing the thermostat, a microclimate that is favorable even for very harsh winters is established in the cabin.
Heating diagram UAZ 452
How to remove a loaf radiator
Repairing, modernizing or replacing the stove on a UAZ 452 involves removing it. For a large number of car models, this operation cannot be called simple, since it requires complete or partial disassembly of the dashboard.
In our case, this will not be necessary, since access to the heater can be obtained from the engine compartment. Let us describe the sequence of actions on how to remove the stove on a UAZ 45:
- de-energize the car (by removing the negative terminal of the battery);
- drain the antifreeze by unscrewing the drain plug on the main radiator. Some models may be equipped with radiators that do not have a drain plug (the designers decided that it was enough to have one on the power unit). In this case, you will have to loosen the clamps and remove the pipes, which tend to stick to the fittings over time, so we do this carefully so as not to damage the hoses;
- since only part of the antifreeze will drain in this way, we look for the drain plug on the bracket of the stove itself (where there is a supply pipe), unscrew that too;
- dismantle the air ducts intended for blowing the windshield;
- unscrew the mass from the stove body;
- remove the glass washer reservoir, which will prevent the removal of the radiator housing;
- Now you need to unscrew with a 10mm wrench the four M6 bolts holding the legs of the heat exchanger housing together. To do this, you will need to dismantle the insulation (near the tap that switches the fuel supply path from the gas tanks). Since they are located in a hard-to-reach place, this may require a little effort. But if you have dealt with car repairs before, you know that this is a characteristic feature of such work;
- Now you can go into the interior to remove the heater control panel. In principle, if you do not plan to change the stove, then you can limit yourself to removing only the buttons (new heaters come complete with the panel), but it is better to remove it - it will be much more convenient to reinstall the device later;
- turn off the power supply to the electric heater fan;
- dismantle the additional resistance responsible for switching the speed of rotation of the fan impeller;
- loosen the clamps and remove the pipes of the stove radiator itself;
- Now you can remove the heat exchanger itself.
We are sure that during this procedure you will repeatedly remember with a kindly quiet word the designers who forced you to repeatedly take the poses described in the ancient Indian epic “Kama Sutra”.
Be sure to go through the air ducts with a vacuum cleaner (if possible), as there is likely to be a lot of debris accumulated there.
Since the radiator of the old-style UAZ 452 stove, even if restored and cleaned, is unlikely to work better than originally, it is better to replace it with a more efficient one. The most popular options are heaters from VAZ, as well as the NAMI-4 product, which by its design is best suited for a large number of UAZ car models. Therefore, we will describe the modernization of the stove using the example of this particular heat exchanger.
Heater UAZ "Loaf"
A car consists of many components. Each of them requires increased attention. Therefore, drivers must monitor the condition of their “iron horse”. The issue of preparing the car for the winter period is especially important.
Here, the presence of a well-thought-out heating system plays a vital role. Let's talk about it in the UAZ "Loaf".
Meaning:
This system is important, first of all, for maintaining normal temperature in the cabin at any time of the year, for ventilation of the air inside the car.
Most “loaf” models are equipped with a high-power heater “N-1” produced by NAMI.
Design:
The heater includes the following elements:
- Radiator.
- Fan.
- Special device for air distribution.
There are two main operating modes:
- When fresh air comes in.
- When recirculating flows.
The second mode implies increased temperature in the cabin. To do this, you need to close the air intake and then open the damper. In the first mode, the actions are performed in the reverse order.
A special unit controls the entire system. A tap is used for adjustment. A new design based on increased flow circulation and the use of fluid in the radiator allows the interior to warm up faster.
It is important to remember about glass blowing. Otherwise, this will lead to icing or fogging. The driver and passengers will feel discomfort.
If moisture gets in, it is removed through the air intake. A docking device is used here.
Breaking
Often, car enthusiasts are faced with cases when the heater (stove) does not perform its direct functions and does not heat. What could be the reasons?
- There is damage in the channels through which air passes.
- Antifreeze is leaking.
- The system is dirty, therefore the temperature is insufficient.
- The faucet on the stove was leaking.
- The valve responsible for protecting the engine has burnt out.
Shall we update?
How to replace a used stove with your own hands? What will you need for this? Everything can be done using the following algorithm.
- We drain all the antifreeze and disconnect all wiring.
- Disconnect the console from the shield. We remove the heating unit, the air intake hatch, remove the seal, and then clean the recesses.
- We try on the air filter, drill holes no more than 3.2 mm in diameter.
- Apply a large layer of sealant to the installation site. We install the housing and fix it. We return the filters from the cabin to their place.
- We install a new heater in the cabin, securing it with studs and M-6 nuts. We fix the node, then install the block console. We fix the entire structure with self-tapping screws.
- Next, we connect the control rod and secure it. We connect the pipes containing the antifreeze to the unit and secure them with special clamps. Then we install blowing channels for the glass.
- Finally, we connect the electrics, fill the system and check how it works. If problems occur, the entire system must be rechecked.
Finally
The heating system of the UAZ “Bukhanka” car is very simple in design. If you do not check its operation in time, eventually the owner will have to spend money on a car service.
UAZ cars at one time became the standard of reliability, operating flawlessly even in the most difficult situations. However, man has not yet invented eternal mechanisms, which means that the owners of these SUVs from time to time have to purchase spare parts for a UAZ car.
And, if you were looking for the most complete catalog of UAZ spare parts, then you have come to the right place - our range is impressive both by the standards of the regions and Moscow. Our online store AvtoALL sells the widest range of UAZ auto parts: from us you can buy literally everything, from the screw for securing the visor to the engine.
Please note that our store sells UAZ spare parts not only in Moscow, so you should pay attention to the special field in the description of each product, indicating the places where the required spare part is available. However, nothing prevents you from ordering delivery, which can be carried out almost anywhere in the Russian Federation.
Even today, among domestic motorists, the UAZ brand is synonymous with reliability and unpretentiousness. However, these SUVs, even despite the ingenious simplicity of their design, still fail from time to time. And carrying out truly large-scale repairs is impossible with the help of repair kits alone; you have to look for where to buy UAZ spare parts.
We are glad that the answer to this question was a visit to our UAZ auto parts store. In the presented catalog you can find everything you need, from large components like an engine to small but extremely necessary parts, such as all kinds of plugs, linings, seals, hinges, etc. We can offer not only really low prices for UAZ spare parts, but also guarantee the quality of all products, which is achieved through established cooperation with official manufacturers.
What else separates you from your first order of UAZ auto parts? Perhaps you are having problems finding the necessary components? Just contact our online consultant - and the required part will be found in the blink of an eye.
Full or partial use of any materials or their copying is permitted only with the written consent of the site administration.
Additional UAZ stove
You can put a second stove in the “goat” (a parlor stove from a loaf (“snail”?) or from a foreign car). The stove is located between the front seats and is connected in series with the main stove.
Place the stove parallel to the main one. The tees must be placed directly at the input and output, on the motor itself. If the hoses to the second stove are much longer than to the first, then it is better to install liquid electric pumps (from Gazelle) in both circuits.
For the winter, I install a cabin heater from a Gazelle, and let the hoses run under the back seat (so this is an additional radiator). And what they say that the second stove will heat poorly (if connected in series) is complete nonsense, there is a hell of a lot of heat in the engine, and if the thermostat is working and hot antifreeze does not go into the radiator and the car is not blown through, then the second stove turns on only after -25 . You disconnect the outlet hose from the standard radiator and run it back with a long reinforced hose, another hose returns from the stove and through the adapter tube to the clamps to the previously disconnected hose. I don’t know where the hose came from (I bought it at a hardware store), thick-walled. Make the switch for the additional stove separately; when driving, the standard one usually works at half power (so that the glass does not freeze) and the rear one does the same, but it has much more heat transfer - galoshes on felt boots almost melt! And I also replaced the standard motor with a motor from M-2141 (it is more powerful).
He makes hoses in Moscow - st. Usacheva, 11. It is not far from metro station Frunzenskaya. Opposite the market there is a large building, approximately in the middle of it, near one of the entrance gates, there is a small door to the store. Yes, and this is important! Not any rubber “holds” antifreeze - what summer residents use for watering is not suitable for antifreeze. For this purpose, sleeves are made with an inner layer of special rubber, which the store should know as “Durite”. Wires are needed approximately 1.5 m each (with a margin)
Feel free to connect short hoses using fluoroplastic tees and adapters for plastic water pipes. Take “Normov” clamps. There will be no heat loss due to the joints. But what you really have to spend money on is an electric pump; it must be installed after the usual one, in front of the two stoves. If this is not done, the second stove will most likely be cold. Do not use watering hoses - they will fall apart. And if it’s stuck, cook a piece of hose in a saucepan in antifreeze for at least thirty minutes, and before throwing it into boiling antifreeze, freeze it in the freezer until it’s crisp. If it doesn’t spread, you can install... When a second stove appears in your car, you will understand that life is much more beautiful than you thought before. In particular, in the “dump” 2 stoves cool the engine from 120 to 80 degrees in 1 minute!
Initial data UAZ -31519, the floor is filled with “airfield” rubber, there is no heat and noise insulation, except for the “luxury” door mats. Due to the colder weather, I was concerned about installing a second stove, for which I bought the following: 1. Salon stove from Gazelle - 1200 rubles. (the radiator is covered with a metal casing to which the motor with a propeller is screwed) There is a salon version from Sobol for sale, the same eggs only in a plastic casing and 300 rubles more expensive. 2. 5 meters of hose for the heating system. Stores sell cut ones in 1-meter pieces, but it’s better to find a whole one. 3. 5 standard clamps 27-19 if memory serves. 4. Three liters of antifreeze to top up. Wires and other little things from old stocks :)) I stuck the stove between the front seats. The holes in the floor for seat belts are ideal for mounting. For the third mounting point of the stove, I drilled a small hole in the casing above the transfer case and screwed it on with a self-tapping screw. The hoses and wires were pulled together with tape clamps and secured to the casing in several places. By passing the switch between the lever. speeds and transfer case levers. In short, right above the casing bolts in the center. I connected the wires to the standard stove. I decided not to bother with a separate switch. I drained the antifreeze only from the engine and not much, about two liters. The hoses were connected as follows: from the block head to the lower pipe of the radiator of the standard stove, from the upper pipe of the standard stove to the lower pipe of the additional one and, accordingly, from the upper pipe of the additional one to the pump. IF YOU CONNECT ANY OTHER WAY IT WILL NOT WORK!!! Either the pump is not enough to pump this circuit or the radiators are only half heated. There is a positive effect from the additional heater: rear passengers feel much warmer and the interior warms up faster.
Replacing the radiator: preparatory stage
The complete set will weigh about 7 kilograms, which is about 2 kg less than the weight of the original stove. A distinctive feature of the NAMI-4 heat exchanger is its completely plastic body (the original had a metal one), which affected the weight of the device. We also note that the heater consists of both a radiator and a fan with an electric motor, which led to the high price of the kit. In this case, you won’t have to regret the money spent, since both the radiator and the fan have much better characteristics than the original heater.
We advise you to immediately replace the foam rubber seal with a more practical material (for example, polyurethane) - foam rubber will quickly dry out under the influence of temperature, losing its sealing properties.
To do this we will have to perform the following steps:
- get rid of the foam rubber (try not to damage it when removing the sealant - we will need it as a stencil);
- carefully cut out the new sealing material from the polyurethane foam blank, adhering to the previous dimensions;
- using waterproof glue, install a new seal in its original place;
- if the sheet is not thick enough, it may be necessary to paste a second layer of polyurethane foam, but this procedure should be started only after the first layer has set).
Most modern heating systems provide a special drainage hole that prevents moisture from accumulating in the unit body, which adversely affects the components of the stove, and also gets into the air ducts, moistening the cabin filter, if there is one. This significantly worsens its filtering characteristics and leads to unpleasant odors. Penetrating into the cabin, excess moisture causes the windows to fog up. The “loaf” does not have such drainage initially, and cabin filters simply did not exist just 15 years ago.
So many owners, before connecting the modernized UAZ 452 stove, solve the above problem on their own. To do this, you can use one of the technological holes available in the heater body. There are two of them. We caulk one of them using, for example, standard auto sealant, but the second technical hole can be used to organize a drainage system. For these purposes, you will need a tube corresponding in size to the diameter of the hole. We attach it to the hole and bring it out into the crankcase area, but so that the tube does not come into contact with hot parts.