An empty container should be placed under the radiator to drain the cooling fluid. If you are going to refill it into the system, choose a clean container. Now you can drain the coolant. The installation process may be complicated by not the most convenient access. It will take some getting used to the layout of the UAZ Bukhanka, but as a result, all car owners of this miracle managed to realize their idea. You can do it too. The stove valve, although simple, is a very important element of the stove equipment of any car, including the Loaf. It’s up to you to use analogs of a factory faucet, or to use some non-standard solutions in the form of plumbing faucets. But in practice, it has been proven that a faucet from a plumbing store works excellently and provides convenient control. In this case, no special difficulties arise during the installation process.
Dismantling and replacing the faucet of the UAZ stove
It is unlikely that even among experienced car service workers you will find a specialist who could claim that he knows how to perform any type of repair on any vehicle model. But if we talk about car owners who own only one specific car, then decades of continuous operation will probably force them to study all the components and assemblies of their four-wheeled friend to perfection. But what about those who do not have such significant experience? For them, every new operation is a step into the unknown, positive or negative. Our resource is an attempt to minimize outcomes with a negative scenario. We want to ensure that repairs are done correctly, both technically and for safety reasons.
Typical faults
The stove used in the heating system of the UAZ Bukhanka car is characterized by several breakdowns that owners often have to deal with. The result of malfunctions is the failure of the furnace equipment, that is, the stove ceases to perform its assigned functions. Heating stops, which leads to corresponding unpleasant situations during the winter period of operation of the Loaf. There are several main reasons why the stove on the Loaf may not heat:
- damage has appeared in the channels intended for the passage of heated or still cold air flows;
- antifreeze leaked;
- the stove tap is out of order;
- the system is dirty, which causes a decrease in temperature when heating the interior;
- a leak has formed in the heater tap;
- The valve intended for the engine of the heating system of the Bukhanka has burnt out.
If the system is completely out of order, it is not always rational or financially feasible to repair it. When the Bukhanka stove has served for a long time, and at the same time it works frankly poorly, the most correct solution would be to completely replace it.
How does the UAZ heater valve work?
The first and still practically the only domestic SUV, although not the pinnacle of engineering, is characterized by a number of original developments that are extremely rarely found on other vehicles. For the owner of such a car, exclusivity is far from the dominant factor. It is important for him that all units, including the stove, work reliably and have a long service life.
So, there are problems with the standard heater, regardless of what year the car was produced: in the 60s of the last century or now. UAZ owners are well aware that in severe frosts, the original stove will not provide passengers, especially the rear ones, with comfortable conditions in the cabin. Therefore, upgrading the heating system is a standard step, which is resorted to more often the further north the machine is operated.
Purpose and design
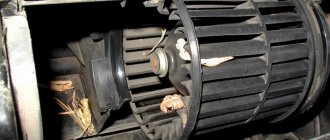
Before getting acquainted with the diagram of the UAZ Bukhanki stove, you should study the main functions and design features of this equipment. It is important to note that in the case of the Loaf, a pair of ovens is used, which are divided into a back and a front. Since most motorists drive alone or only with a front passenger, they pay most attention to the front system. As for the rear equipment, it is preferable to replace it with an autonomous heater, which copes with its tasks much more efficiently. The task of the heater on the Bukhanka is no different from the heaters on any other car. That is, here the system exists to maintain optimal temperature inside the vehicle. It is responsible for heating mainly in winter, and also works as a ventilation system, supplying air under the set due to the operation of fans and a motor. Currently, most Loaves are operated with the NAMI heating system, which is characterized by increased productivity and decent efficiency indicators. Structurally, there are 3 main components of furnace equipment. The loaf heater consists of:
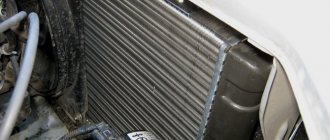
- radiator;
- fan;
- a device designed to distribute air flows.
Malfunctions of the UAZ heater tap
Being a mechanical device, it is in semi-permanent contact with an aggressive environment (antifreeze is not water, it also contains alcohols and some other additives). This means that over time, this part of the UAZ climate system may fail, which will cause a lack of heat in the cabin (which is very fraught in winter) or, conversely, as a result of such a breakdown, coolant will constantly circulate in the radiator. This is bad in the summer, and in general worse, since it creates additional load on both the stove radiator and the pump.
Let's consider the main malfunctions of the faucet that affect its functionality:
- oxidation due to contact of liquid with metal;
- jamming of the rotary valve, which is usually also a consequence of rust accumulation inside the faucet;
- breakdown of the coupling mechanism between the faucet and the regulator.
violation of integrity as a result of corrosion processes;
It is very rare to encounter such a nuisance as a broken heater tap. This usually happens when repair work is being carried out on a UAZ - the faucet may be installed crookedly, and when trying to open/close it simply breaks.
In any case, diagnosing a breakdown is not difficult, unlike repairs - the faucet is too inconveniently located.
In particular, one of the most characteristic signs of a leaking faucet is the smell of antifreeze in the car interior, which is easily recognizable. In such cases, a puddle forms under the rubber mat on the front passenger side. If you notice these symptoms, the first thing you should check for leaks is the stove faucet.
If you find that a leak appears when the faucet is switched (when it is opened, when coolant from the engine rushes into the radiator), then this indicates that the product cannot be repaired and the faucet must be replaced.
Why is replacement needed?
To begin with, it is worth focusing on the original faucet. Initially, it may seem that its modification is completely unnecessary, since the engine is already in the cabin, you can open the conditional hood without even getting up from the driver’s seat, unscrew and tighten the tap, blocking or opening the path for the coolant. But in practice, not everything is so simple. The layout of the Bukhanka is quite special, due to which the standard tap is located under a cap on the partition. Getting to it is quite problematic. The faucet also has several weak points, which manifest themselves in the form of leaks and other malfunctions. Some are engaged in replacement purely for the purpose of modernizing the entire system. Others are faced with such a need because the loaf tap has simply broken down. In both cases, the tap needs to be replaced. In the case of faucets, 3 malfunctions can occur.
- Souring problem. Usually on the Bukhanka, as on other cars, the tap turns sour during the summer operation of the car, when no one uses this device. The tap is turned off and practically not opened again in spring, summer and autumn until cold weather sets in, since during this period the driver only needs fan blowing without heating. During this time, the valve begins to sour. If the malfunction has just begun to appear, then this can be noticed by the weak flow of hot air, even if the tap is open as much as possible. By applying extra effort to a soured faucet, it is not difficult to break it completely.
- Leakage. When the housing is depressurized, a leak begins. This can be explained by wear of the oil seals and seals. As a result, the tap cannot close completely. Because of this, the level of coolant in the tank and throughout the system begins to drop.
- Jamming. Most often it happens on cars where low-quality coolants are used, or ordinary tap water is poured in, the impurities of which clog the faucet. Malfunctions usually manifest themselves in the same way as in the case of souring. Only the reasons for the malfunctions are different. Deposits that accumulate in the damper mechanism cause jamming. Therefore, the driver cannot regulate the level of coolant entering the radiator.
Jamming and souring are considered fairly serious failures, but they are not critical, since there is no loss of cooling fluid. The opposite situation is with leakage, which is recommended to be eliminated as soon as possible after detection. If the coolant level drops to a critical level, this will negatively affect the operation of the entire cooling system of the Loaf.
Self-replacement of a faulty UAZ faucet
We have already said that this is a rather unpleasant procedure, but a lot here depends on the specific UAZ model, the availability of a set of high-quality tools and your experience in carrying out such repair work.
Let's start with dismantling the faucet on the UAZ Patriot. We will need:
- 10mm socket wrench with long handle and ratchet;
- container for draining coolant.
The procedure itself is carried out in the following sequence:
- drain the antifreeze (with the heater tap open, remove the cap of the expansion tank and unscrew the drain plug on the main radiator, and then on the BC);
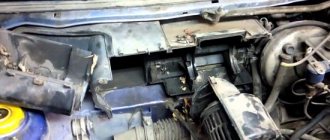
- we dismantle storage boxes, as well as an auxiliary shelf for things;
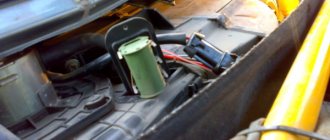
- we gain direct access to the tap located on the extension of the sidewall of the central tunnel;
- if traces of antifreeze leakage are noticeable, the faucet must be replaced, for which it is necessary to loosen the clamps of the pipes going to it and remove them;
- the same should be done with the pipes located in the area of the engine compartment;
- to dismantle the UAZ stove valve itself, we need a 10mm wrench, with which we need to unscrew a couple of nuts facing the engine compartment - here we can’t do without a long socket wrench;
- then, loosening the tension on the drive cable, remove the bracket holding the cable to the lever and disengage the cable;
- to prevent the cable from coming out to the adjustment lever (inserting it back is not for the faint of heart), it should be strengthened;
- Now you can remove the tap itself;
- most likely, the rubber seal has stuck to the seat - it needs to be torn off and the flange itself thoroughly cleaned;
- We install a working faucet in the reverse order.
Despite the minimum set of required tools, such a replacement cannot be called easy.
Afterwards, you must check the functionality of the device and make sure there are no leaks both on the tap itself and on the pipes.
On the UAZ Hunter, this activity is carried out in approximately the same way, but a cross-shaped analogue should be added to the flat-tip screwdriver:
- drain the antifreeze;
- being in the engine compartment, loosen the clamps securing the pipes leading to the faucet and remove them;
- we do the same in relation to the pipes leading to the stove radiator;
- unscrew a couple of pins holding the faucet to the body;
- pull out the faulty tap;
- change the rubber seal, install a new faucet;
- we put everything back together in reverse order.
But on loaf modifications you will have to tinker a lot more - here access to this device is much more difficult, but in any case, this operation can and should be done independently.
So, the sequence of actions:
- place the machine on a flat surface;
- place a container of sufficient capacity (about 15 liters) under the cooling radiator; if you plan to reuse antifreeze, it must be clean;
- We drain antifreeze from the radiator;
- We perform the same procedure with the drain hole located on the cylinder block;
- loosen the clamps on the pipes going to the stove faucet from the power unit, remove them;
- we do the same with the pipes going to the heater radiator;
- unscrew the bolts securing the faucet - in most cases, the fastener heads are in poor condition, especially if the faucet has leaked. Here the basis for success is a quality instrument;
- we remove the faucet, assess the condition of the seat, and, if necessary, clean it;
- install a new faucet;
- carefully attach all previously removed pipes using new clamps of the appropriate size;
- fill in antifreeze, start the engine and test the operation of the switch.
Replacement procedure
There is no point in trying to repair the old mechanism for regulating the supply of coolant to the heater. Purchasing a new set is much easier and sometimes even cheaper. Plus, it will last for many years, unlike a refurbished device. To ensure the proper level of sealing of the plumbing faucet, it is recommended to combine all purchased components with a threaded connection using fum tape in parallel. It will eliminate possible gaps, liquid will not leak, and therefore the fastening will be reliable and durable. Considering the design features of the Loaf and the location of the engine, as well as the installation location of the faucet itself, you will have to work a little. Although in reality everything does not look as complicated as on some other cars.
- Place your UAZ on a flat surface. An empty container should be placed under the radiator to drain the cooling fluid. If you are going to refill it into the system, choose a clean container. Now you can drain the coolant.
- Next, the coolant will need to be drained from the engine, for which a corresponding drain hole is provided.
- Loosen the hoses that connect the faucet and the cooling system of your loaf engine. Then it will be possible to remove the hoses from the pipes.
- Loosen the fastenings on the side of the faucet itself. Disconnect the hoses going to the stove radiator.
- Remove the fasteners that are directly responsible for the standard tap of your UAZ Bukhanka. It may be difficult to give in. Apply force, but do not overdo it, so as not to break or damage anything.
- The tap can be removed, remembering to first disconnect all connections.
- A new system is screwed into its place. It is important to add here that first of all it is recommended to connect all the hoses connecting the tap to the heater and the engine cooling system, and only then fill in the coolant.
The installation process may be complicated by not the most convenient access. It will take some getting used to the layout of the UAZ Bukhanka, but as a result, all car owners of this miracle managed to realize their idea. You can do it too. The stove valve, although simple, is a very important element of the stove equipment of any car, including the Loaf. It’s up to you to use analogs of a factory faucet, or to use some non-standard solutions in the form of plumbing faucets. But in practice, it has been proven that a faucet from a plumbing store works excellently and provides convenient control. In this case, no special difficulties arise during the installation process.
Source
We are replacing the UAZ Patriot heater tap
Every self-respecting motorist knows how important the proper functioning of a vehicle unit such as a stove is. But the inoperability of the stove is influenced by many factors, one of which is a malfunction of the heater tap.
The UAZ Patriot SUV is equipped with a special regulator in the interior heating system, which is called a tap. The main purpose of the heater valve on an SUV is to open or close the supply of hot coolant to the heater radiator, and as a result regulate the temperature of the air entering the car’s interior, depending on the temperature outside. To regulate the temperature of the air flow, the driver resorts to adjusting a special lever located on the center console. In fact, this lever is directly connected to the stove tap, through which it opens or closes. When opened, the heater radiator heats up and heats the air passing through it and going into the cabin. When the tap is closed, the air entering the cabin does not heat up. But you can learn about the design of the cooling system from the corresponding material on this site, and today we will pay attention to the UAZ Patriot heater valve and look at what it is, what malfunctions occur and how to replace it.
Types of taps used
When choosing a new heater tap for a UAZ Bukhanka, many car owners have a large number of questions. Some people do not want to use the same faucets as previously used. The current analogues offered are cheap, but their quality is of the appropriate level. Practice clearly shows that faucets supposedly designed for Loafs do not serve long and reliably, quickly fail, and also cause a certain discomfort during operation. Therefore, folk craftsmen came onto the scene and came up with a not entirely standard approach to solving the pressing problem of the UAZ Bukhanka, which was related specifically to the stove tap.
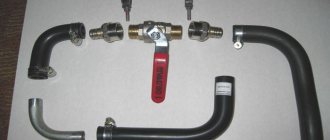
Instead of car faucets, they use plumbing faucets. That is, ordinary durable taps that are sold in plumbing stores. Moreover, they work excellently, last a long time, have a more convenient handle for switching, do not turn sour so quickly and do not leak. All these qualities apply to a plumbing faucet if you initially choose a quality product and also carry out the correct installation. If you are also attracted to this option, you will need a certain set of components to work. By choosing a regular automotive faucet that is suitable for the Loaf, the installation procedure itself will not change much. At a plumbing store you will need to purchase:
- bend angle from 1/2 to 1/2;
- ball valve 1/2 to 1/2;
- 1/2 fitting with a comb for connecting a hose;
- the comb itself must fit a hose with a diameter of 18 mm (it is better to take accurate measurements in advance);
- adapter that will be screwed into the block, from 1/2 to 3/8;
- a hose with a diameter of 18 mm is long enough;
- fumka tape for better sealing.
Initially, it is recommended to buy a faucet that has a fairly long handle. This will make it much more convenient to switch modes from closed to open, and back. Buy high-quality components from trusted stores if you plan to use the new faucet on your Loaf for a long time.
Design features
The part discussed in the material is an element of the cooling system, the main purpose of which is the ability to regulate the supply of coolant to the heater radiator. Structurally, the crane of the UAZ Patriot SUV is the following product, shown in the photo below.
The faucet is made of a metal base and a ceramic valve, as a result of which the service life of the device is extended to several thousand hours. A cable from the control lever is connected to the steel movable plate. As a result of the tension of the cable, the product is closed and opened. Also, these products can be made of special heat-resistant plastic, which can be found on Iveco diesel engines of the UAZ 3163 SUV. The essence of this product is to block the flow of coolant circulating in the engine cooling system. Thus, when you turn on the heater with the tap closed, a cold stream of air will come out, causing a decrease in the temperature in the cabin. This element periodically becomes unusable, so it needs to be replaced. But first, let’s look at what problems can occur with this device.
Malfunctions
The faucet comes into contact with the liquid, and this, in turn, leads to a violation of the integrity of this device. In this case, there are three types of main malfunctions of this device:
- oxidation;
- violation of tightness;
- jamming.
It is not difficult to determine these causes of malfunctions. As soon as you notice the smell of antifreeze in the car interior, as well as the presence of liquid under the front passenger's rug, then you need to immediately check the integrity of the product. In frequent cases, it is the tap that is the main cause of fluid leakage in the cabin. It is also important to note that a leak often appears at the moment the tap is opened, when hot antifreeze begins to circulate through the heater system. In this case, the faucet cannot be repaired and must be replaced. Let's take a closer look at how to do this yourself.
Replacement
The replacement process is not very labor-intensive and can be done at home. To carry out work to replace the product, you will need to make sure that you have a ratchet wrench and a “10” socket. You will also need a special container to drain antifreeze or coolant from the system. So, the order of work is as follows:
- Initially, the coolant is drained from the SUV engine cooling system.
- The next step is to remove the glove boxes. You can find out how this is done from the corresponding material on the website.
- Next, the additional luggage rack and glove compartment are dismantled.
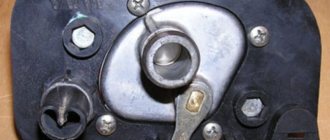
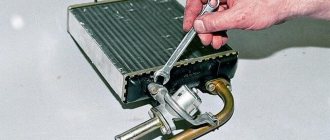
- Now you can see something like the same picture as in the photo below.
- Traces of oxidation are visible on the heater tap, which indicates its leakage and requires urgent replacement of the product. To do this, loosen the clamps of the supply hoses. After this, it is necessary to disconnect the hoses from the nozzles of the product.
- It is also necessary to remove the hoses in the engine compartment area in a similar manner, having first loosened the clamps.
- Now you can begin to dismantle the device by unscrewing the two nuts to “10”. The nuts are located in the engine compartment area.
- By loosening the cable tension, it is necessary to remove the bracket and disengage the cable from the lever. The cable should be secured to prevent it from “moving” to the adjustment lever. After this, you can dismantle the product.
- The next step is to remove the rubber seals and replace them with new ones.
- The new product is installed in the reverse order of removal.
At this point, the process of replacing the heater tap is completed and the appropriate conclusions can be drawn that a malfunction of this device will force the driver to constantly add antifreeze to the system. When a malfunction of the product is first detected, it should be replaced, eliminating the unpleasant consequences of filling the interior of a UAZ Patriot SUV with antifreeze.
Schematic diagram of the UAZ Bukhanka heating system
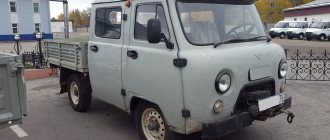
The embodied schematic diagram of the UAZ Bukhanka heating system attracts great attention from the owners of this car when upgrading the car’s interior. After all, all car owners know that the interior of this off-road car in terms of comfort is very far from its foreign counterparts, although this model was designed from the very beginning for use by intelligence services, and what can you expect for such an inexpensive price.
Suggested options for tuning the UAZ Bukhanka interior
As already indicated, the UAZ 452 car was created to meet the high requirements of special transport for the Ministry of Emergency Situations, military and medical services. True, this fact is not at all considered a statement that the performance of this car can be considered impeccable. That is why, when tuning the interior of the Loaf, not only the heating system is modernized, but also many other parts and components.
First of all, when finalizing the decoration inside the UAZ Bukhanka, most car owners replace standard hard seats with more modern and soft versions, since the main seats can shake out the soul when driving, which is especially typical for off-road driving. Moreover, some craftsmen even integrate chairs with heating and electric drive, for which the existing electrical equipment connection diagram is adjusted.
At another step, attention is paid to soundproofing the interior of the UAZ 452 and fixing the components of the dashboard, but before fastening the components, the heating system of the Bukhanka is modernized, which will be discussed further. In terms of theme, the interior can be lined with leather, the dashboard can be decorated with wood inserts or wood-look details.
Often, various auxiliary accessories appear in the interior of the UAZ Bukhanka, including shelves, glove compartments and ashtrays. The steering wheel is often replaced with a modern imported version with soft leather upholstery or other material.
Of course, there are other options for modifying the interior of this car, which depends on the imagination of the car owner, but one of the main nuances of tuning the interior is still the upgraded circuit of the Bukhanka heating system, since the standard heater simply cannot cope with its immediate tasks.
How Bukhanka's heating system can be modernized
When the schematic diagram of the UAZ Bukhanka heating system is being finalized, the following points must be taken into account.
The heating device of the heater must be located below the level of coolant present in the cooling system, so that this substance is pumped through it much more efficiently and is always present in it. To do this, it is necessary to make the cooling system closed by integrating a weather valve in the cap of the expansion tank. In this case, in the latter, the coolant level must always be higher than the installed heater.
The air needs to be aggravated by a less noisy centrifugal fan, which should be located along the air flow to the heating device. This approach will further reduce the noise parameter.
The air flow through the heating device must pass only due to the pressure generated by the fan, and not using kinetic energy. In this case, the fan nozzle should not blow directly into the radiator honeycomb, since the air will pass unevenly through the heating device.
The temperature of the discharge air should be changed by a damper that mixes cold and hot air flows, and not by a tap. When using a faucet, the temperature will greatly depend on the operating mode of the power unit, and the damper can be used to adjust the ratio of the two air flows.
The driver and passenger of the UAZ 452 will feel more comfortable when a higher temperature develops in the legs and lumbar region, and cooler air should be at face level to eliminate drowsiness. To do this, the heating system circuit must be built in such a way that hot air is forcedly supplied to the feet and glass, and cooler air must flow to the face, which can be done by additional selection of cold air masses between the heating device and the fan, and also using an adjustable mixing damper air flows.
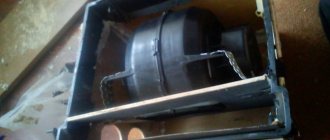
One of the options for upgrading the Bukhanka heating system is usually the following sequence of actions, which consists in integrating a pair of snails onto an ordinary stove body:
- one snail is taken from the Bukhanka salon stove, the body of the second must be taken from MTZ-82, and the fan and motor are installed from another UAZ stove;
- it is necessary to insert a turbine from the Volga into the snail, since the standard one is considered very small and does not inspire confidence;
- then hoses are connected to the volute, for which a plate with a pair of holes is simply made, which is the least difficult solution;
- after this, you need to take traditional sewer expanders with a dimension of 50 * 45, which are attached to the plate. Their fastening is also very ordinary. You need to take plugs from the 50 pipes and make holes in them to form a ring with a side. Then the entire system is placed on the plate;
- To rotate the outlet, you need to put a pair of rubber rings on it, which can be taken from tractor hydraulics. Then the entire system is applied to the cochlea, and as a result it is necessary to obtain a similar performance with the second cochlea. One thing to keep in mind is the integration of diffusers;
- The work ends by fastening the snail to the plate using bolts, rivets and welding, after which the product is painted. It must be remembered that the stove body cannot be removed without draining the antifreeze in advance and without disconnecting the hoses from the heater.
Conclusion
Concluding our discussion of our topic, let us recall that if you invest specific funds and effort into the Loaf, you can get a jeep that is quite convenient for movement. At the same time, the schematic diagram of the UAZ Bukhanka heating system must be modernized, since the base heater is unlikely to live up to its name in the cold season.
Read more:
- Tuning the interior of the UAZ "Loaf"
Every owner of a UAZ Bukhanka car understands that his jeep is very far from its foreign counterparts in terms of comfort in the cabin. Of course, it is much cheaper and was developed in .
Tuning UAZ “Loaf” with your own hands
UAZ-452, popularly known as “loaf” and “tablet”, is an all-wheel drive, two-axle cargo and passenger vehicle, available in flatbed and body versions, with a long history (its production dates back to .
Equipment replacement
If you decide to replace the heater yourself, you should first familiarize yourself with the UAZ Bukhanka stove diagram to connect the electrical component. It is not difficult to install the equipment itself, securing it in the conventional engine compartment located inside the car. But even here you should adhere to certain rules and recommendations. The process will be considered using the example of using NAMI equipment, which has better performance and also boasts the presence of a cabin filter, which is not present in the standard Bukhanka heater.
- The first step is to drain the antifreeze from the system and also disconnect all existing wiring. To make it easier to reassemble and connect, you can write down all your steps or mark the wires, pipes and hoses;
- You need to disconnect the console from the shield, then remove the heating unit, remove the air intake flap, remove the seal and thoroughly clean all existing open recesses;
- Take measurements under the air filter, placing its housing against the surface. Next, make several mounting holes. Just don't use a drill with a diameter larger than 3.2 millimeters;
- At the installation site, apply a layer of high-quality automotive universal sealant that is resistant to moisture and sudden temperature changes. Make the layer large enough. Install the filter housing and secure it. The filter itself can already be inserted into its mounting slot;
- A new heater is being installed in the interior. It is fixed with studs, nuts and an M6 bolt. Secure everything as securely as possible;
- Then the console is installed, the entire structure is mounted on self-tapping screws;
- Then you can start connecting the control rod and fixing it;
- Connect all pipes through which antifreeze passes. For reliability, it is recommended to tighten them with clamps;
- Don’t forget about the channels that allow you to blow on the windows, avoiding them from fogging when the car is used in conditions of high humidity or precipitation. Every car should have windshield defrost. Be it a latest generation Mercedes or the good old Bukhanochka produced by UAZ;
- The installation is completed by connecting the electrical component. There is a connection diagram here that is worth considering separately.
Design:
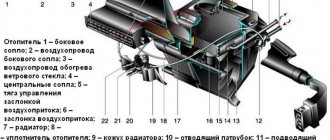
The heater includes the following elements:
- Radiator.
- Fan.
- Special device for air distribution.
There are two main operating modes:
- When fresh air comes in.
- When recirculating flows.
The second mode implies increased temperature in the cabin. To do this, you need to close the air intake and then open the damper. In the first mode, the actions are performed in the reverse order.
A special unit controls the entire system. A tap is used for adjustment. A new design based on increased flow circulation and the use of fluid in the radiator allows the interior to warm up faster.
It is important to remember about glass blowing . Otherwise, this will lead to icing or fogging. The driver and passengers will feel discomfort.
Additional heater on UAZ 09 Apr 2010 11:54 #3
- Dolphin
- Off site
- Administrator
- Posts: 10647
- Reputation: 3
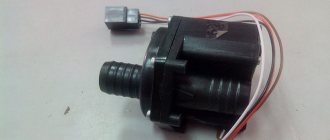
NOW a few words about additional options.
1. Electric pump from GAS Improves the circulation of coolant in the heating branch of the cabin, and is also useful in removing air pockets from the system. Available in several configurations (including with internal heating). You can put it in a chain break, and in any segment. During operation it makes some noise, but considering the general noise of the engine, it is almost imperceptible. Before installation, it is recommended to disassemble and lubricate with sealant, otherwise in severe frosts antifreeze begins to leak due to deformation of the plastic parts.
Source