Body and interior of the Lada Granta 2190. Repair and maintenance.
This section will describe all the features of operations for dismantling and installing Granta body and interior elements.
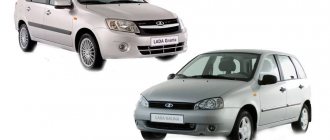
Body Grants
is an all-metal, load-bearing structure. At the moment, the market is presented as a four-door sedan, but in the future it is planned to launch the Granta hatchback. The body consists of several parts electrically welded together: the sidewalls, roof and frame parts are welded to the base. The body of the Lada Granta is a non-separable structure with high rigidity, which allows it to carry all the components of the car, mounted body components and interior parts.
Attachable components include side doors, hood, front fenders, front and rear bumpers. The doors and hood are secured to the body using hinges. The front fenders are attached to the body with bolts, the front and rear bumpers are attached with bolts and screws.
The front side doors are equipped with electric windows, depending on the version. The glass of the side doors and sides, as well as the rear glass, is curved, polished, and tempered. The windshield is three-layer, which is glued into the body opening. The same can be said about the rear window, which is additionally equipped with electric heating. The front seats are separate. They have only mechanical adjustment of the longitudinal position and angle of the backrest. The rear seat includes a cushion and a backrest. The rear seatback can be folded down to increase luggage space. The seat can also be folded separately from the backrest.
All seat belts are of the inertia type, with an additional ISOFIX child anchorage. The interior contains a heater, sun visors, and a rear-view mirror. The vehicle is equipped with front and rear towing lugs. In the optional version (luxury configuration), air conditioning, electrically heated front seats, a removable ashtray and a cigarette lighter can be additionally installed.
Source
Do-it-yourself modifications and tuning Grants
The front interior lighting in the Lada Granta does not illuminate brightly enough; reading in such lighting is not comfortable.
Let's look at how easy it is to make a small tuning of the interior lamp, the lighting of which will be several times brighter. Comfort inside a car is determined by many factors, one of them is interior lighting. In this article we will tell you how to implement lighting for the round heater deflectors of the Lada Granta and Kalina 2nd generation.
Without a doubt, tuning headlights significantly changes the appearance of a car, which is why headlight tinting is very popular. You can tint the head optics with film or paint. In this article we will figure out what is needed to paint the Lada Granta headlight mask with your own hands.
To be honest, the hood of the Lada Granta is quite rigid and heavy, which cannot be said about many foreign cars, where it can easily bend with a little hand effort. But soundproofing the hood has a number of other positive aspects, which are discussed in this article:
If you live in the northern regions of the country, where there are severe frosts in winter, then do not forget to prepare your Lada Granta for winter on the eve of the first frost. It is better to approach this issue comprehensively, and one of the important points is the use of a car blanket.
Tuning taillights is a broad concept, and one of the areas is tinting. Granta headlights can be tinted in various ways, each of which is different and has its own characteristics. This time we will learn how to make black headlights for a Lada Granta using vinyl film.
Have you experienced problems with door seals, when water gets into the cabin through the doorways, dirt accumulates on the seals while driving, and then falls on the driver’s face when the door is opened? Let's find out how to eliminate another disease of Granta and Kalina of the 2nd generation.
The standard trunk lighting of the VAZ 2170 is not as bright as we would like, the lampshade shines dimly and clearly does not cope with its task. Let's look at how quickly and inexpensively you can improve the trunk lighting.
The armrest can be called one of the popular car accessories. The armrest in the Lada Granta is not installed from the factory, so owners have the right to choose the model that suits them best. Which armrests for Grants are the most comfortable, practical and inexpensive?
The option “heated rear-view mirrors” is a very useful thing not only in winter, but also in summer in rainy weather. Installing heated mirrors on a Lada Granta with your own hands is not difficult, the main thing is to figure out in advance how to disassemble the mirrors, prepare a wiring diagram and the necessary tools.
Source
Refinement of the car interior ventilation system
Passenger cars have natural supply and exhaust ventilation of the interior. Air enters the cabin through an air intake in the front part of the body, and exits through exhaust ducts, which are installed under the rear bumper. If the air ventilation in the cabin is insufficient, then during the operation of the car you may notice increased humidity, the appearance of odors and fogging of the windows. Did you know that this design can be improved?
To improve ventilation in the car interior, the first thing you should pay attention to is the condition of the air filter. Often the problem of glass fogging can be solved by simply replacing the filter. If this is not enough, try modifying the interior ventilation yourself.
Did you know about this?
Another useful feature that the manufacturer reserved is the ability to replace the front ring of the air duct nozzle. That is, in the standard configuration it is black, in comfort and luxury it is silver. Accordingly, by replacing the nozzle, you can change the color of the ring if you tune the interior to one tone: completely black or silver. In addition, there are also separate rings for sale for these air ducts, but already chrome-plated. Thus, we have 3 options for coloring the nozzle rings, which, you see, gives excellent scope for choosing the color scheme of the car interior. And the possibility of purchasing nozzles in a set or one at a time is perfect for everyone: those who decided to replace a broken 1 piece, or those who change all 4 pieces at once to the desired color tone.
Air duct nozzles, or otherwise called deflectors, with a chrome ring are used on Lada Granta (VAZ 2190, 2191), Kalina 2 (2192, 2194), Datsun On-Do, Datsun Mi-Do, Nissan Almera cars.
Installation is carried out in standard places without modifications.
ATTENTION! The electronic catalog of spare parts intended for reference purposes only! Our company does not sell all spare parts presented in this list.
ATTENTION! The electronic catalog of spare parts intended for reference purposes only! Our company does not sell all spare parts presented in this list.
Holes in trunk trim
Required
: Hyundai/Kia side ventilation grill (article 874854В000, price about 125 rubles) or VAZ 2110 door ventilation grill (article 21100810410200, price 10 rubles).
You can print the ventilation grille on a 3D printer (author).
Download the model: To download files you need to log in to the site
- Plastic: ABS
- Filling: 30%
- Need supports for the groove, and brim to improve adhesion.
Improvement using the example of the Lada Vesta car (author evgeniy333orel)
- Make a hole in the trunk trim (in the side).
- Make small holes for the legs of the grill.
- Install the grille and secure it with screws from the inside.
According to owners' reviews, this set of modifications allows for improved ventilation in the car interior, which prevents the windows from fogging up even in rainy weather.
Share on social networks:
Found an error? Select it and press Ctrl+Enter..
Source
Removing and installing Lada Granta ventilation exhaust valves
Tools:
- Small flat screwdriver
- Medium Phillips screwdriver
- Ratchet wrench
- Torx T20 socket
- 8 mm head
- 10 mm head
- Pliers
Parts and consumables:
- Valve blocks for interior ventilation exhaust openings (replacement if necessary)
If there is a smell of exhaust gases in the car interior, check the condition and, if necessary, replace the valve blocks of the exhaust vents of the interior ventilation.
1. Remove the rear bumper as described here.
2. Check the operation and fit of the petal valves of the ventilation exhaust openings. If they do not fit tightly, exhaust gases and dust can enter the cabin.
3. Open the ventilation exhaust valve in the trunk trim.
4. Press out the four clips on the inner surface of the reed valve block housing and remove the block.
5. Similarly, remove the valve block from the opposite side of the body.
6. Install the ventilation exhaust valve blocks and rear bumper in the reverse order of removal.
Source
How to remove air ducts on a grant
We carry out work to replace the instrument panel, panel wiring harness and elements of the heating and ventilation system. Disconnect the wire terminal from the negative terminal of the battery. Drain the liquid from the engine cooling system (see “Replacing the coolant”). In the engine compartment, remove the heating and ventilation system filter (see “Replacing the heating and ventilation system filter and cleaning the drainage hole in the plenum box”).
Using a Phillips screwdriver, unscrew the four self-tapping screws that secure the filter housing of the heating and ventilation system to the instrument panel...
...and remove the casing. Loosen the clamps securing the heater inlet and outlet hoses...
...and remove the hoses from pipes 2 of the heater radiator. Using a high 10mm socket with an extension, unscrew nut 1 of the stud securing the flange of the heater radiator pipes to the front panel. Inside the car...
We disconnect the steering column from the instrument panel frame and lower it to the floor or remove the button completely (see “Removing the electric power steering column”).
We remove the seals of the openings of the right and left doors in the places where the instrument panel and the upholstery of the front pillars are installed.
Having overcome the resistance of the clamps, remove the left side trim of the instrument panel. Similarly, remove the right side trim of the instrument panel. Use a screwdriver to pry up the upholstery of the left front pillar and, overcoming the resistance of the pistons...
...remove the upholstery. Similarly, remove the upholstery of the right front pillar.
Remove the headlight beam direction control knob.
Using a 21mm socket, unscrew the nut securing the regulator to the instrument panel...
...and remove the nut.
We take out the headlight beam direction control from the hole in the instrument panel.
Using a screwdriver, press out the two latches on the glove box and remove the upper edge of the box from the instrument panel.
Removing and installing Lada Granta ventilation exhaust valves
April 20, 2022 Lada.Online 148 315
If, while operating a LADA car, you notice that during load (when the air conditioner is running, the heating is on, etc.) in a traffic jam, the engine begins to operate unstably (troits, pulls poorly, etc.), perhaps the reason lies in the ventilation system crankcase The article proposes to solve the problem by installing a PCV valve from a foreign car.
Air distribution of heater/air conditioner and ventilation of LADA Granta
Fig. 1 : Distribution of air flows from deflectors and air ducts of the heating (air conditioning) system and ventilation of the LADA Granta interior.
The following air flow distribution elements are located in the cabin:
- front door glass blower nozzles;
- side air supply nozzles to the driver and passenger in the front seat or to the front door windows;
- windshield blower nozzles;
- central air supply nozzles to the cabin;
- air ducts supplying air to the feet of passengers in the rear seat;
- air ducts for supplying air to the driver's and front passenger's footwells.
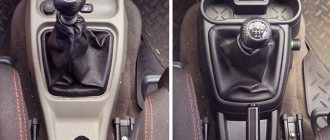
Granta stove deflectors tuning
Wind deflectors on the Grant Liftback are not included as standard. The owner installs the accessory himself, having previously purchased it at a car dealership.
The gluing process is not complicated and intuitive. Every driver can cope with the task. Contacting the service center is not necessary at all. If you have accessories and rags, the work will take no more than ten minutes.
Removing the deflector on VAZ cars: step by step
The most common problem faced by owners of VAZ cars is the breakdown of the plastic curtains on the central deflector, as well as the air intake clogged with debris and dust.
The rotary air duct deflectors on the VAZ 2106 are round and are located on top of the instrument panel. It is held in place by three plastic snap fasteners.
Layout of deflectors on the VAZ 2107
On the classic, there are two deflectors (33) in the center, separated by a plastic partition. They are inserted into the sealing rubber inside and held in place by compression. Plus there are small floating clips on the top and bottom. Easy to remove. At the attachment points they are pryed with a screwdriver and pulled out. The side deflectors (5) are removed in the same way.
On old-style cars VAZ 2110, 2111, 2112, everything is also very simple. The grille is held in place by latches, so you just need to pry the grille with a screwdriver and it will snap off. You must first remove the plastic cover on the slider. The deflector on new cars cannot be dealt with so easily, since the grille is additionally fixed with screws. To remove it, you will need a Phillips and slotted screwdriver.
- The fasteners that need to be unscrewed are located behind the plastic cover.
- Pry it off with a flathead screwdriver.
- Under the insert you will see two screws, you need to unscrew them with a Phillips screwdriver.
- After removing the screws, simply remove the grille; it is no longer secured in any way.
Video: dismantling deflectors on a VAZ 2110
On the Lada Granta the process is trivial. The air duct deflectors are simply pulled out of their seats.
Video: removing deflectors on Lada Granta
On Priora and Kalina, air duct deflectors can also be removed without additional labor costs. On Kalina, for example, they are attached with two screws: from the top.
However, Lada Vesta will throw up a lot of surprises in this sense. Since the air duct deflectors are additionally fixed there, and the screws of the side air ducts are located in hard-to-reach places.
| Removing the plastic cover | First, remove the cover shared with the radio. It is held in place by fasteners. We pry it up with a screwdriver and gradually unclip it around the perimeter. |
| Fasteners | Under the cover you will see 4 screws that hold the deflectors in place. Unscrew them. |
| Vesta with deflectors removed | Remove the grille. |
We install new silent blocks
Now the moment has come when you can install new silent blocks on the Lada Granta, the main thing is to know how to press them in. The landing site will need to be pre-lubricated, you can use graphite lubricant, then the nut is screwed on, the silent blocks of the grant are pressed in, the price for them is not high. In this case, you can do without special devices that allow you to press parts. And you don’t need to remove the lever itself, as some people do.
When you have figured out how to change the silent blocks on the grant, it is worth remembering that after replacing you need to loosen the nut so that you can attach the crab. It must be taken into account that the holes intended for fastening are displaced. So Lada Granta, replacing silent blocks is not complete without a hammer, which is useful for adjusting the holes. It will be necessary to use it on both sides.
After replacing the silent blocks on the grant is completed, you may encounter an amazing effect. Drivers notice that the roughness in steering disappears, the steering wheel becomes more obedient, and the road holds without problems. Therefore, if there is a suspicion that the silent blocks of the front levers of the grant have become unusable, it is better to immediately look for the cause and replace them. As a result, you will receive a machine whose performance will only please you.
LADA Granta climate system control unit
Fig. 2 : LADA Granta climate unit not equipped with air conditioning. 1 — fan operating mode switch; 2 — temperature regulator for air supplied to the cabin; 3 — block of push-button switches; 4 — regulator for the distribution of air flows supplied to the cabin; 5 - control lever for the recirculation system
Fig. 3 : LADA Granta climate unit with air conditioning. 1 — fan operating mode switch; 2 — temperature regulator for air supplied to the cabin; 3 — block of push-button switches; 4 — regulator for the distribution of air flows supplied to the cabin; 5 — recirculation system control lever
The control units have the following switches and regulators: 1) Fan operating mode switch . To increase the intensity of air supply to the passenger compartment while driving and to ensure air supply when the vehicle is stationary, use the switch handle to set one of the four operating modes of the air blower fan. 2) Temperature regulator for air supplied to the cabin . To change the temperature of the air entering the cabin, rotate the temperature control knob. The blue part of the scale corresponds to the supply of the most cooled air, the red part to the supply of the most heated air. When the handle is in the middle position, air is supplied to the cabin at ambient temperature. On a car equipped with air conditioning, the system also provides an automatic mode for maintaining the set temperature in the cabin. 3) Block of push-button switches . Depending on the configuration, the unit can be equipped with: 4) A regulator for the distribution of air flows supplied to the cabin . To change the direction of air supply, use the control knob to select one of four options (clockwise):
- air supply to the windshield (through the windshield blower nozzles);
- air supply to the upper part of the cabin (through the side and central nozzles of the instrument panel);
- air supply to the lower part of the cabin (through the lower nozzles of the heater housing);
- air supply to the lower part of the cabin and to the windshield (through the lower nozzles of the heater housing and the windshield blower nozzles).
5) Recirculation system control lever . To turn on the recirculation mode, move the lever to the extreme right position. When the recirculation mode is turned on, outside air does not enter the cabin, and the air blower fan circulates air inside the cabin. This mode is used to quickly warm up the interior in the cold season, as well as when the surrounding air is dusty and gassy.
WARNING
It is not recommended to turn on the recirculation mode for a long time while the car is moving, as this usually leads to fogging of the windows.
— rear window defroster switch. When you press the button, the rear window heater turns on and the heater on indicator on the button lights up;
In a variant, when the heated rear window is turned on, the heated exterior rear view mirrors are also turned on.
— the windshield heated switch is used to quickly remove frost and moisture from it. When you press the button, the windshield heater turns on and the heater on indicator on the button lights up. The system operates only when the engine is running.
- automatically after 6 minutes;
- when you press the switch key again during heating;
- when the voltage in the on-board network drops below the permissible level;
- when engine speed decreases below permissible limits;
- when the ignition is turned off;
Reviews
| № | Positive |
| 1. | Vitaly: It’s a pity that the Lada Granta is not equipped with deflectors as standard. To embellish it a little, I glued the overlays myself. The process is not complicated, it took no more than ten minutes of time. |
| 2. | Kirill: I’m leaving my positive review about the quality of VoronGlass deflectors. I bought it at a car dealership on special. Special thanks to the seller for his good advice. The double-sided tape holds tightly and does not vibrate at speed. |
| 3. | Gennady: after buying the car from the dealership, I ordered the installation of deflectors. The guys glued it up within half an hour, efficiently and beautifully. There were several manufacturers to choose from; I chose Rein REINHD065. |
| 4. | Ignat: I’ve been using the side window covers for six months now, I have no complaints, they fit tightly. I've heard negative reviews from owners about the quality, but I can't confirm it. |
| 5. | Vasily: my recommendations to car owners on the quality of manufacture and cost of windshields on the Lada Granta Liftback Russtal 1000016264. Bought in a store, one year warranty. |
| 6. | Sergey: on the advice of his comrades, I glued the trim on the side windows. Everything is simple, intuitive, no complications. I did not contact the car service. |
| 7. | Gennady: I’m sharing a positive review about the quality of side window deflectors from the manufacturer Cobra B0046. A year and a half has passed since installation, no comments, double-sided tape holds tightly. My recommendations to motorists. |
| Negative | |
| 1. | Victor: after gluing, the windshields lasted two months, after which one fell off along the way and was never found. I can't recommend VIP-Tuning VZ02. I'll try more expensive models. |
| 2. | Vasily: my windshields did not survive the winter, they fell off along the way. I bought domestic Russtal 1000016264 on the car market. I'm not going to practice anymore. |
| 3. | Kirill: I still have bad memories after installing the deflectors. The quality is worse than ever, at vibration speed. One of these days I will tear it down and clean the perimeter. |
Installing windshields on the Lada Granta Liftback is extremely necessary. This is not only visual beauty, but also protection from water and raindrops entering the car interior.
How does a stove fan work?
The main task of the fan is to take air flow from the outside and deliver it to the deflectors.
The fan is activated by a mechanical button, to which a 12 V power supply is supplied. In the Lada Granta version, the fan operates at one of three speeds. The driver selects the most optimal mode depending on the temperature inside the cabin.
Additional resistors Grants
Without resistors, the fan operates at one speed with a stable rpm. There are a total of 3 resistors installed on the board.
When the lever is moved to the first position (three resistors), the fan rotates at the first speed, the very minimum. Transfer to the second position - second speed (two resistors). Transfer to third - third speed (one resistor). The detailed diagram of the stove is shown in the photo.
Air distributor flap
Installed to regulate the air flow coming from the fan to the glass for blowing through air ducts.
Often, deformation and bending of the plastic body under the influence of temperature leads to flow leakage and depressurization.
Read more: How to update the Navitel program on your navigator
Temperature control flap
Regulates the supply of warm air flow from the stove heater to the car interior. The wider the damper is open, the greater the throughput of the “channel”, and vice versa, the narrower it is, the less.
Heat exchanger Grants
Its main purpose is to heat the air flow entering the cabin. The heat exchanger is connected to the power unit through two rubber pipes: supply and return for fluid circulation.
The standard location is the central part of the dashboard of the car interior.
Air temperature sensor inside the car
Structurally installed inside a plastic interior lighting lamp. To avoid overheating, the sensor is equipped with a forced airflow system.
The installation is designed so as not to distort the actual temperature readings.
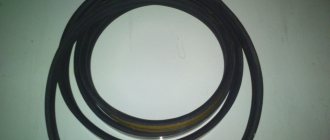
Pipes
Rubber pipes literally permeated the entire cooling, stove heating, and air conditioning system. Without their help, it is impossible to connect sections of highways with each other. Fixation method: with clamps, metal ties.
Product delivery options
Note! Below are the shipping methods available specifically for this product. Payment options may vary depending on the shipping method. Detailed information can be found on the “Delivery and Payment” page.
Parcel by Russian Post
- Cash on delivery (payment upon receipt)
- Using cards Sberbank, VTB, Post Bank, Tinkoff
- Yandex money
- QIWI
- ROBOKASSA
Parcel by Russian Post 1st class
- Cash on delivery (payment upon receipt)
- Using cards Sberbank, VTB, Post Bank, Tinkoff
- Yandex money
- QIWI
- ROBOKASSA
Express Parcel EMS
- Cash on delivery (payment upon receipt)
- Using cards Sberbank, VTB, Post Bank, Tinkoff
- Yandex money
- QIWI
- ROBOKASSA
Transport companies
- Using cards Sberbank, VTB, Post Bank, Tinkoff
- Yandex money
- QIWI
- ROBOKASSA
Courier delivery in Togliatti
- Cash upon receipt
- Using cards Sberbank, VTB, Post Bank, Tinkoff
- Yandex money
- QIWI
- ROBOKASSA
Delivery time from 1 to 12 hours.
Pickup from our warehouse
- Cash upon receipt
- Credit, installments
- Using cards Sberbank, VTB, Post Bank, Tinkoff
- Yandex money
- QIWI
- ROBOKASSA
Pickup times must coincide with store opening hours.
We are all accustomed to the fact that on all domestic cars the heating system in the cabin is presented in the form of grilles with a leash that adjusts the direction of air flow. At least it should be regulated. In reality, it doesn't quite work out that way. The small rotation angle and small nozzles inside allow the air flow to be directed at a very small angle. This problem becomes very noticeable in rainy or cold weather, when the windows in the car are fogged up or frozen. As a result, you need to choose - either sit in extreme heat (in the summer with rain), but with the glass blowing, or freeze yourself, but, again, wait for the glass to defrost. In addition, the central nozzle, which is supposed to blow air over the driver and passenger, blows in the center and reaches quite a bit to the desired angle.
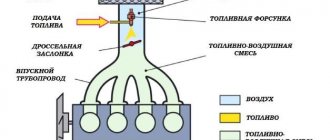
Diagram of the standard crankcase ventilation system
The crankcase ventilation system of VAZ engines consists of two circuits that operate at different load modes and speeds:
- The small ventilation circuit is connected to the valve cover and the intake manifold (behind the throttle body). This connection diagram provides intensive crankcase ventilation due to the vacuum that occurs in the intake manifold when the throttle is closed. To avoid an effect such as hyperventilation, the cross-section of the small circuit is limited by a jet in the cable throttle body with a diameter of 1.7 millimeters. This circuit operates in the region of 800-1500 rpm.
- A large ventilation circuit is connected to the valve cover and the air pipe (in the pre-throttle space). This scheme provides intensive crankcase ventilation at high speeds. The cross section of the large contour is 16-18 millimeters
Examples demonstrating the shortcomings of the standard crankcase ventilation system:
- A car is going down a hill with the gear in gear. In this mode, the engine operates at higher speeds with a reduced load. A high vacuum is created in the crankcase, and a large ventilation circuit is connected, in which there are no control valves. Since both circuits are connected to one volume of the oil trap, a strong vacuum in the crankcase will draw a fresh portion of air bypassing the throttle. The mass air flow sensor will show increased air flow, and the ECU will try to close the throttle. Having realized that this is not possible (it is already closed), the lean mixture will be corrected by increasing the fuel supply (fuel consumption will increase). As a result, the entire internal volume of the engine will work as a parallel receiver of very significant volume, connected to the intake, bypassing the throttle. It is this volume that will interfere with the formation of a high-quality mixture.
- A car in a traffic jam drives under tension with additional consumers (for example, the air conditioner is on). The compressor clutch is connected, the load increases abruptly. The engine does not have enough air, it begins to pull it from the crankcase, bypassing the throttle. But the ECU is also aware of the clutch engagement and also supplies more air by opening the throttle. The vacuum drops sharply, the vacuum brake booster (VBR) does not have enough strength to hold the car. Leap forward. The ECU sees an increase in oxygen and closes the throttle. A sharp increase in vacuum, VUT seizes. The car jerks, the transmission hits. And so on ad infinitum.
As a result, in both cases, when the engine is running, speed jumps occur and the engine choke under the load. Jerking and vibration are possible on manual transmissions, automatic transmissions and automatic transmissions. To eliminate these shortcomings, it is proposed to modify the design according to one of the presented schemes.
Quick heating of the interior
To do this, do the following:
- Turn control knob 2 to maximum heat.
- Place the regulator handle 4 opposite the pictogram -
- Switch the operating mode switch 1 of the electric heater fan to position “3”.
- Open the side and center vents on the instrument panel.
- Set lever 5 to the extreme right position - no outside air enters the cabin (recirculation mode).
WARNING
It is not recommended to turn on the recirculation mode for a long time while the car is moving, as this usually leads to fogging of the windows.
Cooling
To cool the interior air, do the following:
When the air passing through the evaporator cools, the water vapor contained in it condenses. The condensate is drained through a drain pipe under the bottom of the car. If the ambient air humidity is high, a puddle of water may form under the car, which is an indirect sign that the air conditioning system is working properly.
WARNINGS
Turning on the air conditioner while the engine is running under difficult conditions (long climbs, heavy city traffic, etc.) can lead to engine overheating. Monitor the coolant temperature gauge: if the temperature exceeds the permissible value, turn off the air conditioner. During long trips in city traffic, the efficiency of the air conditioner may decrease due to the intense thermal conditions of the engine. This is not a sign of malfunction; the air conditioner will operate effectively when driving under normal road conditions.
- climate block grants
- air duct grants
- air conditioning grants
- stove grants
Sequence of actions for self-installation of window deflectors on the Lada Granta Liftback
- We place the car on a flat platform and provide unobstructed access around the perimeter of the body.
- We take priority safety measures: activating first gear, pulling the parking brake lever.
- We start with the driver's door: wipe dry the perimeter above the glass where the deflector will be glued. We degrease with acetone or another solvent, the type of liquid is chosen by the owner.
- We apply the side trims to the body, measure the gaps, adjust them, and mark them with a marker.
- We remove the protective film from the tape on the deflector, apply the ends, and then press the middle.
- Hold in this position for 2 - 3 minutes, release, ready.
The quality of fixation depends on the thoroughness of cleaning the surface and degreasing it. By analogy, we carry out installation on the remaining windows. We glue the rear windshield according to the already known algorithm.
Review of Manufacturer Prices
*prices are current as of October 10, 2018.
Recommendations for choosing window deflector manufacturers
The size of the budget determines the price category of manufacturers. It is obvious that domestic windshields and deflectors will cost 10–15% less than their foreign counterparts. The workmanship of the original accessories is approximately the same.
The market for automotive components is saturated with accessories of dubious origin. Such goods are sold at reduced prices. Always ask the seller for documents indicating the original manufacturer.
Preparatory stage
Required tools and materials:
- set of wind deflectors;
- rags;
- acetone or other solvent.
Schemes for upgrading the crankcase ventilation system
Schemes for modifying the crankcase ventilation system, as well as a description, are provided by IgorRV.
For LADA cars with manual transmission and AMT (“robot”), scheme No. 1 “Crankcase ventilation scheme with PCV valve for E-GAS and cable throttle” is suitable:
It is necessary to install a PCV valve (article 94580183, price about 400 rubles) from a foreign car into the small crankcase ventilation circuit. When connecting the PCV valve to a small circuit on an E-GAS, use a new hose (petrol-oil-resistant 8 mm without fabric reinforcement). On a cable choke, connect to the receiver, not to the choke.
As a result, the valve will shut off the circuits in transient modes, which will allow:
- Accept the load without jerking or dropping engine speed (for example, when the compressor is running, heated windows, seats, etc.).
- Reduce vibration load at idle
- Increase traction from the bottom (noted by owners of automatic transmission with VAZ-21126 engine, manual transmission with VAZ-21227, 21126 and 11186 and AMT with VAZ-21127).
- Get a sharper response to the gas pedal and faster shifts (on AMT). Perhaps due to the fact that the valve does not allow the engine to slow down, maintaining a more optimal switching algorithm.
- Reduce oil consumption through ventilation.
The valve replacement period is 40,000 km.
For LADA cars with automatic transmission (Jatco) and AMT (“robot”), scheme No. 2 is suitable:
Description of scheme No. 2: The pressure reducing valve is connected in series to a large ventilation circle. Thus, it regulates the flow of crankcase gases at high speeds and during transient processes. This allows:
- Exercise full control over the flow of crankcase gases between the small and large circuits.
- Improve engine operating mode.
- Reduce vibration load.
- Reduce oil release into ventilation.
For LADA cars with automatic transmission (Jatco) and AMT (“robot”), scheme No. 3 is suitable:
Description of scheme No. 3: To improve the operation of the braking system and facilitate the process of holding the car on the brakes in mode “D”, an “Ejection Pump” was used. Due to the flow of crankcase gases from the small circuit, the vacuum in the tube leading to the vacuum booster increases. This happens at low speeds, which is very helpful when driving in traffic jams. Keeping your foot on the brake all the time is not very easy, but this pump makes the task easier.
- Getting rid of vibrations, failures, transmission shocks.
- The engine begins to operate more calmly and softly.
- The force on the brake pedal becomes less.
- The air conditioner turns on almost imperceptibly.
- ejection pump (article 10793 VIKA, price 546 rubles);
- pressure reducing valve (article 1117701500 JP GROUP, 422 rubles);
- PCV valve (article 94580183 GENERAL MOTORS, 400 rubles);
- clamps (about 10 pieces, 600 rubles);
- thin, petrol-resistant 8 mm hose 50 cm (100 rubles);
- standard ventilation pipe.
Installing the PCV valve on Granta
:
Installing the PCV valve on Vesta:
By the way, there are other ways to modify the crankcase ventilation system. Are you ready for such modernizations? Let us remind you that modification of the ignition system (installation of capacitor ignition coils in the harness) is also common among owners of LADA cars.
Keywords: lada xray engine | Lada Vesta engine | Lada Largus engine | Lada Granta engine | Lada Kalina engine | Lada Priora engine | Niva engine | universal article