Considering that the head light on the VAZ 2110 and other popular models (for example, VAZ 2114, 2115, etc.) is not the best, driving without fog lights in poor visibility conditions is quite difficult, tiring and even dangerous.
Of course, if the car does not have PTF from the very beginning, that is, in the factory configuration, in such a case, many drivers install fog lights on the VAZ 2110 themselves.
In this case, the main problems are considered to be the need to select fog lights for the VAZ 2110, as well as to figure out how to connect the fog lights. Next, we will look at what to look for when choosing a VAZ PTF, as well as which PTF 2110 will be the best solution.
Features of the VAZ 2110
The VAZ 2110 car is not very different from its younger brothers of the following modifications, but there are still some differences:
- This model does not have front fog lights. Moreover, the car bumper may not even have seats for PTF.
- For some reason, the car has rear fog lights, which seems strange: there are rear ones, but no front ones.
- The VAZ 2110 can be equipped with different types of panels: standard (also called old) and europanel. In the first case, there is no space for installing the PTF power button, but there are several slots for installing additional switches. In the case of the Europanel, the PTF button can be installed in a place previously provided for this, and the fuse panel has sockets for connecting fog lights.
Instrument panel VAZ 2110 - description of lamps and indicators
Designations of indicator lamps on the device panel of the VAZ 2110 - 15.
Many car owners are faced with this seemingly common question. What do the indicator lights on the device panel mean?
Well, how do we know, all of them together light up only when the ignition is turned on, and when one of them lights up while driving, it becomes a little restless.
I didn’t know this myself when I switched to the “two” after the “seven”; on the 2107, in general, half of them didn’t light up, so I didn’t know what it was and why. And a friend of mine, after buying a car in Novorossiysk, even bought a whole book on VAZ, due to ignorance of these light bulbs.
The designations on the device panels on all VAZs are virtually identical, just placed differently.
Let's start in order.
1 — Cooling water temperature, in degrees Celsius.
2 - Tachometer, engine speed.
5 — Speedometer, vehicle speed in km/h.
6 — Fuel level in the tank. With a remainder of 5-7 liters. A yellow light comes on - a warning or an icon with a picture of a gas station.
7 - In fact, this is an image of a gas station, signaling the need to refuel.
8 - Indicator lamp for turning on the dimensions.
9 — The brake water level is low, it may be leaking here and there.
10 - Turn on the high beams.
11 - Clock adjustment knob (hours/minutes - switches when pressed), from time to time this knob does the function of switching the total mileage/day mileage (on panels with a narrow screen).
12 — The screen displaying the total mileage/daily mileage can be narrow on some models.
13 - Hazard warning lamp - “hazard light”.
14 - Check Engine, often indicated by this icon - this means there is a malfunction in the engine, it is recommended to stop the engine.
15 — Screen with a clock (can show the outside air temperature if there is a temperature sensor).
16 — Malfunction in the battery charging system: loose or broken generator belt, generator malfunction, open circuit and other problems.
17 - Parking brake indicator.
18 - Insufficient oil pressure in the engine, it is recommended to turn off the engine and find the cause.
19 — Air damper light (on carburetor engines)
I’ll also add about the lamps on the additional panel in the dashboard of the VAZ 2110 - 12.
— The light marked with an arrow indicates a malfunction of the dimensions or brake lights. — Below is a brake pad wear indicator, if it lights up, check the brake pads, maybe it’s time to change them. — Seat belt warning light — this is clear from the picture.
On the other side from above:
— Low engine oil level — Low washer water level — High cooling water temperature
This is what the review came out with. If some kind of lamp lights up and the signal beeps, do not panic. As a rule, these are little things.
Save this note for yourself on your own social network by clicking on one of the buttons below.
What you need to have to connect
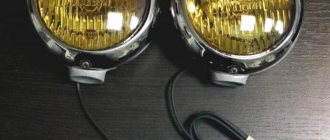
1) A ready-made set of fog lights ( GKPTF ), the price of the set is about 120 hryvnia (if you don’t take fancy ones).
Set of fog lights.
Important: for an old-style torpedo you need a GKPTF kit for 2110, if you have a EURO torpedo, buy a GKPTF for 2115 (there is a difference in the buttons).
2) Indicator lamp (control).
3) Multimeter (special multitester).
4) Set of female-male connectors + 8 female connectors.
5) A roll of electrical tape.
6) Heat shrinkage (packaging).
- Electronic connection diagrams are included with the fog lights.
Instrument panel VAZ 2110 - description of indicator lamp buttons
The device panel of the VAZ 2110, as in any car, both imported and Russian, should determine the general condition of the car, and should show all the information about: the amount of fuel, engine temperature and the presence (quantity) of lubricating parts of the engine.
In addition to the above data, the VAZ device panel on the screen displays all the errors (current malfunctions) of the car.
Later in the article I will give you a complete description of the VAZ 2110 dashboard and tell you about the description of buttons, lamps, light indicators, and tell you about common errors that may appear on your screen while on the road.
Legal requirements
When purchasing headlights, an auto parts store offers a huge variety of fog components in different formats and sizes. GOST 8769-75 forces VAZ-2110 drivers to control themselves and install headlights that meet certain legal requirements:
- You cannot install just one fog light; fixation involves installing a kit consisting of 2 parts.
- If you measure the distance from the side marker, the headlight is in 400 mm increments, and the measurements are taken along the outside of the diffuser.
- The step from the road surface to the bottom edge to the dissipative product cannot be less than 150 mm.
- It is not permissible to install headlights higher than the headlight.
Tools and materials required for installation
To install the PTF, you must purchase in advance the entire set of materials and tools:
- A set of fog lights, note that the VAZ-2110 dashboard is an older model, so the headlights for Euro models should be put aside.
- Lamp for monitoring the procedure.
- A multimeter that allows you to test the correctness of individual stages of work.
- Double connectors, among experts they are also called “mother and father”, 1 set is enough.
- 8 pieces of female connectors.
- Insulating tape.
- Packaging material for heat shrinking.
To correctly install fog lights on a VAZ-2110, you need to start from the electrical diagram; it can be taken from KGPTF.
Xenon installation
Xenon bulbs in action. The photo shows correctly adjusted xenon headlights.
It is very important that the headlights themselves have the letter “D” - this is what indicates that xenon can be inserted into the headlights. If the letter “H” is written, then problems may arise with the authorities
Before installing xenon in the VAZ 2110, it is necessary to remove the standard block lamps. The xenon is dismantled and installed according to the following scheme:
- Remove the negative terminal from the battery.
- All connectors from the headlights must be disconnected.
The photo shows the main power wires for connecting xenon PTFs.
Carefully unscrew the bolts securing the optics unit. We dismantle the radiator grille. There will be a bolt at the bottom that secures the headlight from below. Pry up the cover and remove it completely. Using the 10th wrench, unscrew the nut securing the block to the bracket. The block can then be removed. The next step is to turn the lock, which belongs to the hydraulic corrector cylinder. Now we remove it completely. Before installation begins, it is necessary to remove the turn signal - it is held in place by several bolts.
To avoid problems with the law, it is better to install a legal xenon module. Alternatively, you can take headlights from Hella. Both the first and second generation models are suitable. They are designated by the name Lens G2; headlights are standardly installed on BMW E60, so there can be no questions about quality.
Preparing for installation
Before you go to a car store, you should find out what exactly you need to purchase, taking into account the characteristics of your car.
And for this we visually define:
- What type of dashboard is installed in the cabin;
- Are there any seats (stampings) in the front bumper for installing PTF?
Note! Ready-made foglight kits have a lot of differences in the mounting method. In particular, the button for turning on the fog lights of the VAZ 2110 for cars with an old dashboard has a different shape than with a Euro-dashboard.
The kit for connecting fog lights of the VAZ 2110 has a double button for the Euro panel
Lamp manufacturers - the choice of users and experts
As of the beginning of 2022, the following brands of lamps for VAZ 2110 headlights are available on the Russian market (in descending order of their properties and prices):
| Philips X-treme Vision 130% - the luminous flux, according to the manufacturer, is increased by 30%, there is a so-called xenon imitation. |
| OSRAM Nightbreaker UNLIMITED 110% - this lamp features a 10% increased luminous flux. |
| OSRAM ULTRA LIFE - lamps are characterized by durability and a price from 500 to 650 rubles. |
| Beacon H1 12V 55W Super Light 50% - the manufacturer positions its products as an affordable product for a wide range of car owners. The luminous flux is sufficient. |
Color meaning
Some people, in the old fashioned way, believe that it is better when the fog glass is yellow. But this is not true. Most leading manufacturers today produce transparent white fog lights, and they are not only as good as yellow ones, but often superior to them.
On the VAZ 2110 you can install corrugated or transparent glass. The latter are for some reason more fashionable, although less useful, since they shine in spots, while the corrugated ones give a more directed beam, which really increases visibility in bad weather.
Color of light beams
Read
Selecting and replacing a windshield wiper motor for a VAZ 2110
Fog lights can be in several colors. Bulbs made from tungsten - Halogen bulbs work better for illuminating the ground at short distances. These bulbs are yellow, blue, orange or snow-white. Yellow lights are more useful and non-hazardous. Some fog lights use a blue color that can absorb light from fog and snow. Snow-white tinted bulbs that are close to daylight are also a good option for PTF. From time to time, fog lights may appear green.
The best light bulbs for car fog lights are sources with snow-white or selective yellow light.
White light
Snow-white light in fog lamps, which are made using xenon gas, they are highly durable and durable. In addition, they are significantly brighter than their halogen counterparts. Choose lamps with snow-white light, they do not produce blue waves that cause glare.
Selective yellow light
The selective yellow light of the bulb improves visibility during adverse weather conditions by reducing short wavelengths emitted by blue light.
Coating for selective yellow light lamps
If you want to make these lamps better, you can purchase a special coating that limits the amount of blue light emitted.
Buying what you need
You can, in principle, buy a ready-made set along with wires, but many believe that if you buy everything separately, the number of installation options increases, and it will all cost less. So, we buy:
- Set of headlights (2 pieces);
- Plastic pads;
- Headlight frames;
- A key and a yellow indicator for it;
- Relay;
- Wires. It is better to purchase ones from an electrical equipment store, so that there are two copper conductors with double insulation (ShVVP-2 is suitable). A cross section of 0.5 mm will also be normal, but if you want to install lamps of higher power, take 0.75 mm;
- Terminal for installation to ground;
- Wide as well as narrow terminals, called mother/father. When purchasing them, it is advisable not to take them complete with wires. Installation will be more convenient if these terminals are crimped with pliers already on the connections of the installed wires.
Kit for connecting fog lights on VAZ 2110
Note: if your VAZ has an old-style dashboard, then it is better to buy a PTF 2110 kit, but for a new, so-called EURO, it is more convenient to connect PTF 2115.
You can, of course, vary it, but we are talking specifically about the convenience of the location of the buttons. Regarding the power of the lamps, 55 W is enough, no more is needed. Also keep in mind that very cheap fog lights will not last long.
Regular and similar PTFs
Rectangular fog lights with standard mounts fit into the VAZ-2110 bumper in a standard place without additional modifications. They are produced by a lot of manufacturers, but, again, all these headlights are different both in the quality of the optics and in the light source.
The most common are two types of domestically produced PTFs OSVAR and headlights from the Avtosvet plant from Kirzhach. The latter have two modifications - for a lamp with H3 and H1 sockets. According to user reviews, headlights with H1 lamps provide a denser and more concentrated luminous flux over the entire illumination range. Their price is about 900 rubles apiece. But they are sold without a lamp. Fog lamp Kirzhach. Domestic headlights - OSVAR 2212.3743-04. They are assembled rather roughly and this spoils the appearance. The lampshade is non-removable and is glued in with sealant, which if damaged will affect the cost of replacement. However, with a price of about 700 rubles (with a lamp), they look pretty decent. The illumination is even, but if installed correctly, the near zone is illuminated worse.
Another relatively domestic manufacturer is the Ryazan Bosch plant
The headlights are designed for H3 lamps, the light doesn’t matter, but they also cost about 650 rubles. The most budget option for infrequent use
They are sold without a lamp.
Selection of fog lights for the VAZ 2110
The range of PTFs for the VAZ 2110 today is quite wide: large and small, round and square, yellow and white. Which ones to choose? Everything here will depend on your taste and financial capabilities, but I still dare to give some advice.
- Yellow light is less absorbed by water (and fog and rain are water). This means that yellow PTFs will produce a higher quality light spot than white ones of the same power, and at the same time they will not dazzle oncoming drivers.
- The shape of the headlights does not matter, the main thing is that they should fit the seats of your bumper as best as possible.
- You should not buy very expensive headlights from famous brands. Most often, such companies charge a lot of money just for the fact that they are famous (the so-called surcharge for the brand).
- Before purchasing, take the headlight in your hands and carefully examine the quality of the body and glass. Even by its weight and appearance, you can feel whether it is a worthwhile thing or junk that will fall apart after 100 km of run.
Below I will give some common and affordable PTF models for the VAZ 2110 that really deserve attention.
| Set (2 lights) | Manufacturer | Brand | Peculiarities | Estimated cost at the end of 2022, rub. | |
| PL-519DLВ W VAZ | China | DLAA | LED, white glass, smooth | 1 200 | Buy |
| PTF VAZ 2110 | Italy | Magneti Marelli Automotive Lighting | Incandescent, white fluted glass | 930 | Buy |
| Bosch VAZ | Russia | Ryazan | Incandescent, white fluted glass | 890 | Buy |
| Fog lamp VAZ 2110 | Russia | Lada | Incandescent, yellow corrugated glass | 520 | Buy |
| Fog lights for VAZ 2110-11-12 | Russia | Stavr | LED, smooth white glass, chrome-plated body | 800 | Buy |
| Fog lamp “Osvar” for VAZ car | Russia | Auto Start | Incandescent, white glass, corrugated | 850 | Buy |
| HY-174-2LED VAZ | Russia | Auto Key | LED, white glass, lenses | 900 | Buy |
| Hella FF 75 VAZ | Germany | Hella | Incandescent, external, white glass, smooth + installation kit (relay, button, etc.) | 5 000 | Buy |
| LD-088 | China | DLAA | LED, white glass, lenses | 1 100 | Buy |
Installation
A diagram for connecting fog lights on a VAZ 2110 is always offered with the purchased kit, so there shouldn’t be any special problems. But keep in mind that something may need to be corrected or adjusted to ensure effective operation.
Connection diagram
Before installing fog lights on a VAZ 2110, you need to decide on their location. If the design of the car does not provide space for them, then they will be mounted under the front bumper.
The PTF connection diagram is as follows.
- We install the wiring for fog lights on your car. This is done through the left side under the hood along the fender. The main wiring is approximately the same.
- Now you need to connect power to the button, which is located on the dashboard. According to the factory diagram, power is installed from the fuse on the right dimensions. But you can use the light switch button or the lead from the ignition switch to turn on the head optics. That is, in such a situation, the fog lights will turn on when the ignition is on. Some take power from the output to the dimensions. This can be done, but is not recommended. If you forget to turn off the PTF, the battery will soon run out.
- We connect the plugs to the headlights. If after this the fog lights on the VAZ 2110 do not light up, an error was made in the circuit. Check every element of the circuit. It is not difficult to determine where the fog lamp relay is located on a VAZ 2110, so make sure that the relay clicks. If it is present, then the coil will activate it. It is not uncommon to have to change a relay.
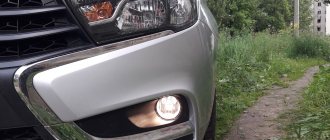
The last stage of installation begins after all the wires have been connected, the power has been turned on, and the light from the fog lights has spilled out. It's about adjustment.
Checking whether the PTF lights are shining correctly is quite simple. Get out on the road and see how the fog lights work. If the light is directed slightly downwards, the luminous flux touches both the road surface and the side of the road, then everything is working perfectly, and you don’t have to worry about the wrath of oncoming drivers whom you will blind.
https://youtube.com/watch?v=t0ysCPFw_WA
If there are deviations from the norm, be sure to make adjustments. This work can be done independently, but ideal room conditions will be required. Therefore, it is better to trust the specialists from the car service center, who have a special stand, a flat area, and equipment for adjustment.
Loading …
Installation process
Before installing fog lights on a VAZ 2110, you should carefully consider purchasing them.
But don’t rush to the store, but first figure out what kind of front bumper your car is equipped with. If the bumper has seats for PTF (they are usually closed with plugs), then everything is in order. Measure your seats and go to the store.
If the installation of fog lights on your bumper is not provided, then you will either have to buy a new bumper or do it yourself. Here everything will depend on your desires and capabilities, since there are always PTFs on sale with decorative overlays that can be installed on almost any bumper.
This can be done using a conventional drill by drilling a series of holes around the perimeter of the future seats.
After the hole is cut or the plugs are removed, install the PTFs in their places, following the instructions and using the fasteners included with the headlights. Typically, headlights are attached through a decorative trim using two screws.
Tidy indicator lamps 2110
Lamps 3 and 4 indicate that the direction indicators are turned on outside the car and they light up and flash immediately after the right or left indicators are turned on. At the end of the maneuver, the power button returns to its initial position and the pointer should turn off automatically. If this does not happen, the reason should be found in the returnable mechanism of the indicator button.
The lamp that deserves special attention is located in the center of the tidy and is indicated by the number 14 in our diagram. This is a control lamp that indicates defects and improper operation of the electrical engine control system, otherwise it is called the Check Engine lamp, by analogy with imported cars. When this warning lamp is activated, computer diagnostics of the engine should be carried out and error codes identified. Some errors are removed by software, while others require intervention in the engine control systems: the power supply system, ignition and other systems that could lead to errors.
READ Installing Thermostat From Grants on VAZ 2110
Number 12 in the diagram shows the digital odometer screen and the daily mileage indicator, which is reset by a button located directly on the device panel. The top line indicates the total mileage of the car, and the bottom line, which can be reset, indicates the mileage for a certain period.
The VAZ 2110 device panel is a description of the lamps and indicators of which we will complete with ordinary and conventional warning lamps for any car:
- Position 8 points to the external light switch;
- Lamp number 9 indicates that the brake water level in the reservoir has been reduced to a minimum;
- High beam - lamp 10;
- The triangle under the number 13 is the hazard warning lamp;
- Position 18 usually remains in reserve, and in cars equipped with airbags, there is a sensor activation lamp in this place.
Other warning lamps: handbrake, emergency oil pressure in the lubrication system and critical battery discharge are located in the bottom row in order. Let the emergency lamps glow less often on your dashboard, good and unsullied roads!
Correct installation and connection of fog lights VAZ 2110 and its modifications
Not all models of the tenth row of VAZ are equipped with factory fog lights. If the driver independently tunes additional lighting, he has three options for solving this problem:
- Buy a front bumper with fog lights already installed. They just need to be connected to the car network.
- Buy a front bumper with ready-made stamped sockets for installing PTF. In this case, you need to choose the right set of fog lights and install them yourself.
- Make holes in the plastic for the PTF yourself, attach the fog lights and connect them to the car’s network. This option allows an experienced driver to install fog lights from foreign cars on the VAZ 2110 model range.
The “tens” model range is equipped with PTFs with corrugated (provide a narrowly directed light flux) or transparent (gives spots of light) glass.
The requirements of the Road Traffic Regulations do not contain a mandatory condition for installing PTF on cars, so domestic manufacturers do not always install fog lights on the assembly line. But there are GOST 8769–75 and GOST 41.48–2004, which regulate the number, location and order of switching on all lighting devices, including fog lights.
Requirements for installation of PTF
Fog lights are installed according to certain rules:
- quantity - 2 pieces;
- no closer than 25 cm to the surface of the road surface;
- no more than 40 cm from the outer contour of the headlights;
- sockets for fog lights should be located below the top point of the low beam headlight socket;
- PTF line-of-sight angles should be: in the vertical plane 5o+5o, in the horizontal plane - 45o+10o.
What do we want from fog lights?
Clear upper cut-off line.
Low and wide bun.
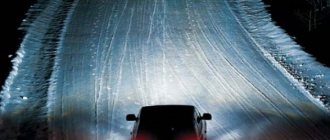
First, a few words about what we need from fog lights and why a different light installed elsewhere on the car will only harm both the driver himself and interfere with oncoming traffic. Even with the brightest headlight bulbs and the best optics, their task remains the same - to illuminate as much of the space ahead as possible and to capture as much of the roadside as possible.
In general terms, this applies to both low and high beam, it’s all about the settings. In conditions of limited visibility associated with high humidity (fog, snow or rain), headlights are of little use .
Most often, they only get in the way, especially high beam lamps - reflecting from moisture particles, the powerful light literally creates a wall impenetrable to the eye.
Such light can be produced by a cheap PTF: it will dazzle terribly, and glowing under fog is out of the question.
Features of PTF
The best way out in such cases is to turn off the high beam and slowly drive the low beam. This is if fog lights are not installed.
Their peculiarity is that they are installed much lower than the headlights and that is why they easily penetrate the veil of fog. And all because even the thickest fog almost never touches ground level.
Correctly configured PTFs will never create a veil of light and their luminous flux will spread along the asphalt and not blind the driver himself. This is the reason for the design features of fog lights, which we have to deal with.
Instructions for installing and connecting fog lights on a VAZ 2110, 2111, 2112 with your own hands
For independent installation and connection, you will need plumbing skills, the ability to read and understand electrical diagrams, and a willingness to incur certain material costs.
Tools and materials
To install PTF you need to have on hand:
- multimeter (multitester);
- control light;
- a combination screwdriver with a slotted and cross-shaped working body;
- pliers;
- wire cutters;
- wrenches 8x10, 12x14;
- light hammer;
- electrical tape;
- packaging of heat-shrinkable tubes.
You can purchase a ready-made set of fog lights for the VAZ 2110 or buy everything separately (cheaper option):
- PTF - 2 pcs.;
- right and left frames made of plastic for VAZ 2110 fog lights - 2 pcs.;
- a key with a yellow backlit indicator;
- relay;
- wire with 2 copper cores of different colors with a diameter of 0.5 mm (for more powerful lamps, a diameter of 0.75 mm is preferable) - 5 m;
- narrow female connection terminals (single) - 8 pcs.;
- wide (double) female/male block for connection to each fog lamp - 2 pcs.;
- M8x45 bolts - 4 pcs.;
- “wings” for M8 bolts - 4 pcs.
Self-installation and connection
Before installing the PTF, you need to remove the plugs on the front bumper and secure the fog lights with frames. The best option: do not use self-tapping screws, but M8x45 bolts with wings, which provide more durable fastening and quick dismantling.
The fog lamp is inserted into a special frame, with which it is attached to the hole in the front bumper
Installing PTF will take a minimum of time if you follow this algorithm:
- Connecting to the electrical network should begin by pulling the wires from under the dashboard into the engine compartment. They must first be placed in a protective corrugation.
- The operation described above may require partial disassembly of the torpedo. On the VAZ 2112, the factory wiring provides this option for connecting the PTF, so you just need to find the connection pads, which are located near the socket plugs in the front bumper.
- Remove the positive terminal from the battery.
- Open the relay and fuse mounting block (located at the bottom left of the steering column near the clutch pedal).
- Unscrew the self-tapping screw with a screwdriver and remove the block.
The mounting block with fuses is located on the left side near the driver’s left foot.
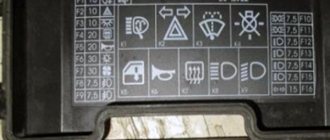
After this, you need to find the fuse terminals F4 (serves to protect the right PTF) and F14 (protects the left fog lamp).
The location and purpose of fuses in the VAZ 2110, 2111, 2112 mounting block are indicated on the inside of the protective cover
Fuse F20 provides protection for the rear PTFs, which were originally built into the rear lights of the VAZ 2110 model range in the form of side light lamps with two filaments. In unfavorable weather conditions, the second thread is activated by a special button located on the dashboard.
At the final stage, you need to put copper connectors of the “female” type on the ends of the wires and insert them into the plug according to the attached electrical and wiring diagrams.
Electrical diagram for connecting fog lights VAZ 2110, 2111 and 2112 using a backlit key and relay
The choice of location for installing the fog lamp switch depends on the type of front panel. There are certain nuances in connecting the old PTF and the European panel.
Simple do-it-yourself connection of fog lights on a VAZ 2110 and VAZ 2111 with an old front panel without connecting the PTF switching relay
On VAZ 2112 models with a Europanel, wires for connecting fog lights are installed in the car wiring at the factory.
Wiring diagram for connecting the VAZ 2112 PTF wires to the factory wiring connected to the PTF sockets, mounting block, relay and to the backlit power button (connects independently)
General algorithm for connecting and connecting fog lights
Installation of fog lights will take approximately 1–1.5 hours if you proceed in the following sequence:
- The PTF wiring is laid on top of the main wiring, which runs along the left front fender.
- According to the factory's recommendation, power to the PTF power button, inserted into the socket on the dashboard, should be taken from the fuse for the right side lights. With this option, the PTFs will remain on when the ignition is turned off. If you don't turn them off with your button, the battery will quickly drain. But if the PTFs are powered from the main headlights button or directly from the ignition switch, they will light up when you turn the ignition key.
- Connect the plugs to the fog lights and turn them on. If the PTF on the VAZ 2110 and its modifications does not light up, it means that an error has crept into the wiring diagram. In this case, each element of the circuit should be checked again.
Video: connecting fog lights VAZ 2110
Making sure your fog lights are lighting correctly is relatively simple. You need to drive onto the road in the evening or at night and turn on the PTF. If the light flux is directed slightly downwards and illuminates not only the roadway, but also the side of the road, then everything has been done correctly. In this case, oncoming drivers will not be blinded by the light of your PTF and sufficient visibility is guaranteed in bad weather conditions.
How to choose, install and connect daytime running lights with your own hands
The inside of the headlights are foggy, what should I do? defogging of headlights
Installation Guide
On a VAZ 2110 or even - a completely reasonable solution, because these optics can perfectly cope with the problem of illuminating the road in fog. If the car owner has never encountered such a problem before, then he will probably be interested in learning how to connect the fog lights on his own. We will tell you more about this below.
Tools and materials
To install or xenon in PTF, you will need:
- The headlights themselves, which can be purchased at any store. Domestic stores can supply headlights in two variations - for old-style center consoles it is optimal to use PTF for “ten”, but if your car is equipped with a new torpedo, then you will need optics for the VAZ 2115. In this case, the difference lies in the buttons for turning on the optics.
- Multimeter for measuring voltage.
- Indicator light with wire.
- Heat shrink packaging.
If you decide to use xenon in fog lights, then you will also need an additional xenon kit.
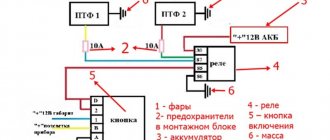
Connection diagram
How to properly connect fog lights to your car:
- First you need to open the fuse box and unscrew one screw, after which the device itself needs to be unfolded. The wires that will need to be connected additionally are marked in green in the photo. The number 1 marks the cable that transmits a positive charge, which can be checked using a test lamp. The connection of this wire is made from the relay to connector 20, as for the wire numbered 2, this is also a plus and it needs to be connected to the relay on pin 87.
- Next, you need to connect wires to the safety elements, which will subsequently split into the left and right lights. The wiring is installed, and the corresponding wire (also with a female output at both ends) is connected to the output with a double “female” contact, the length of which should be 30 cm.
- After these steps, you need to insert the cable with single female contacts into the white connector on the block. As for the double female connector, it must be removed from the block and connected to the male output, which is located behind the trunk opening button.
- Next, the black cable, which is marked with the number 3 and comes from output 87, should be routed from the top of the power supply; this wire is a minus. Here you can see the wires that were installed at the factory; they are connected under a nut that can be opened with a 10 key. The cable, which is marked with the number 4, ensures activation and deactivation of the optics.
There are several options where you can lay the foglight control cable:
As an option - from the side lights directly, without using a switch. In this case, the fog lights will automatically turn on along with the side lights.
- Another option is from the same side lights in a sequential manner, but using a switch. In this case, voltage will be supplied to the fog lamp switching regulator. However, the optics will only turn on if the button is pressed.
- Another option is from the ignition system via a switch. That is, when the driver turns on the ignition, there will be a plus on the optics switch. As in the previous case, the lights will turn on only after the switches are activated.
- In the engine compartment, disconnect the wires that are connected to the fluid control regulator and the washer expansion tank. To do this, unscrew the washer fixing nut and remove the block with wires, which is located under the left side member.
- For the Ш-1 connector you will need three cables - one yellow and two black-yellow.
- After this, you will need to cut two pieces from the yellow cable - they should be pulled into the vehicle interior. The wiring is thoroughly cleaned and male terminals are connected to it. Having completed these steps, the connectors must be connected to the block in such a way that the marked cable is connected to the black and yellow wire. Next, the block must be connected and two yellow cables attached to the harness. Having done this, the washer reservoir can be installed in place.
- After this, you will need two more pieces of wire, each should be 0.5 m long. You need to connect a ground terminal to these wires, and then fix it to the stud along with the ground cable from the optics.
- The cable from the PTF must be pulled from the front side member and brought out to where the lamp itself will be fixed. A ground terminal must be connected to each cable.
- After these steps, the brackets are mounted on the bumper itself, and the terminal blocks are connected to the wires. The final stage will be the installation of light bulbs in the lanterns (the author of the video is the proVAZ-2110 channel).
Connection to electrical circuit
So, the VAZ fog lights are installed in their regular places, all that remains is to connect them to the VAZ hog network. According to the current rules (see above), PTF can only be turned on together with the side lights. If you turn on the PTF, but forget to turn on the “dimensions”, then this will already be a violation.
The fact is that the fog lights are installed quite close to each other, and in the dark the oncoming driver will not be able to correctly assess the width of your car. That is why the side lights must be on when the PTF is operating.
To prevent this from happening, the connection diagram for fog lights in a VAZ is assembled in such a way that they cannot be turned on with the lights turned off. Despite its apparent complexity, the circuit is quite simple, and anyone with basic knowledge of electrical engineering can understand it.
Why are fog lights needed?
The very name “fog” lights already speaks about their essence.
Their light penetrates fog, a wall of rain, and contributes to more efficient illumination of the road. The presence of PTF provides three important advantages.
- PTF or fog lights are characterized by a flatter luminous flux, which literally spreads above the ground, spreading more in width than in height. This was done on purpose, since the temperature of the road surface is higher than the temperature of the air and fog, so it does not fall to the ground itself. Consequently, fog lights provide a certain range of illumination compared to conventional headlights. You will see approximately 10 meters further than with low beam.
- The width of the PTF light beam allows you to see the markings and the side of the road, which will allow you to make a maneuver in time and not end up outside the road surface. Unfortunately, this is a common occurrence in foggy conditions. Moreover, those who do not have fog lights suffer much more often. It is a fact.
- PTF does not blind oncoming cars, but allows them to see you. Only if the headlights are adjusted correctly, of course. Therefore, fog lights on your car have a big impact on safety by signaling oncoming cars that you are approaching.
Other manufacturers and types of lamps
Of course, many are trying to install other types of light sources and other types of lamps. All headlights discussed above have a halogen lamp. That is, it is actually the same incandescent lamp, but its filament operates in a gas environment (bromine or iodine halogens).
There are also alternative fog lights.
LED PTF
Intelligent LED PTFs are very expensive, and it makes no sense to buy cheap ones.
The main disadvantage of effective LED fog lights is their huge price and low efficiency..
The low efficiency is explained by the fact that a conventional LED produces light that is bright and pleasant to the human eye with a temperature of about 6000 K. This is not bad for head optics, but not for PTF. However, there are exceptions. For example, Osram LEDriving FOG 101 . A high-tech device with LEDs of a proprietary proprietary design with a color temperature of about 3000 K, which is just suitable for PTF.
Price - no less than 16,000 rubles.
Xenon PTF
Difficult to install and expensive lighting devices.
Standard PTFs converted to xenon fog lights.
The old xenon PTFs worked on lamps D1 and D2, the new ones received lamps D3 and D4 without the use of mercury vapor. Theoretically, the efficiency of such fog lights and the luminous intensity are higher than those of halogen lights. However, do not forget about the specificity of PTF - not to cause reflection of the beam from the water suspension. And all inexpensive xenon headlights require very precise adjustment of the light beam and are not able to provide a low horizontal stripe to combat fog.
In addition, the maximum color temperature for the effectiveness of fog lights is 3000-4500 K , otherwise they will be of no use and blinding light will be provided for oncoming drivers. The prices of such foglights are not lower than 5-7 thousand ( Hella Micro DE , for example). Anything cheaper is useless and even dangerous.
Comparison of halogen, xenon and LED lamps
Based on purely consumer parameters, the primacy of auto lamps looks like this:
- LEDs are the most modern auto lighting products. They are superior to their competitors in all characteristics - durability (can work with a decrease in the brightness of the light flux by a maximum of 10% for more than 25 thousand hours), energy efficiency (consume a minimum of energy, most of which is converted into light radiation), price (at first they were expensive, but already are currently significantly cheaper than competitive designs).
- Xenon - they are also called gas-discharge. On the outside they are similar to halogen ones, but they differ sharply in their operating mechanism and internal design. In xenon lamps, the inside of the cylinder is filled with the generous gas xenon (hence the name), and the light appears not due to the intensity of the iron arc, but as a result of the glow of the gas in the cylinder. The difference in the operation of xenon lamps is the release of a significant amount of heat and light radiation from that part of the range, which leads to burnout of the reflective coatings of the reflectors. The service life of these lamps is about 4-5 thousand hours; their installation requires a headlight of a special design with a lens, position corrector and washer. The price is significantly higher than halogen ones. It is true that the brightness of the light flux, and therefore the range of the illuminated section of the road, is higher.
- Halogen - this type of lamp was initially provided by the manufacturer of the VAZ 2110. Both manufactured headlight designs were designed specifically for halogen lamps. The service life is quite moderate - about 500-1000 hours. The brightness and range of illumination are also very inferior to rivals. The advantages are proven design and affordability.
Fundamentally! In the late 1990s and early 2000s, it became popular for many car owners to install xenon lamps that were not provided for in their headlights. It was enough to purchase an installation kit and use the simplest tools. The brightness of the headlights increased significantly, but due to the lack of provision for such an upgrade, the risk of blinding oncoming drivers and oneself during snowfall increased, and visibility also decreased (to a level below standard halogen ones) during rain and fog. At the moment, such a substitution is expressly prohibited by law and can lead to severe consequences for the motorist.