Today is the second day I've been fiddling with the PTF. In the morning I went into town to look for the button and wiring. I still found a button, but not for the PTF, but for the interior lighting from the Farmer. I decided to assemble the wiring myself, for this I needed: 1) 7 meters of wire (6m green and 1m black) 2) 2 tails for an H11 lamp 3) A fuse in the casing 4) 4 power rings 5) 5 females 6) Relay with block 7 ) 5 meters of corrugation 20cm of heat shrinkage From all this I soldered the wiring, crimped the ends and inserted them into the relay block so that there were fewer “twists” and “soldering”. Above the radio in the cockpit there are 2 unused blocks with wires. Here block number 2 suits us. The 2 lower wires, brown (it powers the button backlight) and black, are “+” from the dimensions and minus, respectively. 2 perpendicular wires are the opening of the button. Let's parallel the brown wire with any of the vertical ones. We connect the remaining vertical wire with the wire that comes from the relay. And voila, everything should work!
Spent 2 hours of time including wiring.
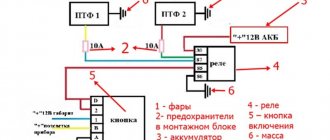
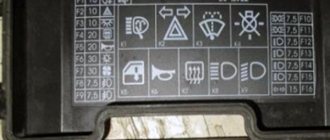
Connection diagram
headlights
To improve visibility in foggy conditions in summer, and during snowstorms in winter, fog lights are used. Previously, these headlights had yellow glass, but in the near future, thanks to an increase in the luminous power of the lamps, they are being made with transparent reflectors (glass). Fog lights are not an essential lighting device and therefore not all trim levels of cars are installed with them. For this reason, the installation, if desired, has to be done by the owners themselves or contacted by a car service center. The main requirement for connecting fog lights is the presence of a separate switch. Because the power of the lamps is quite high, and the current switched by the existing buttons and keys is small, an intermediate relay must be used when connecting. When connecting, do not forget about protecting the circuits with fuses. A common mistake is connecting fog lights specifically to the side lights in the headlights. The headlight switch and wires are not designed for the current consumed by the lights.
Let's take a look at the connection diagram for the fog lights of the VAZ 2110. According to the connection diagram proposed by the factory, presented below, the fog lights turn on after the side lights are turned on. The disadvantage of this circuit is the lack of dependence on the ignition switch. This can lead to leaving the headlights on while the engine is not running for a long time. To prevent this, I recommend connecting the wire to the headlights switch not to pin 58, but to pin “X”. In this case, switching on will occur regardless of external lighting, but when the ignition is turned on.
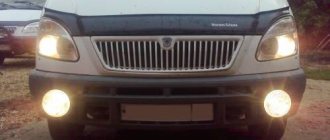
Installing fog lights on a gazelle
Contact group: Write if you have any questions or ideas.
fog lamp diagram
When installing fog lights on a VAZ 2114 and modifications, on cars after 2005, in the cabin you will most likely find a connector for connecting the button connected to the mounting block. Therefore, you will only need to assemble the circuit in the engine compartment. The complete connection diagram is shown below. The disadvantage of this scheme is the same as that of the VAZ 2110 and I propose the same solution. diagram fog lights does not suffer from the disadvantages of circuits for VAZs, and almost all cars are equipped with these headlights. Unlike the Volga, its closest “relative”, the Gazelle , is practically not equipped with fog lights. Therefore, you have to make the connection yourself. When connecting, it should be taken into account that on new panels the central light switch used may have a position for turning on the fog lights and it can be used when connecting, so as not to install an additional button or key. The simplest connection diagram is shown below. The same scheme can be used for other cars.
The more broken down the car, the louder the radio screams from there.
Almost every car owner asks the question of improving roadway lighting. Drivers of Gazelle Business trucks, which are used exclusively for commercial transportation, will not be an exception. Considering weather conditions and cramped loading and unloading areas, equipping additional light sources will add convenience and safety.
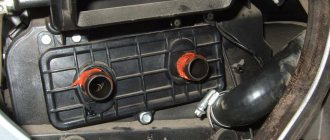
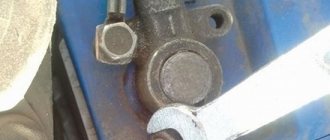
The places under the PTF are closed with plastic plugs
Installation process
To install the kit yourself, you can:
- Use the places in the front bumper designated by the manufacturer;
- Choose the mounting location on the bumper yourself (taking into account traffic regulations).
The fact is that the shape of the fog lights is different both in size and shape. Therefore, the connection of fog lights on the Gazelle will be carried out by you based on the dimensions of the selected lighting devices.
Today you can find the following products on sale:
- Rectangular shape;
- Square shape;
- Oval shape.
There are no restrictions on the shape of the headlights - the owner himself determines which ones to purchase
And the question after purchasing the set you like is how to install lighting fixtures in places not intended for them. The thing is that companies strive to produce universal lighting devices, while there is no uniform standard among automotive manufacturers.
Bumper mounting methods
The difficulty is that the standard front bumper does not have slots for installing additional lighting fixtures.
Therefore, Gazelle owners have two options:
- Cut them out yourself, or install fog lights on top of the bumper;
- Buy an improved bumper.
Buying a new bumper with a grille and slots makes it easier to install additional headlights
Advice! If the second option seems too expensive for you, since price is a decisive factor, then you still have the option of installing fog lights directly on the bumper using homemade fasteners.
Integration into the electrical circuit
Having figured out the mounting location, you have to connect the electrical components into a single circuit and integrate it into the standard one.
To do this, the fog lights come with:
- Electrical wiring with connectors for connection to the Gazelle circuit;
- Relay interrupter;
- Power button designed for installation on the instrument panel;
- Instructions for connecting and pinouting terminals.
Traditional wiring kit for fog lights
The work algorithm will be as follows:
- We connect the installed headlights with wires;
- We bring the wiring harness into the engine compartment;
- We determine the location of the relay installation;
The relay in the fog light circuit must be installed
Advice! If the kit does not include a relay, then purchase one from Gazelle 3302 - this relay is responsible for the operation of the rear foglights.
- We connect the wires to the relay from the headlights;
- We start the wires from the relay through the technological hole into the passenger compartment;
- We determine the installation location of the power button;
- We install it and connect it to the standard Gazelle wiring diagram.
Let's figure out how to connect the wires to the relay. The fact is that the relay itself is required to protect the power button, since it is not designed for the current that powerful fog lights consume.
Color diagram for connecting fog lights on a Gazelle
Having assembled the entire circuit together, check that the wires are connected correctly to the relay installed under the hood:
- Contact 86 – relay coil circuit;
- Contact 87 – to “plus” via a button;
- Pin 30 – to “plus” through a fuse;
- Contact 85 – ground (“minus”).
What to consider when connecting
When connecting, keep in mind that the new Gazelle instrument panels are equipped with a central switch, which has a separate position for the fog lights, so you don’t have to embed a separate button.
A number of points regulate where and how additional lighting fixtures should be installed:
- First of all, this is the height, which must be at least 25 centimeters from the surface of the roadway.
- Fog lights should be installed in such a way as to maintain symmetry with the axis of the vehicle itself .
- These and any other devices cannot protrude beyond the external dimensions of the machine by more than 40 cm.
- And in any case, the flow of light cannot be higher than the flow of the main low-beam headlights.
In some cases, traffic regulations allow the installation of fog lights on the roof of a vehicle. For example, if we are talking about an all-wheel drive vehicle with high cross-country ability. Or its operating conditions are so harsh that even making stickers for the headlights is not able to protect them from stones.
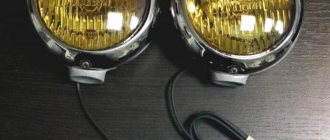
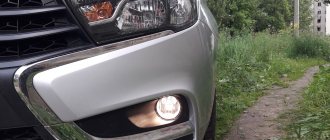
PTF before installation
Install on the front bumper
At the same time, in the first photo you can see that the manufacturer has already designated places for future foglight mounts in the bumper. You can choose another place, not forgetting the recommendations of the traffic police officers stated above.
Again, there is quite a variety of headlights on the market, based on shape and size. Most often, headlights of rectangular, square or oval shape . But after the purchase you will have to decide where your lighting fixtures can be placed.
If PTFs are inoperative
Let's briefly consider the main reasons for the failure of fog lights or problems in the operation of control mechanisms (see photo). Unfortunately, long-term use and not always favorable climate cause corrosion and oxidation of wires and contacts.
- Each fog light has its own fuse located in a block under the hood. Check first to see if it is faulty. If both headlights do not work at once, then the problem is different, since the fuses do not fail in pairs.
- If the lamps burn out, you can’t think of anything else other than replacing them, and the reason may be in the breaker relay. There should be a clicking sound when the headlights are turned on. If not, then either it is not working, or there is no power to it, or, as an option, there is no normal mass on the body, or from the relay.
To bet or not to bet? Drivers' opinion
Judging by the reviews, drivers unanimously welcome the installation of fog lights. The only question is what kind of headlights to put on the Gazelle. The automotive industry has only now “grown up” to install them, and the first models were deprived of this. Therefore, drivers most often address this problem in specialized forums.
Drivers also believe that it is better to use yellow fog lights, but they should not skimp on good PFCs.
They recommend Osram All lamps for fog, and Night Breaker or Bosch lamps for snow.
Did you like the article? Follow our channel for new ideas of useful car tips. Subscribe to us in Yandex.Zen. Subscribe.
Each car has its own use, largely depending on the owner. But if the conversation turns to Gazelle, then almost always we are talking about commercial transportation.
Moreover, the routes often end far from illuminated city streets.
Therefore, the issue of improving roadway lighting is more relevant than ever:
- After all, standard headlights are not enough to maneuver in tight yards for loading and unloading operations;
- And if we take into account weather conditions, then installing fog lights on a Gazelle is a conscious necessity, designed to protect the vehicle’s movement in poor visibility conditions.
PTF for "Gazelle" series "Business" and "Next"
The problem of safe driving in difficult weather conditions gives rise to the following question: “Which fog lights (Gazelle-Business - your car) should I buy? Is it possible to install PTFs designed for other cars?”
The difficulty lies in mounting the headlights specifically for this car. A mistake in choice can be costly for the owner of Gazelle Business. According to the majority of drivers and car service specialists, the best option may be the Lada-Priora fog lights, although the mount will still have to be modified: an adapter will be required.
The fog lights installed on the Gazelle-Next will not create problems for the driver similar to those encountered by the Gazelle-Business.
This model is equipped with anti-fog devices from the manufacturer.
Types of fog lights
Based on their shape, Gazelle fog lights are divided into rectangular, square and oval, but the shape of the body does not play a special role and does not give any special advantages to one over the other.
“Fog lights” may differ in optical designs. Thanks to the use of different options, the issue of the optimal ratio of the maximum luminous flux and the minimum power consumed to provide it is resolved to varying degrees.
The most widely used headlights are those with a parabolic reflector. With this scheme, the installation location of the light bulb is aligned with the focal point, which allows the luminous flux to be formed in the form of a horizontal strip. A special screen limits its upward spread. The headlight efficiency is 27%.
Fog lights with a free-form reflector have higher efficiency (up to 45%). The design allows the use of a significant amount of light, providing a maximum area of its distribution. However, headlights with this optical design are expensive and have not yet become widespread.
Installation Guidelines
Fog lights on the Gazelle are installed with the obligatory consideration of the power of their flow. The use of PTF is prohibited if this indicator exceeds the power of the main light sources.
Headlights must be installed symmetrically relative to the axis of the car.
If the factory has already provided and marked on the bumper the installation locations for fog lights, then you should follow the factory recommendations and install the headlights in these areas.
After fixing the PTFs, the correctness of their adjustment must be checked. It is advisable that this be done at a service station by a qualified electrician. This step is perhaps the most important of the previous ones, since the quality of the fog lights depends on it. Only in this case will they be useful equipment.
The main stages of connection work
Here are sample connection instructions:
- First of all, in symmetrical places on the bumper we cut out two holes in which the light sources will be attached and thoroughly lubricate them with an anti-corrosion agent.
- We connect the purchased pair of foglights with wires. Check that the cross-section of the main wiring of the car is the same as that supplied with the headlights. It is generally accepted that the minimum cross-section diameter should be at least 0.75 mm.
- We de-energize the car battery.
- Wiring is carried out in accordance with the diagram that comes with the package.
Decoding connectors for connecting headlights to Gazelle
- You need to open the housing of each headlight and pull out its optical element. This will be required so that you can carefully insert the halogen light bulb and not damage the housing with glass during the installation process.
- After tightening the headlight housings, install the contact relay with the wiring facing down. This way we will protect it from moisture.
- When you insert a halogen lamp into its optical element, do not allow your fingers to contact the surface of the bulb. Wear gloves or even wrap a rag around the flask. Grease on the surface of the bulb will significantly shorten the life of the light bulb.
- We connect the wiring kit to the lamp and install the optical element.
- Gazelle fog lights will be considered installed when you have completed all stages of work and provided power to the battery again. Now you can check the functionality of the device. Turn on the headlight only after complete assembly. The video in this article will give you the opportunity to visually see some of the work.
Installation location
Since the Traffic Rules must be strictly observed, the only correct place for installing fog lights can be the front bumper of the car.
Note! Traffic regulations prescribe restrictions on the location of additional lighting fixtures on the car. In particular, Gazelle fog lights should not be located above the low and high beam headlights. Also, they should not protrude more than 400 mm beyond the external dimensions, and the distance from the road surface to the headlights should be at least 25 cm.
The traffic rules and GOST 8769-75 allow the installation of fog lights and additional headlights on the roof, provided that the vehicle is operated in difficult road conditions:
- On gravel roads where there is a high risk of headlight damage (quarries, road construction, etc.);
- Off-road;
- On four-wheel drive vehicles participating in sports competitions.