A starter is an element of a vehicle - an electric motor that has 4 poles. He starts the engine in the car. As for the principle of its operation, it is based on the fact that it transmits the initial stroke to the engine crankshaft. Thanks to the 4 brushes of this device, the level of power and torque increases. Of course, if the starter is faulty, the engine cannot be started.
Also on the website read everything about tuning the interior of the VAZ 2106
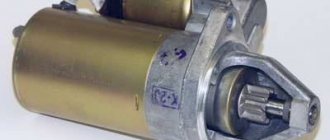
ST221 starter design
Starter ST-221 is an electric DC motor consisting of the following elements:
- Housing with field windings;
- Two covers;
- Anchor with drive;
- Traction relay.
The covers are connected to the body into one rigid structure using two pins. The housing, coils and poles make up the stator of an electric motor.
Stater design features
Four poles, fixed inside the steel housing with screws, are the basis for installing winding coils on them. Coils are divided into series and shunt and differ in the way they are connected to the armature. Serial ones are connected in series, and shunt ones in parallel. By using two types of coils, the so-called mixed stator excitation is obtained. The use of this design makes it possible to obtain a fairly low armature rotation speed at idle without load. Which has a positive effect on the longevity of the work, since the bearing bushings wear out less, and therefore do not create prerequisites for armature beating.
Starter armature design
The design of the starter armature includes the following parts:
- Shaft;
- Core with copper winding;
- A collector made as a plastic sleeve with copper plates mounted into it.
The free axial play is adjusted using washers; its value should be in the range from 0.07 mm to 0.7 mm. The maximum stroke for starter 35.3708 should not exceed 0.5 mm. The front end of the armature shaft has an installed unit called bendix.
Bendix combines a roller overrunning clutch and a gear. Torque is transmitted from the starter armature through the gear to the flywheel ring gear to ensure engine starting. After the engine starts, the flywheel begins to try to spin the armature. A high frequency of rotation of the armature can lead to the winding being ejected from the grooves of the core, and to prevent this from happening, an overrunning clutch is necessary.
The overrunning clutch is made of outer and inner rings. The outer ring has three grooves in which there are holes for steel spring-loaded rollers, guide rods and plungers. The groove for the rollers is made with a variable width, which ensures free rotation of the rollers in the wide part, and in the narrow part they simply jam between the outer ring and the inner one.
Traction relay design
To put it simply, so that the starter begins to spin only at the moment when the gear engages with the flywheel. But the traction relay has another function: turning off the starter rotation and retracting the gear after the engine starts.
Bendix
The magnetic system consists of the following elements: A flange with a core pressed into it; The yoke that surrounds the winding; Flange. The relay coil is wound on a frame made of plastic jaws and a brass tube. The windings differ in holding and retracting, and their winding direction is in one direction.
Design features of a penny starter
When the ignition switch is turned on, the starter does not turn.
Why does the starter not respond to turning the ignition key? This also happens. The first “kopecks” were equipped with ST-221 starting devices. Their design consisted of:
- housing, which is also a stator with field windings;
- two end caps;
- armature (rotor) with commutator and drive;
- solenoid relay.
In essence, SST-221 is a classic four-pole electric motor that consumes direct current from a battery. A special feature of this device was a collector with transversely arranged plates. In principle, all electric motors at that time had this design.
Over time, SST-221 replaced the new VAZ-2101 starter, modification 35.3708. By the way, it is still being produced today. Almost all VAZ “classics” were equipped with it. Structurally, it differs from its predecessor only in the presence of an additional winding of the solenoid relay, a longitudinal collector and an improved stator. All other elements remained the same, which made it possible and allows us to easily change the outdated model of the launcher to a new one without any modifications.
Signs of a faulty starter
A faulty VAZ-2101 starter may show the following symptoms when trying to start the engine:
- the solenoid relay does not operate (does not click), the rotor does not rotate;
- the relay works, but the armature rotates too slowly;
- the traction relay is activated repeatedly, but the armature does not turn the flywheel;
- the relay works, the starter turns, but the flywheel does not rotate;
- operation of the starting device is accompanied by an uncharacteristic sound;
- The VAZ-2101 starter works normally, but does not turn off when the ignition key is released.
Now let's look at each of the signs in more detail.
VAZ 2101 Replacing starter brushes
The starter does not engage when turning the key
1. Remove the starter (Section Removing and reinstalling the starter).
2. Give back the nut.
3. Disconnect the starter power cable from the solenoid starter terminal.
4. Loosen and remove the 2 screws securing the shaft cover to the manifold cover.
5. Remove the cover.
6. Remove the O-ring.
7. Remove the ring clamp and remove the gasket and O-ring.
8. Remove the through bolts securing the manifold cover and stopper to the body. Mark the cover in relation to the body.
9. Remove the manifold cover.
10. Remove the brush holder assembly while releasing the power cable sealing gasket from the clamp. If repair or cleaning of the commutator/armature is required, remove it from the stator at this stage, then remove the brush holder assembly. After removing the brush holder assembly, the springs will push the brushes out of their holders, but the brushes will be held in place by the wires.
11. Inspect the brushes for wear and replace them if necessary. It may be possible to purchase brushes separately from automotive workshops, otherwise the brush holder assembly may need to be completely replaced. Clean all components before starting assembly. Clean the commutator using fine sandpaper. If the commutator is excessively worn, it can be machined in an electrical equipment repair shop. Make sure that the brush holders are thoroughly cleaned so that the new brushes move freely in the brush holder.
12. Partially install the brush plates without brush holders onto the commutator, then center the brushes and put the springs and brush holders on them.
13. If removed, replace the armature inside the stator. 14. Place the brush holder assembly in the kit onto the commutator armature, while simultaneously inserting the sealing sleeve of the power cable into the slot in the housing. 15. Install the manifold cover onto the armature, then install the O-ring, gasket(s), and ring clip. Make sure the O-ring is seated correctly. 16. Reinstall the manifold cover, making sure that the previously applied marks for the relative position of the cover and body are aligned. Insert and tighten the through bolts. 17. Reinstall the gaskets and O-ring, then place the shaft cap and O-ring on the manifold cover and tighten the 2 screws. 18. Connect the power cable to the electromagnetic starter terminal and tighten the nut. 19. Reinstall the starter (Section Removing and reinstalling the starter).
Dismantling and replacement
To make it more convenient to replace the relay, it is recommended not to be lazy and still remove the starter itself. This will allow you to simultaneously check the condition of the starter while replacing the relay.
The removal procedure described below concerns an assembled relay, which has the ability to replace individual structural elements.
- Disconnect the negative terminal from the battery.
- Disconnect the red terminal from the relay. This is a red wire.
- Using an 8 mm wrench, unscrew the nut securing the brush assembly. You will find it behind the relay.
- Remove the contact that this nut held in place.
- Unscrew the fastening of the solenoid relay to ground. We are talking about coupling bolts.
- Next, you need to dismantle the power wire, after which the relay itself is pulled out.
- The fastening nuts are unscrewed from the end part, which allows you to remove the upper part of the relay.
- It is advisable to immediately replace the relay core with a new one.
- Install a new relay.
- Proceeding strictly in reverse order, reassemble the assembly, which will allow you to complete the replacement of the unit.
- When separating the relay into its two component parts, be sure to ensure that the core does not slip out and the spring does not jump out.
We can say that replacing the gearbox on a VAZ 2114 is not so difficult. It is much easier to replace a non-separable relay, since to replace it it is enough to unscrew all the fasteners in the same way and disconnect the contacts.
Disassembly, diagnostics and repair of starter
Lada Priora Sedan Logbook Preparing for winter. Starter
Let's move on to the starter itself. To disassemble it, use a Phillips-head screwdriver to unscrew the two screws on the back cover. After removing it, carefully pry off the shaft retaining ring and washer. Next, use a 10mm wrench to unscrew the two bolts that secure the device body. After this, use a screwdriver to unscrew the four screws that secure the terminals of the stator windings. Now you can remove the anchor. Once done, remove the cover from the stator.
Let's move on to diagnostics. Having carried it out, we will decide what we have to do: repair the VAZ-2101 starter or replace it. Let's start with the brushes. They are located in the brush holder of the back cover. Remove them from their seats and assess their condition. If there are cracks, chips, or traces of a short circuit on their surfaces, the brushes must be replaced. Using a ruler or caliper, measure the height of each of these parts. It should not be less than 12 mm. If at least one of them has wear exceeding the specified value, the entire set of brushes must be replaced.
Carefully inspect the copper lamellas (plates) of the collector. They must not show any signs of damage. Otherwise, the entire rotor will have to be replaced.
To check the integrity of the stator windings we need an ohmmeter. It is connected to the common terminal of the windings and the starter housing. When the resistance device readings are less than 10 kOhm, an interturn short circuit is evident.
If you don’t have an ohmmeter at hand, the test can be carried out using a piece of insulated wire with a plug for a standard socket and a regular 220 V incandescent lamp. Voltage is supplied through it to the common terminal and to ground (device body). If the windings are in good condition, the lamp will not light. Naturally, this test is not safe, so it is not recommended for people unfamiliar with the basics of electrical engineering.
Pay attention to the starter drive parts. They must not show signs of wear or damage
The drive gear must rotate easily in the direction of rotation of the starter shaft. Finally, inspect the bushings of the device covers. If they are noticeably worn, replace them with new ones.
If serious faults are detected, such as a break or short circuit in the windings, damage to the stator housing, in order not to bother with repairs, which will cost a tidy sum, it is easier to buy a new VAZ-2101 starter. The price of the device, depending on its modification and manufacturer, varies between 3000-3500 rubles. Well, to prevent it from breaking, adhere to the rules of its operation provided by the manufacturer.
REMOVAL AND REPLACEMENT
Let's figure out how to remove the starter on a VAZ 2114. To work, we will need a key for 13 and 10, a hammer, a flat-head screwdriver and VD-40 (if the bolts have not been unscrewed for a long time).
The algorithm of actions is as follows:
- Remove the “-” terminal from the battery;
- The starter is secured to the clutch housing with three screws - two upper and one lower. The lower one, as a rule, is removed during the first car repair, since, in fact, it is not needed, but it adds significant inconvenience. If there is no lower bolt, then you can remove the starter on a VAZ 2114 without a pit, but if there is a lower lock, then to get to it you need to drive the car into a pit or crawl under the car. Unscrew the screws with a 13 key;
- We remove all wiring from the device (when installing a new unit, it is most convenient to install the wiring in advance, before attaching the starter to the engine);
- We move the starter to the right so that it comes off the guides on the engine, and remove it.
To determine the malfunction, unscrew all the screws connecting the housing and disassemble the device (you may need to tap the housing with a hammer). Check the wear of the brushes, field winding and flywheel teeth.
The most typical failure of the unit is wear or mechanical damage to the bendix.
Replacing the Bendix on a VAZ 2114 is carried out as follows:
- Using a flat-head screwdriver, bend the Bendix fork at its connection to the body;
- We remove the ring, under which another one is hidden - the locking ring. It can be removed with a 13 key; you may need to knock down the fastening with a hammer;
- We remove the retaining ring using a screwdriver; it’s easy enough to pry it off;
- Pull the bendix out of the body.
Do not think that if there is no visible damage on the bendix, then it is working, since it usually breaks from the inside. If typical signs of a Bendix malfunction are detected, it needs to be replaced.
If you are interested in how to remove the starter on a VAZ 2115, then you can do everything according to the algorithm given in the article - the technology for removing the starter for the fourteenth and fifteenth VAZs is identical.
Troubleshooting problems that subsequently cause the VAZ 2106 starter to not turn
The search for starter problems should occur in several sectors.
These include the device itself, the battery and the electrical communication system. Therefore, if the VAZ 2106 starter does not turn, first of all you need to check the condition of the battery and determine its charge level. Next, you should clean all wiring contact connections and ensure its integrity. Then you need to check and clean all fuse contacts. If the cause of the malfunction was not identified during a routine inspection, the starter will have to be removed for subsequent disassembly. This will require a set of tools and some special skills.
When disassembling, it is important to pay attention to the following points:
- assess the condition of the contacts of the electrical wiring connections
- check the integrity of certain windings
- determine the presence of graphite brushes, as well as their production
- determine how efficient and worn out the bendix is.
All internal components of the electric motor are regularly exposed to various contaminations. This could be dirt, dust, erased graphite, grease, insulation. This fact can also cause it to work incorrectly. This may also be a consequence of burnt contacts, wear of individual parts, failure of a special relay, or sticking brushes.
When disassembling the starter, it is necessary not only to eliminate a specific malfunction or breakdown, but also to clean and also check all engine parts.
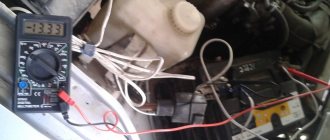
It is important to check the readings of the ammeter (optimally - no higher than 23 A) and voltmeter (no higher than 9 V). If the values exceed the norm, then there may be a short circuit in the electrical wiring
Using a tester you need to check the condition of the windings. Their coils must be dried and treated with insulating varnish. If there are scratches on moving parts, you need to remove them with sandpaper.
It must be remembered that collectors with worn plates cannot be repaired. If the insulation is damaged, it is better to replace it, as well as all parts whose wear rates exceed the established specifications. If the thread is torn or damaged, it can be restored with a new thread. If oxidized contacts are detected, it is recommended to clean them.
After all repair work has been carried out, the equipment is assembled in the manner prescribed by the instructions. It is best to regularly carry out preventive inspection and cleaning of starter parts. In this case, you can avoid serious damage in the future.
Option one battery
This is perhaps one of the most common types of malfunctions of this kind. Its essence lies simply in a discharged or inoperative battery. Determining discharged is simple:
- if the solenoid relay clicks, but the starter does not turn, and the lights on the dashboard go out, the culprit is the battery;
- when a series of clicks occurs, and the lamps also noticeably dim, then, as in the previous case, the battery is to blame;
- if nothing happens at all, then the battery may also be discharged - you need to check it with other loads (for example, turn on the headlights).
If the cause is the battery, then it would seem that everything is simple - just charge it (or light it) and you can hit the road. But not everything is so simple, because the unclear reason that caused the consequence in the form of an unsuccessful launch will cause the same consequence again. Therefore, it is worth figuring out why the battery was discharged.
Everything is elementary if a light was simply left on somewhere, or another consumer was left on. But if everything was turned off, then it is necessary to check the quality of the generator, as well as the serviceability of the battery itself.
Operating principle of ST221 starter
When you turn the key in the ignition switch, the contacts close and electric current is supplied through the windings of the electromagnetic traction relay. The magnetic force generated on the relay windings moves the armature until it comes into contact with the core. After this, the retractor winding is turned off, and only the holding winding works. This is because holding the armature inside the relay is much easier, since it is already retracted, while the holding winding produces much less magnetic flux.
The relay armature, moving forward, is moved by the bendix lever in the direction of engagement with the flywheel. The starter armature shaft has screw splines that ensure rotation of the working gear. In addition, both the working gear and the flywheel ring gear have chamfers made on the side edges of the tooth profile. These features make it easier to engage the gear and flywheel, and a buffer spring between the lever and the freewheel softens the impact.
When the relay contacts close, electric current is supplied to the armature and stator windings, which forces the stator to rotate, and with it the hub and the outer ring of the overrunning clutch rotate. The rollers are located in the narrow part of the grooves by means of springs, that is, they wedge the outer and inner rings of the overrunning clutch, thereby ensuring the transmission of torque from the armature to the working gear. Starting the engine is accompanied by an increase in the speed of the flywheel, and, accordingly, the working gear. In this case, the inner ring of the coupling helps to remove the rollers from the wedge state, that is, the inner and outer rings move independently of each other.
After the ignition key is removed, the current stops flowing to the relay windings. The relay armature is retracted back with the help of a spring and at the same time removes the bendix from the engaged state. Braking of the relay armature occurs due to friction forces between the shaft and the cover.
Basic malfunctions and methods for their elimination
The main ones include:
The starter does not turn on:
- There may be no contact in the power circuit, observed with rusted or oxidized tips - cleaning or tightening the contacts will help;
- Relay failure - inspection and testing will help; in case of failure, replacement is recommended;
- There may be a short circuit in the winding - if repair is impossible, install a new one;
- There is no contact in the ignition switch - it is worth checking the lock, it is possible to replace the contact part.
Crankshaft
When the starter is turned on, the crankshaft rotates slowly:
- The battery may be damaged or discharged - it is worth charging or replacing the battery;
- Oxidation of battery terminals - stripping the terminals and wire tips will help;
- Engine oil does not have the required viscosity - the oil should be replaced;
You can hear the starter rotating, but the crankshaft does not spin:
- The freewheel may slip; the drive needs to be replaced;
- There is no shaft lubrication - the shaft must be washed and lubricated with engine oil;
When the starter is turned on, a gear grinding sound is heard:
- Incorrect adjustment of gear travel or closing torque - adjustment is necessary;
- There are nicks in the flywheel ring gear - the ring gear needs to be replaced;
- The buffer spring is weakened - the spring needs to be replaced.
After starting the engine, the BAZ 2101 starter does not turn off:
- Possible jamming of the armature shaft or oxidized relay contacts - repair the part after removal;
- Failure of the ignition switch - replacement of the lock;
- Short circuit in the relay winding - replace the relay;
- Bearings are worn out - new ones need to be installed.
Starter noise while driving
Poor fastening of the starter or contacts - tighten the bolts.
https://youtube.com/watch?v=mX5cNzT9TK0%2520
The starter clicks or hums, but the engine does not catch the root causes of the problem.
If there is a malfunction that manifests itself in the form of clicks from the starter when the engine starts, then analysis of the nature of the clicks can indicate the causes of the breakdown. If the starter traction relay clicks constantly:
- the battery is discharged, it is necessary to check the charging current;
- you should check the tightness of the battery terminals;
- there are problems with the “ground”, it is necessary to check the place of contact of the ground with the body or internal combustion engine, it may be necessary to implement additional demining;
We also recommend reading about what engine demining is. From this article you will learn about why it is necessary to install additional weight in a car and what advantages this solution has.
If the starter clicks only once and does not turn the engine, then the following are possible:
- insufficient fastening of the traction relay to the starter housing;
- the contacts in the starter traction relay burned out;
- the malfunction is due to poor ground contact;
- the starter has broken down;
If checking the fastening of the traction relay does not reveal any abnormalities, then the starter relay should be removed for inspection. A dismountable relay means that after disassembling the device, it is necessary to clean the power contacts. The non-separable traction relay must be clearly replaced if a breakdown is detected.
The absence of malfunctions in the starter traction relay will indicate that it is then necessary to remove the starter itself for detailed diagnostics. Note that the starter clicks, but does not turn, both due to breakdowns of the starter retractor relay, and as a result of its own malfunctions. The most common are:
- the power wire that goes from the starter windings to the traction relay may burn out;
- The starter brushes have become critically worn. In this case, the brushes require replacement;
- jamming of the starter armature occurs due to wear of the starter bushings. The starter bushings will need to be replaced;
- a short circuit occurs in the starter armature winding, as well as a break or short circuit in the stator windings;
An element such as the starter bendix should also be mentioned separately. The Bendix may be deformed or the Bendix drive fork may be damaged. Another problem associated with the starter bendix is damage to its teeth. The bendix teeth are jammed, meaning that the device cannot engage the teeth on the flywheel ring.
The bendix is also connected to the retractor core through a special fork. The absence of engagement of the bendix with the teeth of the flywheel ring means that in this case there will be no complete retraction into the winding of the traction relay at the moment of switching on. As a result, the so-called “nickel” will not be able to bridge the power contacts of the relay to supply power to the starter motor.
So what should we do next?
Starter connection diagram
Throw away the penny starter? Yes Easy! It still doesn't turn. Of course, this is the most optimal option, but it is suitable only for those who can afford to buy a new one, or who already have one in storage. But what should the rest of us do? The budget for repairs is meager, but it’s still difficult without a car. No matter what, but it serves faithfully. Yes, it all comes down to the minimum program:
- buy brushes;
- buy bronze bushings;
- breaking the unusable blade from a metal saw;
- prepare a solvent and an old toothbrush;
- if necessary, buy a solenoid relay;
- extremely rarely a soldering iron, rosin and a piece of tin may be required.
Are you ready? On the count of three! so that the starter is disassembled! Don't be afraid, you won't break anything in it, since it's already faulty. The sequence for disassembling the starter on a penny and other classic models:
- Remove the back cover by unscrewing two bolts with a screwdriver. Sometimes the cover is also tightened with nuts, which will be discussed in the next paragraph. It all depends on the specific starter model.
- Unscrew the nuts from the studs, thereby disconnecting all three parts of the starter.
- Unscrew the nuts that secure the brushes and stator winding terminals to the contacts. You can even remove the brushes before this by pulling the spring.
- Using a screwdriver, remove the retaining ring on the rotor.
Main malfunctions and their causes
The starter of the sixth VAZ model has a standard configuration similar to other models of this brand. It follows from this that the malfunctions of these cars are similar.
Typical starter faults:
- The relay and armature do not work.
- When turned on, only the solenoid relay is activated, and the circular rotation of the armature occurs very slowly or completely absent.
- When turned on, the crankshaft does not work.
- After starting the engine, the starter does not stop working.
- Increased noise effects coming from the electric motor.
There are quite a lot of reasons for the occurrence of problems in which the standard starter of a VAZ 2106 car does not turn. Here are some of them:
- insufficient battery charge;
- there was a massive short circuit;
- the tightening force of the tips has weakened;
- the terminals of the wires or battery ends have oxidized;
- the fastening bolts have become loose;
- brushes are worn out or stuck;
- commutator burnt out;
- the freewheel slips;
- relay contacts stuck together;
- the starter is not positioned correctly;
- bushings are worn out or gear teeth are broken, etc.
Circuit breakers
Location
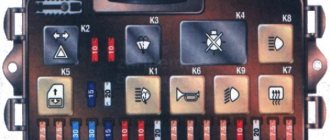
The fuses are located under the instrument panel on the left side of the steering column.
Description
1 (16A) - Lamps / Sound signals / Socket / Cigarette lighter / Brake lamps
2 (8A) - Windshield wiper and wiper relay / Heater motor / Windshield washer motor (VAZ-21011, 21013)
3 (8A) - Left headlight (high beam) / High beam indicator lamp
4 (8A) - Right headlight (high beam)
5 (8A) - Left headlight (low beam)
6 (8A) - Right headlight (low beam)
7 (8A) - Left front light (side light) / Left headlight (side light; VAZ-21011, 21013) / Side light indicator lamp / Right rear light (side light) / Trunk light lamp / License plate light lamp / Lantern license plate lighting (VAZ-2101) / Instrument cluster lighting lamp
8 (8A) - Right front light (side light) / Right headlight (side light; VAZ-21011, 2101) / License plate light lamp / Cigarette lighter light / Left rear light (side light) / Engine compartment lamp
9 (8A) - Oil pressure warning lamp / Coolant temperature gauge / Fuel level gauge with reserve warning lamp / Parking brake and brake fluid level warning lamp / Turn indicators and corresponding warning lamp / Battery charge warning lamp / Reversing lamp / Lamp glove box
10 (8A) - Voltage regulator / Generator excitation winding
Location
The relays are located in the engine compartment.
Description
1 — Battery charge indicator relay (RS-702)
2 — Relay for turning on the high beam headlights (VAZ-21011 and BA3-21013)
3 — Relay for low beam headlights (VAZ-21011 and BA3-21013)
Source
Replacing a VAZ classic starter
The most common reason why the starter on a “classic” becomes faulty is the inoperability of the retractor relay with which it is equipped. That is why, when turning the key, the driver will hear a characteristic click. Consequently, the engine will not start in this case.
True, sometimes it is necessary to completely replace the starter. But first you need to dismantle the old starter. To do this, use the key to “thirteen”.
Replacing the starter consists of the following steps:
- We remove the battery.
- Then you need to find the fasteners.
- Then you need to unscrew the 2 bolts.
Then you should pull the starter and move it towards the right. So it will move away from its previous position and shift to the right side. - Next, you need to lift the left side of the starter and turn it upside down. It is pulled up all the way.
- This element of the vehicle should be lifted until the wiring located at the rear of the starter becomes accessible and the wires can be removed.
- There are 2 wires at the back. One of them is fixed using a standard nut, which initially needs to be unscrewed.
- A simple plug serves as the second nut. It needs to be moved to the side. It can be dismantled without much effort.
- Once the starter is free, it can be easily removed.
As for installing a new starter, it is carried out in the reverse order. This procedure will not take much time. It is recommended that you perform these steps in a specific sequence.
In other words, you first need to connect the wires to the starter, and only then install it in its original place. At the same time, the price of a new starter for a six ranges from 2 to 4 thousand rubles. It all depends on the manufacturer and modification of the device itself.
Reinstallation instructions
Before installing a gear starter on a car, you need to remove the old one from it. To do this you need:
- Unscrew the two mounting bolts;
- Pull the part slightly to the right so that it changes its original position;
- Take the left side of the starter and turn it upside down, pulling it up as far as possible;
- You will need to lift it until the power wires located on the back of the part become visible;
- One of the wires is attached with a nut; it will need to be twisted;
- The second wire is connected using a plug; you can simply remove it;
- Once freed from the wires, you can pull it out.
In order to install a new spare part, you need to perform the same steps, but in reverse order.
All that remains is just a little, after reading the material, drawing conclusions, going to the store, purchasing a gear starter and enjoying easy starting and a pleasant engine sound like a foreign car.
https://youtube.com/watch?v=5RtEsp2dUsI%2520
Starter circuit for VAZ 2101, 2102, 2103, 2104, 2105, 2106, 2107
First, let's take a closer look at the VAZ 2101, 2102, 2103, 2104, 2105, 2106, 2107 starter circuit.
VAZ "classics" starter circuit
Deciphering the starter circuit for VAZ 2101, 2102, 2103, 2104, 2105, 2106, 2107:
- — drive side cover;
- — retaining ring;
- — restrictive ring;
- — drive gear;
- — overrunning clutch;
- - drive ring;
- — rubber plug;
- — drive lever;
- — relay anchor;
- — holding winding of the traction relay;
- — pull-in winding of the traction relay;
- — relay coupling bolt;
- — contact plate;
- — relay cover;
- — contact bolts;
- — collector;
- - brush;
- - armature shaft bushing;
- - cover on the collector side;
- — casing;
- — shunt coil of the stator winding;
- - frame;
- — stator pole fastening screw;
- - anchor;
- — armature winding;
- - intermediate ring.
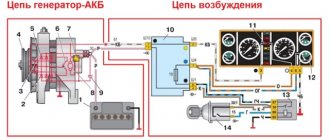
Deciphering the starter connection diagram for VAZ 2101, 2102, 2103, 2104, 2105, 2106, 2107:
- — generator;
- - accumulator battery;
- — starter;
- ignition switch;
P1 - pull-in winding of the traction relay;
P2 - holding winding of the traction relay.
Fuses in the cabin
The main fuse box is located under the dash on the driver's side. Can be closed with a protective cover.
p, blockquote 7,0,0,0,0 —>
| 1 | 16A Lamps Horns Socket Lighter Brake light |
| 2 | 8A Windshield wiper and wiper relay Heater electric motor Windshield washer electric motor (VAZ-21011, 21013) |
| 3 | 8A Left headlight (high beam) High beam indicator lamp |
| 4 | 8A Right headlight (high beam) |
| 5 | 8A Left headlight (low beam) |
| 6 | 8A Right headlight (low beam) |
| 7 | 8A Left front light (side light) Left headlight (side light; VAZ-21011, 21013) Side light indicator lamp Right rear light (side light) Trunk light lamp License plate light lamp License plate light lamp (VAZ-2101) Lighting lamp instrument clusters |
| 8 | 8A Right front lamp (side light) Right headlight (side light; VAZ-21011, 2101) License plate light lamp Cigarette lighter lamp Left rear light (side light) Engine compartment lamp |
| 9 | 8A Oil pressure warning lamp Coolant temperature gauge Fuel level gauge with reserve warning lamp Parking brake and brake fluid level warning lamp Turn indicators and corresponding warning lamp Battery charge warning lamp Reversing lamp Glove box lamp |
| 10 | 8A Voltage regulator Generator excitation winding |
Fuse number 1 at 16A is responsible for the cigarette lighter.
The windshield wiper relay (RS-514) is located separately, on the left driver's pillar under the dashboard behind the insulation.
Wiring diagram 2101
Traction relay repair
First of all, unscrew the nut on the solenoid relay, which is located closer to the motor housing. Remove the winding output from the stud. After this, unscrew the three nuts securing the relay and disconnect it from the stator.
After unscrewing the nuts on both studs, you need to carefully unsolder the two contacts of the windings located on the back cover. After this, it can be removed. Carefully inspect the condition of all relay elements: spring, contact plate, nickels (contact bolts). The latter, by the way, very often burn, so it is recommended to clean them with fine sandpaper until they shine. The same must be done with the plate. If signs of a starter malfunction point to the relay, be sure to check (ring) its windings with a tester. After making sure that the device is working, you can reassemble it in the reverse order. If any of its parts malfunctions, it will need to be replaced or the entire spare part assembly will need to be replaced.
If you feel that you are unable to repair the VAZ-2101 starter relay yourself, you can simply replace it. Moreover, it costs about 500 rubles.
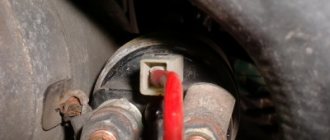
Before you start repairing
If you discover that the VAZ-2101 starter does not turn, do not rush to go to a service station or dismantle the device. First, you should make sure that the reason is in it, and not in the battery or wiring. First of all, check the condition of the battery terminals. If they show signs of oxidation, remove the wires from them and clean them thoroughly. To check that the wiring is working properly, take a piece of multi-core cable and use it to connect the positive terminal on the starter to the corresponding battery terminal. This will directly connect the jump starter to the power source. This, of course, needs to be done with the ignition on and the gear off. If the starter works and your VAZ “kopek” starts normally, the reason must be looked for in the wiring or ignition switch. Otherwise, the starting device will need to be dismantled for further diagnostics and repairs.