Description of design
Heater air ducts and control parts.
Air recirculation of the VAZ 2110. 1 – rear heating air ducts 2 – floor tunnel lining 3 – foot heating ducts 4 – central cabin ventilation nozzles 5 – side cabin ventilation nozzles 6 – front door window heating nozzles
7 – control lever for the interior heating system 8 – air distributor housing 9 – foot heating flap 10 – windshield heating flap 11 – heater
1 – electro-pneumatic valve 2 – front heater air intake housing 3 – air intake water deflector flap 4 – recirculation damper control valve 5 – air intake recirculation damper 6 – rear heater air intake housing 7 – heater duct damper 8 – heater control damper 9 – radiator 10 – heater radiator casing
11 – steam exhaust hose fitting 12 – supply hose fitting 13 – exhaust hose fitting 14 – heater electric motor with fan 15 – electric motor housing 16 – support platform for the heater control damper drive lever 17 – heater control damper drive lever 18 – damper drive micromotor 19 – resistor 20 – heater casing cover
Interior ventilation is supply and exhaust: air is supplied into the cabin through holes in the windshield trim (spontaneously - when the car is moving, or forced - when the heater fan is operating) and exits through the cracks between the upholstery and the inner door panels and then through the holes in the ends of the doors. These holes have valves that allow air to come out, but prevent it from getting inside the car. This design improves the thermal insulation of the cabin.
The air entering the cabin is heated, if necessary, by passing through the heater radiator and distributed in accordance with the position of the air flow control handle. The main part of the air is directed to the windshield and - through deflectors blocked by flaps - to the side windows and to the central part of the cabin. Air is also supplied to the feet of the driver and the passenger sitting in front through two pairs of deflectors (one pair at knee level, the other at the floor) and to the feet of rear passengers through the lining on the floor tunnel and two air ducts under the front seats.
To speed up the heating of the cabin and prevent the entry of outside air into the cabin (when crossing gas-filled, smoky, dusty sections of the road), an air recirculation system is used. When the recirculation button is pressed down (on the instrument panel), the electro-pneumatic valve opens, and under the influence of vacuum in the intake manifold, the recirculation system flap blocks the access of outside air to the car interior. Thus, the recirculation system can only operate when the engine is running. At the same time, if the fan is turned on, the air in the cabin continues to circulate, passing through the heater air ducts.
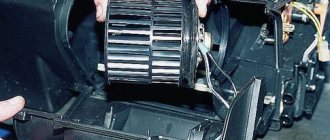
The fan has three operating modes: low speed, medium and automatic speed selection (determined by the control unit). The fan electric motor is a commutator, DC, with excitation from permanent magnets. Current consumption at maximum speed is 14 A. Depending on the selected speed, the electric motor is connected to the vehicle’s on-board network directly (maximum speed) or through an additional resistor. The latter has two spirals with a resistance of 0.23 Ohm and 0.82 Ohm. If both spirals are included in the circuit, the fan rotates at low speed, if only one (0.23 Ohm) rotates at medium speed.
It is not recommended to press the fan wheel from the electric motor shaft - this can upset the balancing. The electric motor cannot be repaired (except for cleaning the commutator); if it fails, it should be replaced as an assembly with the fan wheel.
The heater radiator is installed horizontally under the instrument panel in a plastic casing and consists of two plastic tanks (the left one has a steam outlet fitting) and two rows of aluminum tubes with pressed plates. Depending on the position of the dampers, part of the intake air passes through the radiator (in the extreme positions of the dampers all the air passes or does not pass at all), while the rest of it bypasses the radiator. Unlike previous VAZ models, there is no valve to shut off the flow of coolant, so the heater radiator is always heated when the engine is running. This design ensures low inertia of the system (the set air temperature is reached faster) and the absence of leaks associated with faucet leaks.
The heater is controlled by commands from the electronic control unit. The air temperature in the cabin is set by setting the controller knob (temperature setter) to the appropriate scale division (from 16°C to 30°C, with an interval of 2°C). The unit reads information about the temperature in the cabin from a temperature sensor located on the ceiling and equipped with a microfan. Then - depending on the temperature difference - it turns on the micromotor that controls the heater dampers and selects the fan rotation speed if the fan control knob is set to position “A”. The micromotor is equipped with a heater damper position sensor (ring resistor). The signal from the sensor is sent to the control unit, which turns off the micromotor as soon as the damper reaches the set position.
Afterword.
Sea trials were successful. The air recirculation system is actively and quite often used by me. When warming up the interior in winter, on dusty/dirty/smoky sections of the road, when there is a smelly anti-freeze. It also (I recently discovered) successfully helps disperse snow that gets into the air intake.
PS All these “why is this necessary..., nonsense..., well, you should also...” are not accepted. Information and other people's experience are given to us equally; we only decide whether to use them or not.
Issue price: 300 ₽
If you find an error, please select a piece of text and press Ctrl+Enter.
Connecting a radar detector, video recorder and other additional equipment to a VAZ 2110
| Installing a radar detector or any other electronic device usually does not cause any difficulties. They are placed on the windshield near the mirror, or on the panel (dashboard). The radar detector's instructions suggest connecting it to the cigarette lighter. This photo report is intended for those who are not satisfied with hanging wires and a busy cigarette lighter. |
The instructions are shown using the example of connecting a radar detector; for other devices (connecting a DVR or navigator), all actions are performed in the same way.
- Radar detector, video recorder or navigator;
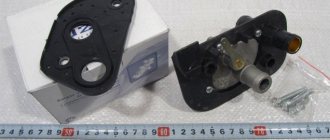
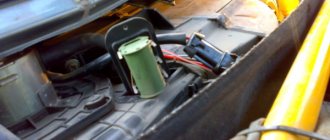
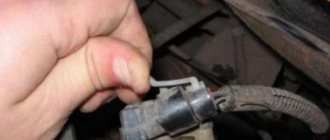
So, in order to connect the radar and button lighting, you will need to remove the BSK unit, and take the ground and power from it after ignition (see photo No. 1), or use the 4-pin clock connector (further connected through it, photo No. 2).
- 1st pin (black wire) - “minus”;
- 2nd pin (white wire) - “plus” appears after the dimensions are turned on;
- 3rd pin (orange wire) - “plus” appears after turning on the ignition;
Other useful contacts in the fuse box (+12V when ignition is on):
- Ш2-16 (directly from the ignition switch),
- Ш1-4 and Ш4-17 (through before F19),
- Ш5-3 (via relay contact K6 and before F18),
- Ш5-5 (via relay contact K6 and before F9) - the last two are high-current.
Decide for yourself where to place the device itself. Did you know that if you get rid of the housing and leave only the device board, you can install a radar detector in the sun visor.
How did you connect additional devices in the car?
Photo source: Key words:
Add a comment
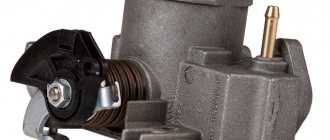
Diagnostics of serviceability and dismantling of the stove control unit
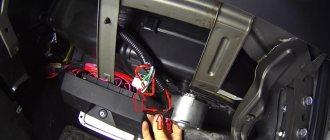
The SAUO module is located on the center console of the car and is responsible for proper heating of the interior. Repairing the VAZ-2110 stove control unit requires certain knowledge in electronics, so before you begin repairing the part, you need to determine whether the problem is really in the electronic module itself.
To do this, you must initially dismantle the unit and install a known-good part in its place. Take the SAUO unit from friends or at a service center to diagnose the heating system of your car.
Before performing any work on the vehicle that involves electronics or wiring, turn off power to the battery to avoid shorting or burning out the electronic components.
Then you can proceed directly to removing the unit through which the functionality of the stove is coordinated. To do this, the buttons that are located on the sides of the stove are initially dismantled. The heater controls must be switched to zero positions. Only then can the module be pulled out. This must be done very carefully, since the power plugs are connected to the back of the unit. As soon as you see them, they must be carefully disconnected so as not to damage the contacts. At this point, dismantling can be considered complete.
The working unit is installed on the standard seat, and the operation of the vehicle’s heating system is checked. If the stove functions correctly with the new unit, then the fault is in the ACS unit itself. Otherwise, it is necessary to diagnose other elements of the heating system.
Connecting a radar detector, video recorder and other additional equipment to a VAZ 2110
| Installing a radar detector or any other electronic device usually does not cause any difficulties. They are placed on the windshield near the mirror, or on the panel (dashboard). The radar detector's instructions suggest connecting it to the cigarette lighter. This photo report is intended for those who are not satisfied with hanging wires and a busy cigarette lighter. |
The instructions are shown using the example of connecting a radar detector; for other devices (connecting a DVR or navigator), all actions are performed in the same way.
- Radar detector, video recorder or navigator;
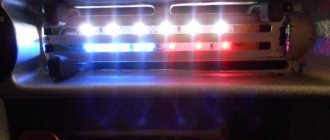
- Button (for example, recirculation), for convenient on/off. additional devices.
- Pliers;
- Insulating tape;
- Twin wire;
- Knife.
To prevent the battery from being discharged while parking, it is recommended to connect an additional
devices through the ignition (when +12V disappears when the ignition is turned off). The “tens” navigation lamp is not suitable; it has constant +12V, so you will have to run the wires under the panel. So, in order to connect the radar and button lighting, you will need to remove the BSK unit, and take the ground and power from it after ignition (see photo No. 1), or use the 4-pin clock connector (further connected through it, photo No. 2).
- 1st pin (black wire) - “minus”;
- 2nd pin (white wire) - “plus” appears after the dimensions are turned on;
- 3rd pin (orange wire) - “plus” appears after turning on the ignition;
- The 4th pin (white-red) is a permanent “plus”.
Pinout of the recirculation button (photo No. 3):
- Contacts 6 and 7 are the backlight of the + and - buttons, respectively.
Other useful contacts in the fuse box (+12V when ignition is on):
- Ш2-16 (directly from the ignition switch),
- Ш1-4 and Ш4-17 (through before F19),
- Ш5-3 (via relay contact K6 and before F18),
- Ш5-5 (via relay contact K6 and before F9) - the last two are high-current.
Decide for yourself where to place the device itself. Did you know that if you get rid of the housing and leave only the device board, you can install a radar detector in the sun visor.
How did you connect additional devices in the car?
Photo source: Key words:
Add a comment
Diagnosis of recirculation system malfunctions
If outside air continues to flow when the button is pressed, there is a problem with the system. You can determine the cause of the breakdown by diagnosing the cooling system, which involves performing the following actions:
- turning on the ignition, starting the power unit;
- setting the maximum fan speed mode;
- pressing the recirculation key.
This triggers the valve and closes the damper. If the car is moving at a constant speed and the damper is completely closed for several seconds, the system is working properly. If there are suspicious sounds (clicks, pops) and the damper moves jerkily, we can talk about problems.
Application
Quick warming up of the car, protection from harmful gases, pollen and burning, in the VAZ 2110 is carried out by the recirculation button.
In a VAZ car, two different methods of air intake are used: VAZ 2110 recirculation button
In the article we will consider in detail the second item on the list. Recirculation was installed selectively on VAZ 2110 cars; cars of 2001 were equipped with it, but since 2002 only the button remained. In such cars, the recirculation system required additional installation and was installed independently, at the request of car enthusiasts.