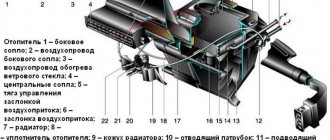
Main stove malfunctions
Stove malfunctions can be very different. The most common reason for its failure is:
- heater valve malfunction;
- damage to radiator pipes;
- failure of the additional resistor;
- radiator damage;
- control unit problems.
As a result of any of the above situations, the stove stops working normally.
Warm air does not enter the lower part of the cabin
Before repairing the stove, you should check the temperature of the coolant (coolant). Perhaps the problem is not in the interior heater, but in the cooling system. If the engine warms up to operating temperature (90˚C), then the cause of the malfunction should be sought in the stove.
With the help of damper position regulators, warm air is directed to different parts of the cabin
The dampers should be adjusted first. To supply hot air to your feet, follow these steps:
- The engine warms up until the warm air can be felt with your hand.
- The heater fan speed switch is set to position 4.
- The airflow direction knob turns to the 12 o'clock position and immediately returns to 10 o'clock. Air should begin to flow into the lower part of the cabin.
- If the result is not achieved, the procedure is repeated.
How to change the heater fan on a Chevrolet Niva yourself: instructions, tips, photos
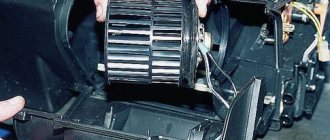
Then you should check with your hand that the impeller can be easily rotated. If there is no possibility or desire to remove the instrument panel, you can try to crawl up to the stove from below.
In this case, you will definitely have to remove the glove compartment, since it is not possible to remove the motor any other way. We remove the glove compartment, unscrewing everything that will interfere with us.
Then you need to disconnect the connector on the motor. If the motor does not work in only one position, you should simply replace the board. Disconnect the fan power supply and rubber hoses.
Improvement No. 3. Installing the grille on the air intake
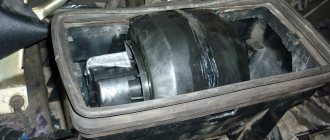
When disassembling the heater, a large number of tree leaves and insect remains were found in the air intake casing and in the honeycombs of the heater radiator grille, which also reduced the efficiency of the heater. Therefore, after cleaning and flushing the heater core, I took measures to prevent the radiator from clogging.
To do this, I bent a wire frame to the size of the air intake inlet, covered it with a nylon mesh with a 1x1 mm cell, and installed it at the bottom of the rubber seal of the air intake inlet. It was perfectly fixed there in the fold, like an accordion, without additional fastening.
Heater diagram
The most common reason for its failure is: Warm air does not enter the lower part of the cabin Before starting repairs of the stove, you should check the temperature of the coolant. Perhaps the problem is not in the interior heater, but in the cooling system.
With the help of damper position regulators, warm air is directed to different parts of the cabin. First, the dampers should be adjusted. To supply hot air to your feet, follow these steps: The engine warms up until the warm air can be felt with your hand. Consequently, it is almost impossible to open the tap without breaking it.
stove Niva Chevrolet
https://youtube.com/watch?v=UNMCm8ypDbI
To get to it, you need to dismantle the dashboard in the cabin on the passenger side. The stove tap is mounted in a special niche in the engine compartment. If the tap has been replaced, then it is better to install new pipes along with it, because during operation they have probably lost their elasticity.
Collective farm tuning of the Niva Chevrolet stove: In some cases, the correct switching method does not work and then you have to modify the heater in order to achieve its full functionality. The main problem with dampers and ducts is leakage.
We will improve the cracks and eliminate leaks in the stove. Remove the heater control unit by disconnecting all wires and cables from it. If there is a radio, remove that too. Disconnect the transmission tunnel lining.
You don’t have to remove it completely, but only lift it by unscrewing two screws on the driver’s and passenger’s sides. Remove the steering wheel, steering column trim and unscrew the screws securing the front panel. When removing the dashboard, mark all the wires to make it easier to reattach them in their places in the future.
Without removing the entire front panel, when dismantling the heater unit, some elements of the air conditioner and the stove itself can be damaged. Remove the front panel frame attached to the body with screws. The heater housing cannot be removed without dismantling the front panel frame. Behind the frame you will find the heater unit casing, connected to the intermediate housing of the heater or to the evaporator section on a car with air conditioning.
Chevrolet Niva 2012, 80 l. With. — self-repair
Installation of a new unit is carried out in reverse order. The most common purpose of such tuning is to improve the air supply to the driver's and front passenger's footwells. To do this, install additional air ducts and adjust the shape of the damper drive strip
For such modification you will need: You must work with the plastic of the heater housing very carefully, as it is quite fragile
The steps are performed in the following order: Select tubes suitable for the role of additional air ducts. You can use plumbing pipes as additional air ducts. Remove the side trims on the center console on both sides.
Air flows in the cabin are distributed by air ducts, which are located under the instrument panel and under the floor tunnel lining, and under the floor upholstery to supply air to the feet of the rear passengers.
To control the distribution of air flows, use the distribution regulator handle on the center console of the instrument panel, as well as the regulators and guides of the central and side deflectors on the instrument panel.
To heat the interior, move the temperature control knob to the hot red zone. In this case, the outside air is directed using a damper through the heater radiator, which is integrated with the engine cooling system.
Remove the screws of the tie rod brackets. Disconnect the rods from the heater damper levers. Unscrew the screw of the bracket securing the recirculation flap drive rod and remove the lever bracket and disconnect the wiring harness block from the heater electric fan switch.
Heater diagram First of all, we want to orient you that the Niva already has a liquid-type heater installed, which allows you not only to supply warm air into the car interior, but also to cool the running engine, preventing it from overheating. It's no secret that overheating the engine entails extremely undesirable consequences.
An electromagnetic clutch is built into the compressor pulley, which engages and disengages the compressor shaft from the pulley according to signals from the engine control system controller. Refrigerant vapor from the compressor under high pressure enters the condenser located in front of the radiator of the engine cooling system. Passing through the honeycombs of the condenser, the refrigerant is cooled by the counter flow of air and with the help of fans of the cooling system.
Cooling system fan and heater fuses Niva Chevrolet
The engine cooling system of a modern car is a complex mechanism equipped with passive and active components. Chevrolet Niva fan relays, responsible for turning on and off the specified elements.
Fuses help the electronics turn active cooling on and off to reduce powerplant temperatures.
Video How to Remove the Heater Control Unit Niva Chevrolet
- air flow direction control knobs;
- switch for high-speed fan operation.
After all three switches are removed, arm yourself with a screwdriver and, by prying it a little, remove the air circulation control lever. Now nothing will hinder you; you can easily remove the control unit lining itself. Also, carefully pry it in several places with a screwdriver and remove it. Under the facing panel you will find two screws, which will be easy to unscrew using a Phillips screwdriver. After these steps, you can carefully remove the control unit itself. On the reverse side you will see that a block of wires connected to the speed mode switch is attached to the block; be sure to pull it out too. In the same way, find the block of wires connected to the backlight lamps, and disconnect them too. If your car has an air conditioner, then you will need to additionally disconnect the hoses from the vacuum switch.
A little lower you will find a bracket holding the shell of the damper drive rod. You need to carefully pry it off with a screwdriver. Do the same with the other rods, ensuring that the control unit is completely disconnected.
As you can clearly see, there are no particular difficulties when dismantling the control unit. But you realize that you should not, of course, do such manipulations for the sake of enthusiasm and practical experience. It is often necessary to remove the unit if the backlight bulbs have burned out. Changing them is simple, just spin the socket in the opposite direction, pull it out, change the lamp, and then do all the steps in reverse order.
You also have to disassemble the control unit when you discover that the heater of your Chevrolet Niva does not work or works with serious problems.
Very often the electronic control unit for the stove installed on your Niva fails. In this case, you will still have to turn to qualified electricians for help, since you can remove the unit, but you cannot identify the cause of the problem. To carry out such work, it is very important to have various tools, instruments, testers and devices, and it is also important to have good knowledge of electrical engineering.
So, if you are unhappy with the way the stove works on your Chevrolet Niva, you don’t like the fact that the car’s interior warms up slowly, then act boldly, look for the reasons, solve problems, armed with tips and necessary instructions, and enjoy the good performance of your car.
DIY troubleshooting
If the Chevy Niva cooling fan does not turn on, then if you have at least a little experience, you can try to fix the problem yourself. The main advantage of repairs without the involvement of third-party specialists is saving money and time . Also, during the work, other elements and devices that are located at the location of the stove can be checked.
The disadvantages of self-repair may include making serious mistakes , which will lead to failure of not only the products being repaired, but also related parts. In some cases, replacing parts may result in a short circuit and fire in the vehicle.
If, despite all the possible disadvantages, you decide to repair the Chevrolet Niva yourself, then the recommendations below will help minimize the risks and possible damage from unprofessional intervention in the electrical system of the car.
Step-by-step instruction
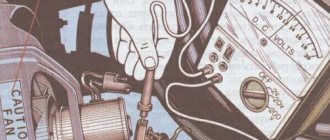
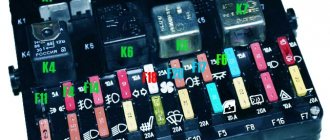
If the stove fan does not turn on, then first you should check the fuse , which is responsible for the safety of the wiring circuit of this electricity consumer. The Chevrolet Niva relay and fuse mounting block is located under the steering column. To get to it, you will need to unscrew the screws and remove the cover by pulling it towards you.
The location of the fuses inside the block may vary significantly depending on the car model, but in both old and restyled models, the protective device located in cell F18 is responsible for the heater heater. Such a product must operate at a current strength of more than 25 Amperes. You can check the functionality of the fuse with a tester or multimeter.
Attention! When installing a high-power fan motor (25A), the standard fuse is replaced with a product with a response current of 30 Amps.
If the fuse is in good condition, it is possible that the heater fan malfunction is caused by a failed electric motor. To make sure that this part has actually burned out, you will need to dismantle it.
This work is performed in the following sequence:
- Remove the glove compartment. To perform this operation, you will need to unscrew several screws, remove the cover stops and the side casing.
- Unscrew the screws securing the electric motor.
- Disconnect the wires.
- Open the hood and remove the windshield wipers and the panel underneath them.
- Remove the cabin filter.
- Unscrew the four nuts holding the air duct box in place.
- Remove the engine from the engine compartment side.
You can check the electric motor using a multimeter, or by directly connecting it to a 12 V current source. If the motor is faulty, it must be replaced with a new original product or its complete analogue. Otherwise, it is recommended to lubricate the bearing and reassemble the interior heating system in the reverse order of removal.
Attention! If the cabin filter is significantly dirty, it also needs to be changed.
If the heater fan motor constantly runs at maximum speed, then most likely the additional resistor is faulty. As a rule, this part cannot be repaired and you will need to use a new product in order to select the operating mode of the stove. To replace this part, you will also need to dismantle the glove compartment as described above.
My account
After removing the glove compartment, access to the heater valve opens. A rod is attached to the crane lever using a clamping bracket. Use an open-end wrench size 7 to loosen the nut located on the bracket.
The traction cable is removed from the crane lever. Using an open-end wrench, the fastening of the rod is loosened. Using a 10mm socket, unscrew the two bolts securing the faucet to the wall of the engine compartment. The mounting bolts of the heating tap are unscrewed with a 10 mm socket wrench. The heater tap is removed from its niche and replaced with a new one.
The heating tap is removed from its seat. The tap is assembled and installed in the reverse order. Initially, you should disconnect the hose from the pipe. This action is quite difficult, since the hose sits tightly on the pipe. If you move incorrectly, your hand may slip and you may be injured.
For this reason, we recommend that you wear gloves to avoid such unfortunate consequences. Now, using a screwdriver, unscrew the screws that secure the seal, pressing it against the partition.
To dismantle the stove faucet, it is necessary to drain the antifreeze. Open the faucet as far as possible. We substitute the hose and insert one end into the basin. To drain the antifreeze, you need to unscrew the plug on the cylinder block. Lightly hold the hose with your hand and gradually open the cap located on the expansion tank.
We do this work carefully, as the stream of antifreeze will gradually increase
In order to remove the stove valve, it is necessary to completely drain the antifreeze. Loosen the clamp on the carburetor heating pipe and remove this part from the fitting. After all the coolant has flowed out, screw the plug into the block and tighten it well. Antifreeze leakage from the stove In used cars, coolant often begins to leak from the stove. The reason for this is usually wear and tear on the pipes or a malfunction of the heater tap.
Since antifreeze circulates under pressure, all connections must be tight. However, during prolonged use, hoses and gaskets lose their elasticity and burst. After inspecting the heating system and identifying the leak, the worn part is replaced with a new one. When making repairs, you should not use clamps made in China due to their poor quality.
Due to loss of elasticity, the stove pipes crack over time and leak antifreeze. The coolant can also leak from the heater radiator itself. In this case, it will have to be replaced with a new one.
Replacing a Chevrolet Niva Chevrolet heater core
https://youtube.com/watch?v=PgDz4rJ2GJ0
The stove does not heat well. To diagnose the malfunction, turn on the ignition, start the stove and try to change the intensity of the air supply. If at the first three speeds the air is not supplied or is supplied cold, the cause of this is a faulty resistor that needs to be replaced.
The reason for the inability to switch speeds is the failure of the resistor. If the resistor is OK, the diagnosis continues. If it is low, add antifreeze to normal and check it after a few days.
If the level has noticeably decreased, you should pay attention to the hoses and pipes, wear of which is usually the cause of coolant leakage. One of the reasons for poor heating of the interior by the heater may be a low level of coolant in the system. If the control unit malfunctions, it will have to be removed
Faucet replacement process
Repairing the unit at home is only possible if you have the appropriate tools - it’s easier to contact a car service center.
Another reason for the stove stopping may be a dust-clogged cabin filter.
In this case, the load on the electric motor increases, which, in turn, leads to failure of the heater fuse. In this case, it should be washed. This is true when purchasing and operating used cars. However, it can sometimes fail. Replacing the heater cable Sometimes it is not possible to change the position of the heater damper.
The reason for this is a broken cable. To replace it, you will need a standard set of tools and a headlamp. Replacing the cable is carried out as follows. The driver's seat moves back. The handles are removed from the damper control panel and the screws are unscrewed.
The panel is dismantled on the left side at the location of the driver's feet. To access the cable, you will need to remove the heater control mechanism. The latches securing the cables are removed. The recirculation damper mechanism is dismantled and the cable is removed.
Each end must be twisted into a ring and securely fixed. Using a cable, the position of the air supply flap is changed. Assembly is carried out in the reverse order.
Refinement of the heating system of the Chevrolet Niva
When the intensity of supply of air heated by the heater into the cabin decreases, it becomes necessary to modify the heating system. This is due to errors in the assembly of the system. The main problem is the lack of tightness in the air ducts and dampers. This leads to incorrect distribution of warm air throughout the cabin. The modification is carried out as follows.
- The steering column casing and driver's side console are removed.
- On the heater side, a plate is removed that sets the direction of air supply. The die located on the heater side needs improvement
- The slot at the top of the die is made straight while maintaining the starting and ending points. To give the desired trajectory of movement of the damper, you can glue a plastic card to the die. To give the desired trajectory of movement of the damper, you can glue a plastic card to the die
- The lower flap, which is responsible for supplying air to the legs, is rigidly attached. To do this, a homemade bracket is cut out.
The last stage of modification of the stove is the rigid fixation of the lower damper
As a result, warm air will be distributed throughout the cabin strictly in accordance with the position of the flow direction regulator.
Thus, even an inexperienced car enthusiast can ensure a comfortable microclimate in the interior of a Chevrolet Niva car. To do this, you just need to strictly follow the instructions and recommendations of professionals.
VAZ 2121 (Niva 4x4): replacing the heater radiator with your own hands
Replacing the pump yourself on a Niva Chevrolet: quickly, efficiently and with your own hands
Symptoms of a problem
The simplest situation is when the electric motor does not spin at all. In this case, there may be several reasons:
- Failure of fuse No. 18 with a nominal value of 25 A. It protects only the heater motor circuit.
- Break, short circuit, damage to the motor winding.
- Lack of contacts on the motor power supply block, damage to the wiring.
- Damage, freezing or wear of the electric motor brushes.
- There is no voltage at the output contacts of the speed switch, the switch is broken.
Connection diagram for the electric motor of the heater fan and the rear window heating element: 1 – ignition switch; 2 – mounting block; 3 – heater motor switch; 4 – additional resistor; 5 – heater electric motor; 6 – rear window heating element; 7 – switch for heated rear window with control lamp; A – to power supplies; K6 – additional relay; K7 – relay for turning on the heated rear window.
Stove fan repair
It is more difficult when the engine turns, but does not develop sufficient speed. This is dangerous because when the rotation of the electric motor shaft is difficult, it consumes much more current, so the fuse may burn out and the winding may fail. Diagnosing a fault in this case requires some experience and the breakdown may not be immediately detected, but a blown fuse will make it clear that there are problems with the motor.
In addition, insufficient motor speed can be caused by an interturn short circuit in the armature winding or wear or clogging of bushings or bearings. It is also possible that the cabin filter is clogged. In the case of bearings or bushings, the engine will make noise during operation, and the noise will increase over time. This can be treated either by replacing the motor, or by lubricating or replacing bushings or bearings.
The cause of increased noise from the stove may be clogged bearings and bushings that need to be lubricated.
The bushings or bearings are lubricated only with a regular spindle and machine oil. Engine oil or grease is not used in this case. A new engine costs about 600 rubles, depending on the manufacturer.
What kind of malfunctions can there be?
If the engine is working properly, but the cooling fan is not working, then this condition of the ventilation and heating system may be caused by a simple wiring break. In this case, a thorough visual inspection is carried out while simultaneously testing the electrical circuit with a tester.
Sometimes a malfunction of the cooling and heating system manifests itself in the constant rotation of the fan motor at maximum speed. Despite the apparent insignificance of such a breakdown, it can lead to an excessive increase in temperature in the cabin.
The heater does not work on the Niva Chevrolet
The “stove” on the Chevrolet Niva SUV is good because the inlet and outlet pipes of the heater radiator tanks are tilted upward, which eliminates the formation of air pockets in it. This means that there will be no problems with the circulation of coolant inside the heater radiator. Therefore, all problems associated with the failure of the interior heater to release warm air through the deflectors will be related to the electrical circuit of the fan or mechanical malfunctions of the air flow control damper drives.
The most common malfunction of the interior heater is the failure of the additional resistor, which ensures the inclusion of the first, second and third speeds of rotation of the fan motor. At the same time, the fourth, fastest rotation speed will turn on without problems. The reason for the failure of an additional resistor to perform its functions is usually a fuse that protects them from overheating. It burns out in most cases due to the fact that drivers forget to change the cabin air filter on time.
When the cabin filter is dirty, it becomes harder for the heater fan to pump air through it, which leads to an increase in the current in the additional resistance electrical circuit and the contacts that act as a fuse are unsoldered. In this case, the additional resistor will have to be replaced, since you are unlikely to have low-melting solder with which to solder these contacts again. You cannot solder with regular solder, as it melts at a higher temperature, and this can cause overheating of the wires and melting of their insulation, which can lead to a fire.
If the stove fan refuses to turn on in all operating modes, then first you will have to check the integrity of fuse F18 (25A). It is located in the mounting block to the left of the steering column, its designation is the symbol of a four-blade fan. We replace the blown fuse, there are two options for further events: either the fan will start working, or the fuse will blow again. If fuse F18 blows again, you will have to look for a short circuit in the electrical circuit of the fan motor. Also, relay K6, through which voltage is supplied to the terminals of the fan motor, may be involved in such a malfunction.
Warm air will not flow into the cabin if it is impossible to move the damper inside the heater housing to the desired position. This happens due to the weakening of the cable drive on the lever, with which you can turn the damper to the required angle.
helping-auto.ru
If only fourth speed works
In cases where the motor refuses to work at the first, second and third speeds, but turns perfectly at the fourth, the same resistor with three isolated windings is to blame. If you can’t buy it, you can try to restore it yourself. True, only in the case when the thermal fuse has blown, naturally, no one will rewind the windings, the game is not worth the candle.
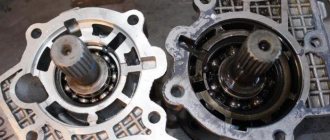
Fan resistor
You can remove and check the resistor without dismantling the engine. It's done like this :
- Use a Phillips screwdriver with a short blade to unscrew the rightmost screws securing the glove compartment.
Unscrew the rightmost screws securing the glove compartment.
Move the glove compartment aside to get to the resistor.
We remove the contact block.
Unscrew the screw securing the resistor.
How to understand that the heater motor on a Niva Chevrolet is faulty?
On Niva Chevrolet cars, the heater is turned on from inside the car using a regulator located on the dashboard.
It has four locking positions, one position is responsible for turning off, and the rest for the air blowing speed. Therefore, if when you turn it on, there is no air blowing, or extraneous sounds are heard, this will indicate that the device at least requires maintenance.
Causes of motor malfunction
The main reasons why the stove motor fails include the following:
- There is no power to the device. This may be caused by a lack of contacts or a problem with the battery.
- There is damage to the motor wires; due to their location in a niche, they may be subject to chafing.
- The fuse has blown. This could happen if a current of the largest value from the standard passed through the circuit. It is in the 25A standard. Number F18.
- The preliminary resistance has failed. A similar problem manifests itself in the fact that the stove will not work in one of the speed modes.
- Problems with ignition. This fact should also not be excluded, because the stove only works when the ignition is on.
- The motor and its drive shaft are worn out due to long-term operation of the device.
In any of the above cases, in order to understand what happened to the motor, it is necessary to dismantle it.
The electric motor of the interior heater fan on a Niva Chevrolet car is removed for repair or complete replacement. To carry out repair work, prepare a standard set of tools, turn off the power to the car by disconnecting the minus terminal from the battery and perform the following sequence of actions:
Dismantle the glove box.
- We disconnect the block with the power wires from the fan electric motor.
- Next, disconnect the air supply hose.
Using a screwdriver, unscrew the three screws securing the fan motor and remove it along with the impeller.
- Remove the retaining ring and impeller from the shaft.
- Carry out the necessary repairs or replacements, then reassemble and install the engine in the reverse order.
At this point, the repair work to remove the heater fan electric motor on the Niva Chevrolet has been completed.
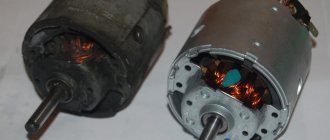
How the heater and cooling fan works in Niva Chevrolet
The movement of air through the heater radiator is carried out by a DC motor . The impeller is installed directly on the rotor shaft, which minimizes power losses. The fan electric motor is securely mounted in a sealed casing, which is located under the windshield of the car, so to repair it, you will need to remove some interior elements.
Attention! The maximum impeller speed can reach 3000 rpm, but only if the original electric motor model is installed.
The operation of the electric heater motor is controlled from inside the car using a special switch.
Additional resistor
To ensure a comfortable temperature inside the car, it is not always necessary to operate the fan motor at full power. To reduce the speed, additional resistance is installed in series in the electrical circuit . This simple but effective method can significantly reduce the intensity of the air flow.
For more precise adjustment, the resistor has 3 resistance values , and given the possibility of direct connection, the rotation of the motor rotor can be set in 4 different speed modes.
The standard product provides the following current indicators , which is directed to the electric motor after passing through the internal spiral of the limiter:
- 5.1 A – first speed.
- 9.0 A – second.
- 14.0 A – third.
Attention! Depending on the type of motor installed, the maximum current at fourth speed can range from 18 to 25 Amps.
Malfunctions of the stove of the Niva Chevrolet SUV and their elimination
Car heating system
The Chevrolet Niva SUV has a heating system that not only heats the interior in winter, but also cools it in summer.
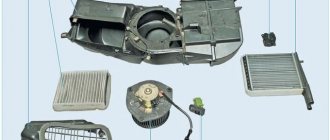
Its design includes:
- Control block;
- radiator;
- coolant pump;
- pipes;
- evaporator;
- tap;
- compressor.
In addition, the design has a resistor and a fuse that are responsible for functionality.
Heating system diagram
Possible faults
Various problems with the Chevrolet Niva are possible: the heater blows cold air, the fan may not work, etc.
The cause of the problem may be the following:
- The stove tap does not work;
- radiator pipes are damaged;
- the additional resistor does not function;
- radiator is faulty;
- The control unit does not work.
To restore the functionality of the system, you need to know how to troubleshoot problems and repair faulty elements or replace them.
How to fix a resistor?
Before repairing a resistor, you need to make sure that it is inoperative. To do this, you need to turn on the ignition and check its operation - how the air will blow. This device is responsible for the operation of the fan, or more precisely, its rotation frequency. If the fan does not work in the first three speed positions, then the device is faulty.
Checking the device for serviceability
To change the resistor, you need to pull the glove compartment forward without removing it. Disconnect the wiring harness. Next, remove the device and install a new part. After the process is completed, you should check the operation of the fan at different speeds (author - Andre Vladimirovich).
How to change the tap and pipes?
Over time, due to wear and tear, the pipes become unusable and the heater valve leaks. The stove pipe is replaced if it is leaking. If the faucet is faulty, it should be replaced. It is better to replace it with a ceramic product; they last longer than the standard ones. It is recommended to change the pipes along with the tap: over time, they lose elasticity and may leak.
Control block
The control unit contains switches for heating system modes. If it doesn't work, it needs to be replaced. To do this, you need to dismantle the device and replace it with a new one. You can carry out repairs, but in this case you need to understand electrics or entrust the repair to a professional.
Fan
If the fan is not working, check the functionality of the electric motor. Using this device, air is pumped into the interior of the car. To repair the fan, it must be removed. The removed device is checked using the battery. If the motor is not working, it must be replaced. You can completely replace the entire device by purchasing a new device in advance.
Replacing the heater (radiator)
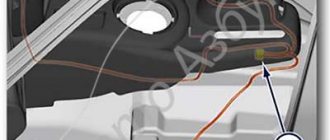
Replacement is carried out if antifreeze begins to leak. The radiator is located behind the glove box, in a niche on the left side of the front passenger's feet.
New replacement product
The procedure includes the following steps:
- First, turn off the on-board network by disconnecting the negative terminal from the battery.
- Then you need to remove the glove compartment and side panel.
- Drain the antifreeze from the block.
- Next, unscrew the air duct blowing on the legs so that it does not interfere with removing the parts.
- Then remove the cabin air filter.
- Having unscrewed the snail, we move the damper body to the side. Then you should disconnect the wires, and take out the volute and motor.
- Next, unscrew the evaporator screws and disconnect the hose. Moving the evaporator to the side and gently pressing it to the floor, remove the device.
- Then disconnect the pipes. If there are new pipes, the old ones can be cut off.
- After unscrewing the two fastening screws, remove the heater radiator from the niche.
- We install a new device. Assembly is carried out in reverse order.
- Add coolant.
New&Pomos
The main reasons why the Chevrolet Niva heater does not work and how to eliminate them
It often happens that with the onset of cold weather, owners of the popular Chevrolet Niva SUV model are faced with a problem when the heater in the cabin does not work. Quite an unpleasant phenomenon that requires immediate resolution. It is the question of solving this problem that we will deal with in this material.
Car heater system
Heating system for a Niva Chevrolet car
The automotive heating system of a Chevrolet Niva SUV consists of the main structural elements and components that are responsible not only for heating the interior, but also for cooling it in the summer. The heating system consists of the following elements:
- Heater radiator;
- Control block;
- Heater pipes;
- Coolant pump;
- Compressor;
- Evaporator.
These are the main elements, but there are also small ones such as a resistor and fuse, which are also responsible for the functioning of the stove as a whole. So, we will not consider how the heating system works, but will only analyze the main points that may be the causes of stove malfunctions. The car's heating system is shown in the photo below.
Causes of malfunction
Often, a breakdown of the stove in the interior of a Chevrolet Niva car is not particularly difficult, so to eliminate it, you should know the main reasons, or, more precisely, the components that fail.
So, the following factors can be the causes of stove malfunction:
- Additional resistor malfunction. This resistor is used to control an electric fan that blows hot air directly into the car interior.
- Malfunction of heater pipes.
- Leak at the connections of the pipe and the heater radiator.
- The stove control unit is faulty.
- Heater malfunction.
Let's look at how to eliminate the main causes of stove failure, how repairs are carried out and what you need to know to carry them out.
Resistor - how to fix it?
Initially, you need to make sure that it is the Niva Chevrolet fan resistor that has failed. This can be found out as follows: if, when the ignition is turned on, none of the first three speed positions work, then the problem lies precisely in this small part. The fourth speed will function in this case, since the resistor does not affect its operation.
Checking the resistor for functionality
So, the resistor is responsible for the operation of the fan, or rather for its rotation frequency. By switching the regulator, the resistance changes, directly affecting the speed of the stove fan.
To replace the fan resistor, follow these steps:
- Disconnect the negative terminal from the battery.
- Inside, you need to loosen the glove compartment clamps and slightly pull it towards you.
- Behind the glove compartment there is a resistor, which is removed by removing the terminal block and unscrewing the screw.
Replacing the resistor is not particularly difficult and will take no more than 5 minutes. After installation, we check for functionality.
Condition of the pipes
Another common malfunction is wear of the pipes (which occurs in rare cases and requires their replacement) or damage to the clamps on them. Coolant (antifreeze) passes through this connection and its leakage is observed over time during operation. You can determine this leak by feeling the carpet in the car interior. If there are traces of coolant or an odor, the products need to be replaced.
You also need to pay attention to the condition of the clamps securing the pipes; perhaps one of them is not tightened, or has been damaged, and because of this, a leak has formed into the interior.
If a product such as a radiator is being replaced, it is recommended to install new pipes together. During operation, they lose their elasticity, and liquid may leak.
Control block
If the heater control unit fails, then it will need to be replaced. The stove control unit is a front panel on which the stove operating mode switches are located.
In the event of a malfunction, this product will require repair, which involves removing the unit and further replacement. Product repair can be entrusted to an experienced electrician, who can determine the exact location of the fault in a matter of minutes and carry out repairs. If you are sure that it is impossible to operate the control unit in the future, then you can replace it with a new one. The process of removing the control unit is simple, but it will take about an hour if you remove it yourself.
Fan
If the stove fan does not work, then you need to check the serviceability of the electric motor. The fan acts as an air blower that enters the car interior. The fan can be repaired, but first it needs to be removed. The extraction process is described in the relevant materials. After removal, the fan is checked from the battery. If the engine is faulty, then it is replaced. You can replace the fan as a whole by first purchasing a new one.
Heater (radiator)
The last element that requires attention if the heater in the cabin does not work is the heater. If the heater radiator becomes clogged, then heater repair is required. To avoid this, it is necessary to fill the radiator not with ordinary water, but with distilled water or antifreeze. The use of powder-based sealants is also not allowed, as they lead to clogging of the radiator honeycomb. In this case, no repair will help and the radiator and heater will need to be replaced.
Thus, starting from the simplest and getting to the most complex moments of stove malfunction, you can notice that small devices (fuse, resistor) often fail. Good luck troubleshooting the stove in your Niva Chevrolet.
Important nuances
There are several important points that must be taken into account when changing the heater fan on a Chevrolet Niva. Here they are:
The cabin filter cover should be removed very carefully, since the latches that hold it in place are easily broken. This point is especially relevant if you have to change the fan in the cold;
when lowering an unscrewed electric motor, you should remember that there is a small guide bushing on its shaft, which is very easy to lose: it falls, rolls down the glove compartment directly into the engine compartment and it will be very difficult to find it there;
The guide bushing from the Chevrolet Niva heater fan is very easy to lose
It is not always possible to find a “native” fan for a Chevrolet Niva on sale (its catalog number is 21238118020)
For this reason, many car owners install LUZAR brand fans (and its number is lFh01211). These devices cannot be called a good alternative, and here's why. “Native” fans for the Chevrolet Niva can rotate at a speed of 3000 rpm, while the analogue from LUZAR reaches a maximum speed of 2800 rpm. The “native” fan consumes a current of only 18 A, and the LUZAR consumes 25 A. At the same time, fuse F18, mentioned above, is designed for 25 A, that is, the risk of its burnout when using the LUZAR fan increases many times over. In such a situation, the best option would be to install a “native” fan on the Chevrolet Niva.
Installing a LUZAR fan on a Chevrolet Niva is justified only as a last resort
Replacing a broken fan on a Chevrolet Niva is not that difficult. Even a novice car enthusiast who has held a Phillips-head screwdriver at least once in his hands can cope with this task. The main thing is not to damage the latches on the cabin filter cover and not to lose the fan guide bushing.
Main stove malfunctions
Stove malfunctions can be very different. The most common reason for its failure is:
- heater valve malfunction;
- damage to radiator pipes;
- failure of the additional resistor;
- radiator damage;
- control unit problems.
As a result of any of the above situations, the stove stops working normally.
Warm air does not enter the lower part of the cabin
Before repairing the stove, you should check the temperature of the coolant (coolant). Perhaps the problem is not in the interior heater, but in the cooling system. If the engine warms up to operating temperature (90˚C), then the cause of the malfunction should be sought in the stove.
With the help of damper position regulators, warm air is directed to different parts of the cabin
The dampers should be adjusted first. To supply hot air to your feet, follow these steps:
- The engine warms up until the warm air can be felt with your hand.
- The heater fan speed switch is set to position 4.
- The airflow direction knob turns to the 12 o'clock position and immediately returns to 10 o'clock. Air should begin to flow into the lower part of the cabin.
- If the result is not achieved, the procedure is repeated.
This sequence of actions is due to assembly errors. Due to gaps and backlashes, interference is created with air distribution and installation of the damper in the desired position the first time. If after these steps the heat still does not reach your feet, the heating system needs to be modified.
Antifreeze leak from the stove
In used cars, coolant often begins to leak from the stove. The reason for this is usually wear and tear on the pipes or a malfunction of the heater tap. Since antifreeze circulates under pressure, all connections must be tight. However, during prolonged use, hoses and gaskets lose their elasticity and burst. After inspecting the heating system and identifying the leak, the worn part is replaced with a new one. When making repairs, you should not use clamps made in China due to their poor quality.
Due to loss of elasticity, the stove pipes crack over time and leak antifreeze.
Coolant can also leak from the heater radiator itself. In this case, it will have to be replaced with a new one.
Dismantling the stove
The stove is dismantled as follows.
- The negative terminal is removed from the battery.
- Remove the dashboard, performing the same steps as when replacing the control unit.
- The screws securing the heater to the cross member of the instrument panel are unscrewed.
- The stove is pulled out from its installation location.
Removing the stove from a Niva Chevrolet car is quite simple
Important nuances
There are several important points that must be taken into account when changing the heater fan on a Chevrolet Niva. Here they are:
The cabin filter cover should be removed very carefully, since the latches that hold it in place are easily broken. This point is especially relevant if you have to change the fan in the cold; when lowering an unscrewed electric motor, you should remember that there is a small guide bushing on its shaft, which is very easy to lose: it falls, rolls down the glove compartment directly into the engine compartment and it will be very difficult to find it there;
when lowering an unscrewed electric motor, you should remember that there is a small guide bushing on its shaft, which is very easy to lose: it falls, rolls down the glove compartment directly into the engine compartment and it will be very difficult to find it there;
It is not always possible to find a “native” fan for a Chevrolet Niva on sale (its catalog number is 21238118020)
For this reason, many car owners install LUZAR brand fans (and its number is lFh01211). These devices cannot be called a good alternative, and here's why. “Native” fans for the Chevrolet Niva can rotate at a speed of 3000 rpm, while the analogue from LUZAR reaches a maximum speed of 2800 rpm. The “native” fan consumes a current of only 18 A, and the LUZAR consumes 25 A. At the same time, fuse F18, mentioned above, is designed for 25 A, that is, the risk of its burnout when using the LUZAR fan increases many times over. In such a situation, the best option would be to install a “native” fan on the Chevrolet Niva.
Replacing a broken fan on a Chevrolet Niva is not that difficult. Even a novice car enthusiast who has held a Phillips-head screwdriver at least once in his hands can cope with this task. The main thing is not to damage the latches on the cabin filter cover and not to lose the fan guide bushing.