Lada Largus fuses are the most important part of the electrical wiring of the Russian-French station wagon, responsible for opening the circuit in the event of a short circuit.
When a wiring or electrical component is shorted, the wires heat up, which in turn causes the fuse to heat up. It, in turn, burns out and opens the circuit, since it is made of fusible material.
A fuse is a simple, but less ingenious invention that protects a car from fire due to a short circuit in the wiring.
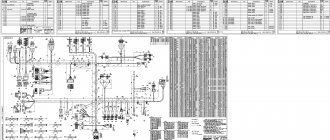
Fuse and relay diagram under the hood of Largus
| Relay/fuse panel number | Relay/fuse number | Relay/fuse assignment |
| 299-1 | 231(A). | Fog light relay |
| 753(B) | Headlight washer pump relay | |
| 299-2 | 233 | Heater Fan Relay |
| 597-1 | F1 (60 A), F2 (60 A) | Electronic control unit for ABS and ESP systems |
| 597-3 | F1 (50 A). F2 (25 A) | Exterior light switch, interior fuse box |
| 784 | 700(A), | Cooling fan relay |
| 474(B) | Air conditioning compressor relay | |
| 1047 | F1 (30 A), | Relay box power supply |
| F2 (25 A) | Injection relay power supply | |
| F3 (5 A), | Power supply for injection system relay, ECU | |
| F4 (15 A) | Not used | |
| 238(A). | Injection blocking relay | |
| 236(B) | Fuel pump relay |
Recommendations for shutdown rules
Disabling the immobilizer is not a difficult task, but consistency is important in this matter. To deactivate the device, we proceed according to the diagram supplied by the manufacturer. We detect the device where it is located and try to disconnect it from the power module.
We stock up on tools:
- rubber hammer;
- a Phillips screwdriver;
- figured bat;
- cardan type hinge with a corresponding extension.
Let's act!
- We remove the battery.
- Remove the dashboard protection.
- The immobilizer looks like a small black box and is located behind the interior heating control module. Here the difficulty will arise with the approach to the bolts that secure the device.
- You will first need to de-energize the APS. To do this, pull out the plug while holding its plastic retainer with your hand.
- Sometimes owners of LADA Kalina forget about the need to restore the diagnostic connection (line) after dismantling the anti-theft module. For this purpose, a jumper is required, through which the exchange of impulses between the diagnostic block and the ECU itself is restored. If there is no need for such an option, then we proceed more simply - we connect the appropriate cables to provide the “K-line” functionality.
Having completed the removal procedure, we configure “APS” again. You will need to erase the entire list of data stored by the immobilizer in the volatile memory of the engine control module.
This process looks like this:
- Do not forget to remove the connector with wires from the device socket in advance.
- Now we resort to connecting the contacts labeled “18” and “9.1”.
- We open the controller housing, where it is located, as can be seen in the diagram, and insert the chip with the cleaning utility instead of the standard wiring chip. We are trying to start the engine. It will start if all the specified actions are performed correctly.
- If you cannot remove the designated chip, you can find the Combiset software product, which is also capable of clearing the memory. When this method does not bring results, then you will need to re-solder the circuit socket itself.
Owners of LADA Kalina with an ECU in the “January 5.1” version were luckier. The module allows you to easily install the Eeprom program. It is capable of overwriting data with new firmware, which can be obtained from an untrained anti-theft device by reading from the on-board controller. These actions ensure that the ECU can independently generate the required password, after which the engine will be allowed to start.
Sometimes there are cases when it is not possible to completely eliminate data, for example, from Eeprom. There is an exit! Let's try to edit the dump file. Here the bytes from “2” to “7” are replaced by the letters “FF”.
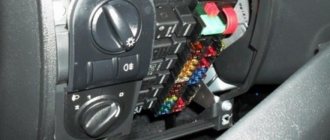
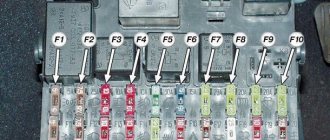
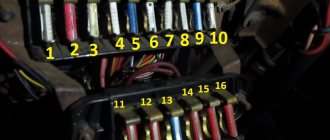
Decoding the fuses in the interior of the Lada Largus
| № | Strength top, A | Color | Protected target |
| F1 | 20 | Yellow | Windshield wiper, windshield wiper switch, heated tailgate relay |
| F2 | 5 | Beige | Instrument cluster, fuel pump relay, engine control unit (ECU) |
| F3 | 10 | Red | Brake light switch |
| F4 | 10 | Red | Diagnostic connector, immobilizer antenna unit, body electrical control unit |
| F5 | — | — | Reserve |
| F6 | — | — | Reserve |
| F7 | — | — | Reserve |
| F8 | — | — | Reserve |
| F9 | 10 | Red | Instrument cluster, left low beam |
| F10 | 10 | Red | Low beam right headlight |
| F11 | 10 | Red | Instrument cluster, left high beam |
| F12 | 10 | Red | High beam right headlight |
| F13 | 30 | Green | Rear door window motors |
| F14 | 30 | Green | Front door power window motors |
| F15 | 10 | Red | ABS electronic control unit, acceleration sensors, steering angle sensor |
| F16 | 15 | Blue | Electrically heated front seats |
| F17 | 15 | Blue | Sound signal |
| F18 | 10 | Red | Left front and rear parking lights |
| F19 F20 | 10 7,5 | Red Brown | Right front and rear parking lights, glove compartment lighting, instrument cluster lighting, hazard warning switch, HVAC control unit, audio system, cigarette lighter, central locking switch, front door power window switches, license plate lights, right lights front and rear position lights Rear fog light |
| F21 | 5 | Beige | Electrically heated exterior mirrors |
| F22 | — | Reserve | |
| F23 | — | — | Reserve |
| F24 | Reserve | ||
| F25 | — | Reserve | |
| F26 | 5 | Beige | SRS system |
| F27 | 20 | Yellow | Tailgate wiper motor, horn, TDC sensor, reverse light switch |
| F28 | 15 | Blue | Interior electrical control unit (energy saving mode) |
| F29 | 15 | Blue | Interior electrical control unit, diagnostic connector |
| F30 | 20 | Yellow | Interior electrical control unit |
| F31 | 15 | Blue | Fog lights, fog light relay |
| F32 | 30 | Green | Heated tailgate glass |
| F33 | — | Reserve | |
| F34 | — | Reserve | |
| F35 | — | Reserve | |
| F36 | 30 | Green | Electric motor for heating, air conditioning and ventilation systems |
| F37 | 5 | Beige | Electric exterior mirrors |
| F38 | 15 | Blue | Audio system, cigarette lighter |
| F39 | 10 | Red | HVAC Motor Relay |
Radio malfunctions and methods for diagnosing them
As you know, the Lada Largus is equipped with an audio system with a set of speakers already from the factory (depending on the configuration). The amplifiers are located in the front and rear door panels. To connect non-original speakers, several wiring harnesses are provided (including for increasing power using an amplifier when connecting a subwoofer). Since the connector plugs do not comply with the current standard, to connect another head unit you will need to additionally purchase adapters.
A standard car radio sometimes brings not only the pleasure of listening to music, but also some problems. The device may not work or function incorrectly for various reasons. In general, the list of faults includes only those that an ordinary driver (without special knowledge of electrical engineering) can fix with his own hands, without the need to contact a specialized center.
When it comes to repairs, it can often be cheaper to replace the device. Especially considering the availability of alternative options in different price categories and with different capabilities. At a cost of no more than 6,000 rubles, repairs can cost half this amount.
Main problems
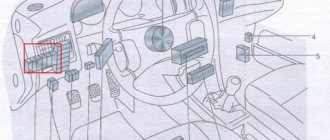
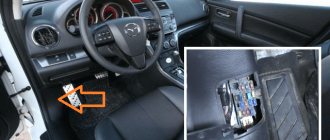
If, when you press the power button, the head unit does not respond and does not turn on, then first of all you should pay attention to the mounting block, checking the 15A fuse in socket F28. Through it, the electrical circuit of the device’s memory is connected with the saved settings.
The mounting block cover is located on the front panel on the left side at the end
You can understand that this fuse has blown by the absence of signs of operation of the instrument cluster panel, interior lighting and trunk lighting, since their electrical circuit is also powered by F28. If the fuse has not blown, the next check point will be the condition of the connecting contacts and the integrity of the wire that goes from the fuse to the A4 power connector on the back of the radio
The mounting block cover is located on the front panel on the left side at the end. You can understand that this fuse has blown by the absence of signs of operation of the instrument cluster panel, interior lighting and trunk lighting, since their electrical circuit is also powered by F28. If the fuse has not blown, the next check point will be the condition of the connecting contacts and the integrity of the wire that goes from the fuse to the A4 power connector on the back of the radio.
A common problem is no sound, i.e. the device itself turns on but there is no sound coming from any of the speakers when playing music.
In this case, the fault may also be the fuse, but F38. It supplies power to audio output devices. A faulty fuse is also indicated by a non-functioning cigarette lighter. If the latter works, then the fuse is intact. The lack of sound can also be caused by a violation of the integrity of the wire running from the fuse to connector A7 on the radio. And if only the rear speakers do not work, the culprit may be a broken connection in the block, which is located directly behind the driver's seat between the front and rear doors.
The cause of the malfunction may be the absence of ground - this is the black wire going to the radio (terminal A8). In all other cases, intervention in the electrical circuits of the device will be required. Without appropriate knowledge in this area, there is a high probability of complete failure of the radio. When contacting specialists, repairs can cost at least 1,000 rubles, not counting diagnostics.
Removing and installing the radio
If a device fails, you will need to dismantle it to install another one. Removal will also be necessary if it is necessary to connect speakers, repair, clean terminals or reflash. Visually, there are no latches or keys for removal on the front panel.
In fact, on the front of the radio there are four holes into which you need to insert 4 rods of suitable diameter (about 2 mm). The dismantling process is as follows.
- Two rods are inserted into the holes on the left side.
- Two more - on the right.
- Now you should simultaneously press all the rods at once.
- At the same time, pry it with a suitable plate, for example, a plastic card.
- After characteristic clicks indicating that the latches are loosened, you can remove the device.
Installing the radio is even simpler: just insert it into the mounting socket and press until the latches fit into the grooves.
Temperature sensor
Such sensors break down quite rarely, but sometimes such troubles do happen. The following “symptoms” will indicate its malfunction:
- Coolant temperature readings on the on-board computer are -40⁰;
- The Check Engine light on the instrument panel combination will light up;
- Unstable operation of the internal combustion engine.
To make sure that the problem is with the sensor, you will have to “arm yourself” with a multimeter and check the resistance at the contacts of the device. The data obtained must be checked against a special table and, based on this, conclusions must be drawn about the need to replace the part.
Possible causes of failure
There are quite a few reasons why the cigarette lighter on a Priora may not work, but most often they are of the same type and are associated with improper use of this part or due to its aging.
- Contamination of the contacts inside the cigarette lighter, which makes it impossible to conduct current through them. This problem occurs quite often if the cigarette lighter is used as intended. Remaining ash gets inside the cigarette lighter and contaminates it.
- The cigarette lighter connector, which is connected to it from below, is also susceptible to damage. When using powerful accessories, the contacts may burn.
- The cigarette lighter fuse is one of the most common problems with a non-working cigarette lighter. Fuse blowing occurs due to a possible short circuit or the use of powerful car accessories.
- A malfunction of the cigarette lighter illumination does not lead to its failure, but still, when something in the car does not work, it is not good and requires repair.
Why might the cigarette lighter not work?
The principle of the device is the same for all car models. The original purpose of the cigarette lighter socket on the Lada Largus is to light cigarettes, so inside the thin metal rod there is a small alloy thread. After switching to the working position, the contacts close and the spiral begins to heat up. After 15 seconds, sufficient to reach the lighting temperature, the relay is activated and the system returns the socket to its original position.
The cigarette lighter on the Lada Largus can work for a long time if the basic operating rules are followed. But due to age or network overload, it can break down. The most common malfunctions.
- Burnt-out cigarette lighter socket fuse. Each important segment of the electrical network has special protection. Exceeding the maximum current, which occurs due to a short circuit or connecting too powerful devices, threatens the wiring melting and a fire. In order to protect the cables, as well as the relays from burnout, it is the auto fuse that blows. It is necessary to open the mounting panel and replace the used element with a serviceable one, rated 15 amperes.
- "Shorty." If the Lada Largus cigarette lighter fuses burn out frequently, there is a risk that there is a short circuit in the network. This occurs when the positive and negative wires are in constant contact. When the fuses trip, you need to take a tester and then measure the battery voltage with the ignition off. Then we turn it on and measure again. Differences greater than 0.5 volts indicate a short circuit. It is worth ringing all the cigarette lighter wires and eliminating it.
- Broken nest. The active use of foreign electrical appliances leads to the fact that the Lada Largus cigarette lighter connector itself becomes loose, paralleling the extension of the fixing tabs. It is necessary to de-energize the circuit by removing the cable from the battery or removing the fuse. Then you need to bend the contact tabs inside the cartridge socket using a screwdriver or a knife with a thin tip.
- Raid. The ingress of liquid, as well as great age, lead to the formation of rust or oxidized plaque on the contacts of the socket. This prevents the cigarette lighter from working properly on the Lada. It is advisable to periodically take preventive measures: remove the rod from the connector and rub the problem areas with sandpaper or a needle file to the metal base.
- Burnt out backlight. Each cigarette lighter socket on the Lada is equipped with a light filter. This helps to find the connector at night. A lamp is responsible for its operation, the spiral of which burns out with age and the fuse trips. To repair, you will need to remove the device and replace the light bulb with a working element.
- Burnt-out filament. After prolonged exposure to temperature, the spiral inside the socket rod may burn out, causing the fuse to trip, causing the device to stop functioning. Restoration in this case does not make sense - the cigarette lighter of the VAZ Largus model needs to be replaced.
- Fallen cables. Soldering points may fall off over time, and constant shaking may cause the insulation to fray along with the copper wire. It is necessary to inspect all the cables of the Lada socket for kinks, breaks or melted insulation. Otherwise the fuse will trip. The latter should be patched with insulating tape, the contact points should be soldered with a soldering iron with tin, and the broken cords should be replaced with new ones.
The table below will give tips on restoring the functioning of the device:
| Name of the breakdown | Correction work |
| Weak contact | Using a screwdriver, bend the fixing tendrils of the socket. |
| The appearance of foreign plaque | Remove oxides and rust using a file and sandpaper. |
| Burnt fuse | Installing a working 15 amp fuse into the interior mounting block. |
| Malfunction of socket wires | Using a tester, check the wire contacts on the Lada, inspect them, and replace the broken cables with new ones. |
| Bulb burnout | Disassembly and replacement with a working part. |
| Burnout of nichrome thread | Replacing the cigarette lighter. |
Where is the wiper relay on Largus?
Good day everyone!
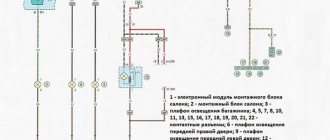
The autumn weather revealed one inconvenience in Largus, namely the operation of the windshield wiper intermittently. Sometimes you want to swing the brushes more often, sometimes, on the contrary, less often, it all depends on the weather. On my previous car, the windshield wiper control lever had a pause adjustment switch in 4 fixed positions. Here this necessary “gadget” has to be modified. As always, having scoured the Internet, I found information that Largus owners (and Renaults too) install an additional relay with an adjustable pause themselves. Usually this relay is ordered from online stores and they wait a certain number of days for delivery. I wasn't very happy with this approach. A trip to a car store that was friendly to me turned out to be a success - this product was on sale, although the relay was for a VAZ 2105-07, but this did not bother me. Also, due to the lack of demand for it at all, this product was sold at a symbolic price. The peculiarity of the purchased relay (63.777) is that it is built into the wiring and there is no need to redo anything. I like this approach from the manufacturer, it’s just a pity that this relay is intended for installation in a VAZ 2105-07. To implement it in Largus, I had to study the operation of the windshield wiper in a VAZ in order to understand the purpose of each wire, and also study the operation of the windshield wiper in Largus in order to correctly implement this device. In fact, as it turned out, there is nothing complicated. In Largus, the BUS (interior control unit) is responsible for the intermittent operation of the windshield wipers; it has a pause relay built into it. It’s a strange approach, of course, because in all Russian cars a separate relay is responsible for the intermittent operation of the windshield wiper. Well, here is such a feature. To connect to a relay with pause adjustment, we find the following wires on the connector to the windshield wiper control lever: - cream (A1) - this wire is supplied with power when the intermittent mode is turned on, this wire must be cut so that the power does not go to the BUS. And we connect the wire from our relay to the block. — purple (A3) — this wire goes to the wiper motor; we supply it with power from the relay to control the wipers. — red (A6) — this wire influences the wipers to return to their original position. But it must be interrupted at the time of control through our relay - yellow (A7) is the power supply to our relay (+12V) - black (B3 or B5) is minus. That's all the wires we need. There was also a wire on the relay that needed to be connected to the windshield washer pump, but this function is already implemented via the BUS, so we don’t touch it. I will not describe the connection of this relay by wire - it is unlikely that anyone will buy this relay; there are a lot of other relays, the connection of which is well described even on this resource. I soldered the connections well (twisting is unacceptable) and insulated them. Control check - everything works! The pause is adjusted by switching the lever to continuous mode or to the off position.
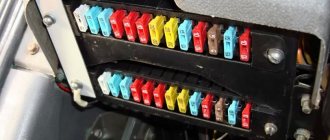
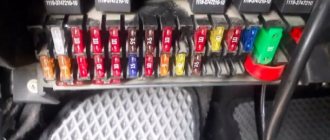
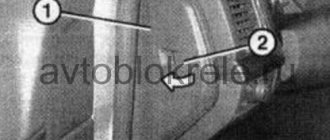
Replacing engine compartment mounting block fuses
We replace fuses in the mounting block of the engine compartment of the Lada Largus car in the following order:
- Remove the minus terminal from the battery;
- Use tweezers to remove the small fuse
- We remove large fuses with our fingers.
- We’ll also give you a damaged relyushka
A new relay or fuse should be installed to replace a broken one only after the cause of the malfunction has been identified and eliminated. You can only use standard fuses designed for a given rated current size (the rated current parameter of the fuse is marked on its body).
Radio malfunctions and methods for diagnosing them
As you know, the Lada Largus is equipped with an audio system with a set of speakers already from the factory (depending on the configuration). The amplifiers are located in the front and rear door panels. To connect non-original speakers, several wiring harnesses are provided (including for increasing power using an amplifier when connecting a subwoofer). Since the connector plugs do not comply with the current standard, to connect another head unit you will need to additionally purchase adapters.
A standard car radio sometimes brings not only the pleasure of listening to music, but also some problems. The device may not work or function incorrectly for various reasons. In general, the list of faults includes only those that an ordinary driver (without special knowledge of electrical engineering) can fix with his own hands, without the need to contact a specialized center.
When it comes to repairs, it can often be cheaper to replace the device. Especially considering the availability of alternative options in different price categories and with different capabilities. At a cost of no more than 6,000 rubles, repairs can cost half this amount.
Main problems
If, when you press the power button, the head unit does not respond and does not turn on, then first of all you should pay attention to the mounting block, checking the 15A fuse in socket F28. Through it, the electrical memory circuit of the device is connected to the saved settings. The mounting block cover is located on the front panel on the left side at the end
You can understand that this fuse has blown by the absence of signs of operation of the instrument cluster panel, interior lighting and trunk lighting, since their electrical circuit is also powered by F28. If the fuse has not blown, the next check point will be the condition of the connecting contacts and the integrity of the wire that goes from the fuse to the A4 power connector on the back of the radio
The mounting block cover is located on the front panel on the left side at the end. You can understand that this fuse has blown by the absence of signs of operation of the instrument cluster panel, interior lighting and trunk lighting, since their electrical circuit is also powered by F28. If the fuse has not blown, the next check point will be the condition of the connecting contacts and the integrity of the wire that goes from the fuse to the A4 power connector on the back of the radio.
A common problem is no sound, i.e. the device itself turns on but there is no sound coming from any of the speakers when playing music.
In this case, the fault may also be the fuse, but F38. It supplies power to audio output devices. A faulty fuse is also indicated by a non-functioning cigarette lighter. If the latter works, then the fuse is intact. The lack of sound can also be caused by a violation of the integrity of the wire running from the fuse to connector A7 on the radio. And if only the rear speakers do not work, the culprit may be a broken connection in the block, which is located directly behind the driver's seat between the front and rear doors.
The cause of the malfunction may be the absence of ground - this is the black wire going to the radio (terminal A8). In all other cases, intervention in the electrical circuits of the device will be required. Without appropriate knowledge in this area, there is a high probability of complete failure of the radio. When contacting specialists, repairs can cost at least 1,000 rubles, not counting diagnostics.
Removing and installing the radio
If a device fails, you will need to dismantle it to install another one. Removal will also be necessary if it is necessary to connect speakers, repair, clean terminals or reflash. Visually, there are no latches or keys for removal on the front panel.
In fact, on the front of the radio there are four holes into which you need to insert 4 rods of suitable diameter (about 2 mm). The dismantling process is as follows.
- Two rods are inserted into the holes on the left side.
- Two more - on the right.
- Now you should simultaneously press all the rods at once.
- At the same time, pry it with a suitable plate, for example, a plastic card.
- After characteristic clicks indicating that the latches are loosened, you can remove the device.
Installing the radio is even simpler: just insert it into the mounting socket and press until the latches fit into the grooves.