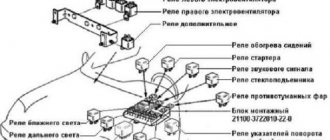
Fuse and relay block: decoding
Priora is equipped with three mounting blocks, two of which contain both fuses and relays.
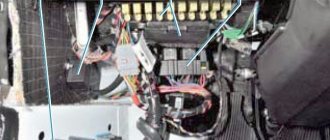
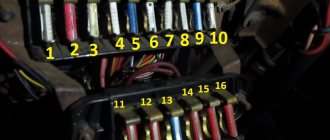
The first of them is located at the driver’s left foot, near the dashboard. To open it, you need to turn three latches 90 degrees. There is another block under the hood. Its place is near the expansion tank. As with the following, you will need a Phillips screwdriver to remove the cover. The last additional unit occupies a place near the central tunnel on the front passenger side. Fuses are designated by the letters F, and relays by K.
Installation instructions for an additional electric pump
Communities Lada Priora Lada Priora Club Blog Micro FAQ 2. Checking the functionality of the expansion tank cap Installing an additional water pump on any car (including the Lada Priora has 16 valves) is basically no different. It is necessary to place the electric pump in the section of the pipe, which is the input or output to the car’s stove and provide its power supply.
Step-by-step instructions for installing this additional component are as follows:
- Provide access to the heater pipes under the hood of the car by removing components that interfere with operation.
- Compress one of the rubber pipes that comes out of the heater (stove), which is done to prevent coolant from leaking out, or drain antifreeze (antifreeze) from the entire system.
- Cut part of this pipe to the length of the corresponding pump being installed.
- The length of the fittings is not taken into account due to the fact that they fit into the pipes.
- It is necessary to select the diameter of the fittings on the electric pump in advance to obtain a high-quality connection.
- Secure the rubber pipes to the pump fittings using metal clamps.
- Attach the additional electric pump to a pre-selected location under the hood of the car (indicated above) using special fasteners.
- Connect the power supply to the pump by selecting the options listed above, or install a separate switch.
- Start the engine and check the tightness of the connections, as well as the functionality of the electric pump.
- Install all parts that were removed before installing the pump.
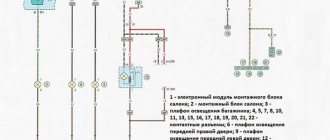
Lada Priora fuse diagram
The VAZ 2170 sedan, which became the flagship of the Priora family, left the production lines in 2007. Instead of a 6-valve engine, an eight-valve engine was installed for the first time. In 2008, its representative in a hatchback body saw the light, and a year later, in 2009, a station wagon. In 2010, production of the Priora Coupe began, and in 2011, the transition from generation 1 to generation 2. One of the main consequences of the update was the installation of a VAZ-21127 engine with 16 cl, which appeared under the hood in 2014. 2012 was the most important year in the history of the family – the model took first place among the best-selling in Russia.
The layout of fuses and relays in Priora does not really depend on the generation, but it is influenced by the vehicle equipment. If in the standard and “Norma” there is one, then in the luxury one, as well as in the “Norma” with air conditioning, there is another. This is due to the presence of air conditioning.
| Fuse no. | Current (amps) | Circuit protection |
| F1 | 25 | Electric radiator fan for engine cooling system |
| F2 | 25 | Heated rear window |
| F3 | 10 | Far right light |
| F4 | 10 | Far left light |
| F5 | 10 | Sound signal |
| F6 | 7.5 | Near left lights |
| F7 | 7.5 | Low right light |
| F8 | 10 | Signal |
| F9 | 25 | Heating |
| F10 | 7.5 | Instrument cluster, interior lighting, brake light |
| F11 | 20 | Windshield wiper and heated rear windows |
| F12 | 10 | Output 15 devices |
| F13 | 15 | Cigarette lighter |
| F14 | 5 | Side lighting on the left |
| F15 | 5 | Side lighting right |
| F16 | 10 | Conclusion 15 ABS |
| F17 | 10 | Left fog light |
| F18 | 10 | Right fog light |
| F19 | 15 | Heated seats |
| F20 | 5 | Immobilizer control unit |
| F21 | 7.5 | Rear fog light |
| F22-F30 | — | Reserve |
| F31 | 30 | Electrical package control unit (comfort unit) |
| F32 | — | Reserve |
The list of relays looks like this:
| Relay | "Norm" | "Norma" with air conditioning | "Lux" |
| K1 | Turning on the electric radiator fan to cool the engine | Reserve | Turning on the low beam and side lights |
| K2 | Heated rear window | ||
| K3 | Starter | ||
| K4 | Ignition | ||
| K5 | Reserve | ||
| K6 | Front window washer and cleaner | ||
| K7 | High beam | ||
| K8 | Sound signal | ||
| K9 | Alert | ||
| K10 | Reserve | Fog light | |
| K11 | Reserve | Heated front seats | |
| K12 | Reserve | ||
Fuse diagram of Lada Priora Lux
In the “Norma” with air conditioning and “Lux” trim levels, the unit is somewhat different from the two cheaper ones in the set of functions, and therefore the circuit fuses.
| Fuse no. | Current (amps) | Circuit protection |
| F1 | Reserve | |
| F2 | 25 | Mounting block, rear window heating relay (contacts), electrical accessories controller, contact “10” of the rear window heating block XP2 |
| F3 | 10 | Right high beam headlight, instrument cluster, high beam indicator light |
| F4 | 10 | Left high beam |
| F5 | 10 | Block, horn relay, horn |
| F6 | 7,5 | Left low beam |
| F7 | 7,5 | Right low beam |
| F8 | 10 | Unit, alarm activation relay, alarm horn |
| F9 | Reserve | |
| F10 | 10 | Instrument cluster, pin “20”, brake light switch, brake light lamps, interior lighting, right front door threshold light, additional brake light |
| F11 | 20 | Mounting block, windshield wiper high speed relay, wiper/washer switch, terminal 53a, wiper/washer switch, terminal 53ah, rear window defroster switch, mounting block, rear window defroster relay (winding), wiper motor windshield, rear window wiper motor (2171, 2172), windshield washer motor, rear window washer motor (2171, 2172), airbag control unit, pin “25” |
| F13 | 15 | Cigarette lighter |
| F14 | 5 | Left side headlight, instrument cluster, main light switch indicator, license plate light, trunk light, power accessories controller, pin “12” of X2 block |
| F15 | 5 | Right side lamp, glove compartment lighting |
| F16 | 10 | Hydraulic unit, contact "18" |
| F17 | 10 | Left fog light |
| F18 | 10 | Right fog light |
| F19 | 15 | Seat heating switch, contact "1", front seat heaters |
| F20 | 10 | Recirculation switch (switch on), block, relay for turning on low headlights and side lights, electric heater fan relay, automatic lighting control switch, windshield wiper and external lighting control unit, contacts 3, 11, automatic climate control system controller, contact “1”, rain sensor, pin "1" |
| F21 | 5 | Light switch, pin 30, diagnostic deck, pin 16, clock, automatic climate control system controller, pin 14 |
| F22 | 20 | Auto Windshield Wiper Motor, Assembly, Windshield Wiper Relay and High Speed Windshield Wiper Relay |
| F23 | 7,5 | Windshield wiper and external lighting control unit, pin “20” |
| F24-F30 | Reserve | |
| F31 | 30 | Electrical package controller, terminal “2” of block X1, Electrical package controller, terminal “3” of block X1, driver’s door module, pin “6”, left front door threshold lighting |
| F32 | Reserve |
Lada Priora: diagram of fuses and relays under the hood
Near the expansion tank under the hood there is a second fuse box; there are no relays here. There are only 6 elements, the same for all trim levels of the Lada Priora family:
| Fuse number | Current strength, ampere | Which electrical circuits does it protect? |
| F1 | 30 | Power supply to the electronic engine control system (ECM) |
| F2 | 60 | Engine cooling fan power supply circuit, ignition relay, rear window defogger, power accessories controller |
| F3 | 60 | Engine cooling fan power supply circuit (relay control circuit), horn, alarm, ignition switch, instrument cluster, interior lighting, brake light, cigarette lighter |
| F4 | 60 | Generator power circuit |
| F5 | 50 | Electromechanical power steering power supply circuit |
| F6 | 60 | Generator power circuit |
Ignition switch fuse diagram for Lada Priora
At the left foot of the front passenger, in the area of the central tunnel, there is a third block with 5 protection elements - 3 fuses and 2 relays:
- F1 for 15 amperes - is responsible for protecting the main relay circuit and blocking the starter;
- F2 at 7.5 – is responsible for the power supply circuit of the ECU controller;
- F3 at 15 – is the fuel pump fuse;
- K1 – main relay;
- K2 – fuel pump relay.
To gain access to these elements you will need a Phillips screwdriver.
Where is the fuel pump relay located?
Like its fuse, in the Priora it is located in an additional block located below, near the central tunnel on the front passenger side.
Where is the fan relay located?
It is located in the main mounting block under number K1.
Where is the turn signal relay located?
The turning light relay is provided only for the “Lux” configuration. It is located among most similar elements, in the main fuse and relay block and is designated by number K1.
Starter relay location
Refers to elements that can be found in all Priora trim levels. It is marked everywhere with the number K3 and is located in the first block to the left of the driver.
Which fuse goes to the cigarette lighter?
In the standard circuit, where the Kulibins did not work, the fuse-link of the engine compartment mounting block number 3 is responsible for powering the cigarette lighter. A 60 Amp fuse ensures the operability of a number of lines.
The interior unit has an insert that is directly responsible for the cigarette lighter itself. It is indicated by the number 13 and has a working load of up to 15A.
Wipers
The windshield wiper is controlled by fusible link No. 11 inside the interior mounting block.
Which fuse on the Priora goes to the low beam?
A separate fuse is responsible for the low beam illumination of each side of the head optics. Fuse links numbered 6 and 7 are responsible for the left and right headlights, respectively.
Which fuse is responsible for the heater on the Lada Priora
The heating system is protected by a 15 A element with number 9.
Which fuse controls the power windows?
The manufacturer made fuse No. 11 responsible for the wipers. At the same time, the position is relevant for all modifications and types of mounting blocks.
Fuses for cars with climate control systems
On cars that have climate control systems, an additional (small) fuse box is installed. Under the hood, the device is attached to the left glass, near the main insert. At the same time, depending on the type of complex, the location and purpose of the inserts may differ.
Fuses and relays of a car with air conditioning HALLA
South Korean Halla is distinguished by its own panel design. Here is the actual location:
| Name | Purpose |
| F-1/ F-2 | Right and left radiator fans |
| F-3 | Heater |
| F-4 | Compressor unit |
| R-1/3 | Right and left fan relay |
| R-2 | Additional element |
| R-4 | Cabin air heater |
| R-5 | Compressor switch power |
Panasonic car fuses and relays
In Panasonic systems, the location of the fuses and relays is slightly different:
| Name | Purpose |
| F-1,2,3 | Power supply for radiator and heater fans respectively. |
| F-4 | Voltage supply to compressor |
| R-1/3 | Heater fan control for high and low speeds, respectively |
| R-2/4/5 | Relays for the right and left radiator/air conditioner coolers |
| R-6 | Compressor unit power supply |
Features of the bodies of “Ladovo” models
ATTENTION! A completely simple way to reduce fuel consumption has been found! Don't believe me? An auto mechanic with 15 years of experience also didn’t believe it until he tried it. And now he saves 35,000 rubles a year on gasoline! Read more"
Since we started with QOL, let’s continue this topic. For the frame of Ladovsky models without glued glass, the quality of life is 14 thousand N*m/degree, which is a very good mark. And with glass this figure is even higher.
The testing of the Lada body in the rear turned out to be especially good. Thus, in the rear door opening, after a tough diagonal pressure test, the changes were recorded as only 1.5 mm, whereas on most foreign cars the same figure was 5-6 mm.
The body design of the Lada Largus and other similar models fundamentally complies with current European standards in terms of protecting passengers and the driver. The front subframe on Ladovsky models is one of the most important body elements responsible for this indicator. It is even considered an auxiliary spar, significantly increasing the strength of the body, as well as absorbing impact force.
The high quality of life of the Ladovsky body also has a beneficial effect on obtaining high-quality sound comfort in a car showroom. The frame does not twist over bumps and bumps, no deformations or anomalies occur between the interior and body elements, which ultimately has a positive effect on the absence of squeaks.
Note. Of course, in addition to the quality of life indicator, the quality of interior elements also affects the high level of sound comfort. They were obtained through proper calculation so as not to come into contact with the body in places where squeaking might occur. This was achieved by fixing the plastic components with special fasteners and minimizing the various gaps that arise one way or another between them and the body.
A lot of original parts, interchangeability of interior elements between Ladovsky models, enlargement of some parts of the body - all this was only a plus. In particular, the increase in some body elements led to a decrease in their number, which reduced production time and had a positive effect on performance.
Lada Largus
Called a budget station wagon with increased cross-country ability. The body was assembled based on Dasia/Renault Logan. The car was initially adapted for the market of Eastern European countries.
Even in the basic version of Logan, engineers took effective measures to enhance anti-corrosion protection, using protective inserts for the wheel arches. In addition, anti-corrosion and anti-gravity protection is installed over larger areas than before (at Samarov’s vehicles), with a thicker layer of mastic.
Here are some more innovations:
- The engine compartment is well protected. Additional protection was used correctly;
- The front suspension reinforcement has been increased. This was achieved through the use of leverage;
- The washer reservoir has become larger and holds more fluid;
- The wheels received protective aprons;
- The change got a torpedo;
- The bumper and radiator grille have been modernized.
It is noteworthy that the station wagon is made in 2 body versions: 5-seater and 7-seater. In addition, a van is also produced. The price of cars is low - only 350 thousand rubles and good comfort. When compared with foreign cars, the cost is heaven and earth.
In general, the Largus exterior is designed in such a way that it makes it possible to rightfully call the car roomy. A large family, along with bags and suitcases, as well as pets, fits comfortably inside. As for the design, the abundance of straight lines gives the car some speed and dynamism to the slightly clumsy family station wagon.
Height with rails is 167 cm, which is 10 cm more than Dasia Logan. The remaining sizes are also quite individual and do not copy “anyone”.
Lada Kalina
A car with 4 body types: sedan, regular 5-door hatchback, station wagon and sports hatchback.
"Sedan" version
Let's start with the sedan:
- From the new family of Kalina cars, AvtoVAZ is produced;
- The modern elegant appearance and comfortable interior are called the root reasons for the sedan's good sales;
- It has good handling at high speeds;
- It maneuvers well in the city traffic rhythm;
- Practical and incredibly convenient for daily use;
- The sedan body received wedge-shaped silhouette lines, visually creating the image of a strong, brutal car;
- The opening angle in the luggage compartment has been increased by 120 degrees, which makes loading easier. Inside the trunk, the manufacturer has wisely provided special loops that allow you to secure the cargo being transported.
How to remove and replace the relay and fuse mounting block on a Lada Priora
Removing the fuse head located in the engine compartment is quite simple. The procedure should be followed.
- Open the panel cover by unlatching the fasteners.
- Unscrew the housing mounting bolts.
- Remove all fuses in sequence.
- Using a paperclip or awl, unclip the wire terminals.
- Remove the wiring from the housing.
- Remove the panel from its slot.
For ease of reassembly and simplified maintenance of the unit, the location of all wires and their installation sequence should be marked.
How to choose a coolant
Answering the question of what antifreeze to use in Priora, the manufacturer did not provide a large assortment to its users. It is best to use the Felix-40 cooler. You can use other brands, but this is not recommended. The engine system may wear out in a shorter period of time. As a result, you will have to contact the service for global repairs and replacement of parts.
If you are using antifreeze from another manufacturer, it is recommended to study its characteristics. It must meet international quality standards.
How to check the fluid level and how much will be enough?
To determine how many liters of coolant are needed to fill the tank, carefully read the vehicle's owner's manual. You will need approximately 7.8 liters. Some car owners prefer to fill a little less - 6 liters.
You can check the antifreeze level in the tank even on a cold engine. To do this, lift the hood lid. You will see a tank. There are two marks on it with a maximum and a minimum value. The fluid level must be within these marks.
Where to begin
First of all, many people ask questions about the advisability of the soundproofing procedure specifically on the engine side in the engine compartment.
There is an opinion that this is a completely useless event. And supposedly there is no meaning in it. But this is said mainly by those who have not felt the difference between cars with and without sound insulation, or who initially drive a car that has high-quality and efficient noise insulation from the factory. In the second case, I really don’t see the point in further insulating the engine compartment. But this occurs mainly on expensive and new cars. Owners of older and cheaper cars are less fortunate.
Cars that have been in use for more than one year, produced more than 10 years ago, usually have high noise and vibration from the engine. And even when running at idle.
And you shouldn’t blame only diesel engines. Gasoline engines also vibrate a lot and require additional noise.
Vehicle check
To ensure traffic safety and increase the service life of the vehicle, it is necessary to periodically carry out external and internal inspections of the vehicle.
The length of the inspection depends on how well you know your car and how often you use it. While operating your car, you will learn about the rate of oil consumption in the engine and gearbox, brake and coolant, and the reliability of various systems and devices. This will allow you to plan your actions and time to inspect the car in the future. For example, if it turns out that the engine consumes oil quite intensively (albeit within normal limits), then the oil level in the engine sump should be monitored more often. If the oil consumption of your car’s engine is low and there is no visible change in the oil level over a month, you can limit yourself to a monthly check. The more familiar the car inspection activities become for you, the less time you will spend on them. However, if you encounter difficulties in servicing the car yourself or suspect that it is faulty, you must contact one of the service centers for servicing this car model. Source Location of components and assemblies (bottom view) : 1 - mudguard of the power unit; 2 — gearbox; 3 — front suspension stretch; 4 — left wheel drive; 5 — front suspension arm; 6 — anti-roll bar; 7 — transmission control rod; 8 — jet thrust of the gearbox control mechanism; 9 — tubes of the power supply and brake systems; 10 — additional muffler for the exhaust gas system; 11 — pressure regulator in the hydraulic drive of the brake mechanisms of the rear wheels; 12 — fuel tank; 13 — rear suspension beam; 14 — main muffler of the exhaust gas system; 15 - niche in the bottom of the trunk for a spare wheel
Bottom view of the front part of the car (the power unit mudguard has been removed for clarity) : 1 - front wheel brake mechanism; 2 — engine sump; 3 - generator; 4 — cross member of the front suspension; 5 - starter; 6 — gearbox; 7 — left wheel drive; 8 — anti-roll bar; 9 — transmission control rod; 10 — jet thrust of the gearbox control mechanism; 11 — additional muffler pipe; 12 — right wheel drive; 13 — front suspension stretch; 14 — front suspension arm
From the outside of the car we check : – air pressure in the tires: inspect them for damage; – tightening the wheel bolts; – serviceability of lighting and alarm devices. You can check the operation of the brake signals without an assistant by pressing the brake pedal and watching in the rearview mirror for the reflection of the signal light from a wall, such as a garage; – no traces of leakage of oil, coolant, fuel and brake fluid.
In the engine compartment we check : – engine oil level; – oil level in the gearbox; – coolant level in the expansion tank of the cooling system; – brake fluid level in the brake hydraulic reservoir; – presence of liquid in the windshield washer reservoir; – generator drive belt tension; – condition and fastening of battery cable terminals.
Inside the car we check : – serviceability of the vacuum brake booster; – operation of the clutch and gearbox drives; – the amount of travel of the parking brake lever; – serviceability of the sound signal; – serviceability of the windshield cleaner and washer; – serviceability of instrumentation; – fuel level in the tank; – adjustment of rear view mirrors; – serviceability of door lock mechanisms.
Sound insulation of the Priora engine compartment is done independently
Priora soundproofing of the engine compartment, starting from the partition
Soundproofing a Priora is a process that does not require you to have car repair skills, so anyone can do it themselves in a matter of hours. You just need to know the necessary materials, tools and the procedure to perform the actions. You also need to be attentive; the resulting quality of sound insulation depends on your attentiveness when performing the work, and our instructions will help you deal with the rest. Lada Priora is today the newest model in the VAZ family, however, Priora, like other domestic car models, has such an inherent drawback - too high a noise level inside the cabin. The main source of this noise is, of course, the engine. To cope with this nuisance and make your car trips more comfortable, the solution would be comprehensive sound insulation for the Lada Priora engine compartment. When soundproofing the engine compartment, the following feature is taken into account - in order to achieve maximum effect, it is necessary to insulate the engine shield on both sides - both in the engine compartment and inside the cabin. To do this, you will have to remove the dashboard and disassemble everything that prevents you from gaining access to the shield.
Description
Soundproofing engine compartment upholstery VAZ 2170 (set of 2 pcs.)
The manufacturer reserves the right to change the characteristics of the product, its appearance and completeness without prior notice to the seller.
| Packed length | 0.98 m |
| Packed width | 0.4 m |
| Packed height | 0.07 m |
| Package weight | 0.97 kg |
| Automobile model | VAZ 2170 Priora |
Refinement of the cooling system
Domestic cars are far from perfect, that's a fact. Lada Priora was no exception in this regard, having inherited many shortcomings from the legendary “ten”. One of them is an unfinished cooling system.
There are several ways to quickly and without financial costs modify the SOD on Priora.
- Installing a 6-hole thermostat (stable maintenance of coolant temperature).
- The use of Kalina SOD on Priora will reduce the pressure in the system and provide quick warm-up at subzero temperatures.
- Installing a larger or additional water pump to improve coolant circulation efficiency.
- Use of multi-speed and silent forced cooling fan.
- Changing the firmware of the control unit so that the fan operates at a lower temperature.
Refining the cooling system of the Lada Priora is a feasible task even for novice car enthusiasts. The SOD has a simple design with a minimal set of components. Thanks to this, the system is relatively reliable.
Why does the generator belt whistle (reasons for whistling)
Many car enthusiasts believe that the whistling of the alternator belt appears only because it is worn out or sagging, but this is not entirely true. It is not always possible to eliminate whistling by replacing the old belt with a new one or “tightening” it. Often the causes of whistling may not be obvious.
In order to understand how to eliminate the whistling of the generator belt, you must first understand why it whistles (squeaks, creaks), and what are the reasons for the appearance of these sounds.
During operation, the alternator belt, like other vehicle drive belts, is subjected to prolonged high loads. With its help, torque from the engine crankshaft is transmitted to the generator and other attachments.
Most drive belts in automobiles are wedge-shaped, which provides greater frictional force where they contact the pulleys. They are called V-belts. The same belts that have several wedge-shaped tracks (so-called “rivulets”) are called poly-V-belts.
V-belts are available with and without teeth. It is believed that belts with teeth work better at breaking, do not break and slip less often.
So we come to the answer to the main question - why does the alternator belt whistle? It's very simple - in 99% of cases, the whistle appears due to the friction of the belt on the pulleys and tension rollers as a result of slipping! That is, if the belt cannot turn the pulley of a generator or other equipment, then it simply slips, making an unpleasant sound similar to a whistle, squeak, squeak or squeal.
Replacing the ignition lock cylinder of a VAZ 2109 and the entire lock
Therefore, you need to look not for the cause of the whistle, but for the reasons that cause the belt to slip. And there can be five main reasons:
- Weak or very strong alternator belt tension;
- Poor quality or worn belt;
- Getting dirt, moisture, oil and other technical fluids onto the belt and pulleys;
- Faulty generator bearing or tension roller;
- Pulley misalignment.
In addition, the appearance of a whistle can be influenced by such factors as humidity and ambient air temperature, the technical condition of the generator, air conditioner, power steering and other equipment driven by the generator belt.
Disadvantages of low engine operating temperature
- The most basic problem is increased fuel consumption (read how to reduce fuel consumption on a Lada Granta here).
- There is also a risk of breakage.
- Well, the car interior will not warm up so well.
Remedies
Only replacing the thermostat with a model with an opening temperature of at least 92 degrees will help. Grantmakers purchase a WAHLER 3091.92D thermostat, take the insides out of it, and insert it into the old thermostat.
In order not to disassemble the original thermostat ahead of time, you can purchase a thermostat for the Lada Granta, and put the insides from a non-original replacement into it.
This is a native Luzar thermostat
VAZ 2170 (Priora) 2004+ General information about the car
The small class car VAZ-2170 Lada Priora with a four-door sedan body (class C according to the international classification) is designed for operation at ambient temperatures from –40 to +50 °C on public roads with hard surfaces. The Lada Priora is equipped with an injection 16-valve engine mod. located across the engine compartment. VAZ-21126-00 with a working volume of 1.6 liters. The engine is equipped with a distributed fuel injection system and an exhaust gas catalytic converter, structurally made in a single block with the exhaust manifold (catcollector). The body is load-bearing, all-metal, of welded construction, with hinged doors, front fenders, hood and trunk lid. The driver's seat of the Lada Priora is equipped as standard with an airbag, and in an optional version - with a front passenger airbag, as well as front seat belts with pretensioners and load limiters, which significantly reduces the likelihood and severity of head and chest injuries in a traffic accident.
| Overall dimensions general information about the car Lada Priora VAZ 2170 | Section 1. Design of the Lada Priora VAZ 2170 car The small class car VAZ 2170 Lada Priora with a four-door sedan body (class C according to the international classification) is intended for operation at ambient temperatures from -40 to +50 °C on public roads with hard surfaces . The VAZ 2170 Lada Priora is equipped with an injection 16-valve engine of the VAZ 21126-00 model located across the engine compartment with a displacement of 1.6 liters. The engine is equipped with a distributed fuel injection system and an exhaust gas catalytic converter, structurally made in a single block with the exhaust manifold (catcollector). The body is load-bearing, all-metal, of welded construction, with hinged doors, front fenders, hood and trunk lid. The driver's seat of the VAZ 2170 Lada Priora is equipped as standard with an airbag, in an optional version - with a front passenger airbag, as well as front seat belts with pretensioners | and load limiters, which significantly reduces the likelihood and severity of head and chest injuries in a traffic accident. NOTE The airbag only deploys if there is a severe impact to the front of the vehicle. In minor frontal impacts, vehicle rollovers, rear or side impacts, seat belts are the primary means of protection. The transmission on the VAZ 2170 Lada Priora is made using a front-wheel drive design with drive wheel drives of different lengths. The front suspension is independent, spring, with anti-roll bar, with hydraulic shock absorber struts. The rear suspension is semi-independent, lever-spring, with hydraulic shock absorbers. The front wheel brakes are disc brakes with a floating caliper, the rear wheels are drum brakes. In a variant version, VAZ 2170 Lada Priora cars are equipped with an anti-lock brake system, which prevents wheel locking during braking and maintains controllability and directional stability. | The steering is injury-proof, with a rack-and-pinion steering mechanism, with an electromechanical booster that changes the transmitted torque depending on the speed of the vehicle. VAZ 2170 Lada Priora cars are equipped with a remote control system for locking or unlocking door locks (in a variant version and locking the trunk lid lock) with simultaneous activation or deactivation of the vehicle security mode. In addition, remote activation of the alarm system in case of violation of vehicle security zones and blocking of all doors by pressing a button from inside the vehicle are provided. This system also includes an electronic engine locking system (immobilizer), which provides additional protection against unauthorized engine starting. The overall dimensions of the VAZ 2170 Lada Priora car are shown in Fig. 1.1, technical characteristics are given in table. 1.1. Elements of the engine compartment of the VAZ 2170 Lada Priora are shown in Fig. 1.2, the location of the main components and assemblies is shown in Fig. 1.3 and 1.4. |
| The airbag only deploys when there is a strong impact to the front of the vehicle. In minor frontal impacts, vehicle rollovers, rear or side impacts, seat belts are the primary means of protection. |
The transmission is made according to a front-wheel drive design with drive wheels of different lengths. The front suspension is independent, spring, with anti-roll bar, with hydraulic shock absorber struts. The rear suspension is semi-independent, lever-spring, with hydraulic shock absorbers. The front wheel brakes are disc brakes with a floating caliper, the rear wheels are drum brakes. In a variant version, Lada Priora cars are equipped with an anti-lock brake system, which prevents wheel locking during braking and maintains controllability and directional stability. The steering is safety-resistant, with a rack-and-pinion steering mechanism, with an electromechanical booster that changes the transmitted torque depending on the speed of the vehicle. Lada Priora cars are equipped with a remote control system for locking or unlocking door locks (in an optional version and locking the trunk lid lock) with simultaneous activation or deactivation of the vehicle security mode. In addition, remote activation of the alarm system in case of violation of vehicle security zones and blocking of all doors by pressing a button from inside the vehicle are provided. This system also includes an electronic engine locking system (immobilizer), which provides additional protection against unauthorized engine starting.
The overall dimensions of the car are shown in Fig. 1.1, technical characteristics are given in table. 1.1.
| Rice. 1.2. Engine compartment of the car: 1 – engine; 2, 14 – supports of the power unit; 3 – steering mechanism; 4 – throttle unit; 5 – reservoir of the main brake cylinder; 6 – expansion tank of the engine cooling system; 7 – main fuse block; 8 – washer reservoir; 9 – battery; 10 – air filter; 11 – mass air flow sensor; 12 – alarm signal; 13 – generator; 15 – hood stop |
Elements of the engine compartment of the VAZ-2170 Lada Priora are shown in Fig. 1.2, the location of the main components and assemblies is shown in Fig. 1.3 and 1.4.
| Rice. 1.3. Location of the main components of the vehicle components (bottom front view, engine splash guard removed): 1, 3, 13 – power unit supports; 2 – generator; 4 – radiator of the engine cooling system; 5 – electric fan of the engine cooling system; 6 – starter; 7 – front suspension cross member; 8 – front suspension extension bracket; 9 – front suspension extension; 10 – shock absorber strut of the front suspension; 11 – stabilizer strut; 12 – left front wheel drive; 14 – gearbox; 15 – front exhaust pipe of the additional muffler; 16 – engine oil sump; 17 – catalytic collector; 18 – right front wheel drive; 19 – anti-roll bar; 20 – front suspension arm; 21 – front wheel brake mechanism |
| Rice. 1.4. Location of the main components of the vehicle components (bottom rear view): 1 – separator; 2 – main muffler; 3 – shock absorber struts of the rear suspension; 4 – spare wheel niche; 5 – fuel tank filling pipe; 6 – rear suspension beam; 7 – fuel tank; 8 – fine fuel filter; 9 – suspension cushions for the exhaust gas system; 10 – brake pressure regulator |
Table 1.1 Technical characteristics of cars
Work order
In Lada Priora, sound insulation is performed in the following order:
To perform soundproofing of the interior, it will be necessary to remove all the front seats, as well as the center console, remove the steering wheel and dashboard
Interior with the above items removed
- As soon as all the disturbing elements are removed from the interior, we remove the carpet and remove all the factory sound insulation of the engine shield, located on the interior side, photo above
- Then we apply Bimast Bomb to the engine shield in the cabin.
- Accent or Splen of your choice can be applied over this to absorb sound waves from the engine, stereo speakers and other sources.
Engine shield treated with vibration absorber from the interior
We remind you that before applying the vibration-absorbing material, the entire surface is thoroughly wiped from dust, dirt and preservation, then thoroughly degreased with a solvent or alcohol
How to change the lock on the trunk of a VAZ 2113, 2114, 2115
- Before installing the material in place, it is cut out, then the carefully prepared pieces are heated with a hairdryer, only after that they are applied to the surface
- And after applying the material to the desired surface, it is rolled with a roller (roller) from the center of the attached part to the edges in order to expel all the air, and our material is more tightly attached to the surface
- Inside the engine compartment, soundproofing material is glued to the hood, in addition, to the front shield, all planes that do not have stiffeners, as well as in places that can be glued without removing the engine and dismantling its components
- We cover the motor shield on the engine side with insulation from the top to the point where the shield connects to the floor of the car, in this case we use the material Bimast Bomb or Bimast Super;
- The hood cover is insulated with bimast, and on top there is splen for thermal insulation
- After the soundproofing materials have been applied, we put all the removed parts back in their places, and the work can be considered complete
- Additionally, you can watch the training video
After such a small modification, the noise level inside the car is noticeably reduced, and the ride becomes much more pleasant and much more comfortable. And when all the work is done yourself, this means money saved for more pressing purposes, plus you will be absolutely sure of the quality of sound insulation of your favorite car.
Source