01/26/2022 11,870 Daewoo Lanos
Author: Ivan Baranov
In order to ensure that the air in the cabin of your car is always clean and fresh, you need to pay at least a little attention to the air conditioning system from time to time. No special knowledge is required here and it is often enough to monitor the condition of the filter and know how to tighten the air conditioning belt on Lanos. In some cases it may need to be replaced.
It just so happens that a domestic car enthusiast, before going to a service station, will definitely try to do this or that work on his own. This makes sense, because in this way you can save quite a decent amount. Replacing the air conditioner belt is exactly the case when there is no need for the services of a service station, and you can do it yourself.
[Hide]
The importance of tension level and checking it
How to tension the alternator belt
Let's consider what unpleasant consequences an incorrect level of tension will lead to. If it is weakened, then there is a high probability of slippage . That is, the generator drive will not operate at rated speed, which in turn will lead to the level of voltage generated by it being below normal. The result is an insufficient level of battery charging, insufficient electricity to power the vehicle systems, and operation of the electrical system under increased load. In addition, when slipping, the temperature of the belt itself increases significantly, that is, it overheats, which is why it loses its service life and may fail prematurely .
If the belt is too tight, this can also lead to excessive wear on the belt itself . And in the worst case, even to its breakage. Also, excessive tension has a detrimental effect on the bearings of the crankshaft and generator shaft, because they have to work under conditions of increased mechanical load. This leads to excessive wear and speeds up their failure.
Hyundai Accent Tagaz from 2001 to 2012
Buy drive belt and rollers 16 cl. DOHC
25212-26021 — generator drive belt
MOBIS original. Quality 100%!
1 987 947 895 — generator drive belt
BOSCH The supply of spare parts to automakers' conveyors and their sale to the secondary market accounts for 70% of the company's turnover. BOSCH spare parts are very popular in many countries, both among professionals and among car enthusiasts.
KDB006 - generator drive belt
KORTEX corresponds to the price-quality ratio. All products are manufactured in compliance with the requirements of the ISO International Quality Standard and European standards PIMOT, ECE R90, ATEST, as well as KBA/TUV/ISO technical standards. Auto parts sold on the Russian market are certified by NAMI.
57231-29100 — power steering belt
MOBIS original. Quality 100%!
1987948145 — drive belt
BOSCH The supply of spare parts to automakers' conveyors and their sale to the secondary market accounts for 70% of the company's turnover. BOSCH spare parts are very popular in many countries, both among professionals and among car enthusiasts.
AVX13X670 - drive belt
CONTITECH The German concern Continental AG is the third largest company in the world supplying units and components for primary equipment in the automotive industry.
97713-1E000 — air conditioning belt
MOBIS original. Quality 100%!
1987947894 — air conditioning belt
BOSCH The supply of spare parts to automakers' conveyors and their sale to the secondary market accounts for 70% of the company's turnover. BOSCH spare parts are very popular in many countries, both among professionals and among car enthusiasts.
KM53-01661 — air conditioning belt
KORTEX corresponds to the price-quality ratio. All products are manufactured in compliance with the requirements of the ISO International Quality Standard and European standards PIMOT, ECE R90, ATEST, as well as KBA/TUV/ISO technical standards. Auto parts sold on the Russian market are certified by NAMI.
97834-2D520 — air conditioner belt tension roller
MOBIS original. Quality 100%!
GTA0720 - air conditioner belt tension roller
GMB (Japan) is the world's largest manufacturer of water pumps, propeller shaft joints (crosspieces), and timing belt tensioner rollers.
PSA-C015 - air conditioner belt tension roller
PARTS MALL are exporters and manufacturers of high quality Korean auto parts for the entire range of Hyundai and Kia cars.
Tension check
Tension checking process
Now let's look at the issue of checking tension. It’s worth mentioning right away that the force values are unique and depend not only on the make and model of the machine, but also on the generators and belts used. Therefore, look for the relevant information in the manuals for your car or in the operating instructions for the alternator or belt. This will also be influenced by the presence of additional equipment installed in the car - power steering and air conditioning. In general terms, we can say that if you press the belt on the longest section between the pulleys with a force of about 10 kg, then it should deflect by approximately 1 cm (for example, for a VAZ 2115 car, when applying a force of 10 kg, the belt deflection limits are 10 …15 mm for generators 37.3701 and 6…10 mm for generators type 9402.3701).
Often, if the alternator belt is loosely tensioned, it begins to make whistling sounds, and the driver sees malfunctions in the operation of the electrical equipment of the car. In some cases, the low battery light will tell you about problems. In such a situation, we recommend checking the tension level of the alternator belt and increasing it.
If during the check you find that your alternator belt is too loose or too tight, you need to adjust the tension. This can be done in two ways depending on what kind of machine you have - using an adjustment bar or using an adjustment bolt. Let's look at them in order.
Recommendations
- As a rule, the alternator belt must be tightened every 15-20 thousand km. mileage, while the belt is replaced every 60 thousand km. or once every 4-5 years. It is also important to check the tension because the alternator belt stretches over time.
- On some cars you can find an automatic belt tensioner (tension is achieved using springs). In this case, the driver does not have the opportunity to tighten the belt. Only the belt and/or tensioner are replaced as the elements wear out or if the belt slips.
- To replace, you must purchase only high-quality alternator belts, pulleys, bolts and tensioners that are fully suitable for the specific make and model of the car. Ignoring this rule leads to the fact that the belt and tensioning mechanisms can quickly fail, whistles appear, the belt slips or breaks, problems with electrical equipment, etc.
You should be prepared for the fact that if the belt breaks while driving, the power steering may fail. In this case, the effort to turn the wheels on the steering wheel increases significantly (this is especially noticeable at low speeds). For this reason, it is necessary to check the condition of the alternator belt regularly, especially if it also drives the power steering pump on a particular car.We also recommend reading the article about what an EUR is. From this article you will learn how the electric steering differs from the power steering, as well as which type of power steering is better and more reliable.
- After replacing the attachment belt, replacing tensioners and other elements, as well as making adjustments, the tension must be re-checked after a while. The fact is that the new belt may loosen a little after 100-200 km. It also happens that when checking, the belt tension is too strong. However, if the adjustments are not made again, the problem will progress in the case of an insufficiently tensioned belt. If the belt is tightened, this will cause a significant reduction in its service life (by 50-60% or more).
Tension with adjuster bar
Securing the generator using a strip
This method is used for older cars (for example, “classic” VAZs). It is based on the fact that the generator is attached to the engine using a special arc-shaped strip , as well as a bolt and nut. By loosening the fastening, you can move the bar with the generator relative to the engine to the required distance, thereby adjusting the tension level.
Actions are performed according to the following algorithm:
- unscrew the fastening nut on the arc-shaped bar;
- Using a pry bar, we adjust the position (move) of the generator relative to the engine;
- tighten the nut, fixing the new position of the generator.
The procedure is simple, it can be repeated if you were unable to achieve the required level of tension the first time.
Let's get to work. Removing the belt
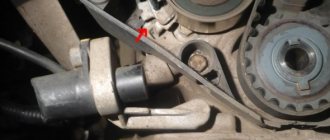
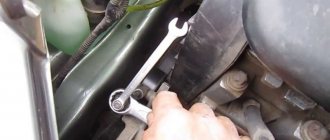
So, first you need to jack up the front left side and remove the wheel. Next, open the hood and loosen the pump pulley bolts. A total of four bolts need to be unscrewed. Next, remove the belt from the air conditioner (if one was installed on the car). To loosen the belt, slightly unscrew the tension roller. Next we need to remove the alternator belt. For this we need 12" heads. Additionally, unscrew the power steering shaft. The amplifier itself can also be removed.
We remove the pump pulley with the belt and disconnect the fasteners of the power steering reservoir. We move the last one a little to the side. Next, you should remove the side motor mount (the one that is attached to the right wing). As the work progresses, we inspect its condition. The engine mount should not have cracks or play. Otherwise, we replace it with a new one.
Next, unscrew the plastic casing under which the timing belt is hidden. Using a ratchet and a 22mm socket, unscrew the bolt located in the middle of the crankshaft. Be careful - it is twisted with great effort.
Tension using adjusting bolt
Adjustment with a bolt on a VAZ-2110
This method is more progressive and is used in most modern machines. It is based on the use of a special adjusting bolt , by turning which you can adjust the position of the generator relative to the engine. The algorithm of actions in this case will be as follows:
- loosen the generator, its upper and lower fastenings;
- Using the adjusting bolt, we change the position of the generator;
- fix and tighten the generator mount.
The belt tension level in this case can be determined during the adjustment process.
2271-3-8-05-02
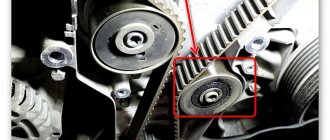
We turn the roller bracket clockwise, overcoming the resistance of the tensioner spring (for clarity, shown on a removed engine)...
Rotate the roller bracket clockwise, overcoming the resistance of the tensioner spring (for clarity, shown on a removed engine)...
We turn the roller bracket clockwise, overcoming the resistance of the tensioner spring (shown for clarity with the engine removed)…
Tension adjustment using a roller
Adjusting roller and key for it
Some modern machines use special adjustment rollers . They allow you to quickly and easily tension the belt. As an example of using this method, consider adjusting the belt on a Lada Priora car with air conditioning and power steering, as one of the most popular cars in our country.
How to tighten the alternator belt on a Priora
Work on tensioning the alternator belt on a Lada Priora car is carried out using a special tension roller, which is part of the structure. To work, you will need a 17 mm wrench to unscrew and lock the mentioned roller again, as well as a special key to turn the adjusting roller (it is a structure of two rods with a diameter of 4 mm, welded to the base, the distance between the rods is 18 mm). Such a key can be purchased at any auto store for a nominal price. Some car owners use curved pliers or “duckbills” in their work. However, we advise you to still buy an adjustment wrench, given its low price and ease of further work.
Voltage regulation process
To adjust with a 17 key, you need to slightly unscrew the fixing bolt that holds the adjusting roller, then use a special key to turn the roller a little in order to increase (most often) or decrease the belt tension. After this, use the 17 key to fix the adjusting roller again. The procedure is simple and even an inexperienced car owner can handle it. It is only important to choose the right force.
After you have completed the tension, you need to perform a check . To do this, start the engine and turn on the maximum consumers of electricity - high beams, heated rear window, air conditioning. If they work properly and the belt does not whistle, it means you have tensioned correctly.
The automaker recommends tightening the belt every 15 thousand kilometers, and replacing it every 60 thousand. Also, do not forget to periodically check the tension, as the belt tends to stretch.
Alternator belt tension on Priora
Another method for tightening the alternator belt on a Priora
You will find detailed information about the process of replacing the alternator belt on a Lada Priora in the corresponding material.
How to tension the Ford Focus alternator belt
On different modifications of Ford Focus cars, one of two systems for adjusting belt tension is used - using an automatic or using a mechanical roller. In the first case, operation is much simpler for the owner, since the belt is tensioned using built-in springs. Therefore, the driver only needs to periodically replace the belt (either on his own or at a service station).
In the case of a mechanical roller, tension must be done manually using bench tools - a pry bar and wrenches. The design of the roller mechanism may also differ. However, the essence of the procedure comes down to the fact that it is necessary to slightly loosen the fastening of the roller, tighten it and fix it again. Also, in some modifications of the Ford Focus (for example, Ford Focus 3), there is no tension adjustment . That is, if the belt slips, it must be replaced.
Note! Buy original belts, as often non-original ones are slightly larger, which is why it will whistle and get hot after installation.
We invite you to familiarize yourself with the material, which presents the procedure for replacing the alternator belt on a Ford Focus 2 car - article.
Features of clutch replacement
Replacing the clutch on a Hyundai Accent is a very labor-intensive operation that involves hanging the engine and gearbox. In Moscow and other large cities there are specialized car services ,
where there is a lift, pit and other necessary equipment.
Important features you need to know about.
- It is necessary to use a special mandrel to center the driven disk, otherwise the box will not fit into place - the usual VAZ mandrel is not suitable here.
- Removing the starter is somewhat difficult. To gain access to the starter bolts, you need to remove the cable fastenings. The cables themselves can be hooked onto the vacuum brake booster.
- The release bearing on this car is mounted on a short bell-shaped guide. If the bearing wears out due to heavy load, the Hyundai owner will face repairs at a high price. The guide itself will need to be changed.
- The clutch on the Accent is installed in the crankcase, connected to the cylinder block and gearbox. The basket is connected to the flywheel using 5 bolts. The latter is equipped with three pins, which, when installing the coupling, enter the structurally provided holes in the casing (basket). Thus, centering occurs.
- The pressure plate is fixed to the basket by three pairs of elastic steel plates. Replacement of the casing is recommended if there is significant settlement of the diaphragm spring and severe wear of the drive disk and petals to a depth of more than 0.8 mm. However, due to the complex process of removing the transmission on a Hyundai Accent, it is recommended to replace the entire clutch kit, including the discs and release bearing.
The work time depends on the type of mechanism installed on the Hyundai Accent. If this is a regular mechanism, then the repair will take about 1 hour.
Finally
Regardless of which method you used to adjust the position of the generator, after the procedure you need to turn the crankshaft 2-3 times using a wrench, and then make sure that the tension level of the hanging belt has not changed. We also recommend driving a short distance (1…2 km), and then checking again .
If you have not found information about the tension level of the alternator belt or cannot perform this procedure yourself, contact a service station for help. If the adjusting mechanisms are set to the extreme position and the belt tension is insufficient, this indicates that it needs to be replaced. As a rule, the mileage of a car between belt replacements is 50...80 thousand kilometers, depending on the model and brand of the car, as well as on the material from which the belt is made.
What's the result?
Many car enthusiasts mistakenly believe that the alternator belt is not as important an element as the timing belt. However, problems with the drive belt of mounted units can also cause a number of failures and malfunctions.
We also recommend reading the article about what to do if the alternator belt whistles. From this article you will learn how to solve the problem of a whistling alternator belt, as well as what to do if tightening the belt does not produce results.
For this reason, experienced specialists recommend checking the tension of the alternator belt at every scheduled maintenance (every 10-15 thousand kilometers). As for replacement, often even a high-quality alternator belt, according to regulations, needs to be changed every 50-60 thousand kilometers, while cheap analogues last noticeably less.
What are the signs to recognize a malfunction?
A number of signs indicate the need to replace old rollers with new ones. They appear both directly while driving, in the form of extraneous noise, and during visual inspection.
- Mechanical damage on the surface of the rollers;
- Noticeable play;
- Grinding noises when turning. This is a clear sign that the car needs repairs;
- Damaged bracket or bearing;
- Leaking oil;
- High temperature during operation;
- Strong vibration during operation;
- Difficulty in turning the shaft.
Reasons for failure
- Entry of a foreign body. This is most likely evidenced by traces of impacts on the body and marks on the flat side of the belt.
- Incorrect belt tension adjustment - too strong or too weak. In this case, the tension indicator, tensioner cover or tensioner limiter breaks. This can be caused by incorrect tightening of bolts or incorrect sizing.
- Work in high temperature.
- Part misalignment. Because of this, belt marks can be seen on its surface.
- Mechanical damage from tools during installation.
How to remove the generator.
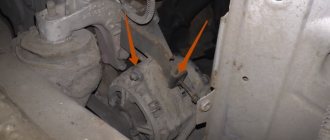
To remove the generator you need to use a ten key, loosening the nut that holds the base with the tension roller, removing all the nuts from their seats. Then unscrew the adjusting screw, having first found it. After making sure that the screw moves freely, unscrew it to the top of the platform. In the photo you can see where all these bolts are located.
We fold the belt off the pulley and unscrew the bolts that hold the device, this can be done with a thirteen key, and on the other hand with a seventeen key. We disconnect the two wires that are connected to the back of the generator, one is connected to the head of the bolt, the other is plugged in, and we disconnect them. Then we remove it from the seat.
Installed a new Chinese generator on Shevik
When replacing the timing belt on a Chevrolet Niva, follow these steps.
- Remove the air conditioning and cooling radiators completely. Before this, of course, you will have to drain the liquid from the cooling system and bleed off the freon. There is no need to remove the fans from them.
- Remove the air purification filter housing.
- Remove the A/C compressor and alternator drive belts. Be sure to remove the tension mechanisms as well.
- Remove the upper part of the timing housing.
- Place marks on the shaft gears. They must definitely match. There is a notch on the engine crankcase that should match the mark on the pulley.
The first step is to prepare the generator for the repair and replacement process. To do this, old parts are removed. To do this, you will need wrenches of diameter 10 and 17.
1. First of all, you need to loosen the belt and remove it, otherwise you will not have access to the bearings themselves. To do this, you need to loosen the roller, which is held by a platform with nuts. There are three nuts, they require a 10mm wrench. Once they are all unscrewed, you need to unscrew the adjusting screw so that it moves up from the platform.
- Place the car in first gear to prevent the crankshaft from turning;
- Unscrew the nut that secures the part
- Remove the spring washer and remove the part.
The process of removing generator rollers on a Niva Chevrolet is identical to any other car.
5. The new ring is installed in its place;6. A new roller is installed in place of the old bearing. Before doing this, you should check the diameters of both parts to avoid the mechanism not working;7. Next, the bearing is fixed using a washer with a spring mechanism and a nut;
8. After this, the belt is put on the new roller.
1. You can put the car in 4th gear, put the belt on the roller and push in the direction of rotation of the crankshaft. When it starts to turn, you need to pull the belt onto the generator pulley, and it will fall into place on its own.
2. In the same way, you can not push the car, but lift the wheel and spin it, or spin the generator itself.
This makes it easy and quick to replace the Chevrolet Niva generator belt rollers. You should regularly diagnose the moving parts of the car in order to prevent possible breakdowns in time and replace faulty parts.
We recommend replacing the bearings and belt every 40 thousand kilometers.
As it turned out, the generator jammed and because of it the belt broke. Why did this happen? Most likely (my version) - when replacing the pump, the service center tightened the belt too much, because we couldn’t tighten the same one at all. As a result, during the hellish “tightening”, the old gene grunted; the bearings could not withstand such abuse. Therefore, it is better to do everything yourself or in a trusted service. Well, tighten it correctly, you could press the samples with your finger by 1 cm.
How did they even manage to tighten the 1885 belt? I can't imagine))
First I'll tell you about the generator
I took the old one, they completely disassembled it, looked at it and said that it had come to an end. The bearings were torn, and the rotor was worn out to such an extent that repairs would cost 2,500 rubles. And a new one costs 3100. It’s Chinese, but the warranty is 3 months, we checked it at the stand - everything works.
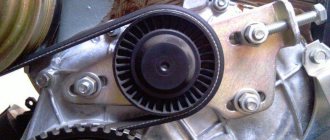
Therefore, it is better to take a native gene with the same width of the roller and with the correct number of rivulets (grooves). That’s why the belt is called a ripple belt, because the grooves must match, it turns out something like rails.
I wanted to buy a 100 Amp Pramo, but I couldn’t find it anywhere in the city; the original genes cost 4,000 rubles. So I decided to try Chinese))
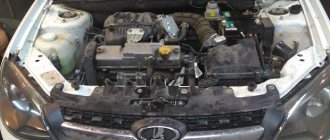
How to remove a generator from a Chevrolet Niva
First you need to loosen the belt, which if tense, cannot be easily reset. So, our task is to loosen the tension roller; it is held in place by a platform with three nuts. You will need a 10mm wrench, it is very advisable to have a ratchet with the same head, preferably an elongated one, because the third nut is located directly under the belt and it is better to approach it from the side.
The first 2 nuts are easy to get out with a regular open-end wrench. But the third one is much easier with a ratchet.
We've loosened it - now we turn the adjusting screw (key 10) so that it moves as far up the platform as possible, so the entire platform with the roller will move freely up and down.
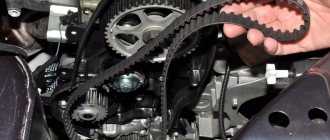
How to replace a belt on a Niva Chevrolet
In order to replace the air conditioning belt on a Chevrolet Niva, you need to use only one 12 key. There are no difficulties in carrying out repairs; it is enough to install the car on an inspection hole or overpass. This makes it much easier to make repairs, because the belt is located at the bottom. To remove it, you will need to loosen the roller mount.
After installing the new belt, simply tighten it using the bolt installed on the roller. Please note that when replacing all belts in a comprehensive manner, this should be installed last. First replace the timing belt, then the generator, and lastly the air conditioner.
It is recommended to buy belts from well-known brands, the quality of which has been tested by time. The layout of the drive mechanisms is shown in the photo.
To work you will need a tool:
- screwdriver;
- jack;
- set of socket wrenches;
- mounting blade.
The manufacturer of the Chevrolet Niva recommends changing the alternator belt every 50 thousand kilometers. Original drive belts can withstand increased loads up to 75 thousand kilometers. Consumables of Chinese origin have to be changed every 15-20 thousand kilometers. Additionally, a visual inspection should be carried out every 10-15 thousand kilometers.
Signs that the drive belt needs to be replaced:
- Visual wear: abrasions, unevenness, tears and cracks;
- Rubber peeling;
- Presence of oil stains.