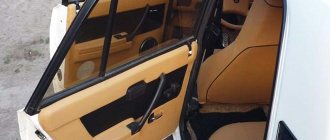
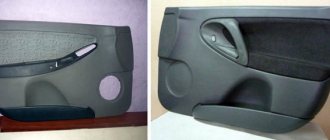
The door trim in any car, including Kalina-2, is a monolithic plastic part called the “card”. To remove the card from the door, you need to lower the side window as far as possible. The design of the upholstery in “Kalina-2 Lux”, as well as “Standard” and “Norma” is different: where there are speakers, there are acoustic pads on the cards. But the upholstery fastening nevertheless does not differ in its design in all trim levels. Let's take a closer look at how to properly dismantle the door card and then install it. Happy reading.
Replacing the front door trim
You will need : remove the negative terminal from the battery and prepare a flathead and Phillips screwdriver, new clips.
Procedure for the left car door :
Procedure for the right car door :
Installation of Kalina door trims is performed in the reverse order. It is recommended to use new clips.
Additional recommendations from car enthusiasts
To save money, some car enthusiasts prefer to use metal screws as panel fastening elements. Using a special riveter, a threaded rivet made of hard metal is fixed to the door. A screw is inserted from the side of the casing and, using a regular screwdriver or hexagon, the screw is screwed into the rivet. To make the fastening look more neat, you can use regular plugs.
Fastening the door trim with clips or screws is reliable and repairable. When purchasing new fasteners, you should study the features of fastening the panel of the car model being repaired.
Replacing the rear door trim
We install the door trims in the reverse order, using new clips.
Let us remind you that it is recommended to remove and install door trims in a warm room, otherwise the plastic clips may break. See also other photo reports on Lada Kalina repairs.
Key words: Lada Kalina doors
Share on social networks:
Found an error? Select it and press Ctrl+Enter..
Source
A detailed guide to removing the front driver's door trim on a Lada Kalina
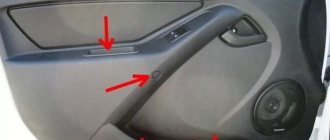
First of all, unscrew the two bolts that are located at the very bottom - in the pockets. The photo below clearly shows:
After this, you need to remove (pry off with a flat screwdriver) the round plastic plug, as shown below, and unscrew and unscrew the screw that is located under it:
Now we move the opening handle to the side and unscrew another bolt:
And the last screw that needs to be removed is located in the very recess on the case, an example in the photo below:
Now you can proceed directly to removing the casing itself. To do this, you must first pry up the casing from one edge with a flat screwdriver and carefully move it to the side, as if pulling it off the fastenings. It is at this step that you need to be careful, since the plastic clips that secure the upholstery are quite fragile and can break. The ideal option would be if you buy yourself a lot of these latches in advance; in any case, they will come in handy sooner or later, especially since the cost of these latches is actually pretty cheap.
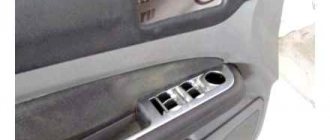
After all the pistons have snapped off, unscrew the central locking latch:
Now we lift the casing up a little and free it from the traction shown above. Almost everything is ready, the only thing that will hold the door trim are two plugs from the power window unit and the wires of the front speaker, if you have one connected. The plug for the power window unit can be removed quite simply; you just need to press the plastic clips on both sides and pull it towards you.
This was the final stage of this repair of our Kalina, as you can see, this simple process will take no more than 15 minutes of your time. If you have any questions about this topic, ask in the comments, we’ll figure it out together.
Source
The door can be removed as a whole (together with the equipment installed on it). It is more convenient to disassemble and reassemble the door when it is installed on the car. At the same time, there is less chance of damaging the paintwork.
An assistant will be required to complete the work.
Removal
1. We remove the window regulator.
2. We remove the glass from the door.
3. Remove the outer door handle.
4. Remove the door lock.
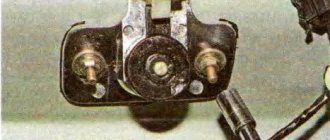
5. Unscrew the nut securing the wiring harness and disconnect the wiring harness block from the door harness block.
6. We release the three latches and remove the wiring harness block from the door hole.
7. Disconnect the wiring harness from the inner door panel and remove the harness through the hole in the door.
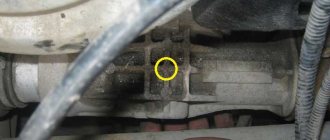
8. Removing the door stop
9. While an assistant holds the door, use a 13 mm spanner wrench (on some TORX T40 cars) to unscrew the lower hinge axis.
10. Using the same key, unscrew the upper hinge axis and remove the door.
Installation
Having coated the working surfaces of the hinges and axles with any grease, install and assemble the door in the reverse order.
Source
Design and types of window lifters
Window regulators are a device designed to raise or lower car windows.
At the moment, there are a huge number of options for these devices, but the design, despite the differences in component parts for different models, is similar, it includes:
- grooves that hold the glass by the side edges
- so-called “rails” that ensure the movement of glass
- Seal and damper, glass movement limiters in the up and down direction.
A window regulator of any design consists of two main elements:
- drive unit
- lifting mechanism - transmitting vibrations of the drive movement to the glass, and thereby ensuring its movement.
The drive is divided into two types:
- Mechanical, known to us from Soviet cars, where in order to lower or raise the window, you need to turn the window lifter handle.
- Electric, typical of modern cars, where to move the glass you just need to press the window button. The electric drive consists of a reversible electric motor with a worm-type gearbox.
In addition, window regulators differ depending on the mechanism of glass movement:
- rack and pinion
- cable
- lever
Each option has its pros and cons and technical features. All these device options have one thing in common: one day they fail; this problem especially often occurs in a model that is so popular today as the Lada Kalina.
There can be dozens of reasons why power windows malfunction, but the most common are the following:
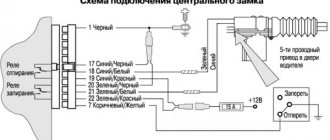
- The commutator brushes of the electric motor, which is responsible for the glass movement process, freeze. This happens, as a rule, due to overheating of fragile graphite brushes, unstable to sudden temperature fluctuations, and this factor starts a chain reaction: overheating of the brushes begins to melt the nest, which is made of plastic in all Kalinas, and not of the best quality. For this reason, the brushes lose mobility, and the device can only be brought into working condition using a hammer. At the initial stage of the breakdown, it is enough to give a good knock or two on the door trim, but after a couple of weeks, this method stops working, and then you will have to disassemble the window regulator to repair it.
- Another cause of failure, typical of the Lada Kalina, as well as many other VAZ models, is the ill-conceived electrical circuit. The contacts cannot withstand the load placed on them, there is no unloading relay, which is why all the window regulators fail at once, and then it is necessary to repair not only the window regulators themselves, but also the remote control.
When it is impossible or too problematic to repair the device, it is more advisable to replace it with a new one. The following options are suitable for the Lada Kalina:
- electric window lifter Garnet VAZ – 530 rub.
- electric window regulator Ningbo – RUB 1,699
- electric window lift AUTO-GEO – RUB 3,300.
Of course, the price is directly related to quality, but if the budget is limited, then the domestic option is not bad.
Now let's talk about how to install window regulators yourself.
Why is the door trim removed?
The technology of disassembling and replacing a decorated panel was first used by VAZ specialists in 2008. The main problem with self-dismantling is the mobility of the door, which is why in this process you will need an assistant who will hold the structure. Removing the Kalina rear door trim is necessary when:
Any of these procedures requires removal of the trim. Without disassembling the inner panel, it will not be possible to replace the lining or gain access to the internal mechanisms of the door card.
Second soundproofing layer
The second layer of sound insulation is designed to suppress unnecessary sounds and retain heat, depending on the material used. The basic principle of operation at this stage is to glue sound-absorbing Accent and heat-insulating Splen on top of the vibration-insulating material. Both materials have a self-adhesive base, so their installation does not require significant effort and special knowledge in the field of sound insulation.
It is necessary to cover the surface with soundproofing material 100%. The only exceptions are technological openings, namely ventilation openings. Only in this case will it be possible to achieve the greatest effect.
Preparation for dismantling
Our instructions will help you understand how to remove the rear door trim on Kalina and determine the further algorithm of actions. Before this, dismantling is carried out. Required::
The door of the Lada Kalina Cross and other sedans is held on by plastic fasteners, so dismantling is prohibited at sub-zero temperatures. If there is a need to remove the casing in winter, then this should be done in a heated room to eliminate the risk of breaking the connecting clips. For the front door you will need 8 pieces, and for the rear door 10. Preparing for dismantling step by step:
After 5 years of operation, car fastenings become brittle, so it is better to purchase additional parts in advance.
Sound insulation of the trunk Kalina 2 (VAZ 2192, 2194)
Car soundproofing technology is the same for all brands and types of cars, however, specific cases have their own characteristics. In the case of the Lada Kalina 2, the whole process begins with removing the trunk trim and tailgate trim, which does not cause difficulties. Next, the entire surface should be cleaned and degreased with White Spirit.
The first layer of trunk sound insulation is vibration isolation material. It is recommended to start installing sound insulation from the rear arches; it is through them that the main noise from the road is transmitted. To soundproof arches, it is recommended to use material with the highest vibration absorption coefficient, for example, 'Bimast Bomb'. We cut sheets of a suitable size (the larger the pieces, the better), and heat the bitumen side with a hairdryer. We apply the material to the cleaned metal of the body and roll it out with a hard (plastic/iron) roller. We glue the next sheet of vibration isolator overlapping or at the joint. After this, we move on to soundproofing the horizontal surface of the trunk, paying special attention to the part where the muffler resonator passes (for Lada Kalina 2 this is the left side).
The second layer is sound-absorbing material. Most often, due to its availability and low price, SPLEN (a largely thermal insulating material) is used, but we recommend that you use an accent. Both materials have a self-adhesive base, so their installation will require significantly less time. We glue 100% of the surface, joint to joint. The only exceptions are technological openings (openings for interior ventilation).
The trunk lid of Kalina 2 must also be soundproofed. Unlike the trunk, you should use a lighter material for vibration isolation, for example, StP Aero. We glue the material between the stiffeners. We set the accent on top in the same way.
Fighting squeaks and crickets. It is worth paying special attention to the sound insulation of the rear shelf. To prevent it from making squeaks, you should stick an anti-squeak (modelin) on all rubbing surfaces, for example, the attachment points of the trunk shelf, the fifth door trim, etc. The soundproofing of the trunk of the Kalina 2 hatchback is completed, we carry out the assembly in the reverse order. The station wagon trunk is treated in a similar way.
one working day to soundproof the trunk
- On the trunk shvi there are 8 sheets of 'Bimast Bomb' (0.53*0.75m) and 2 accent sheets (1.0x0.75m)
- On the trunk lid there are 2 sheets of Vibroplast and 1 sheet of accent.
The effect of sound insulation is significant; firstly, the exhaust pipe becomes less audible. Secondly, it became almost inaudible how the rear suspension worked. And also, if you have tuned the trunk of Kalina and installed a subwoofer there, then soundproofing the trunk is required!
Remember that the best sound insulation is when a set of works has been carried out aimed not only at insulating from external noise (noise from wheels, wind, etc.), but also eliminating creaks and crickets inside the car.
Removing the rear door trim
The rear door structures are secured with 10 plastic holders and 2 screws. The first fasteners hold the door panel, and the second fasteners hold the handles. Disassembly technique:
There are differences between Kalina 1st and 2nd generation. In the first case, the opening handle lever is unscrewed, but in the second option this is not required, since it is screwed directly to the door.
Main functions
Holders, stoppers and restrictive elements installed in the interior guarantee reliable and comfortable use of door leaves. Any door can be opened slightly or left completely open. This prevents possible injuries and ensures complete safety for children.
According to the necessary functions, limiting mechanisms are divided into groups for fixing the position of the doors:
- Locking. The process is ensured by such types as limiters or latches. If you use them, you will no longer be able to open the door from the outside.
- Partial, that is, incomplete opening. Stopping devices stop the movement of the canvas, leaving the opening half-open.
- Full closure. Typically, the role of locking doors in this position is performed by floor mechanisms and door closers.
- Both limiting and holding the door in a certain position (universal devices with magnetic properties are needed).
How to disassemble the trunk lid on a hatchback and station wagon
To unscrew the fasteners on a station wagon or hatchback, remove the trim and disassemble the luggage compartment lid, you will need a standard set of tools. The rear hatch is held in place by 4 clips, 2 retainers and a metal tab with two brackets. Step-by-step algorithm of actions:
If you follow the instructions, the process of dismantling the upholstery takes no more than ten minutes. To return the door card to its place, you need to fix the clips, install the handles, and secure the plastic elements. At the end, the connectors are connected.
Source
The final stage of soundproofing the trunk
In order for the soundproofing of the trunk to be most effective, at the final stage of the technological process it is also necessary to soundproof the plastic in the trunk. Following the algorithm described above, the trunk roof lining is made heavier, which is subsequently covered with bitoplast. Then all wiring is wrapped in Anti-creak. And to avoid unnecessary squeaks, the side shelves and plastic linings of the window mullions are also glued with modelin.
Do not forget that sound insulation of Kalina will be effective only if sound insulation was carried out not in one of the components of the car, but in the entire car as a whole. If you soundproof one trunk, you will certainly notice a certain difference. But things will be completely different if your iron “horse” is soundproofed in all parts of the car.
Removing the Kalina/Granta door
| Unfortunately, road accidents are not uncommon and sometimes it is not advisable to repair the door; it is more convenient to simply install a new part. Do you know how to remove the doors on the Kalina/Grant assembly? |
You will need : remove the door trim (for Kalina, for Granta), prepare socket wrenches “8”, “10”, “13”, socket wrench “13” (for some TORX T40 cars).
All door wiring is connected into one common block, which makes replacing Kalina/Granta doors easier than on previous domestic cars. On the other hand, the presence of this connector makes it difficult to lay new wires in the car doors (for example, heated mirrors).
The door mounting diagram is as follows:
First you need to remove the door stop:
Next, the process for the front and back doors is slightly different.
First vibration-isolating layer
Following the standard trunk noise insulation scheme, the first layer means covering the surface inside the trunk with vibration material. The highest quality vibration-absorbing materials are considered to be materials from STP and Shumoff.
First, you need to cut several sheets of a certain size and shape from a single sheet of vibration-isolating material, and then slightly warm up the bitumen side using a technical hair dryer.
Then the heated sheets of vibromaterial are carefully laid on the cleaned and degreased trunk frame and carefully rolled out with a hard roller made of iron or plastic.
After the first sheets fill most of the trunk area, the next sheets of vibration material should be prepared in the same way. They must be overlapped.
As a result of the manipulations performed, the metal surface of the body should be covered by 55-100%, depending on the material used.
Removing the front door
Remove the front door from the car. Installation in reverse order.