AutoNews / Reviews / Tests
How to Remove the Door Trim of a VAZ 2107 Video
Replacing the door trim on a VAZ 2101-VAZ 2107
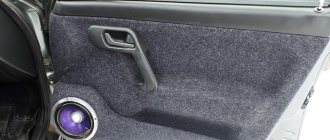
door trim certainly gives a different look to the car when you sit in it inside the cabin, because if you remove it, you can see the inside of the door, as well as the wires (If the door has electric windows), and this is often not very beautiful, but like there are people who do not pursue beauty and thus make a sports car (In this case, everything is removed from the interior and only the steering wheel and one driver’s seat remain), but still not many people need this and therefore the trim in the car it will take its place in the cabin for a very long time (one could say even a lifetime), while covering all the parts on which it is installed.
In order to change the trim, you need tools, specifically: You will need a screwdriver, in addition to this, we also advise you to immediately purchase holders at the auto store that hold the trim on the car door (There are seven holders in total that secure only one trim on the door, Accordingly, if you decide to change the entire door trim, you will need to stock up on 28 holders, they very often break because they are disposable and the broken ones are replaced with new ones, which cost a penny in the store)
When should you replace your door trim?
Everyone decides for himself when he needs it, someone changes it in this case if the casing is torn, and someone changes it because it is very dirty (In paint, for example), but in this case, if it is very dirty, then don’t rush go to a car store and get a new one, try to wash off traces of dirt with the old one, if necessary, use special plastic cleaners or car interior leather cleaner, they clean well, in addition, they refresh the color of the part and give them a new look, and if you use them often, then they protect parts from early aging and the appearance of small cracks on them.
How to remove the door card on a VAZ classic 2106
After watching my video
, You will see “How
to remove
door
panel (
trimming
) on
a VAZ
classic 2106”, how not to break the clips,...
Soundproofing door cards. Replacement of factory pistons. VAZ 2107
Noise insulation: insulating tape 3008v 1mx1.20m 4 mm -256 rubles Piston for trunk upholstery double 2 rubles Installation…
Lada 2107 › Logbook › Homemade cards for the front doors
So, let's start writing in the logbook with the current alteration.
I plan to place podiums with speakers on the front doors of my car. But for such an addition it is necessary to make the door cards tougher. Therefore, at the moment I am busy reworking these very cards.
I didn't plan to make the car a super car. I'm going to leave a lot of things in the classic style. Therefore, the cards will be without any frills.
The materials used were: - 5 mm OSB sheet - self-adhesive backing - black leatherette with the texture of door handles.
Tools: - screwdriver - jigsaw - assembly knife - furniture stapler - pliers - curly and flat screwdriver - a pair of drills and a bit
I decided to make a card from OSB. This material tolerates moisture well and is dense.
We dismantle the old map.
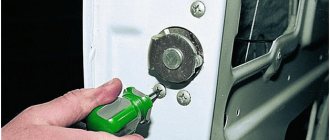
I have an ESP. If you have a meat grinder, remove the window handle. Behind the base of the classic handle there is a steel clip in the form of a spring. This is what you need to take out. The handle will then come off easily. There is also a decorative knob on the door handle. We throw it off with a screwdriver (there are 2 springy plates holding the axis of the handle). Using a screwdriver, remove the plug at the very top of the handle. Then unscrew the 3 bolts hidden in the handle with a curly screwdriver. Take a flat-head screwdriver and carefully remove the pistons around the perimeter of the card.
To easily remove the card from the door handle, do the following. We turn the card up towards the hinge (like doors on a lamp). The card has 2 cutouts in the handle hole for easier removal. Pull back the handle and take out the card.
My door card is already broken in a couple of places. Half of the sockets for attaching the pistons are no longer suitable. The verdict is to change!
We attach the old map to the OSB sheet and outline the outline with a marker or pencil. Don't forget to mark the holes for the door handle and the door handle mounting bolts. There are slots in the hole in the door handle. Don't forget to draw them too. Please note that the new card will be thicker. The door opening handle will still need a few extra millimeters, but the window lift handle will be difficult to attach. Option 3: either cut out a place for the handle with a milling cutter, or take a thinner material, or install an ESP.
We take a jigsaw and cut along the contour. We drill holes with a drill or screwdriver. Make the holes for the door handle oval vertically. This is needed for adjustment.
When using thick material like mine, there is one trick. The lower and outer edge (where the door lock is) should be beveled at 45°. Then the door will close tightly and effortlessly.
Don't forget to check the new map locally. We put the card in place, screw the handle and try to close the door. It should close as usual without any effort. If this is not the case, we look for where it rests on the door opening and finish it with sandpaper or the same jigsaw.
Next we cover it with backing. I use a thin layer of sponge with an adhesive base. Cut off the excess with a knife.
Now you can tighten it up. I cut out a piece of leatherette with a tolerance of 10 cm. We put the leatherette on the backing, turn the structure over, and secure it in several places with a blinder on the back side. We cut the corners a little from the edge of the card to the edge of the leatherette and carefully secure it with a stapler. Using a mounting knife, we cut the leatherette with a cross in the places where we have holes.
Everything is now ready to install the new card.
I decided to carry out the “anti-noise” operation at the same time and covered the outside of the door from the inside with noise.
That's it, now we fix the card in place. We thread the door opening handle, tighten the door handle, put the plug in place at the top of the handle, and install the knob on the door opening handle.
Since I was unable to place the caps on the OSB sheet, I had to go with the collective farm option: self-tapping screws into the metal of the door. I installed 4 screws along the vertical edges of the door. Total 8 screws per door. Please note in this case that self-tapping screws can twist the leatherette and ruin the work. I solved this problem by putting a washer on the self-tapping screw.
It's evening time. Doesn't look very good under the flash. In general, the camera sees differently than the eye. )))
It didn't turn out too bad. The door now closes tightly, does not rattle or knock when driving.
Prices: OSB was in the yard, I don’t remember the price. Leatherette - 2 meters - about 700 rubles. Substrate - 500 rub. Self-tapping screws - 8 pieces per door, one ruble each - 16 rubles.
Source
How to remove the window regulator on a VAZ
It is necessary to dismantle the window regulator only if it stops working or when an electric mechanism is installed on the car.
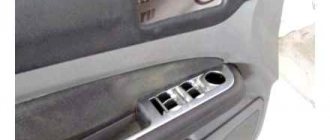
The work begins with removing the handle, as we already wrote about above. Next, the door trim is removed. To perform this action, you will need to remove three bolts holding the closing handle. The casing itself needs to be pryed off with a screwdriver, and it easily comes off the latches.
The first thing you should do when you gain access to the window regulator is to tie the cables with wire. This measure will prevent the rod from weakening and jumping out of the guides. If this happens, it will take more time and labor to return the mechanism to its place.
The dismantling algorithm is as follows:
- put the handle back;
- lower the glass a full turn to get to the clamping bars and cable clamp;
- remove one fastening screw completely - loosen the second one only a little;
- return the glass to the top position (necessarily all the way);
- prop it up with a screwdriver to prevent it from falling;
- remove the nut holding the tension roller - it is located lower than all the others, in the center (if the door is rear, this is not required);
- remove the cable from the remaining reels;
- unscrew the remaining 2 nuts holding the guide groove and move it to the side;
- remove the mechanism.
When the window regulator is removed, check how well its components function
Pay special attention to the videos
Materials for upholstery
Drivers have hundreds of options available to them regarding which door trim material to choose for tuning their car. Most often chosen:
The most affordable artificial materials remain: vinyl and leatherette. The advantage of the set is its durability and the ability to be treated with leather detergents.
Luxury door upholstery involves the use of expensive materials: genuine leather, artificial Alcantara or almara. The material is soft, stretches well, and is highly durable. The price depends on the brand and production features; rough natural leather is cheaper than processed and dyed almara with an additional layer of insulation.
Textile upholstery only has the advantage of a variety of colors. You can choose colored upholstery that will harmoniously fit into the overall style of the interior. The disadvantages of textiles include difficulty in cleaning; not all stains can be removed.
Installation of panels
On the VAZ 2107 door body, you install special bushings with internal threads yourself. Holes are pre-drilled on the panels in appropriate places, and decorative bolts are passed through them. When attaching the bushings, you must carefully follow the installation instructions to avoid turning the part. This mount allows you not only to visually tune the interior, but also to eliminate knocks and squeaks during the trip.
The door panels of the VAZ 2107 car are placed in place and attracted to the base using decorative bolts. This installation method is highly durable and provides optimal conditions for the operation of audio system speakers. Self-tuning by reupholstering the car interior with leatherette transforms the interior into a real work of art.
Features of dismantling
Before work on reinstalling the door trim, you need to prepare a tool. You will need:
To cover doors 2107, you can use an old part; if the factory plywood is not deformed, this will make the work easier.
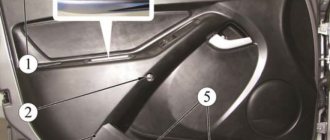
Dismantling the panel proceeds in steps:
Dismantling takes up to 10 minutes, it is important to unscrew the bolts sequentially; if the interior has been modernized, and the door has additional clips along the edge of the card, remove them first.
Door card manufacturing process
The old textile or leatherette covering is used as a template when marking the new one. It is necessary to attach the old cladding to the new material and mark with a pencil the cutting lines and places for the standard holes:
If you plan to replace a mechanical window regulator with an electric one, do not mark the location for the hole. At the preparatory stage, do not make any holes in the door trim.
Making a door card, which is a plywood sheet of a certain size, follows the steps:
Prepare foam rubber. The backing can be glued directly to the art, but it is better to use a fabric backing and glue a sheet of foam rubber to the textile base. This will allow you to clearly stretch the foam and avoid overuse of glue, which is quickly absorbed. Work process step by step:
The panel can be sheathed with a solid piece or a sewn piece of the selected material. If the sheathing consists of two or more pieces, you must ensure that the holes are not cut along the machine stitch line. It is necessary to trim the pattern, leaving an allowance around the perimeter of up to 5 cm. Vinyl leather and Alcantara are significantly deformed when shrinking. The pile in textile upholstery should not be rolled up when the holes for the handles are cut.
The process of stretching the trim onto the door card:
The door panel is installed using the reverse algorithm. If the car used additional clips for installation, it is recommended to buy a new set that matches the overall style.
A simple interior tuning can transform a VAZ 2107 beyond recognition. Wooden panels, inserts on the central and side pillars, dashboard and seat trim are used as additional decorative elements.
Source
Seats
And although the seats of the “Seven” are considered the most valuable of the entire VAZ (classic) family, they have a significant drawback - the front seats are flimsy and break quite quickly. Over time, the back of the driver's seat begins to warp, and even if it is welded, this will not last long. In addition, the upholstery on the seat is worn out, which looks unattractive.
Which seats are suitable for VAZ 2107
In addition to stock factory seats, the VAZ 2107 can be equipped with seats from foreign cars. For example, analogs from the 1996 Mercedes W210 and 1993 Toyota Corolla are perfect for this purpose. They are easily attached to the standard "seven" bolts.
Seats from MAZDA 6 in VAZ 2107
Seats from Fiat or SKODA are also a good option. But in this case, you will have to make two additional holes for more secure fastening. Elements from Nissan and Peugeot can also be used, but during installation you will encounter certain inconsistencies. Volkswagen seats fit well on the 7 without any modifications. They are comfortable, but too high, so it is better to abandon this option.
Video: replacing seats on a VAZ from Ford Mondeo
You can shorten the seat back by trimming it. To do this, the chair must be dismantled and disassembled. Using a grinder, a part of the frame is sawed off. This type of work is very labor-intensive, so it is better to turn to specialists. As for the VAZ 2107 headrests, removing them is very simple; to do this, you just need to pull it up until it stops and press the latch.
Communities › Car audio › Blog › Door cards in 2101
Since they write about Zhiguli here, I’ll post what I did last winter, not great of course, but at least that’s it)
Please don’t kick me too hard, I haven’t been a member of the community for even a month, I didn’t know a lot of things when I did it, and actually the car is for every day, not for competitions, that’s why everything was done in a simple way =) since we bought a Kicx GFQ 6.2 for the front, and my front cards are molded from fiber into ovals, and you can’t redo them, in general, I had to think again... I said one thing right away - no fiber, I’m tired, it’s not realistic to breathe this muck when you’re sanding - then everything itches, I don’t want to... climbed I looked at different options on the net, mostly nothing normal, either heavily stuck on, or some kind of garbage... I came across a link to how someone made maps for the field, I liked the design, it looks like the podium fits the din, it’s not just straight, and the shape itself is similar to something more or less standard, without super-duper bells and whistles, so I settled on it, but with my own modifications) since I wanted to install the music normally, I had to make cards from plywood so that there would be rigidity, and not hang on the snot... cut it out according to the dimensions of the 9mm plywood frame, marked out the main components and shapes of the convexities
Next, we take extruded polystyrene foam and cut it out the way we want to blow out the cards.
well, attaching dins to polystyrene foam is a perversion))) after all, we want it to sound normal, we took normal components, now we must not spoil them with installation) in general, I took 10mm plywood and sawed a ring, under the din there were two spacers of 10 each and on the outside there were mesh another 10mm ring, total under the din itself is 29mm of plywood + the top ring around the mesh also I think will help them, that means another +10 mm bonus) I’m just kind of tired of the meshes sticking out, somehow it looks like a collective farm, with recessed ones it’s much better, closer somehow to the factory or something)
Then we grind the polystyrene with a belt sander to what we like, the corners are easily rounded with ordinary sandpaper, we cut out a hole for the podium and screw it on, we fill the cracks with foam...
Well, so that the foam wouldn’t stand out, I decided to putty the whole thing... I also smeared it in some places where there were small flaws... but that wasn’t the case (((somehow I screwed up, the putty corrodes polystyrene just like polyester resin, so instead of a smooth surface I got even more holes ((((
and then my crazy nerves began to fail, I didn’t even want to continue anymore, my hands gave up...
a couple of days passed, the toad again began to choke that the speakers had been bought, but I wasn’t listening to them, I went to the garage to try other methods... first of all I started with the easiest thing - soak it in the most ordinary PVA, soak it, everything is dry, the glue really absorbs into the top layer and makes it’s even stronger, it’s a buzz, but it didn’t work with putty (((since it adds strength - I still missed both cards)) then, since polyester dissolves it, and epoxy is a natural product, then you need to try it) mixed it a little, anointed it waste, let it dry, checked - everything is ok, the putty doesn’t eat up anymore, so we’ll do it like this =) the next day I take the same glue
DIY door trim for VAZ-2107
The standard door trim on the VAZ-2107 is not very attractive and often spoils the whole picture of the interior. Many owners of “Sevens” tune their cars, and one of these types of modernization is replacing the door trim. The VAZ-2107 car is equipped with cheap materials that are not reliable and begin to wear out over time. Let's pay attention to the question of how to replace the door trim on a VAZ-2107 car, what is needed for this, as well as how to dismantle the standard door panels.
Acoustic shelves and podiums for cars. (Saratov) | Topic author: Batilde
⚡⚡⚡ARE YOU LOOKING FOR QUALITY AND CHEAP COVERS (DOOR CARDS) FOR VAZ 2101-2107? THIS IS FOR US! 2500 PER SET! Cards with ECONOMY podiums for 16th speakers. ✅With pockets for small items. ✅Easy to install on standard clips. ✅A simple solution to refresh the interior and improve the sound. ✅We ship within Russia by Post and transport companies. Write in a personal message or ☎☎☎ Calls/Viber/Wats App+79271631611 ➡Site: http: www.autoobshivci-shop.com ➡On Odnoklassniki: https://ok.ru/akustiches ➡In Contact: https://vk. com/obshivki_class