Published: 10/30/2020
- Replacing the front or driver's door trim
- HOW TO REMOVE THE COVER. VAZ 2114
- Removing the trunk lock drive
- Removing the rear door trim
- How to remove the door trim on a Lada Granta
- Removing the rear door interior handle
- Front door diagram. Catalog numbers of parts
- Replacing the front door trim
- How to remove the front driver's door trim on a Lada Granta
- How to remove the door trim of a Lada Priora yourself
- Remove the front door trim of the Lada Granta
- Removing door trim on Grant
- Removing the front door trim of the Lada Granta
- Replacing the bearing of the input shaft of the VAZ 2107 gearbox
Replacing the front or driver's door trim
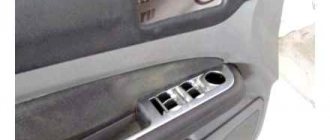
To remove the door trim on a Lada Grant, you need to remember the location of the screws that hold it in place. There are five of them in total:
- under the lock button;
- in the armrest;
- immediately under the armrest;
- two from the bottom of the panel.
They are not difficult to find. Next we proceed to dismantling:
- We unscrew the door lock button, pick up the plug and unscrew the screw.
- We unscrew the screw in the armrest from above (in the pocket) and from below.
- Same with the two on the bottom of the trim.
- We pry up the upholstery with a screwdriver to pull it off the rear view mirror adjustment knob.
- We pry up the upholstery and slowly (so as not to break it) remove it from the clips (8 in total). We recommend starting this from the bottom right corner.
- The last step is to turn off the electronics (if you have speakers or power windows).
This completes the dismantling. To install a new panel, follow these steps in reverse order.
HOW TO REMOVE THE COVER. VAZ 2114
Removing the casing
front door
. Vkontakte community. Subscribe! Xiaomi Redmi Note 3 Pro.
4) Also, usually there is a speaker, it is attached to 2.4 bolts, to be honest I have seen one. Unscrew, there are cross-shaped bolts from the factory. We are deleting.
5) At the top we twist the locking “bolt”, it just turns like a bolt.
6) All removed, now we need to separate the cover, this is a little more difficult. You can pull the corners out and you can pick up the screwdriver and pull yourself out. The main thing is not to break, carefully trying to separate. If some rivets are broken (and it will be 100%), don't worry, we bought new ones
This “analysis” concludes, as you can see, nothing complicated, and they still believe that the front part is complex. Watch video.
Everything is much simpler behind.
Removing the trunk lock drive
To remove the lock drive, you need to disconnect the lock rod from the drive (see above)
Using a marker or felt-tip pen, outline the position of the lock drive relative to the trunk lid
Using a wrench or a socket 8, unscrew the two nuts securing the lock drive to the trunk lid
Removing the lock drive
Use a screwdriver to pry it off and remove the retaining ring.
Removing the pressure lever
And remove the fixing plate
Remove the pusher with washer and spring
We take out the cylinder lock mechanism
Removing the rear door trim
The process of removing the trim from the rear door of the Lada Granta is somewhat complicated. Additional handle fastenings are installed to close the door. It is attached to the car body using two “10” bolts.
- Carefully pry off the plastic cover of the door handle. It is better to do this with a polymer material, a plastic card. It is strictly forbidden to use metal objects, as the edge will be damaged.
- Using a Phillips screwdriver, unscrew the two bolts securing the handle and remove it.
- We twist the latch flag.
- Unfasten the plastic clips around the perimeter of the card.
- In the cavity of the opening, we disconnect the blocks with wires that go to the speaker.
- We replace the door card, carry out preventative maintenance, and connect the electrical wiring. We install new auxiliary equipment as necessary.
- The assembly of the structure is carried out in the reverse order.
By analogy, we remove the trim from the rear door on the opposite side.
Original Lada Granta interior parts at the best price
Lada Granta interior details
Buffer for the glove compartment lid for Lada Granta, Kalina-2 and Vesta. ..
Trunk shelf buffer for Lada Granta (liftback) and Kalina-2 cars..
Glove box (glove compartment) central for Lada Kalina-2 car..
Self-tapping screws 4.9*16 (10 pieces per set) 21140-5325388 Application in Lada cars..
The center pillar upholstery insert is installed standard on Lada Kalina, Grant, Priora cars.
How to remove the door trim on a Lada Granta
It came to covering the rear roof pillars, unfasten the back of the rear seat and lower it for convenience, then unscrew one screw.
We also place our fingers under the upper part of the casing and pull it towards ourselves.
This is what we have, under the plastic
We do the same on the other side, and for the convenience of removing the trim, we pull off the rubber bands of the doors where required.
Next is the most interesting thing, I won’t show the location of the ceiling lining pistons, they can’t be seen with the naked eye anyway, but you can remove them in different ways, one way carefully and the other barbarously, we choose the middle one, since for such providential work there is no necessary tool and there is no way to buy it washed off for one-time use, used the material at hand, what was lying badly, used an old smear from a Chinese toner...
I cut it by eye.
We insert it between the piston and the trim, and pull it towards ourselves without damaging the ceiling trim.
something like this.)))
The casing is intact
- And so we continue until there are 8 pistons in our hands, and here it is, although I couldn’t take a photo of myself as I pull out the headliner, it is pulled out through any rear door, having first lowered the front seat of the side through which you would drag the trim, I pulled it out through the back left.)
And this is what we have
Well, so to speak, to get the full picture, I removed the trim of the rear shelf, it is held on by three pistons.
Removing the rear door interior handle
The interior handle must be removed when removing the door lock, as well as when replacing the handle itself.
Remove the rear door trim as described above.
Using a Phillips screwdriver, unscrew the two screws securing the base of the handle to the inner door panel
We remove the foot of the handle base from the hole in the inner panel of the door and remove the handle from the door
Remove the rubber clamp of the rod and remove its curved end from the handle lever
Install the handle in reverse order
Front door diagram. Catalog numbers of parts
Soundproofing front doors on Lada Granta
The pasting process is not complicated.
We prepare:
- 2 sheets of Visalis AL, dimensions 460x700 mm or more in reserve;
- 1 sheet of Bitoplast, size 1000x700 mm;
- half a meter of corrugation for wiring the front door;
- degreaser;
- hair dryer or any other heating device;
- gloves;
- tools, screwdrivers;
- rags.
Algorithm of actions
- After installing the structure (the process is described above), degrease the surface, clean it of dirt and corrosion.
- At the same time, we evaluate the condition of the vibration-isolating gasket and cover it with a new one.
- Cut Visalis into the required sizes.
- We lubricate all driving mechanisms and hinges.
- We isolate all possible sound sources.
- We cover the surface of the upholstery with vibration-absorbing material.
- We heat the Bitoplast and press it against the metal surface of the door.
If the algorithm is followed, the doors will close silently, as if in a foreign car.
The process of dismantling the structure is described above; we follow its points. After installation by screwing it onto the hinges, we proceed to assembly and filling the inside. Instead of worn rubber seals, we install new ones. This completes the self-replacement process.
Tools and materials for dismantling door cards Grants
Although the procedure for removing door cards on a Lada Granta is not complicated, you need to have all the necessary tools, including clips. It is recommended to perform dismantling at a temperature not lower than +10C; if the temperature is lower, you should be very careful.
Article number of clips for Grants 38535-vo. They are inexpensive and are often found in sets of 40 pieces.
To remove parts you will need:
- Fastening elements (clips) that often break during operation.
- Flat and Phillips screwdrivers;
- Unnecessary credit card or similar item;
- Gloves;
- Rags.
Replacing the front door trim
You will need: disconnect the negative terminal of the battery, prepare straight and Phillips screwdrivers, as well as new clips.
- Unscrew the door lock button.
- Use a flat-head screwdriver to pry out the screw cap that secures the trim to the door.
- Unscrew the screw with a Phillips screwdriver.
- Unscrew the screw in the armrest niche using a Phillips screwdriver.
- Unscrew the two screws for the lower trim fastening using the same tool.
- We begin removing the Lada Granta trim from the lower front corner by inserting a screwdriver between the trim and the metal of the door. Carefully overcome the resistance of the pistons.
We continue to remove the door trim, moving from the corner in both directions. We remove the lock lock rod from the upholstery hole.
- Disconnect the block with wires from the door power window by pressing the lock.
- Disconnect the connector with the wiring harnesses from the front passenger door power window.
- Remove the Granta front door trim.
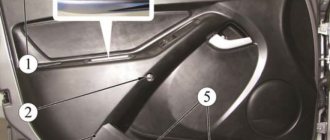
The diagram shows the location of the upholstery fastening pins on the inside.
Installing the upholstery is done in the reverse order.
Preparing the machine for work, necessary tools
The car must be driven into a garage or box (an inspection hole is optional - only when repairing other vehicle components) and secured in place, supporting the wheels to prevent shifting. It is allowed to carry out repairs outdoors in warm, windless weather on flat asphalt or a concrete surface. Be sure to find a fastening box with compartments so as not to confuse what was taken out and where it came from.
For the dismantled cladding, you will need free space to put it aside until the very end of all repair activities. This way it will be completely preserved – it can be further cleaned from the inside before re-installation. You should definitely stock up on clips, which may crack during the process of removing the trim (a kit for such work should be on hand).
You should also disconnect the battery (negative terminal) to prevent a short circuit due to elements under the casing. All components removed from under the trim can also be placed away from the car so that they do not accidentally get underfoot. The following instructions apply to all Lada Granta cars without changes by the owners.
Fastening elements are located along the lower perimeter (three bolts per ten), as well as along the entire door card - eight pistons. To complete all the work you will need:
- two screwdrivers (Phillips and flat head);
- set of tools for removing trim. If this is not the case, then you can use a flat-head screwdriver, an unnecessary credit card, or a similar flat tool;
- latex gloves;
Set of tools for removing trim and clips - rags;
- soldering iron (for fixing wires to the speakers in the absence of a detachable connection).
Additional tools may be required depending on the situation and the intended task.
How to remove the front driver's door trim on a Lada Granta
You need to start work by choosing a thin screwdriver to remove the casing. It is better to wrap the screwdriver tip with electrical tape or tape to avoid scratches on plastic or metal. It is better, of course, if you have a special set of tools - it is easier to work with them, and the clips are removed mostly without damage.
Working with the driver's door is a little more difficult than with the others due to the presence of electric lifts, but even with their presence the whole process will take 10-15 minutes and will be quite simple to perform. The door must be fixed in one position so that movement does not interfere with work and does not put everyone involved in the procedure at risk. Next you need to work in the following sequence:
- The door lock cap is unscrewed counterclockwise.
- In the central part of the door there is a round decorative trim, which must be carefully removed with any flat object (for example, a screwdriver or a not very sharp knife). There will be a bolt under the trim that can be unscrewed with a Phillips screwdriver.
- Another bolt is unscrewed in the recess of the driver's door handle.
Advice!There is also a bolt in the recess of the inside door handle that can be removed. However, this is not necessary to remove the trim - the handle will simply remain on the door skeleton.
- Two bolts are removed from the bottom of the casing.
- No more bolts hold the trim in place - only clips around the perimeter of the door remain. It is recommended to start removing from bottom to top. It is convenient to remove the trim from the corner where the pocket is located. Using a special tool or a screwdriver wrapped in electrical tape, pry up the casing and gently pull it towards you until the click of the clip is heard. The tool is then moved to the next clip and the process is repeated.
Location of the clips on the front door trim of the Lada Granta
- When several pistons have been removed, you can continue to use your hands, grasping the casing and pulling it towards you. In this case, you will need to remove the lock lock rod from the corresponding hole in the upholstery.
- The power window wires will come out of the trim, so you won’t be able to remove it right away. First you will need to disconnect the wiring harness blocks that are connected to the inside of the casing - they are simply removed.
- This completes the process of removing the front driver's door trim on the Lada Grant!
Then you can carry out the planned work. It is recommended to degrease and clean the inside of the door for the most reliable fixation of insulating/soundproofing materials.
Original Lada Granta interior parts at the best price
Interior parts of Lada Granta
Buffer of the glove compartment lid for Lada Granta, Kalina-2 and Vesta. ..
Trunk shelf buffer for Lada Granta (liftback) and Kalina-2 cars..
Glove box (glove compartment) central for Lada Kalina-2 car..
Self-tapping screws 4.9*16 (10 pieces per set) 21140-5325388 Application in Lada cars..
The center pillar upholstery insert is installed standard on Lada Kalina, Grant, Priora cars.
Steering wheel insert for Lada Kalina-2, Granta FL and Priora-2. ..
Inserts (liners) in door cards for Lada Granta, Kalina-2 and Datsun cars. Material – leather..
Inserts (liners) in door cards for Lada Granta, Kalina-2 and Datsun cars. Material – leather..
Inserts (liners) in door cards for Lada Granta, Kalina-2 and Datsun cars. Plastic inserts..
The sleeve is a boat for fastening. Used in Lada Kalina, Kalina-2, Granta, Priora cars.
Guide bushings for Lada Kalina / Granta / Priora door buttons are used to replace broken or...
The original piston (holder) for the roof trim in black from Vesta Sport. Is complete..
Original standard sun visor holder for Lada Granta, Kalina-2 and Danish cars..
Console button cover for Lada Granta / Kalina-2 / Priora, Datsun ..
Original trunk release button cover. Installed in the cover of the fuse block..
- Guarantees
- About Us
- Payment Security Policy
- Regulations on the cumulative discount system
- Shipping and payment
- Contract of sale
- Personal data processing policy
- Contactless delivery
- Write to us
- Site Map
- Personal Area
- History of orders
- Our partners
- FAQ
- Manufacturers
- Articles and news
- Checking order status
st. Dzerzhinskogo, 70, entrance 3, Mon-Fri, from 10 to 18 (Samara time)
The online store “AvtoStolitsa63” is operating as usual, accepting and completing orders.
We do our best to ship all orders as quickly as possible. You can check the delivery time of your order by writing to us at [email protected]
From April 6 to April 10, Russian Post operates as usual. You can receive your parcel. Be careful when visiting Russian Post branches, choose a time when there are fewer customers there, and maintain a social distance of at least 1.5 meters.
If your parcel is paid for in full, you can order delivery of the parcel to your home for 100 rubles, click here to find out in detail. The storage period for parcels has been extended from 30 to 60 days.
Source: autostol63.ru
How to remove the door trim of a Lada Priora yourself
The car brand was released twelve years ago, and since then has been very popular among drivers. And it’s not surprising, because the cost of a high-quality product from the domestic automobile industry is quite low.
Many car enthusiasts can afford to buy it. Repairs and service are cheap, and some parts can be replaced yourself.
For example, from this article, readers will learn how to remove the Priora door trim.
In some cases, vehicle owners want to replace the door trim on the Priora. Achieving this goal is quite simple; you will need a minimum of tools. Lack of experience should not be scary; even people who are not involved in such repairs will be able to remove the old door trim and install a new door trim according to the instructions.
How to remove the trim
The process is divided into three main stages:
- Finding all screws and fixing elements, unscrewing the bolts.
- Removing door trims.
- Dismantling the casing.
The covering of the rear and front panels is removed separately. These steps will be described in detail below in the article; if you do not want to go to a car repair shop, we will provide instructions on how to remove the door trim on a Lada Priora car.
Why is dismantling necessary?
The upholstery of the Lada Priora car is available in several colors. If a car enthusiast wants to change the interior color, then he will have to change not only the seat upholstery, but also the door trim. Components such as noise insulation or insulation cannot be installed without first removing the sheathing.
If the window lifts are damaged, or the door handles are damaged, you will also have to remove the Priora door trim, notice the broken components, and install it back. Also, over time, the cladding loses its appearance, stains appear that cannot be removed.
How to dismantle the casing: instructions
You will need the following tools:
- flat screwdriver;
- Phillips screwdriver;
- clips and pistons to which the covering is attached.
It is not necessary to complete the last point, but it’s better to stock up on clips and pistons in case you break the old ones. In order not to waste time and not run to the store, it is advisable to buy the kit in advance.
When choosing caps or clips for Priora, pay attention to what brand they are intended for. These components for Priora are similar to parts for Kalina
The difference is in length - for Kalina, the clips are one and a half millimeters longer. Ask consultants for help, they will help you choose the right parts.
Front door
So how do you remove the front door trim? Reading the instructions:
- Unscrew the door lock latch.
- Unscrew the screw securing the handle to the door. Remove the screw and remove the handle.
- Unscrew both bolts that hold the switch block. Remove the unit; to do this, unclip the wires from the connector.
- Find the three fixing screws at the bottom of the door, unscrew them, and set them aside.
- Unclip the trim clips using a flathead screwdriver. Using the flat tip of a screwdriver, pry up the edges of the casing and carry out the process from the bottom up.
Such simple manipulations allow you to remove the front door trim. Install the new or old covering (depending on the purpose) in the reverse order
Backdoor
How do you remove the rear door trim? See instructions:
- Remove the socket from the glass receiver handle.
- Move the fasteners aside.
- Carefully remove the window handle and set it aside.
- You will find three bolts at the bottom of the door, unscrew them.
- There are four latches on top; unscrew them with a Phillips screwdriver.
- On the side, where the handle is located, there is another bolt, unscrew it.
- There are two screws on the other side of the door, unscrew them.
- Take a flat-head screwdriver and pry up the trim from below, gradually separating it from the door. Perform manipulations from the bottom up.
Install the door trim in reverse order. A map of the location of the fasteners can be found on the Internet, so you will be sure that you are unscrewing the bolts that secure the covering.
Conclusion
The dismantling process will not take much time and effort. It is so simple that the decision to go to a workshop and order a replacement of the covering there seems irrational. Following the instructions, everyone will be able to remove the Priora's trim.
Remove the front door trim of the Lada Granta
Any car owner can dismantle the door panel trim on the Lada Granta model on his own, since this work does not involve any difficulties.
Removing the casing takes little time. The procedure itself can be carried out through several simple steps. For dismantling, you should only equip yourself with screwdrivers: flat-profile and figured. In this article we will describe how to remove the trim on a Grant from the front door and, accordingly, from the rear door.
How to dismantle the casing in Grant yourself?
How to remove the casing correctly and with your own hands? The first step is to disconnect the negative terminal from the power battery of the Lada Grant. This action is not necessary if the stern doors are not equipped with power windows. When dismantling the trim from the front door panel, disconnecting the terminal is a mandatory measure!
To securely fit the casing in its place, you will need to acquire new clips. It is possible that these fasteners may break during the removal procedure.
Next, on the decorative door panel of the Lada Granta, using a flat-profile screwdriver, pry up the plug and remove it. We act carefully to avoid breaking off its fasteners. Use a Phillips screwdriver to unscrew the fixing screw. We perform a similar procedure with a bolt located in a plastic socket.
After this, we switch to the plugs placed in the handle itself
If you carefully remove them, you will have access to two screws that also need to be unscrewed. We recommend placing all fastening elements in suitable containers.
This will allow you to quickly and accurately assemble the unit to its previous state.
The only action left is to unscrew the remaining pair of trim fixing bolts, which are located at the bottom of the door card.
To remove the locking button, you will need to perform a simple manipulation - turn it to the left and slowly pull it up.
If the car is equipped with a manual drive of the mirror mechanism, then use a screwdriver to pry up the sealing gasket of the mirror hinge lever and remove it.
Based on the photo, it is recommended to first familiarize yourself with the locations of the clips in the Lada Granta. This will reduce the risk of damage and save time on work.
How to remove manual or power windows?
Removing manual mechanisms
In this case, armed with a flat screwdriver, we effortlessly press the mechanism handle lock away from the socket. Next, we move the latch to a position where its protrusion is freed from engagement with the socket. Now remove the socket with the handle.
If the window lift is electric?
The process of removing a panel with an electric mechanism on a LADA Granta is similar to that discussed earlier: the panel is pryed off and dismantled. To eliminate interference caused by the removed panel, it should be placed inside the door card by feeding it through the hole that is the panel seat.
- Speed sensor Lada Granta
- Grant headlight adjustment
- Rapids on Granta
The final stage of dismantling the casing
How to remove the trim carefully? Using a plastic spatula, pry up the casing and carefully remove it from its engagement with the latches. Next we see the switching harnesses with cables
They are necessary to connect door mechanisms:
- window regulator;
- mirror drive;
- loudspeaker, etc. (depending on the configuration version).
We disconnect their connectors.
Upon completion of work, you should make sure that there are no broken clips. If any are present, then we replace them with new analogues. We assemble the casing on the LADA Granta in the reverse order. Now you have become familiar with how to remove the trim on a domestic car on the front door and, accordingly, the rear door.
Instructions
To tune Grants of standard or luxury modifications, you must first disconnect the negative terminal from the battery. If the stern doors are not equipped with electric drives, then this step is skipped. Purchase new clips in advance, since when removing the trim and the trim itself, the old ones are often damaged.
- Remove the decorative panel plug - to remove it without damage, it is recommended to use a flat profile screwdriver. You need to work until you hear a click, and act carefully to prevent the fastener from breaking off.
- Use a Phillips screwdriver to tighten the fixing screw, and do the same with the bolt that goes inside the plastic socket.
- Disassemble the plugs from the handle - remove them to gain access to a pair of screws, unscrew them, put them in a prepared box or other container.
- To complete the disassembly of the casing, unscrew the last pair of bolt clamps installed at the bottom of the Grant door.
Removing door trim on Grant
It is necessary to remove the front or rear door trims on a Lada Granta car in various cases, which can be listed below.
- Failure of the motor or the window lift mechanism itself
- Replacement of side door glass
- Sealing the internal door cavities to improve sound insulation
- Repair or replacement of locks, cylinders or opening handles
The replacement process is quite simple, so you can do it all yourself without any problems. At most, this will take no more than 10 minutes.
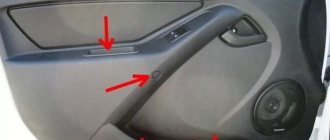
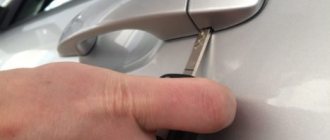
So, before starting the repair, you need to open the car door and use a thin screwdriver to pry off the plug, under which there is a screw securing the trim. Clearly shown in the photo below.
Then unscrew the screw securing the inner door pocket, which is also the handle.
After this, it is worth unscrewing two more screws that are located at the bottom of the Granta upholstery - which secure the so-called pocket.
We unscrew the screw securing the door opening handle and then remove the protective rubber cover in the area of the rear view mirror control handle. This is clearly shown by the yellow arrow.
After this, you can carefully pry it from the bottom of the upholstery and with sharp, but at the same time careful jerks, pull it off the latches.
It will not be possible to completely remove it right away, since the power wires to the window regulator unit will interfere, which must be disconnected.
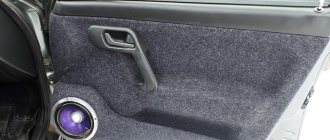
Also, if you have front speakers connected and they are installed on the trim, which is often the case, the wires from them must also be disconnected.
After which you can finally remove the door trim on the Grant and carry out the necessary work further, for which all this was even necessary! Installation of the casing occurs in the reverse order and will not be particularly difficult.
Removing and installing rear door trim on Lada Granta cars
As for the rear door, its trim is not much different in terms of fastenings from the front door. But still, there are some different points that should be mentioned.
- The presence of a full door closing handle means that there are two more screws that will additionally secure the trim. They are located under decorative plugs.
- There is no power window control unit, so there is no need to disconnect extra wires when removing.
Replacement or installation is carried out in the reverse order of removal. The price of new skins in case of damage and the need for replacement ranges from 4,000 to 6,000 rubles for a complete set.
Selecting a skin
As a substitute for standard door inserts, you can use:
- genuine leather. The cladding will look good and serve for a long time, but the cost of the material cannot be called affordable. It is better to use natural leather if you plan to upholster the car interior with your own hands;
- leatherette (dermantine) - inferior in quality, but costs much less than genuine leather. More than a reasonable option for finishing doors;
- eco leather. The material is a high-quality substitute for genuine leather. The composition includes cotton, cellulose-based artificial materials, synthetic polymers and natural leather. Has excellent elasticity, resistance to temperature changes and mechanical stress;
- velours. The material is well suited for door trim, used for car interior trim, and less commonly for ceilings;
- alcantara. High-quality samples will not be cheap, but an analogue from a budget manufacturer can be found at a very reasonable price. Of course, the material from famous manufacturers is of higher quality and easier to paste, but the budget option can also provide a pleasant tactile sensation;
- artificial suede fabric. The textile consists of polyester on a cotton base. Velvety and soft to the touch;
- a special fabric that is usually used to replace a car's headliner. The material must be dense if it is intended to cover the elbow areas, and not just decorative inserts. Prices for ceiling fabric are quite reasonable.
Material, tools
You can calculate the amount of material required for sheathing yourself. We cannot indicate these figures, since everything depends on the size of the insert, as well as the area of the bends. For an approximate calculation, you can use a ruler and formulas for calculating the area of geometric shapes. The price of fabric is set per linear meter.
You can sheathe cards using glue, which is used to reupholster the ceiling with your own hands. If you follow the technology, you are guaranteed not to have problems with GTA Boterm or universal glue “88”. If you cannot buy these adhesives, you can use Moment-1 Glue or Kaiflex K414 Glue. To cover all the door cards of an average passenger car, you will only need one 1 l/0.8 kg can. To apply the glue you will need a brush. Before gluing, it is advisable to degrease the surface. To do this, simply wipe the repair area with a paper towel soaked in solvent.
You will definitely need a standard kit for assembling and disassembling the door cards of your car. Usually a medium-sized Phillips screwdriver is enough for this. To avoid damaging the casing, to remove the cards after unscrewing the screw connections, you can use a set of plastic elements for dismantling car interior panels. You will also need a utility knife and scissors to trim the fabric. The need for a specialized tool may arise at the stage of detaching the fabric inserts from the plastic frame of the door cards.
Removing the front door trim of the Lada Granta
To carry out work to replace or repair car parts, sometimes you have to disassemble the front and rear doors of the car, which is not so easy to do. Lada Granta car owners also have to face such difficulties, but by following the simple instructions described below, you can easily do all the work yourself.
Why do you need to remove the door trim?
This procedure is relevant if you need to carry out repair and restoration work on the doors of a Lada Granta car. For example, it could be:
sheathing repair. If the plastic is cracked or broken in some places, the door cards will need to be repaired after removing the trim. It will be possible to solder a metal mesh into the inner part of the casing. This way the damage will not spread, and the cracks can be sealed with a primer and covered with paint. Another way is to reupholster the doors with new material; New interior trim for Lada Granta
noise and vibration insulation. In order to improve the acoustics in the cabin and make the doors close quieter, it is necessary to eliminate squeaks and rattles. To do this, after removing the skin and disassembling the structure, you should glue a special material, for example, “Vibroplast”
It is important not to forget to seal all technical holes with vibration material. Then all the elements should be assembled and installed in place; Installing soundproofing on a car door
door reupholstery
If you need to update the sheathing material, you should first remove it and disassemble the entire structure. The front doors are more difficult to cover because there are more bends and holes. Therefore, all calculations must be made correctly. Glue the material from the center and stretch it to the edges using an industrial hair dryer. You need to make cuts in the right places. When the surface is processed, all structural elements can be installed in place; Interior trim
airbrushing in the interior. Recently, it has been important to improve the appearance of not only the external surface of the car, but also the interior. To do this, for example, they do airbrushing on fabric on the door trim or ceiling of a car. The material must be painted black or dark blue. Then, using an airbrush device, you need to apply stripes in the form of lightning. After the paint has dried and the trim has been installed in place, you will see amazing effects in your Lada Granta car. You can choose any motif and color scheme.
Instructions for removing the trim on a car door
So, in order to remove the trim from the front doors of a Lada Granta car, you must sequentially perform the following steps:
- Take screwdrivers and prepare new clips.
- Disconnect the negative terminal of the battery.
- Remove the door lock button.
Door lock button - Using a flat-head screwdriver, pry out the fastening screw plug.
- Then remove the screw using a Phillips screwdriver.
- Unscrew all screws securing the door trim.
Location of the casing fastening screws - You need to remove the material from below, from the corner. To do this, insert a screwdriver between the metal and the casing.
- Continuing to remove the coating, you should move in both directions from the corner.
- If there are any devices installed in the doors, they must be turned off and then the covering must be removed completely.
- After this, you can begin the work you intend to do.
- Installing the trim in a Lada Granta car is done in the reverse order.
So, if you have a desire to improve the quality of your Lada Granta car, you can always bring any ideas to life on your own. All you need is time, tools and suitable materials.
Selecting a skin
As a substitute for standard door inserts, you can use:
- genuine leather. The cladding will look good and serve for a long time, but the cost of the material cannot be called affordable. It is better to use natural leather if you plan to upholster the car interior with your own hands;
- leatherette (dermantine) - inferior in quality, but costs much less than genuine leather. More than a reasonable option for finishing doors;
- eco leather. The material is a high-quality substitute for genuine leather. The composition includes cotton, cellulose-based artificial materials, synthetic polymers and natural leather. Has excellent elasticity, resistance to temperature changes and mechanical stress;
- velours. The material is well suited for door trim, used for car interior trim, and less commonly for ceilings;
- alcantara. High-quality samples will not be cheap, but an analogue from a budget manufacturer can be found at a very reasonable price. Of course, the material from famous manufacturers is of higher quality and easier to paste, but the budget option can also provide a pleasant tactile sensation;
- artificial suede fabric. The textile consists of polyester on a cotton base. Velvety and soft to the touch;
- a special fabric that is usually used to replace a car's headliner. The material must be dense if it is intended to cover the elbow areas, and not just decorative inserts. Prices for ceiling fabric are quite reasonable.
Material, tools
You can calculate the amount of material required for sheathing yourself. We cannot indicate these figures, since everything depends on the size of the insert, as well as the area of the bends. For an approximate calculation, you can use a ruler and formulas for calculating the area of geometric shapes. The price of fabric is set per linear meter.
You can sheathe cards using glue, which is used to reupholster the ceiling with your own hands. If you follow the technology, you are guaranteed not to have problems with GTA Boterm or universal glue “88”. If you cannot buy these adhesives, you can use Moment-1 Glue or Kaiflex K414 Glue. To cover all the door cards of an average passenger car, you will only need one 1 l/0.8 kg can. To apply the glue you will need a brush. Before gluing, it is advisable to degrease the surface. To do this, simply wipe the repair area with a paper towel soaked in solvent.
You will definitely need a standard kit for assembling and disassembling the door cards of your car. Usually a medium-sized Phillips screwdriver is enough for this. To avoid damaging the casing, to remove the cards after unscrewing the screw connections, you can use a set of plastic elements for dismantling car interior panels. You will also need a utility knife and scissors to trim the fabric. The need for a specialized tool may arise at the stage of detaching the fabric inserts from the plastic frame of the door cards.
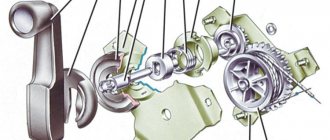
Replacing the bearing of the input shaft of the VAZ 2107 gearbox
The easiest way to replace a worn element is on the removed box. On the VAZ 2107 it is possible to remove the bearing from the input shaft directly from the gearbox in the car, but this procedure is very labor-intensive and time-consuming.
To work, you need to prepare the usual tools for any driver:
- screwdriver with a powerful flat blade;
- hammer;
- puller if necessary.
How to remove the old one
With the gearbox already removed from the car, you need to remove the bell (casing) and retaining rings. There is no need to completely disassemble the box:
- Use a screwdriver to pry up the special groove in the input shaft bearing. (it looks like a ring).
- Pull the shaft towards you, using the bearing as a support for pressure.
- Carefully pull out the bearing, periodically hitting it with a hammer.
- After each hammer blow, it is recommended to rotate the shaft a little to avoid dents or distortion of the bearing.
- As a result, after these actions, the bearing can be easily removed from its support.
How to install a new one
Next, you will need to install a functional one in place of the old bearing. For this:
- Press the new bearing onto the shaft using a hammer.
- Use a hammer only on the inner ring of the bearing, otherwise it may become deformed.
- When pressing, it is necessary to pull the input shaft slightly forward so that the bearing fits in more easily.
Video: replacing the input shaft bearing on a VAZ classic
To summarize all of the above, we can say that the owner of a VAZ 2107 can carry out all the necessary work on the gearbox and input shaft himself. However, if you have doubts about your skills, it is better to turn to auto repair specialists. We also note that the VAZ 2107 gearbox rarely requires any intervention and usually serves for many years without a hint of a problem.
Replacing bearings in a classic gearbox (VAZ 2101, 2104, 2105, 2106, 2107) is an operation that requires complete disassembly of the gearbox. The exceptions are: the bearing of the input shaft of the VAZ 2107 gearbox, as well as the front intermediate rolling support. To replace these parts, disassembling the gearbox is not required.
The input shaft bearing (PSB) is a critical component in the gearbox (Gearbox). It is on the “primary” that the greatest dynamic and variable loads are concentrated. In the event of malfunctions and signs of failure, timely replacement of the VAZ 2107 gearbox input shaft bearing is required. If replacement is delayed, the gear shift unit may jam (in some situations, the clutch or release gear breaks).