Breakdowns
If the rear headlight unit fails, it is often due to a broken bulb from a particular light, or a problem with the fuses.
A rarer type of failure is a broken wiring.
It should be understood that each element of the rear optics plays its own irreplaceable role, therefore it is necessary to maintain the required level of performance of the optics and promptly respond to emerging malfunctions.
Before long trips, be sure to make sure that all the lamps in your car are working properly. In the event of an accident caused by non-functioning taillights, do not count on insurance. She won't act.
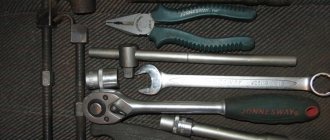
Malfunctions and their elimination (rear and front dimensions)
Now we just have to figure out why such problems occur and how to solve them, for example, how to replace a side lamp on a VAZ 2114 in any part of the car. So, first of all, let’s figure out why the lights don’t light up and what reasons there could be for this:
- No voltage on headlights;
- The lamps are burnt out;
- The fuse has blown;
- The fuse box has failed;
- The button to turn on the lights is broken.
So, now we need to understand each specific option in more detail, for example, why the left rear light does not light up. The first and most logical reason is that the lamp simply expired and burned out, just as happens with ordinary household light bulbs. Now it needs to be replaced; this is done in the same way in all parts of the car:
- First you need to find where the headlight housing or collar housing is located from the inside and remove the protective cover; on the VAZ 2114 it is clearly written on it how this is done. Everything will come out together with the base;
- Now you need to find the size in the base and carefully pull it out;
- We take out the lamp, it is simply inserted here with a latch;
- We insert the new one so that it clicks and assemble everything in the reverse order.
As for the fuses, if the rear right indicator light does not light, then in order to do without special tools and diagnose the cause, you just need to replace the suspicious fuse with a new one and see if the situation improves. If the lamps light up, then it was the problem, but if not, then you will have to look for the cause further. The tail light is always off. A very weak point is a design flaw in the contact group in the headlight.
To understand why the rear lights on a VAZ 2114 don’t light up, you need to look at the car’s electrical circuit; power to the lights goes along with the headlights, and if they don’t light up only at the front or rear, then it’s the wiring. It will have to be checked, but without the special knowledge of an electrician, it is unlikely that you will be able to find an open circuit or some other reason on your own. But if the right indicator light on a VAZ 2114 or only the left one does not light up, then it’s all a matter of fuses, replacing them is simple - take out the old ones and insert new ones in the same place. Checking the button is also quite simple - you need to remove it from the panel and short-circuit the wires; if the lamps light up, then it’s the problem. You will need to find a new button that will fit there and install it.
Reversing lights
Lamps, which are a light-signal element that notifies you when you are reversing, can significantly increase the level of safety on the road.
The turning on of the rear lights indicates that the car is moving backwards, so you should be careful. Non-working lights can easily lead to accidents and collisions, for which you will ultimately be the culprit.
What is this?
3X headlights are white lighting fixtures. They turn on when shifting into reverse gear.
The main function is to ensure safety while driving. They signal other drivers about your maneuvers and illuminate the road when parking in the dark.
Replacing side light bulbs on a VAZ 2114
Removing and replacing front marker lamps.
The replacement process involves sequentially performing the following steps:
- the hood opens;
- the marker lamp socket is removed;
- The lamp is being replaced;
- The socket with the new lamp is installed in its original place.
Replacing the side light bulb:
This lamp is replaced very simply, in order for you to be able to remove the old lamp, you will first need to open the hood and remove the same plastic cover that was discussed just above, in the section “Replacing the low and high beam lamp”, so first remove this completely roof and simply pulling the wires that fit the side light lamp, pull it out of the hole in which it is located and then, holding the lamp itself with your hand, simply remove it from the hole, thereby you will remove it from the chamber, as shown in the small photo slightly below:
Note! In some cars of the Samara family, the optics are slightly changed, so on some cars there are side light headlights that are held simply by tension, and there are those that are specifically fixed in the chamber, those that are held by tension do not need to be turned anywhere, you just need to pull it by force it will come out (This lamp is shown in the small photo above), but those that are specifically attached to the chamber must be turned counterclockwise and only then removed, so before pulling it, try turning it counterclockwise!
Why don't FZH work?
There are several reasons why FZHs can fail. Let's try to understand them.
| Cause of malfunction | What to do |
| Lamp burned out | Replace the burnt out bulb with a new one, check the condition of the contacts |
| The fuse is broken | Check, replace if necessary. A fuse can lead to loss of functionality of the entire contact circuit |
| There is no ground on the board | The board is located under the lamp. Simple repair to fix the problem |
| The contacts have oxidized and become coated | Cleaning contacts is not difficult |
| The wiring is broken | You will have to diagnose the condition of the circuit, check the integrity of the wiring using a tester and a visual method |
| The contact on the headlight film has burned out | You will need to clean the contacts and replace the elements if necessary. |
| There is a breakdown in the gearbox mechanism | In such a situation, the issue of gearbox malfunction will have to be resolved. |
| The frog (sensor) has failed | Check the condition of the reverse sensor, replace the device if necessary |
There are a lot of reasons for the failure of the FZH, so the driver must know exactly how to eliminate this or that type of breakdown.
Block ZF
Removing the rear light board
To remove the board, you will need to perform a few simple manipulations:
- Open the trunk;
- Remove everything unnecessary from the space so that it does not interfere with your work;
- Remove decorative trim;
- Remove the plastic casing;
- Remove the back panel;
- Having gained access to the socket and the license plate lamp, you can remove the devices;
- Remove the reversing sensor mounting studs and the headlight itself.
Many people confuse the reverse sensor with the speed sensor, since these devices are located in close proximity to each other.
Dismantling works
Checking the functionality of the sensor
If the taillights do not turn on, the culprit may be the reverse sensor, that is, a frog in the people.
Remove the contacts from the sensor and clamp them together, then turn on the ignition. If the light appears, the sensor needs to be replaced. If there is still no light, the integrity of the circuit is broken, but everything is fine with the frog itself.
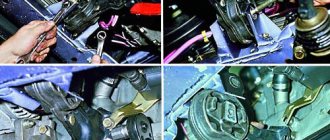
Replacing the sensor is quite simple:
- Place the car on a pit or overpass;
- Apply the handbrake;
- Remove the protection from the bottom, opening access to the gearbox;
- Remove the contacts from the old sensor;
- Place an empty container under the sensor and remove the frog. The container is needed because when the device is removed, oil will leak out of the gearbox;
- Remove the old frog, insert a new one in its place;
- Let the car sit for a while;
- Check the oil level inside the gearbox;
- If necessary, add oil to the required level;
- Reassemble.
Such repairs can be done with your own hands, and the cost will be approximately 250 rubles. This is exactly how much a new sensor for a VAZ 2114 costs now.
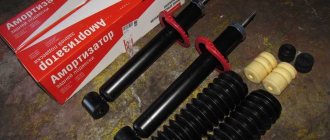
Problem with the light bulb
It is not uncommon for taillights to stop functioning normally due to the failure of the bulb itself.
- To replace it, you need to disconnect the block with wires and remove the contact panel from the flashlight. Here you just need to squeeze the side latches to remove the plastic panel;
- Apply a little pressure on the cartridge and unscrew it counterclockwise;
- Check the condition of the contacts and wiring;
- Screw in a new light bulb that matches the previously installed one;
- If necessary, before screwing in the new lamp, clean the contacts and test the wiring with a tester. There may be a break in the circuit, so a new light bulb will not work.
Connection diagram
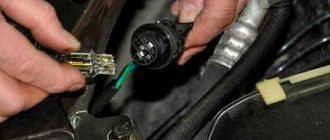
The rear lights on the VAZ 2114 are connected to the vehicle’s on-board network using connectors, the pinout of which is given below.
Pinout of the VAZ 2114 rear light block and wire colors
The numbers in the photo indicate:
- turn indicator – blue (right), blue-black.
- side light – yellow (right), yellow-black.
- The brake signal is red.
- fog light – red-black.
- The reverse indicator is green.
Both lights are connected to one harness, which runs along the rear of the body from the right light fixture to the left, then along the left side to the mounting block located in the engine compartment immediately behind the windshield opposite the driver. The complete wiring diagram of the electrical equipment of the VAZ 2114 (injector) will look like this:
Complete electrical diagram of VAZ 2114
In this scheme we occupy the marked positions:
- 20 — reversing light switch;
- 26 — mounting block of fuses and relays;
- 27 — brake signal switch;
- 29 — ignition switch (lock);
- 33 — rear fog light switch;
- 35 - combined switch for side lights and headlights;
- 36 — alarm switch;
- 58 — rear light;
- 60 - additional brake light.
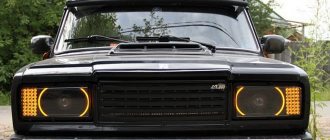
Ways to tint car headlights yourself 2114
Headlight tinting is the most popular type of tuning among car owners. Thanks to the efforts of professional or amateur craftsmen, the appearance of headlights, turn signals, and tail lights can change beyond recognition. With the help of such simple tuning, the overall appearance of the car radically changes.
For example, tinting the headlights of a VAZ 2114 car can create a very stylish image that attracts the attention of others. How you can make your optics tinted is described below.
Replacing the headlight glass
If you see that the headlight itself is working, and its cloudiness is due to glass defects, you need to know how to remove the glass from a VAZ 2114 headlight and then replace it.
The algorithm for performing the procedure is as follows:
- We dismantle the headlight using one of the methods described above.
- Take a thin flat screwdriver (spatula, knife) and pry up the corner of the glass.
- Insert the tip of a utility knife into the resulting gap and cut through the old sealant (if there is a lot of sealant left, take a hairdryer and heat the edges of the glass).
The glass is now removed, but remember that reassembly will involve applying sealant (can be replaced with a rubber seal), so be sure to get some in advance. Also, some manufacturers' headlights have headlights with clips, so don't use brute force, just look where they are and tighten them.
Didn't find the information you are looking for? on our forum.
Replacement timing and choice of optics
In addition to the difficulties described above, which are familiar to motorists who drive long distances, there are more banal reasons related to the depreciation of the headlight itself. This mechanism does not have a specific shelf life, but the lamps “burn out” over time, and the reflector material and diffuser become unusable.
The last two elements have a shelf life directly related to the material from which they are made and the methods of car care. At the same time, even the best of them are still susceptible to the ingress of dirt associated with depressurization of the headlight structure.
IMPORTANT! If you have working headlights, but you still can’t see anything, visit a good car service center that has a light debugging stand. It may just be necessary to clean the structure and adjust it.
The choice of headlights is extremely important for the convenience of the motorist. To be more precise, it is not the manufacturer itself that is important (although it affects the characteristics of the light), but the identity of the lighting fixtures. If your car has standard headlights, but you decide to replace only one, then find the original ones. You should not take AUTO SVET or BOSCH, which are similar in appearance.
From a technical point of view, the headlights will be the same, but the manufacturing technology of the optics differs from one company to another, and as a result, you will get two distinctly different headlights. Even if you don't care about the appearance of the car, don't forget about the properties of your eyes.
Human vision and the brain have a number of characteristics, and in this case they will manifest themselves in the fact that a more powerful headlight will create a “twilight zone” instead of a dimmer light. Consequently, there will be no improvement in visibility, and the brain will perceive the “blind spot” almost the same way if it did not exist at all.