Even taking into account the fact that recently the demand for cars with automatic transmission has increased significantly, cars equipped with a manual transmission are still in demand.
A manual transmission is a device in which the driver selects gears manually (mechanically). In addition, this box belongs to a stepped gearbox, since the torque in it varies in steps.
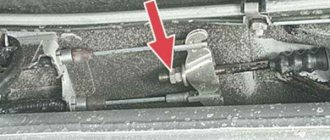
There are several types of manual transmissions, which differ from each other in the design of the device and the method of implementing control. Note that modern transmissions on budget cars are cable (cable manual transmission). In this article we will look at what a manual transmission cable is, as well as how to change the manual transmission cable if certain malfunctions occur.
Preparatory stage
Before you begin routine bicycle repairs, you need to stock up on certain tools. They will come in handy in any case and will last a long time. Basic tools for bicycle maintenance:
- hex keys of different sizes - it is advisable to purchase them immediately in a set;
- wrenches of different sizes - it is advisable to buy a set;
- screwdrivers – you will need both Phillips and slotted ones;
- pliers of different sizes;
- tweezers;
- mallet;
- end attachments;
- scissors;
- clamps.
These tools and devices should always be available, because they may be needed at any time. In addition to the above, it is worth purchasing:
- bicycle chain cleaning brush;
- sleeve wrench;
- bicycle chain squeezer;
- ratchet wrench;
- spoke key.
Necessary tools for repairing and servicing bicycles also include consumables - they should not only always be available, but also in sufficient quantity. Consumables in this case include:
brake fluid; oil for various parts; Please note: you need to have oil available for every part - fork, chain, pedals, and so on.
solvents; cleaners; hydraulic oil.
All these consumables will help not only to properly repair your bicycle, but also to maintain your vehicle in almost perfect condition.
Particular attention should be paid to lubricants - the choice of them on the market is simply huge, you can trust sellers, but with caution. To avoid mistakes, you should remember the following recommendations from experts:
- Any liquid lubricant (I5A oil, for example) is only suitable for processing the rear hub drum and chain. This lubricant has an individual feature - it is excellent for spot use. But there is one critical point - if you plan to ride a bicycle in the cold season, then liquid lubricant cannot be used, since at subzero temperatures it quickly hardens and makes it difficult for the mechanisms to work.
- If there is no time to carry out full repair work, but you urgently need to lubricate the chain and cables, then you can use aerosol lubricants. They instantly restore the operation of all hinge joints and are easy to use - even a child can handle the job.
- For processing threads and bearing units, the best option is to use a thick lubricant.
What tools will you need?
To replace a disc or other damaged clutch mechanisms, you will need a regular set of tools - wrenches, heads of different sizes. It is better to buy original replacement parts or use high-quality substitutes. It is imperative to prepare an empty container for testing, VD-40 for unscrewing rusty fasteners and stands.
In addition, you need to have a professional kit with you:
- ratchet;
- a pry bar with a spade end;
- mandrel for centering the disk.
Bring an assistant, as the weight of the box and its dimensions are large. Professional service stations use equipment that facilitates dismantling.
Carrying out the replacement in stages
The process of replacing the cable is very similar to replacing the switch itself.
Attention! Due to different designs, it will not be possible to use the same method. The replacement steps themselves will consist of 12 steps:
The replacement steps themselves will consist of 12 steps:
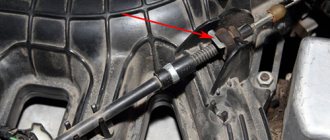
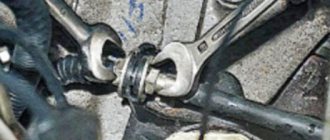
The rear derailleur should be located at the smallest sprocket. Using wire cutters you will need to bite off the end of the cable and loosen the screw used for clamping. But before you perform this action, you need to remember the initial position of the clamped cable
There are only two options: above the screw or below the screw, this is very important for correct gear shifting. Most likely you need a 5 mm hexagon, use it to loosen the shifter fasteners, and then remove it and put it aside. Now access to the protected element is completely open. To remove the cover, you will need to turn it counterclockwise, so the lock will unscrew and go to the shifter. Thanks to the removed cover, the end of the cable located under the spring becomes visible
Carefully study its location there so that you can easily pull it out and re-secure it in the future. Using the tension regulator, pull out the entire cable. Gently slide the spring to the side to gain access to the end of the cable so you can release it. Remember this sliding motion because this is also what the spring will need to move when installing the cable. We replace all the freed space with a new cable. It does not have to be identical to the one that stood before. For precise installation, use a handy tool, such as a screwdriver or perhaps an awl, to guide the end of the cable. After the last steps, carefully review the position, it should stand correctly and not stick out. Now install the shifter cover. This time the lock needs to be turned clockwise until it is fully tightened to prevent breakage. We install the shifter in the place it previously occupied. The cable is stretched until its beginning appears on the other side. This is where it becomes clear whether the cable is suitable. If it does not fit through the braid, then most likely you will have to replace it. If the cable has passed further and you notice its beginning, then we check the location of the switch again. It should be exactly opposite the small star. We apply the cable, remember where it was attached, from above or below, and we can tighten the retaining screw. As promised, this is the last step. To eliminate possible problems, cut off the remaining cable using wire cutters; leaving a couple of centimeters will be enough.
After all these steps have been completed, the cable can be considered replaced. To make sure that no problems will arise on your next bike ride, you should check it. The check should be carried out on the switch and shifter. Testing must be carried out on a bench. But of course, there is no such opportunity and I don’t want to go anywhere for it. Therefore, carry out the most rigorous check yourself. After all, your health is more valuable.
Testing on a stand, and even more so testing on your own, can be very different from actually riding a bicycle. Take this into account.
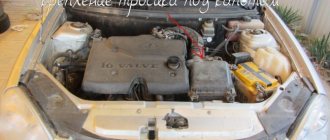
Removing the gearbox
The most common is a manual transmission, in this article we will look at the principle of replacing mechanics. Most often, the gearbox is removed when replacing the clutch disc, eliminating leaking oil seals or gaskets, or repairing the gearbox itself.
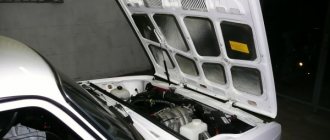
The first thing we'll start with is safety precautions; work should only be carried out on a cold engine and gearbox, since the gearbox also contains oil; when driving for a long time, it will heat up and then it will be difficult to drain it without causing injury. If everything has cooled down, then disconnect the battery terminals, since some cars have different sensors on the gearbox, then remove the engine protection.
It is best to remove the box in an inspection room, as it will be convenient to lower it under the car. After preparation, drain the oil from the box and let it stand for a while so that the oil completely drains, then we tear off the nuts of the drives and wheels. If you decide to shoot in a pit, then you need to jack up the car from the front and hold the front part of the box to avoid the box and its other components falling when unscrewing all the bolts.
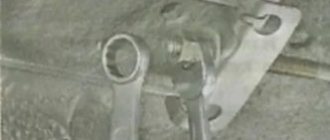
The most important point is to disconnect the drive from the box; it is best to do this with a partner, since you will have to pull out both drives. Using a pry bar, one pulls off the internal grenade, and the second at that moment pulls the wheel to pull the drive out of the box.
Next, we remove everything that will interfere with the lowering of the box from the body, this could be the starter and the air conditioning compressor in some SUVs. Often there is a ground wire in this place; we also remove it. Disconnect the reverse gear sensor, remove the casing and flywheel, and the gearshift gates (don’t forget to mark the position in advance).
The most important point is to unscrew the bolts that secure the box to the engine. Don't forget about the engine, you will need to secure it with a hydraulic jack so that it does not fall to the ground, or by placing emphasis on the spar cups using a jumper above the engine.
Holding the gearbox together, unscrew and remove all the mounting pads to the body. Slightly shaking the box, try to move it away from the engine, this is about 10 cm, so that the input shaft comes out of the disk and basket. When removing, do not damage the petals on the clutch basket. Now you can safely lower the box under the car; if the car remains in this condition for a long time, we advise you to preserve open areas to avoid dust and dirt.
How to Replace the Drive Cable on Shifters and Brakes
A bicycle derailleur is a capricious thing and requires periodic adjustments, in particular, adjustment of the cable tension. The brake system drive also becomes unstable from time to time. This will be indicated by weak pad movement, poor performance and reduced braking efficiency. Despite this, the procedure for adjusting and installing a new cable is simple and accessible when repairing a bike.
Top articles: How to properly fasten your bike
Caring for brake and transmission cables for bicycles and jackets:
Trim frayed ends only with special tools: semicircular scissors, chisel or hacksaw. Once a season it is necessary to lubricate the cables with a thick compound. The caps should tightly close them from the external environment.
Damaged or excess pieces of shirts are trimmed using a grinder or a grindstone. After trimming, it is advisable to straighten the coils from the inside so that the cable does not rub against them.
The cable must be replaced with a new one in the following cases:
- movement inside the braid is difficult;
- there are gaps;
- the threads stick out in different directions or are bent;
- rust on the shirt or cable;
- broken or damaged shirt.
If suddenly there is a need to change the cables to the switches, it’s okay. This is done in literally five minutes. Progress:
- Release the old cable from the gear shifter.
- Pull the shirt out of the mounting sockets on the frame.
- Inspect the shell for damage. If there are no serious defects, it can be left.
- Remove the metal cable from the jacket.
- Insert a new cable into the shirt (or buy them as a set, which is recommended), secure them in the sockets and connect to the switch and shifter.
- Be sure to set the switch to work.
So, the transmission is tuned, now it's time to update the brake cables. First, unhook them from the lever and brake. We inspect the shirt for damage. Typically both the drive and the braid wear out at the same time, but sometimes you can get lucky. If there are noticeable damages and fractures, the shirt is in no way suitable for use. If you insert a new cable into it, it will be of no use: the faults will not hold the tension.
Remove the old cable: loosen the adjusting and fastening screws in sequence. If the shirt is suitable for further use, remove it from the braid. Brake cables are slightly different from the type of handlebar. Therefore, before you buy it, you should look at whether the handlebars on your bike are straight or curved.
If the cable was purchased separately from the sheath, lubricate it a little. The kit does not require lubrication at the replacement stage - everything is fine inside
Installing a new cable on the bicycle frame and connecting to the brake and handle
- Place metal caps on the ends of the shirt.
- Insert into mounting sockets.
- Place the boots on the ends and tighten the mounting screws.
- Temporarily tighten the adjusting bolts.
- Set the optimal tension: the brake should respond instantly to pressing the handle.
That's how easy it is to install a new drive cable on the brake system.
The installation procedure for these components is not only inexpensive, but will also avoid more serious problems with the gear shift mechanisms and braking system. Now that all the cables have been replaced and adjusted, you can safely roll out your bike towards new achievements.
Gearbox installation
Having removed the box, this is only 50% of the work; you still need to install everything back correctly. We will not consider the repair of the box itself, since there is a whole dilemma and each breakdown has its own approach to repair, a typical breakdown is a delayed shift for automatic transmissions or a crunching noise when switching for manual transmissions. Do not forget to check whether all clutch components are in good working order, since often when repairing a gearbox, the clutch disc, basket and release bearing are replaced.
Before installation, it is worth lubricating the spline connection of the input shaft and the release bearing flange. It will also take two people to install. To do this, lower the engine a little using a jack, insert the box all the way, under no circumstances should you do this using tightening bolts, only manually, achieving a tight fit close to the engine.
Now it’s time to tighten the main bolts securing the gearbox to the engine, and install the support for the box. We put on and adjust the clutch cable; for this, the pedal should be about 1 centimeter higher than the brake pedal. We install the rear motion sensor, starter, connect and adjust the gear shift mechanism (that’s why we made marks on the lever, so that we knew the position exactly and simplified the adjustment).
After installing the gearbox, we proceed to assembling the chassis, inserting the drives, remember that they also need to be inserted carefully without knocking, so as not to damage the differential, otherwise you will have to remove the box again. Next we screw on the ball joints and braces. After tightening all the nuts and mounting bolts, lower the car. The last step is to fill the box with oil to the level, the level is individual for each car, it is best to look at it in the service book.
In principle, this is where the installation of a manual transmission ends; first, try changing gears when the car is not running; there should be no crunching and all gears from first to last will shift easily. Drive a 1 kilometer circle in low gears to get a feel for the car. After the oil has passed through the entire box, you can shift into higher gears 4th, 5th, 6th if there is one available.
Video on how to properly remove the gearbox on a VAZ 2110:
Replacing the cable in a bicycle derailleur
Since replacing a cable is a repair process, the person doing it will need a certain tool kit:
- a set of hex keys (and it must contain a 5 mm key);
- and wire cutters.
Moreover, the procedure for replacing the rear derailleur cable is almost identical to the process of changing the front derailleur. Only the latter will need to be set to easy gear before loosening the cable clamp screw
Well, the designs of these two switches are somewhat different - you also need to pay attention to this. It’s also worth remembering how the cables were routed before replacement.
Also, after the cable replacement procedure, you should definitely adjust the rear (or front) derailleur.
Actually, the replacement is carried out in stages, sequentially, step by step:
- The rear derailleur is set to a position strictly opposite the smallest bicycle sprocket. The end of the cable must be cut and the clamping screw loosened. And first you need to remember in which part of the screw (top or bottom) the clamped end of the cable was located. Since this circumstance can have a significant impact on the correctness of gear shifting.
- Using a five-millimeter hexagon wrench, you need to loosen the shifter fasteners and then remove it. This will give access to the protection cover.
- The cover latch must be turned counterclockwise to remove.
- And the removed cover provides the repairman with the opportunity to see the tip of the cable under the large spring. And you need to take a good look at how it is installed there in order to understand how best to remove it.
- The cable must be pulled out completely, assisting the process through the tension regulator channel.
- To help the cable head release, you need to carefully move the spring away. And in exactly the same way it will need to be removed when installing a new cable.
- A new cable must be installed in the vacant space. And you need to stretch it tightly to the location of the old cable. For convenience, you can guide the cable with the end of a thin screwdriver or even an awl. And at the end it is better to make sure that the cable is installed exactly as it should be.
- Now you will need to put the shifter cover in its original position. And secure it with the previously removed lock, this time turning it clockwise.
- The shifter is installed in its place immediately before pulling the cable through the braid.
- The cable is pushed into the braid until its end appears in the area of the rear derailleur. And there is one significant nuance. If the cable “doesn’t want” to fit into the braiding, it always gets stuck and clings to something, it (the cable) will probably have to be changed.
- At the very end, you need to make sure that the rear derailleur is directly opposite the smallest of the bicycle chainrings. Attach the cable and secure it to the screw.
- Cut off the excess cable with wire cutters, leaving only 3 centimeters, and crimp its tip.
After the procedure for replacing the gear shift cable on a bicycle, it is necessary to thoroughly test the functionality of the shifter. And the switch too. This must be done before the bike begins to be used to its full potential. It must be tested on a special stand. And if this is not done, then the brakes may fail at the most inopportune moment.
Just keep in mind that the bench test and the conditions of the real road can vary greatly.
Checking the functionality of the lever
At the end of the work, you need to check how the gears shift. This must be done both on the spot and on the move. If everything is done correctly, there should be no extraneous sounds. And the speeds will turn on easily and will not fall out.
Sources
- https://7gear.ru/news/tros-pereklucenia-peredac.html
- https://KrutiMotor.ru/kak-pomenyat-tros-mkpp/
- https://veloexpert33.ru/populyarnye-stati/zamena-trosa-pereklyucheniya-peredach.html
- https://avtoshark.com/lada/granta/chassis-grant/snyatie-trosov-kpp-granta/
- https://www.tokyogarage.ru/transmission/mkpp/zamena-trosov-mkpp/
- https://bibiauto.club/remont/ustanovka/zamena-trosov-pereklyucheniya-peredach.html
Transmission repair stages
The repair includes adjusting the front and rear derailleurs, as well as checking the condition of the cables, chain, cassette and rollers.
Best articles: Cycling speed: from average to world record
If you see that the cable has broken or is about to break, you should replace it. To do this, buy a suitable cable from a sports store, and then do the following:
- Unscrew the bolt holding the cable.
- Disassemble the shifter and remove the cable from it and from the shirts. It is also recommended to replace shirts!
- Clean the shirts and pour a drop of oil into them for better cable glide.
- Thread the new cable through the shifter and then through all the shirts.
- Proceed to configure the switch.
- Bite off the excess part of the cable and secure its end with a special tip.
Over time, the chain becomes unusable. It is recommended to have several chains in stock and change them every 100 kilometers, because the cassette deteriorates due to chain wear. Multiple chains will wear out more slowly and the cassette will last longer. You can determine the condition of the circuit using a special tool. It is impossible to repair the chain; you just need to replace it if necessary.
If the chain is in good condition, simply remove it, clean and lubricate it. Remove excess with a napkin or dry cloth.
What cables and shirts are used on modern bicycles
Bicycle cables are made from a large number of thin steel wires. Evenly intertwined with each other, they form a wear-resistant and durable metal fiber.
Over time, the strength of each thread decreases unevenly, resulting in “weak areas” where they can break, as well as come out and bend. To improve resistance to mechanical stress (and extend service life), a layer of polymer is applied. An advanced and durable option is the use of stainless steel.
During active use, the cable not only experiences mechanical stress. In addition, dirt or dust may get inside the braid. To protect the metal, special lubricants are used. The most durable and durable Teflon is widely used.
The shirt is also available in several versions. There are three types of cable braids:
- twisted,
- SIS braid,
- upgraded SIS-SP.
Twisted braid is a metal wire twisted into a spring. The metal is covered with a layer of plastic on top. The inner surface of the metal springs is lubricated to reduce friction between the cable and the braid. The price of cables with this braid is the lowest in the series, however, it has become a thing of the past, and it is increasingly difficult to find it on sale.
SIS is essentially the same spiral braid. Its difference from a twisted shirt is that instead of a thin wire, sheets of metal are twisted into a spring. Instead of conventional lubricant, “long-lasting” and cleaner Teflon is applied inside. Currently, it is this type of braiding that has begun to be used on gear shift and brake cables.
SIS-SP is a parallel braid whose threads are held back by a polymer layer. Unlike a spring shirt, this shirt does not change length, while balancing the tension of the cable itself. Thanks to this, both the brakes and the shifters work more accurately. The internal cavity of SIS-SP jackets is lubricated with silicone grease.
It is much easier to tighten the cable on a compressible jacket than on a parallel-woven one.
Take the traffic rules knowledge test for a cyclist!
Time limit:
out of 15 tasks completed
Questions:
- 1
- 2
- 3
- 4
- 5
- 6
- 7
- 8
- 9
- 10
- 11
- 12
- 13
- 14
- 15
Information
To be able to obtain rights, please click Next
You have already taken the test before. You can't start it again.
The test is loading...
You must log in or register in order to begin the test.
You must complete the following tests to start this one:
results
Correct answers: out of 15
Your time:
Time is over
You have scored
a maximum of 15 points
| Place | Name | Recorded | Points | Result |
| Table is loading | ||||
| No data |
Your result has been recorded on the leaderboard
Captcha:
- 1
- 2
- 3
- 4
- 5
- 6
- 7
- 8
- 9
- 10
- 11
- 12
- 13
- 14
- 15
- With answer
- With a viewing mark
Step-by-step instruction
The stability of gear shifting depends on the stretch of the cable and the presence of damage. In this case, the drum is rotated clockwise to the correct position. In some situations, the drum is tightened until the chain jumps smoothly. If the problem persists, the cable must be replaced. You can replace a torn or damaged product yourself.
When the problem is in the spring, it is cleaned of contaminants, then lubricated and checked. No adjustment or adjustment will be required if the speed operation is restored when the fault is eliminated. Before adjusting the switches, you need to check for deformation of the cock plane.
The malfunction could have started after the bike was dropped or hit. In this case, the vehicle is checked for deformations. Broken screws, frames and ears are replaced. Then the transport functionality is checked again.
After all checks, you can adjust the front derailleur and rear derailleur. Otherwise, manipulations will not help. Any malfunctions can negatively affect ride quality and lead to unexpected serious breakdowns and injuries. It is useful to carry out transmission adjustments as a preventative measure for vehicle health.
Before starting the adjustment, you need to check for deformation of the cock plane
Rear derailleur
Owners need to know how to properly set the speeds on their bike. Self-regulation requires compliance with the instructions:
- move the chain to the small sprocket;
- unscrew the screw;
- loosen the cable tension;
- adjust the screw with the letter “H”;
- pull the cable.
Check the functionality of the switch mechanism. Crank the pedals several times and watch the chain flipping. If the problem persists, tighten the cable more. After checking, move the chain to a large sprocket and adjust the tension of the screw with the letter “L”.
You can adjust the switching if you have screwdrivers, hex keys and pliers. It is not necessary to register the transport itself. It is advisable to prepare a cloth for cleaning parts and lubricant in advance. Adjustment of the limiters is possible after checking the serviceability of the components of the mechanism.
Rear derailleur designShift pattern
Front derailleur
Step-by-step instructions will explain how to set up the gear shifters on your bike. The process comes down to adjusting the tension and gear limiters. Setting the transfer quality is important. It is worth eliminating the gaps in advance and replacing deformed parts. You can configure the front derailleur according to the following scheme:
- the chain is moved to the smallest sprocket;
- remove the fixing element;
- loosen the cable tension;
- adjust the frame with a screw with the letter “L”;
- the cable is pulled;
- fixed with a screw.
The chain is moved to the middle sprocket and checked. If necessary, adjust the frame again and fix the correct cable tension. The drum on the left coin will help you quickly achieve the correct tension. The front gear derailleur is checked.
Any cable tension is released at minimum speed. To complete the adjustment and quickly adjust the front derailleur, after correcting the position of the cable, secure it with a bolt and repeat the check.
Gear shifting should be correct. Adjustment may be required due to looseness, wear of parts, or damage. You can carry out the work yourself if you familiarize yourself with the design of the mechanism in advance, study the instructions, and follow the algorithm exactly.
Front derailleur deviceSetting
Problems with gear shift faults
Problems may be the following:
- Shirts are broken - you need to check their integrity. This can be detected visually if there is a visible defect resulting, for example, from a bicycle fall. The braid will spring back and will not transmit the impulse of the cable to the switch. Or low-quality copies. There is only one way out - replace the damaged element;
- Rust has accumulated under the end of the braid, the wires are coming out or are all frayed;
- The components (wires) of the cable itself are worn out (it unravels and gets stuck in the braiding) and the necessary lubrication is completely missing, as well as the presence of rust and oxide. Everything should be replaced. The priority is polished cables (smooth) for bicycles.
Professionals do not recommend filling old versions of the cable with lubricant, since after just one or two kilometers of riding a bike, sand sticks to the lubricant and gets clogged inside, which aggravates the situation. It is better to replace worn components.
Best driving instructors:
Automotive instructor Lyudmila Manual transmission: Chevrolet LanosTeaches in Vidnoye REVIEWS
Driving instructor Alexey Manual transmission: Chevrolet Lanos Automatic transmission: Kia Spectra Teaches in the Eastern Administrative District, Balashikha, Reutov REVIEWS
Driving instructor Mikhail Automatic transmission: Chevrolet Aveo Manual transmission: Chevrolet LanosTeaches in Krasnogorsk, Strogino REVIEWS
Automotive instructor Yakov Manual transmission: Chevrolet LanosTeaches in the Southern Administrative District, Vidnoye REVIEWS
Automotive instructor Svetlana Automatic transmission: Hyundai AccentTeaches in Northern Administrative Okrug, North-Western Administrative Okrug, Khimki REVIEWS
Driving instructor Elena Automatic transmission: Chevrolet LacettiTeaches in the Southern Administrative District, South-Eastern Administrative District, Vidnoye, Domodedovo REVIEWS
Driving instructor Andrey Automatic transmission: Chevrolet Aveo Manual transmission: Chevrolet LanosTeaches in the Northern Administrative District, Dolgoprudny REVIEWS
Driving instructor Mikhail Automatic transmission: Kia Spectra Manual transmission: Chevrolet LanosTeaches in Northwestern Administrative District, Strogino REVIEWS
Driving instructor Marina Automatic transmission: Kia Cerato Manual transmission: Chevrolet LanosTeaches in the Northern Administrative Okrug, Dolgoprudny REVIEWS
Driving instructor Yulia Automatic transmission: Chevrolet Lacetti Manual transmission: Chevrolet LanosTrains in the Eastern Administrative District, South-Eastern Administrative District, Lyubertsy, Reutov, Zheleznodorozhny REVIEWS
Driving instructor Svetlana Automatic transmission: Kia Spectra Manual transmission: Chevrolet Lanos Trains in Krasnogorsk REVIEWS
Driving instructor Peter Manual: Daewoo Nexia Trains at Northwestern Administrative Okrug REVIEWS
Driving instructor Dmitry Automatic transmission: Volkswagen Golf Manual transmission: Chevrolet Lanos Trains in North-East Administrative District, Northern Administrative District, North-Western Administrative District, Dolgoprudny REVIEWS
Driving instructor Oksana Automatic transmission: Kia Spectra Manual transmission: Chevrolet Lanos Trains in the Southern Administrative District, South-Western Administrative District, Vidnoye, Podolsk REVIEWS
Automotive instructor Dmitry Manual transmission: Lada Granta Teaches in the South-East Administrative District, Lyubertsy REVIEWS
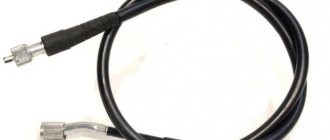
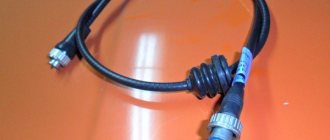
Purpose of cables and braids
The shift cable on a bicycle is the connecting thread between the shifter and the derailleur. It is a very strong metal straight thread. The job of this cable is to take all the forces and transfer them to the mechanism, thereby operating the gear shift. Depending on which gear is selected, by pressing the lever the cable tension becomes stronger or weaker. When the cable tension is optimal, the switch is in working condition.
With the help of a braid of cables (shirts), the force is transmitted to the mechanism into the rear stay. The braid also protects the cable from mechanical damage. It is a twisted metal wire, usually coated with polymer on top. At the ends there are lugs, from which a section of cable appears for adjustments.
A cable is a set of thin strands of steel that are intertwined and together formed into a reliable, damage-resistant metal fiber. Over time, the threads can wear out and the strength of some of them decreases, thus, damaged areas appear with breaks, kinks and individual wires coming out. Therefore, the fiber is coated with a layer of polymer or stainless steel, this improves wear resistance and significantly extends the service life of the cable.
In addition to mechanical influences, cable wear is also influenced by external factors - moisture, dirt, dust. In order to protect the metal from external influences, lubricants such as Teflon are used - one of the most durable and hardy.
Braids on the market are presented in three types: twisted type, SIS type and improved SIS-SP type.
The twisted type of shirt is a spring made of metal wire, covered with plastic on the upper side. Inside, the metal springs are treated with lubricant so that the cable rubs less against the jacket. Cables with such a shirt are the most budget-friendly and are practically not produced today.
The SIS type jacket is similar in type to the twisted one, but the material from which the spring is twisted is more durable - metal sheets. A more durable and clean material, Teflon, is also used inside. This is the most common type of braid today.
SIS-SP braid is parallel woven. The threads are held back by a polymer layer. The length of this braid, unlike the previous ones, does not change, but the tension of the cable is adjusted. This ensures more accurate operation of the shifters. The inside is treated with silicone.
How to change gears on a bicycle correctly?
The rules for shifting gears are simple and not so numerous:
- You only need to shift when the bike is moving. If you don't turn the pedals, nothing will happen.
- When shifting, the load on the bicycle chain should not be heavy. Switching should occur softly and smoothly.
- Don't switch gears when going uphill. The speed must be set in advance.
- The correct speed change is a step change, i.e. at a time - one speed. This will save the chain and nerves.
- If you have a classic system (3x8), then each front sprocket has its own personal rear sprockets. This will protect the chain from distortions.
The large chainring is used for cruising. Medium is needed for poor asphalt, on dirt roads, etc. The small sprocket is invaluable when riding on steep climbs, sand, tall grass, etc.
You can install the most expensive switches on a bicycle, equip it with the coolest shifters, but it will be impossible to ride it. And another unsightly-looking bike, assembled from unknown components, but made by a real master, will “roll”, pleasantly rustling the transmission.
Shifting gears on a bicycle is a complex and organic system. It cannot be divided into separate elements: everything must correspond to each other, and then the bike will “fly”.
Synchronizers
This is an important component of any manual transmission. Synchronizers serve to smooth out the speed of rotation of the gear and shaft. Thanks to synchronizers, gear shifting occurs quickly and smoothly. The device includes:
- Locking ring.
- Hub.
- A gear having a friction cone.
- Engagement clutch.
The hub is the main element of the assembly. It has two slots (external and internal). Due to them, the mechanism is connected to the transmission shaft, moving along it in different directions. Thanks to the external spline, the element is connected to the engagement clutch. Also, the hub design assumes the presence of three grooves. Each is installed at an angle of 120 0 relative to each other. These grooves are used for installing “crackers”. What it is? These are spring-loaded elements that fix the clutch in the “neutral” position. With this clutch installation, the box synchronizer does not work. The flywheel rotates freely without transmitting torque to the box. The clutch itself connects the gears to the gearbox shaft. The part is installed on the hub. From the outside it is connected to the gearbox fork.
A locking ring is used to equalize angular velocities. Smoothing of rotation occurs due to friction. The ring prevents the clutch from closing until the gear and shaft have equal rotation speeds. The inner part of the locking ring has a conical shape.
How does a synchronizer work in a manual transmission:
- When not working, the clutch is in the middle position. The gears on the transmission shafts rotate freely.
- When the driver selects a gear, the clutch moves to the gear through the fork. In this case, the clutch moves the locking ring. The latter is pressed against the gear cone.
- The ring rotates and blocks subsequent movement of the clutch.
- Due to friction, the revolutions of the shaft and gear are equalized.
- The clutch engages the gearbox shaft and gear.
- Torque is transmitted from the flywheel of the internal combustion engine.
Bicycle handlebar shifters - description
The shifter is the external feature that distinguishes a multi-speed bicycle from a single-speed one. At the beginning of their development they were installed on the bike frame, now for the convenience of cyclists they are placed on the handlebars. Their professional name is shifters.
If the bicycle is equipped with two speed switches, then two shifters are installed on the handlebars: one, for controlling the front derailleur, is usually mounted on the left handlebar handle, and for the rear derailleur, on the right.
If the bike is equipped with only one rear derailleur, for example, internal or combined, then the shifter will only be on the right.
Design and principle of operation
The design structure and principle of operation of the shifter are elementary, and little has changed since their appearance.
It consists of several parts: a shifter handle, a moving block, a locking spring, a moving block lever, a wound cable and a housing. This design is created in order to “feed” the cable and fix it.
The principle of operation of shifters in the gear shift system is that when the position of the lever changes, the length of the connecting cable changes, which in turn affects the speed switch - a change by one control division in the shifter corresponds to switching to the next (lower or higher) gear.
Top articles: Buying a branded bike
Work principles
Old box with modernization
The new design is the old gearbox with significant upgrades. The previous design is known to us for its shortcomings: large lever strokes, difficult activation and low vibration comfort.
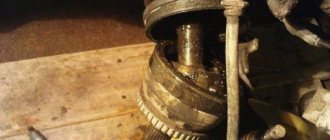
The cable driven gearbox is not a new type. The device can be safely called an updated version of the previous design, which has been made more convenient by improving it. It follows from this that the driver, accustomed to the previous version of the box, will not need to relearn. For cable gearboxes, the diameter of the clutch has been changed, increased from 200 to 215 mm. The starter was moved, installing it along the engine.
Two cables, when interacting with the box, will dampen the transmitted vibrations. This will make the shifting smoother and also reduce the travel of the gearshift knob. The cable design allows shifts to be crisp rather than harsh. In addition, the travel of the shift lever has been significantly reduced. Cable drive is superior to other design solutions in terms of seasonal changes in weather. As a result of replacing the traction drive with a cable drive, the amount of oil poured decreased by 30% due to the transfer of the gear selection mechanism to the top from the bottom.
Severe frost helps the butter thicken. A conventional gearbox requires a lot of effort to start the engine. But the cable mechanism eliminates this problem because the shift mechanism is not submerged in oil, as it is located on top.
The use of a cable drive helps to significantly reduce longitudinal movement - up to 13 cm, and transverse movement - up to 9 cm. The design is made reliable and maximally optimized. This type of gearbox is good for cars with high power engines. Since the clutch has been increased, its torque is quite high.
Shift quality and machine vibration comfort
The gearbox is a complex unit. According to many car enthusiasts, changing gears is not an easy operation. Over time, each driver gains experience in driving a car. But during the adaptation period, a huge load falls on the transmission. Drivers who lack confidence often forget to press the pedal when changing gear.
The design of the box makes it possible to have less impact on the box itself due to the reduced number of strokes. In addition, the possibility of oil leakage is eliminated. Car manufacturers believe that this box option will not affect the cost of the car.
Reviews of the updated gearbox confirm the fact that it is silent when starting the engine and when releasing the clutch. Car enthusiasts talk about easy start-up and lack of vibration. Many users agree that it is now pleasant to change gears. In reviews, some motorists point out that almost nothing has changed in the movements of the lever, but it does not dangle and clicks quietly due to the absence of play in the drive.
Gear shifting efforts have been significantly reduced. According to those who are already using the new gearbox, there is a small drawback: you have to stretch a little for 5th gear, and sometimes the reverse gear is not engaged. But in general, the updated transmission significantly improves the quality of shifts and vibration comfort of the car.