It is impossible to imagine a modern car without such a simple element as side mirrors.
But they did not appear immediately. Side mirrors were first installed in 1911 on a racing car driven by famous racers Cyrus Hatchke and Ray Harroun. Side mirrors were designed to greatly facilitate visibility and make driving safer. It is known that until 1911, drivers used simple mirrors that they held in their hands. But it's inconvenient while driving. Over time, these technical shortcomings were eliminated and designers began installing side mirrors. Their location changed every decade. On vintage cars of the 50s, you can see only one outside mirror, a little later it also appeared on the driver’s side, and only by the seventies did the classic look that is familiar to us today develop: three mirrors - right, left and rear view.
Let's look at this important car detail on a specific VAZ 2106 model, which is still one of the most popular and frequently encountered on Russian roads. What are the mirrors on the VAZ 2106, what are their features, disadvantages and is it possible to come up with something to improve their visibility and appearance?
Rear view mirrors VAZ » VAZ-2104, 2105, 2107 » mirrors series LT-5, Polytech
, St. Petersburg
Mirrors without heating, in a glossy black body for painting. Cable adjustment from inside the car, anti-dazzle reflector in a neutral (chrome) tone. Price per set.
ASPHERIC! Upgraded LT-5b mirrors with an aspherical left mirror element and a spherical right one. Anti-dazzle reflector in neutral (chrome) tone. Price per set.
Mirrors without heating, in glossy black, paintable housing. Cable adjustment from inside the car, anti-dazzle reflector in golden tone. Price per set.
Mirrors without heating, in glossy black, paintable housing. Cable adjustment from inside the car, anti-dazzle blue reflector. Price per set.
ASPHERIC! Upgraded LT-5g mirrors with an aspherical left mirror element and a spherical right one. Anti-dazzle blue reflector. Price per set.
Heated mirrors, in glossy black, paintable housing. Cable adjustment from inside the car, anti-dazzle reflector in a neutral (chrome) tone. Price per set.
Heated mirrors, in glossy black, paintable housing. Cable adjustment from inside the car, anti-dazzle reflector in golden tone. Price per set.
Heated mirrors, in glossy black, paintable housing. Cable adjustment from inside the car, anti-dazzle blue reflector. Price per set.
ASPHERIC! Upgraded LT-5go mirrors with an aspherical left mirror element and a spherical right one. The mirrors are equipped with a heated anti-dazzle blue reflector. Price per set.
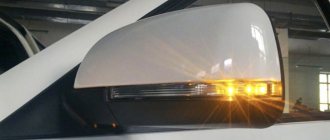
Set of side mirrors with turn signal repeater and heating. Cable adjustment from inside the car, anti-dazzle reflector in a neutral (chrome) tone, mirror housings - gloss black. Price per set.
Set of side mirrors with turn signal repeater and heating. Cable adjustment from inside the car, anti-dazzle reflector in golden tone, mirror housings in gloss black. Price per set.
Set of side mirrors with turn signal repeater and heating. Cable adjustment from inside the car, blue anti-dazzle reflector, mirror housings - gloss black. Price per set.
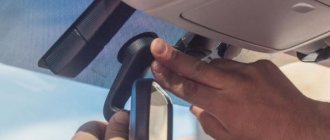
How to remove a rear view mirror
Mirrors of this type are designed to study the situation on the road behind the car. They can be divided into two
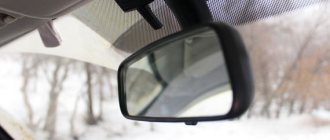
- salon - installed inside the car;
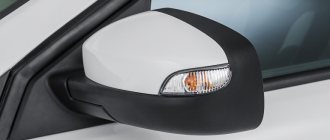
- side - located on both sides on the front door pillars.
The interior mirror is located inside the car
side mirrors are located on both sides of the car
It seems that it could be easier than dismantling the mirror? In fact, this is not so easy to do, and the principle of dismantling can vary significantly between different brands and models. We will tell you about the most universal methods of removing, disassembling and installing internal and external ones. However, if any of the methods described here do not work for you, check your machine's owner's manual. Today, many automobile companies make all such processes much easier: perhaps, instead of unscrewing bolts and bending terminals, you only need to press a small button or pedal.
Required Tools
In order to remove the mirror, you do not need any specific or hard-to-reach tools. As a rule, everything you need can be found in any motorist’s garage.
- a set of screwdrivers (most likely, only figured and flat ones will be useful);
- wrench depending on the size of the bolts;
- household hair dryer for removing the mirror element.
Add to this set skillful hands and the desire to do everything efficiently, and you can get down to business.
Salon
Interior mirrors can be installed in a variety of ways depending on the make, model, and year of your vehicle. There are two methods that are used most often.
- Installation into the car ceiling using bolts or self-tapping screws.
- On the windshield using glue or suction cups.
Thus, on many domestic cars the assistant device is installed using ordinary bolts, which greatly simplifies the dismantling process. To do this, you just need to unscrew the bolts after removing the plug.
in order to remove such a mirror, you just need to unscrew the bolts
The situation can become more complicated if the mirror is mounted on a bracket glued to the glass. First of all, check whether it is possible to separate the bracket itself and the platform glued to the glass. On most cars, they are separated by moving the clamps or turning in a certain direction.
if the mirror is glued to the glass, you need to try to separate the bracket from the holder platform
If this is not possible, you will have to resort to a radical method and remove the bracket along with the windshield. The fact is that the glue holds the elements very firmly, so when you try to separate the mirror, you may accidentally damage the glass.
You most likely will not be able to separate the bracket platform from the mirror on your own, so it is better not to risk it and contact a special salon. Especially if you are dismantling it for future tinting. However, if you decide to do it yourself, be prepared that a trace of glue will remain on the glass.
https://youtube.com/watch?v=XvTNVkHw8Do
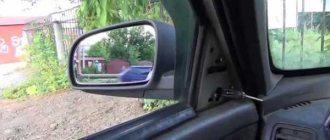
Side left and right
Side mirrors are divided into two
- with mechanical drive;
- with electric drive.
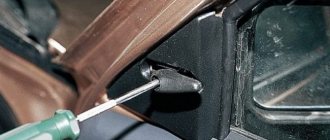
On almost all cars, you will need to remove the door trim to get to the mounting screws. You can find out how to do this on your model in the instruction manual.
This is what a car door looks like with the trim removed
Next, to remove a mechanically driven part, you need to follow a certain procedure.
- Remove the regulator locking bracket.
- Unscrew the fastening screws on the inside of the door.
- Remove the mirror.
Video: dismantling the side mirror
If the mirrors are electric, the procedure will be slightly different.
- Disconnect the negative terminal from the battery.
- Disconnect the block from the wires.
- Unscrew the fastening screws on the inside of the door
- Dismantle.
This is interesting: Advantages and disadvantages of automatic transmission (video)
Interior mirrors VAZ 2106
The purpose of the interior mirror on the “six” is obvious: with its help, the driver can see those sections of the road that are not in the field of view of the exterior rear-view mirrors. First of all, this is the section of the road located directly behind the car. Interior mirrors on the VAZ 2106 may be different.
Standard salon mirror
The standard VAZ 2106 mirror is mounted on a leg, which is secured in the opening between the solar panels using two self-tapping screws. Like exterior mirrors, the standard interior mirror has a housing with a hole for a hinge. The body contains a mirror element.
Standard interior mirrors on “sixes” have never had a wide view
The hinge allows the driver to change the angle of the mirror, adjusting the viewing area. In addition, there is a switch in the mirror housing that allows you to set the mirror in “night” and “day” modes. Despite all these points, the standard mirror has a rather narrow view. Therefore, drivers at the first opportunity change this mirror to something more acceptable.
Panoramic interior mirror
Drivers often call panoramic interior mirrors “half lenses” because of their characteristic shape. One of the main conveniences associated with panoramic mirrors is their mounting method.
Panoramic interior mirrors are often called “half lenses” by drivers of “sixes” because of their characteristic shape.
The mirrors have small clamps with which the “half lens” can be attached directly to the standard mirror without removing it. Panoramic mirrors have both pros and cons:
- the mirror has a slightly curved C-shape, which significantly expands viewing angles, allowing you to capture even part of the dead zones;
- The panoramic mirrors are equipped with protective coatings that can be either anti-reflective, darkening, or, on the contrary, brightening (the latter option is especially convenient for drivers who prefer to tint the rear window).
- but panoramic mirrors also have one significant drawback: they are not suitable for novice drivers. In a panoramic mirror, the distance to the nearest car behind always seems greater than it actually is. Experienced drivers remember this, but beginners often forget.
Mirror with built-in video recorder
Mirrors with video recorders began to be installed on the “Six” about five years ago. Many car enthusiasts consider this option preferable to purchasing a full-fledged recorder.
Mirrors with recorders allow you to do without installing additional devices on the windshield
There is a certain logic in this: since when using such a mirror there is no need to install additional devices on the windshield, the driver’s view is not limited. The image transmitted by the built-in recorder is displayed directly on the surface of the rear view mirror, usually on the left side.
Mirror with built-in display
Mirrors with built-in displays have appeared relatively recently. They are installed on the “sixes” by the most advanced car enthusiasts.
Interior mirrors with displays make parking much easier
This mirror is usually sold complete with a rear view camera installed near the car's bumper. The built-in display allows the driver to see everything within the rear camera's field of view. This makes maneuvering and parking much easier.
So, the mirrors on the VAZ 2106 can be very different. If the car owner doesn’t like the standard ones for some reason, there is always the opportunity to install something more modern both outside and inside the car. Fortunately, there are no particular problems with attaching mirrors, and the range presented on the shelves of spare parts stores is very wide.
What kind of mirrors are installed on the VAZ 2106
As mentioned above, the standard exterior mirrors of the Six are not suitable for all car owners.
And there are several reasons for this:
- small size. Since the area of the mirror elements in standard mirrors is very small, the review also leaves much to be desired. In addition to the limited visibility, standard mirrors have blind spots, which also do not contribute to safe driving;
- lack of protective visors. Since the “six” is a rather old car, its exterior mirrors do not have “visors” that protect the surfaces of the mirror elements from rain and sticky snow. So in bad weather the driver is forced to periodically wipe the outside mirrors. It is clear that not everyone likes this;
- The mirrors are not heated. Because of this, the driver is again forced to manually clean the mirrors from ice;
- appearance. The standard mirrors on the “six” can hardly be called masterpieces of design art. It is not surprising that drivers want to get rid of them.
We list the mirrors that drivers install instead of standard ones.
F1 type mirrors
The name F1 was assigned to these mirrors for a reason. In appearance, they resemble the mirrors found on Formula 1 cars. The mirrors are distinguished by a massive rounded body and a long thin leg.
You can purchase them at any store that sells spare parts for car tuning. The owner of the “six” should not have any problems with attaching these mirrors. They are attached to the car using a standard plastic triangle. They are held on by three self-tapping screws. To install the F1 mirrors, you only need a Phillips screwdriver. F1 mirrors have both pros and cons:
- the undoubted advantage of F1 mirrors is their modern appearance;
- mirrors of this type are adjusted from the cockpit using a special lever. This point becomes especially important for the driver in bad weather;
- but the review of the F1 mirrors leaves much to be desired, since the area of the mirror element is small. As a result, the driver has to adjust the mirrors every now and then. This happens every time the driver moves the seat back slightly or changes the angle of the backrest.
Universal type mirrors
Currently, the spare parts market offers the widest range of universal rear-view mirrors for the VAZ 2106. They differ both in quality and in manufacturer. In addition, mounting methods can also differ significantly. When choosing a universal mirror, it makes sense for a novice driver to focus on a standard triangle mount. And only after that look at the appearance of the mirror and viewing angles. The fact is that to install universal mirrors with non-standard mounts, additional holes may be necessary. And drilling neat holes in the car body is not as simple a task as it might seem. There are two types of mounting universal mirrors:
- fastening using a standard triangle;
It should be noted that fastening “behind the frame” has never been reliable. Over time, any fastener can weaken. As soon as this happens to the bolts in the hinges, the mirror will jump out of the housing and will almost certainly break. And this is another argument in favor of choosing fasteners in the form of a triangle.
Video: universal electric mirrors on the VAZ 2106
Large mirrors from Niva
Some drivers prefer to take a radical approach to improving their mirror visibility. And they install vertical rear-view mirrors on their “six” (they are also called “burdocks”). Nowadays native “burdocks” for the “six” are not so easy to find on sale, although literally three years ago the shelves were littered with them. But drivers found a way out of the situation: they began installing large mirrors from the Niva (VAZ 2121) on the VAZ 2106. The visibility after installing such mirrors really improves. But, alas, it’s impossible to call such a solution beautiful: the Niva mirrors on the VAZ 2106 look too bulky.
Such “bugs” can be attached to the “six” using a standard triangle. Only in this case you will have to take two brackets from the VAZ 2106 and Niva mirrors and use them to make a new fastener for a large mirror.
Here we should also mention the new mirrors. As you know, the Niva car was updated relatively recently. This also affected the rear view mirrors. And if the car enthusiast has a choice, then it is better to install mirrors from the new Niva on the “six”.
Despite their small size, they have a good overview. There won’t be any big problems with fastening either: it’s still the same standard triangle, in which you’ll have to drill one extra hole.
Description of standard mirrors VAZ 2106
The design of both the interior mirror and the two exterior mirrors on the “six” has no fundamental differences. The mirrors are based on a rectangular mirror element mounted in a soft plastic frame, which, in turn, is inserted into the rectangular mirror body.
The design of standard external mirrors on the “six” is extremely simple
All housings have a small hinge hole that secures the mirrors to their support legs. The hinge allows the driver to change the angles of the mirrors, adjusting them to suit himself and achieving the best view.
Number of mirrors and need for right mirror
The standard “six” has three rear-view mirrors. One mirror is located in the cabin, another pair is located outside, on the car body. Many novice car enthusiasts have a question: is a right rear view mirror really necessary? Answer: yes, it is necessary.
The right rear view mirror allows you to more accurately determine the right size of the car
The fact is that the driver, looking in the rearview mirrors, not only assesses the situation behind the car. Mirrors help you better feel the dimensions of the car. A novice driver, who gets behind the wheel of a “six” for the first time, feels the left side of the car very poorly, and does not feel the right side at all. Meanwhile, the driver should have a good sense of the dimensions. This is necessary not only when changing lanes from one lane to another, but also when parking a car. The only way to develop your “sense of size” is to look in the rearview mirrors more often. Therefore, all three mirrors on the VAZ 2106 are indispensable assistants for both beginners and experienced drivers.
How to disassemble a side rear view mirror
This will be required if, for example, the mirror element is broken and needs to be replaced. It is secured in the housing with plastic latches. As a rule, they are located on the reverse side of the mirror surface. The number of these fasteners differs on different car models. In order for the plastic fasteners to become more manageable, they need to be heated. A regular hairdryer can help with this. A stream of warm air must be directed onto the entire surface of the glass. Usually a couple of minutes is enough. In addition to the usual household hair dryer, there is also a construction hair dryer. However, it is better not to perform this operation with its help. The fact is that the latter can heat the plastic to the melting point and damage the fasteners.
When the latches become soft due to heat, you need to use plastic spatulas or a flathead screwdriver. When using a metal object, you need to be extremely careful as it can scratch the glass or case. Using the lever method, you need to pick out the mirror from its mounts. plastic fasteners are not the only thing that connects the mirror to the body. In addition to them, there may be glue or wires. You need to disconnect all unnecessary elements.
Putting the mirror surface back is much easier - you just need to align the latches in the right order and press on the surface of the mirror.
And so, what we have: a used mirror bought at a car disassembly, not painted, WITHOUT electric folding, 7-pin (with folding, 9-pin.) There is a big fundamental difference in the device between “with folding” and “without folding” In theory it shouldn't be.
1) The actual mirror assembly: Attachment 83912
2) First of all, you need to remove the mirror element, in order to do this without breaking (it cracks easily!), you need to pull it towards you by the lower edge with your hands. If it doesn’t work (and most likely it won’t work), you need to take a screwdriver and pry off the fastening, where the fastenings are, see the following photos. Attachment 83913
3) So, most likely it will not be possible to separate the mirror element easily, because in addition to the latches, it is also glued to a certain substance, like a sealant: This black substance is the main problem when separating the mirror element (Attachment 83911
4) The essence of attaching the mirror element is this, in the upper part there are hooks: (the white one is the stitch from the handle for clarity) Attachment 83921
And in the bottom latch: (white is the stitch from the handle for clarity) Attachment 83922
5) As a result, after suffering, we remove the mirror element, then disconnect the heating wiring Attachment 83923
6) Now we see 4 screws, take a screwdriver and unscrew Attachment 83926 we get the following: Attachment 83925
7) Next, we bring the mirror folding mechanism to the “folded” position, that is, we rotate the body relative to the “stand” and find another screw. This screw secures the internal mirror adjustment mechanism to the body: Attachment 83927 Attachment 83928
As noted earlier, the rear view mirror is the most susceptible to damage. Sometimes there are cases when it is possible to repair a part, but the most common times are when the only solution is to replace the mirror. Currently, you can purchase both the original part and a high-quality replica. Reliability and 100% “compatibility” with the car speak for the original. But the advantages of a replica include its relatively low cost and availability.
So, how to choose a new mirror for a Toyota Corolla 120 and 150 body? Before choosing a new side mirror, you need to decide whether it will be from an official dealer or purchased externally.
During the purchasing process, you must adhere to a number of recommendations: you need to decide which drive: mechanical or electric? For example, even if the “original” parts have an electric drive, then it is worth remembering that the control unit on the 2008 and 2012 models is different, and the reflectors from the 2008 model may not fit the 2012 model. When installing the side left and right products, all fasteners should be easy to screw in. The left and right mirrors must be symmetrical. If they have a turn signal, then you should check it before purchasing. The installed element should look like a single whole: there should be no backlash.
Right mirror Toyota Corolla 150 body – from 2000 to 5000 thousand rubles.
Disassembling and repairing rear-view mirrors - the intricacies of do-it-yourself work
A rear view mirror is one of the essential elements of every car. The main function of this part is to ensure safety during operation of the machine. It is the mirrors that provide the driver with information about what is happening on the road in the sector behind the rear wings and rear bumper.
- Reasons for mirror breakage
- Installation and fastening of rear view mirrors
- DIY parts repair
1 Reasons for mirror breakage
- Adjusting car side mirrors
- Interior rear view mirror - improving visibility in the car
- Car mirrors – adjusting and repairing
- Auto scanner for self-diagnosis of any car
The interior mirrors also fail. In most cases, failure is the result of frequent adjustments to the part. At the same time, when re-adjusting the element, the driver does not even suspect the damage.
In fact, you need to start repairing the mirror and try to disassemble it only when the part has deviated at least slightly from the previously specified position. If this happens, it means that the mounting legs have moved. They often come off completely and the driver can only notice this by looking closely at the windshield from the outside of the car.
2 Installation and fastening of rear-view mirrors
External viewing elements are installed on the driver's and front passenger's door pillars closer to the hood of the car. On older cars, most of which are already recognized as rarities, exterior mirrors are mounted on the front fenders closer to the radiator.
Adjustment of viewing elements depends on the price range of the car. If the car belongs to the budget segment, then the mirrors can be adjusted exclusively in manual mode. If the cost of the car exceeded 20 thousand dollars, then its owner has the opportunity to adjust the mirrors either manually or remotely. By the way, it is in the latter case that the driver is forced to repair the viewing elements. This is due to the presence of fragile microcircuits that the manufacturer installs in the rear view mirror housings.
3 DIY parts repair
Every motorist should have a universal device for diagnosing his car.
You can read, reset, analyze all sensors and configure the car’s on-board computer yourself using a special scanner...
Read more.. "
- gluing the part to the windshield;
- replacement of optical elements and housing;
- replacement of mechanical components.
To return the mirror to its place, it is necessary to use only two-component glue, which includes an activator and an adhesive. They quickly set to any type of surface and are very durable. Working with glue is easy. But you should be very careful, because a crookedly installed mirror will not be able to be removed and disassembled later.
To glue the interior mirror with a two-component compound, first take the metal platform of the part holder and apply a thin layer of glue to its surface. After this we have about 5 minutes before the composition dries. We spray the activator onto the surface of the car windshield, and then immediately apply a mirror to the window. We fix the part and hold it for several seconds. After this, all that remains is to clean off the remaining solution and continue operating the car.
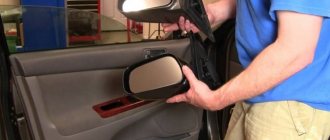
To begin repairing and disassembling the exterior rear view mirror, you first need to dismantle it. To do this, you need to remove the plugs from the inside of the front door. Next, unscrew the mounting screws and remove the mirror. In this case, you need to be extremely careful. If you adjust the part remotely, then during its dismantling, try to prevent the cables and microcircuits from breaking. If the mirror is adjusted manually, then you just need to pull the part out of its “socket”.
In the event of a breakdown, the optical element is replaced with a new one. Any other part of the rear view mirror is repaired in the same way. If you adjust the viewing parts remotely, it is not recommended to disassemble them yourself.
Do you still think that diagnosing a car is difficult?
If you are reading these lines, it means you are interested in doing something in the car yourself and really saving money, because you already know that:
- Service stations charge a lot of money for simple computer diagnostics
- To find out the error you need to go to specialists
- The services use simple impact wrenches, but you can’t find a good specialist
And of course you are tired of throwing money down the drain, and driving around the service station all the time is out of the question, then you need a simple CAR SCANNER ELM327, which connects to any car and through a regular smartphone you will always find the problem, turn off CHECK and save a lot of money! !!
We ourselves tested this scanner on different machines and it showed excellent results, now we recommend it to EVERYONE! To prevent you from falling for a Chinese counterfeit, we publish here a link to the official website of Autoscanner.
tuningkod.ru
How to disassemble the rear view mirror of a VAZ 2110
How to disassemble a car mirror
There are many reasons to analyze a car's side mirror. This may be the desire to paint it or tidy it up after the woodcutter picked it up. Many car drivers are interested in how to disassemble a car mirror and how to remove it quickly and easily. Due to inept movements, a car mirror can become completely unusable, and then a new one will be needed, and as a result the mirror will be installed in a car service.
But there are many brands and even more models of cars and mirrors for them. There are also many types of mirrors. electrical, folding, rotating elements, etc. The most important thing is how to remove it to avoid damage. Below are general steps to analyze your camera's side mirror.
Naturally, it will be more convenient to disassemble a mirror removed from the car, so it should be removed. What will it take?
Removing a power mirror. First, remove the mirror lock, remove the three screws that secure the mirror to the door frame, and then remove the mirror.
Removing the electric mirror. First thing to do. disconnect the negative terminal from the battery. Next, unplug the power cord, remove the three screws that secure the mirror to the door, and remove them.
There are several ways to make a car mirror.
replacing side mirrors on a VAZ 2110
, 2111.2112 and the like.
Video review of replacing the mirror element with an external mirror, rear view
such cars
First way
Using a curved object or screwdriver, carefully rotate the mirror while pushing it from the inside. Trying to pull the mirror away from the edge may damage it.
Some motorists use many objects to remove the mirror element. It could even be all kinds of kitchen spatulas. Some wrap the edge of the spatula with electrical tape to avoid damaging the surface of the mirror. Others use a single solid blade. correct the gap, and insert the other one more softly into the resulting groove.
Second way
To remove the mirror element, you need to hit the body with a soft object. it could be anything. To detach the mirror housing from the triangular mount, remove the spring, unscrew the adjusting rod and remove the pin. Assembly and installation of the mirror is usually done in the reverse order.
Detailed and universal method
In the car, press down on the plastic cover that covers the screws that secure the mirror. With the cover removed, remove the three screws holding the mirror in place and remove it
Then carefully remove the rubber pads
If the rubber gaskets are damaged, it will be very difficult to buy new ones; they are rarely sold separately.
Now unscrew the two screws that secure the mirror adjustment joystick. Analysis of the joysticks themselves. The procedure is simple, you just need to carefully remember the position and color of the cable, as different colors are responsible for setting them. Then remove the three screws that are located in the bottom plastic corner. it is most susceptible to damage during vehicle operation. Then it should be removed. How to remove the mirror element has already been described above. After removing the mirror element, remove the four screws and remove the rest.
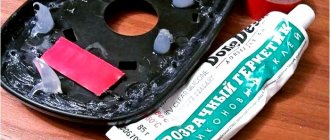
Apply silicone glue
The easiest way, of course. Ask a friend or take your car to a body shop if you need a mirror replaced or a paint job. But most owners are used to having their car repaired. This is a significant money saving.
Replacing side mirror glass using the example of Priora, 2110, Ford Focus and Honda Fit
- 1. Apply pressure on the lower part of the mirror until a gap forms on top;
- 2. Insert a screwdriver into the gap that has formed and, using lever pressure with a screwdriver, disconnect the fastening clamps;
- 3. Remove the mirror by disconnecting the electrical contacts;
- 4. Then, in strict reverse order to the previous one, install the mirror element in its place.
- 1. Press down the lower part of the surface of the mirror element until a gap forms at the top between the glass and the side mirror housing;
- 2. Then, using a curved object, or if there is none, a screwdriver through the resulting gap, apply pressure to the center of the mirror from the inside. With this impact, its retaining clips should become detached. It is highly not recommended to press on the side with a screwdriver, as there is a possibility of damaging the mirror.
- 1. Press on the side of the mirror surface closest to the car body. It should come off on the opposite side;
- 2. Grasping the protruding side of the mirror, pull it in a horizontal direction opposite to the location of the car. The latches should come loose. After these simple manipulations it should be in your hands.
- 1. Gently press the upper part of the mirror surface with your hand, while the lower edge should stick out;
- 2. Grasping the lower part of the mirror, disconnect it from the clamps and hooks securing it to the drive;
- 3. Disconnect the electrical contact for the heated mirror.
AutoFlit.ru
Chrome plating of rear view mirrors
Sometimes it is difficult to find a side mirror in a chrome housing suitable for the VAZ 2107 on sale. However, chrome plating can be done with your own hands. You can do this in two ways:
- applying chrome vinyl film to the mirror body;
- painting the mirror with special chrome paint followed by varnishing.
These methods do not require the use of special equipment and expensive materials.
Applying chrome vinyl film to the mirror body
To apply chrome vinyl film to a mirror you will need:
- stationery knife;
- squeegee (for smoothing the film over the surface of the body);
- construction hairdryer
The film is applied as follows:
- The surface of the mirror body is cleaned of dirt and dried. In this case, you can use any cleaning products.
- The paper backing is removed from a piece of film cut to the size of the mirror.
- Using a hair dryer, the film is heated to 50–60°C.
- The heated film stretches in all directions.
It is more convenient to do this together, holding the film by the corners. The film is stretched so that its size increases by 15–20%. This is done so that wrinkles do not appear in the places where the film will be cut. For a tighter fit to the mirror body, the film stretches in all directions - The film cools and is placed on the largest flat part of the body. From the center to the edges, the film is smoothed with a rubber or plastic squeegee until wrinkles appear.
- Sections of the film with folds are stretched to the edge of the mirror body.
If necessary, these areas can be heated with a hairdryer. The film is stretched from the center to the edges of the mirror body - The entire surface of the film is heated. As a result, it should stretch across the entire mirror body without bubbles or folds.
- The free edge of the film is cut off with a margin and wrapped inward - where the reflective element is installed.
- The folded edge is heated and pressed with a squeegee.
- The entire surface of the film is smoothed again with a squeegee.
In my practice, I had to use film. In order to stick it successfully, you need to practice and acquire certain skills, without which you can ruin everything.
Advice from experienced motorists
Increasing personal safety while driving.
- Try to be more visible on the road. Don't forget about outdoor lighting - your headlights will be reflected in the mirrors of other cars.
- Be aware of the maneuver, move smoothly. Remember to have a turn signal. When changing lanes smoothly, possible troubles from the blind spot are significantly reduced.
- Don't be lazy to turn your head. As a rule, to move from lane to lane, lateral reflection alone is not enough - you need to inspect the “blind” zone live (at the same time, your neck will warm up).
- If possible, avoid the blind spots of neighboring cars - you may not be noticed when maneuvering. Do not maneuver yourself near the right front wheel of heavy trucks - all trucks have a “blind” zone here.
Source
Tuning car mirrors
If you want to transform your car, you can install new side mirrors with a spherical element. This is the hit of the season, which simultaneously gives the car's appearance brightness and energy and increases the viewing angle. The F1 mirrors fit very well on the sixth model. This is an elegant design with a classic style, covered with anti-reflective film.
The body, made of durable plastic, can be either standard black or other colors; if desired, it can always be repainted in any shade you like. F1 mirrors are easy to attach, the work can be done independently, without wasting time and effort.
Recently, such interesting solutions as mirrors with a built-in video recorder have appeared on the market. It's very convenient on the road. Mirrors with heating and electric drive functions are also in great demand. Such elements will not freeze or fog up, and will always retain their ideal appearance and performance properties.
Such products are manufactured by many companies, but it is better, according to experts, to pay attention to the products of Japanese manufacturers. Do not forget that heating and electric drives are the most complex devices, where every screw, every wire must be of impeccable quality and connected correctly and correctly.