The heated mirror function is present on most new car models. But on earlier or budget versions this option may not be provided. In this case, owners wonder whether it is possible to assemble heated rear-view mirrors with their own hands. After all, the system allows you to effectively remove ice, snow, and raindrops that impair visibility while driving.
You can install heating on any car, the main thing is to select suitable heating elements and connect the circuit correctly.
Installation of a heating system in
The installation of a heated mirror system is offered by the Ziesta technical car service. We have ready-made solutions - materials and heating models that have been tested and have the appropriate certification. Meeting all technical requirements, the materials have a long service life and perfectly perform their functions in providing clean and dry mirrors.
Installers have more than 15 years of experience
Certified equipment
No queues
Guarantee on all work
We guarantee our clients:
- reliable operation
; - quality system
; - accuracy
; - timely completion of work
; - guarantee
.
The price of our services depends on the brand and its design features, but always remains optimally affordable for our clients.
How do heated rear view mirrors work?
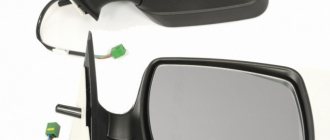
The design of the side mirror heating system is extremely simple. It consists of the heating element itself, a button or switch to turn it on, a fuse and wires to power the element. When the driver presses a button (or unscrews a switch), current is supplied to the heating element from the vehicle's on-board system.
Interesting materials:
What is prohibited from importing into Israel? What makes the wheels of a bicycle move? What does an owl eat in winter? What does it mean to add a post to bookmarks? What does it mean when crows caw? What is the mount for? What are notepads for? What are paper bags for? Why does a dolphin need a big brain? Why are there two buttons on the toilet?
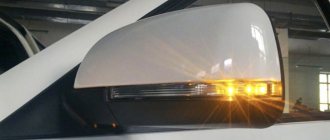
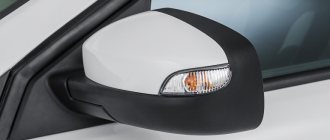
System advantage
Heated front mirrors will minimize the risk of accidents, as well as maintain a presentable appearance of the car during cold periods. No frozen ice or snow, no foggy surface or streaks from wet rags after trying to clean the mirror. Snowfall will not interfere with your movement and full visibility of the rear view. The system is installed to the cable line from the button that turns on the heated rear window, but if there is no such button, you can install a separate button responsible for starting the function of heated car mirrors.
Armrest Lada Largus: which one to buy and how to install it yourself
As for me, for independent implementation, films will be the simplest and most correct solution. Just keep in mind that there are 2 types of films for heating mirrors.
- Film resistor materials. Considered reliable, easy to install and effective. Installation is not much different from fixing boards. The film is attached to the back of the mirror using glue or double-sided tape. The kit already includes outlet wires that connect to the car’s wiring and the button is displayed on the panel in a convenient place;
- Simple films. No electrical connection is required here. This is an option for the lazy, since everything is done in a couple of minutes without much effort and dismantling the mirror. Such films, called anti-rain, are installed in several steps. First, the mirror is cleaned, the marks are checked, the label is separated, a film is glued to the center, air bubbles are removed and the top protective layer is removed.
With the second version of the film, we are not talking about heating, but about creating a special water-repellent layer. At the same time, the film works well, many who managed to buy it remain satisfied. Plus no work with connections, insulation, foiling, etc.
Have you used any heaters? How do you generally solve the problem of icing and fogging of the side rear view mirrors? Share your secrets and observations in the comments.
Thank you for your attention! Be sure to subscribe, leave reviews, and ask relevant questions if you have them!
Principle of operation
Heating is a simple device that includes a heating element and a button in its design. The heater is fastened to the inner surface of the mirror, in compliance with a number of technological rules. Heating begins to function after pressing a button, which allows you to operate the system rationally and consume the smallest amount of electricity. The heater evenly and moderately heats the mirror without damaging its structure, but preventing the surface from freezing and sweating. The device operates at temperatures down to -50 degrees, as well as at high temperatures. For example, with the help of such a system, you can dry the surface after washing, or remove raindrops from mirrors even in the summer.
Repair of trailers and semi-trailers of trucks: how to choose a service station
It is better to take such products as a kit, as is the case with Defogger DC12.
With your permission, I will not consider installing wire heaters. It is based on tungsten filaments, which provide high temperatures and require an extremely careful approach to organizing heating. There are too many risks when trying to assemble it yourself.
Films
Heating device installation technology
The installation of heating begins with disassembling the mirror. A heating element is glued to the inside of the mirror panel. The wiring coming from the heating element is located in the front console, protected from moisture penetration and oxidation. Right there on the console for convenient use, most often there is a start button. If there is a heated seat or rear window, the wiring from the mirror heater is connected to their lines to create a complete heating system. This scheme does not affect the performance of other car systems and is universal in a car of any brand.
Types of heated mirrors
To understand how to properly adjust the mirrors in a car, you should know about the different options for the heating element.
Car rearview mirrors can be heated in three ways:
- An element with heat-resistant insulation in the form of a resistance wire. It is attached to the back of the reflective glass.
- Conductive paste. A resistive stencil element is made from it. It is applied by stencil printing onto a polymer film.
- A film with a continuous resistive reflective element is applied to the opposite side of the optical element. This layer in addition has reflective properties and is used as a reflective layer.
Heated mirrors come in three varieties
Checking the operation of the heated windshield
The efficiency of the windshield heating, like other heating systems in the car, depends on the ambient temperature. Vesta owners have noticed that at -3 degrees, only 3.5 minutes are enough for the ice and snow from the windshield to melt. Then we make one sweep of the wipers and all the ice goes away:
At lower temperatures, for example, when it is -20 degrees outside, the windshield heats up more slowly. Thanks to the heater, after 3-4 minutes the first signs of thawing appeared at the bottom of the glass. The main part of the ice disappears only after 7-10 minutes, you can go.
By the way, if the filaments are clearly visible inside the glass and the heating does not work, contact your dealer with this question; it is possible that this option is simply not activated on your car.
On Lada Vesta SW and Lada Vesta SW Cross, the heated windshield is activated with a separate button. Heating efficiency on video:
Procedure
Now you can begin installing the heater. First, remove the holder with the mirror from the case. On most cars, it is enough to pry it with a screwdriver or something flat from below and pull it towards you.
Based on the characteristics of the holder, we choose the method of fastening the wire. If the inner surface of the holder is smooth (as in the photo), then stick double-sided tape on it.
Then we lay a piece of wire on this surface. This can be done arbitrarily, for example, in a zigzag or something else. The main thing is to place it so that the thread covers as much of the surface of the holder as possible. In this case, the wire should not intersect anywhere. Scotch tape will hold the nichrome thread well.
In this way, we fasten the wire along the accessible surface of the holder without touching the fasteners.
When laying the wire, its ends should be placed towards the side of the holder that is closer to the door, and so that they do not touch each other. To these ends we solder terminals for connecting to the wiring or simply the ends of prepared wires. Then the resulting connections need to be insulated.
All that remains is to provide insulation. If the wire was secured with tape, then to insulate it you can simply stick several more layers of regular adhesive tape on top. This will provide thermal insulation and prevent the wire from peeling off and shorting.
As for the holder where the wire is secured with a soldering iron, you can simply fill the entire surface where the thread passes with sealant and wait until it dries. In this case, the fastening elements will not be affected, which will ensure ease of fastening, and the wire itself will be insulated.
Read more: UAZ Patriot, Bukhanka and Hunter air conditioning does not work: installation, malfunctions and system diagram
Before installing the holder in place, we pull the wiring through the mirror body into the door, the wiring for powering the heaters. Only after this we assemble the mirror.
Tube heater
Self-production of lamp-heated mirrors
We will look at heating made from improvised materials. One of the simplest types of heating is the use of ordinary 12-volt incandescent lamps. When such a lamp burns, enough heat will be released to warm the mirror. At the same time, to create a heater you will not need so many materials:
- two automobile incandescent lamps;
- cartridges for them;
- wires;
- foil;
- insulation (varnished fabric, paronite, textolite);
To install the heating, you need to remove the mirror along with the housing from the car, and then disassemble it so that you can install the bulbs inside. Insulation is needed in order to reduce heat loss from the housing. It needs to be glued from the inside to the body. Then foil is glued to the insulation, which will act as a reflector, providing heat flow towards the mirror.
Independent heating equipment
Factory universal heating element
But that’s all – standard heaters that cars are equipped with from the factory, and not all models have them. And this option is really very necessary, because visibility depends on it. But it is quite possible to make heaters for side mirrors yourself.
Of course, you can buy all the necessary equipment and install it on your car, saving yourself the need to invent something. There are ready-made kits on sale that can be installed in standard mirrors, or you can purchase tuning mirrors that are already equipped with heating, but these are additional costs.
About heated seats
The heating works quite efficiently. The only drawback is the lack of heating sensitivity. That is, there is no option to select power (low, medium, high), as on some foreign cars. But it does not “fry” all the time, but automatically turns off/on while the indicator is on.
Checking the heated seats of Lada Vesta from ZaRulem:
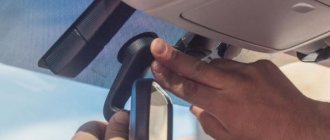
Dismantling
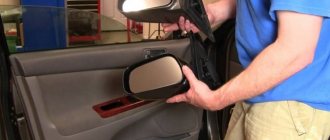
You have decided to carry out dismantling work with your own hands and then reinstall it. The only question now is how to remove and disassemble the element, so that later everything can be returned to its place without any risks. In the meantime, glass replacement or another procedure will be carried out, depending on the specific situation.
To carry out dismantling work, you need to take:
- curved screwdriver;
- flat screwdriver;
- wrench to match the size of the fasteners;
- hair dryer;
- degreaser;
- rags;
- high-quality glue;
- some free time;
- clean garage;
- good mood.
Add to this set of tools a couple of skillful hands, and everything will go great.
As you understand, rear and interior mirrors are removed differently.
Work in the salon
Let's start with the interior design. A lot depends on what kind of car you are working with.
Automakers use different mounting systems. Therefore, start from the specific situation. So, for example, different fasteners are used on cars such as:
- Deo Lanos;
- VAZ 2110;
- Niva Chevrolet;
- Ford Focus;
- Renault Logan;
- Chevrolet Cruze;
- Lada Priora;
- Lada Kalina;
- Hyundai Solaris, etc.
Still, owners of inexpensive cars mostly do this work on their own.
And here you may encounter glue and suction cups, or bolts and screws. These are the most common installation methods.
Domestic cars mostly come with bolts. Therefore, it will be easy to remove the structure. The plug is removed, the key is taken and the fasteners are unscrewed.
But there are also brackets glued to the glass. Here you will first have to figure out whether it is actually possible to separate the fastening element from the glass. Most often, designers use clamps or rotating mechanisms. If this is not possible, you will have to remove not only the bracket, but also the windshield itself. The glue holds the element very tightly, and therefore it will not be difficult to damage the front cover.
Please refer to the instruction manual. There you will probably find a hint on what exactly to do in this situation. Sometimes it’s better to visit a car service center, where specialists will do everything carefully and clearly.
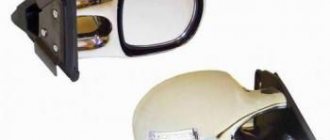
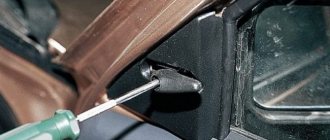
Side dismantling
Everything is clear in the cabin. Now you need to dismantle the exterior mirror structure. Left or right, it doesn’t matter much here. What is more important is what type of design is used. The side mirrors are power driven. And it can be mechanical and electrical.
Almost any car is structurally designed to allow access to fasteners through the doors. You just need to remove the casing. Again, look in the manual for your car, since there are no universal instructions on this matter.
If you have a mechanical drive, then:
- The locking bracket of the existing regulator is removed;
- The fastening screws are tightened on the inside of the door;
- The mirror itself is removed.
In the case of an electric drive, everything is somewhat different. You need:
- raise the hood;
- find the battery;
- remove the negative terminal from the battery;
- disconnect the block with wires;
- remove the door trim;
- unscrew the mirror fasteners;
- remove element;
- rejoice at the result.
The last point is especially important. Know how to be enough for yourself even for small achievements.
All prices of Kia Seltos for the Russian market have become known
On the Kia Seltos Club Russia forum they posted a detailed description of all Kia Seltos trim levels with prices. The base crossover will be equipped with air conditioning and electric windows, and in the “top” version it will receive an advanced audio system. Prices range from 1,119,900 to 1,839,900 rubles.
Kia Seltos
According to the source, it will be possible to buy the KIA Seltos in one of 17 versions, differing in the level of equipment (equipment), engine, transmission and drive type. As expected, there will be five trim levels: Classic, Comfort, Luxe, Prestige and Premium.
The entry-level Kia Seltos is a crossover in the Classic configuration with a 1.6-liter power unit (123 horsepower), manual transmission and front-wheel drive. This car is equipped with a tire pressure sensor, air conditioning, a lift assist system, and also has 6 airbags.
Kia Seltos
The next Comfort version features a 6-speed automatic transmission and an all-wheel drive transmission: climate control, heated mirrors and front seats, and alloy wheels are added to the equipment list.
Kia Seltos
The Luxe version is distinguished by a rear view camera and a multimedia system with a touch screen and support for Apple CarPlay. In addition, a 2.0-liter power plant with 149 horsepower and 180 Nm of torque is available with this package, paired with a CVT, front-wheel drive or all-wheel drive.
Kia Seltos
Kia Seltos in the “top” versions Prestige and Premiun are equipped with rain and light sensors, LED headlights, and an engine start button. Under the hood is a turbocharged 1.6-liter unit (177 horsepower), a 7-speed robot. The cabin features a premium audio system and leather upholstery.
Wire heating
Another option is also simple and easy to make. It uses copper wire instead of light bulbs. And the materials you will need are a plate of thermal insulation material, an insulator for the wire, and foil.
An important condition for the heating to work is the correct selection of the wire cross-section and its length. When connected to the battery, the wire should not heat up above 40-50 degrees Celsius.
In such a heater, a plate is installed inside the body, onto which foil is glued. The wire is placed in an insulator, wiring is soldered to its ends, then it is secured in a zigzag pattern to the plate and the mirror is assembled. The connection is carried out identically to a lamp heater.
These are the simplest, but at the same time very reliable designs of side mirror heaters, which can be made practically from improvised means, and at the same time they will perform their function quite well.
Matching block
A few more words should be said about the coordination unit - it may be needed if your car is equipped with an on-board computer. The fact is that connecting directly can cause various problems in the car's electrical network. The system sees that electricity consumption does not occur as specified in the program - as a result, an emergency shutdown is triggered.
The matching block allows you to eliminate a number of important problems:
- failures in the on-board computer;
- power surges;
- overload;
- emergency shutdowns.
If you don’t feel like you have the talents of an electronics engineer, that’s okay - the industry offers a wide selection of smart connections for any car model. Finding and purchasing a device for the Kia Rio 3 will not be difficult - with it the electrical equipment will work like a clock.