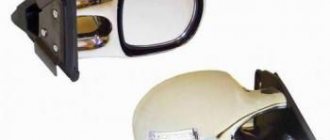
IZH 21261 -070(4x4/UZAM 248-2.0i) › Logbook › Installation of electric and heated mirrors
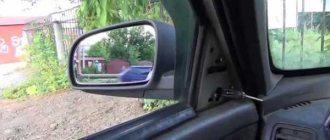
1. The view of the standard rear mirrors is very small, which is not always good in the city.2. When driving on an uneven road ("ridge") at speed - it is impossible to look in the mirrors normally - they shake strongly, and in especially severe cases they begin to slide.3. Manual adjustment.
Looking at the experience of upgrading rear view mirrors dimakalash
www.drive2.ru/cars/izh/2126/2126/dimakalash/and also armed with the experience of the guys from the IZH 2126 forum,
I decided to install electric and heated mirrors from the Lada Granta (Kalina Lux).
IMPLEMENTATION: Preparation
1. I started by ordering mirrors and seals from Solina #
2. Then at the market I bought a VAZ 2110-12 electric mirror joystick and a ready-made wiring harness for connecting VAZ 2110 electric mirrors with heating. + two four-pin relays (one for heating, and the second for the mirror joystick) + two fuse housings.
3. The third stage was to paint the mirrors in the body color (while painting the body kit);
Installation
Since I installed the mirrors at the dacha and there was no photographic equipment at hand, there are no detailed photos (((1. Dismantle the stock mirrors. 2. Cut out a cardboard template along the mirror overlay and mark the holes on the door. 3. Shorten the mirror mounting posts by 5...7 mm ;4. Drill three holes from the outside (12...13 mm in diameter) and adjust them with a file;5. In the area of the right angle of the triangle of the mirror cover, we file down the stiffening ribs by 2...3 mm, ensuring a tight fit of the mirror to the door.6. Drill three holes from the inside (diameter 6...6.5mm) and prepare M5.7 bolts. We close the standard holes with foam rubber plugs, placing them on the sealant. 8. We also place the seals from the kit on the sealant and pull the mirror to the door.
9. Let’s move on to installing the electrics - I used the diagram of the guys from the drive (special thanks to them)
2. Test on uneven roads showed a stable position of the mirrors.3. Electric drive and heating (worked the first time) - convenience and comfort cannot be expressed in words - cool in general.
source
Lada 2110 badass › Logbook › Lada Priora SE mirrors on Lada 2110. Connection lasts a month.
More than a month ago I started connecting wiring to the mirrors. It is almost impossible to find a connection kit in stores, so SheremetValery and I went to the Kuzbass market. There I easily found a wiring kit, a joystick and SE plugs for the front fenders.
Mirrors from the new Priora model have the following connector:
To begin with, I dismantled the central tunnel. And so, every time I take it apart, I remember with a kind word the one who came up with the idea of making self-tapping screws on the sides of this very tunnel! Then I laid the wiring to the joystick (marked in red):
Then the wires should come out from under and separate on two sides; I put the wires on the right mirror where I marked with an arrow:
In this case, all the snot is then perfectly hidden under standard shields.
Next, I used the connection diagram, taken from the same, not entirely free spaces of the Internet:
I decided to connect the turn signals first. To do this, I dismantled the tidy and began connecting to the red block, and at the same time changed the burnt out light bulbs.
The next step was to pass the wires into the door through this f... hated corrugation, which I successfully tore. Since it was below zero outside, I dropped everything and went home to warm up. Then it turned out that the length of the wiring was not enough, 15-17 centimeters... wow, oh, this “universal kit”. This was the reason for the delayed installation... Well, and also the lack of a garage and the weather:
As soon as the weather returned to normal and I had a free minute, I installed a new corrugation on the driver's door and ran the wires:
It is much easier to remove all the wiring from the door and push everything through the straight corrugation, and then tuck everything into the door. I did the same on the right side. To extend the wires, I soldered pieces to the mirrors, along with old-style connectors. Unfortunately, the photos were not preserved. Then I connected everything in the doors:
I took the mass from the left threshold, and + for the mirrors and for the joystick backlight from the cigarette lighter. All that remains is to connect the heating in the fuse block. So, now the question is: Is there a backlight on the joystick, as in the photo below? Otherwise it doesn't work for me.
Everything functions perfectly) I was very pleased with the work done!
Wiring electric mirrors VAZ 2110
Good afternoon everyone.
I decided to touch on the banal topic of installing heated and electrically controlled mirrors from Priora 2 on a VAZ 2110. I don’t see the point in describing all the delights of owning these mirrors, but I will dwell on the installation of wiring in more detail. I hope my experience will be useful. What we buy: 1.Prior 2 mirrors, without turn signal, not painted, heated and electrically adjustable. I'm afraid to make a mistake with the manufacturer, Ulyanovsk or Nizhny Novgorod. When disassembling the mirrors for painting, Chinese electric motors were found inside. Let's hope they won't let us down. Price 1300 rubles (as of February 2016) Samara, Rakita market;
3. Mirror control joystick 12.3769. Suitable for regular place. Convenient to manage. Has a “middle” position. The control handle does not stick out, unlike the UAZ one. Price 550 rubles, (as of July 2016) Samara, Rakita market;
4. Block for wires, for 9 females. Price 30 rubles, (as of July 2016) Samara, Rakita market; Why did you buy the wiring harness 2110.8201326-41? I was hoping to save time on installation. Did not work out. Considering that the UAZ joystick was not used and it was necessary to add 15 cm to each mirror. A waste of money. In my opinion. The only positive point is the connectors already connected to ground (black wire) with a ring tip, heating (brown), joystick backlight (yellow) and power (white). We open the connectors behind the mounting block and insert our wires into the gap.
Guys, before starting any electrical work, turn off the power to the system. This will save you from a lot of trouble.
We find the power connector for the heated rear window (gray wire with a red streak), connect it to the brown wire of the harness 2110.8201326-41.
We hang the mass in the designated place. The photo shows.
We insert the white power wire into the gap in the pink wire. In my case, the previous owner inserted a fuse into the circuit for some reason. I didn't take it out. Left it.
We put the yellow one in the power supply gap for the fog lights. Gray wire. I use PTF as a DRL, so the joystick backlight will be in constant mode. It was possible to put it on the cigarette lighter, like my window regulators are made, but I was too lazy to pull additional wires, to be honest. In principle, everything worked out simply at this stage. We don’t climb anywhere, we don’t cut wires. We don’t open anything except the mounting block.
On Drive I easily found the diagrams and pinouts for terminals 12.3769 and Ф53.602.000. Spent a little time understanding which wire goes where. On mirrors, by trial and error, we find the right combination. I repeat once again, I had to extend the wires to each mirror by 15 cm. In principle, everything is simple.
Yesterday, Sunday, after recovering from Saturday's drinking, I went and bought everything for a braid of mirrors.
Problem and solution
Winter is coming. And here, unfortunately, side rearview mirrors cannot always help the car owner. Winter is a particularly difficult time of year for motorists. We will not now list all possible technical problems, starting with starting the engine, but will touch only on purely mechanical problems:
Let's just remember how in the morning, leaving the entrance and looking around at the cars parked nearby, it is not always possible to immediately understand which one is yours. The reason for the conspiracy is quite banal - overnight snowfall. So, your first task arises to get a shovel or other improvised means and dig out your iron horse After this, we move on to cleaning the body of the VAZ, then the windows of your car. A problem arises, what to do with the rearview mirrors? Ice and snow did not ignore them
However, manual cleaning is extremely problematic due to:
- Firstly, with the design of mirrors, it turns out that their reflective element is recessed into the body, which makes it difficult to use mechanical cleaning means, such as a brush or scraper
- Secondly, any attempt to manually clean the reflective surface will ruin the settings, which will render the side mirrors useless
- Third, if you use too much force, you may scratch or even break them.
- On the VAZ 2112, heated mirror elements can completely solve such problems
Work principles
The heating of the side reflectors is based on any electric heater (low-temperature, of course), electrical wiring, and a button (on the dashboard) to control:
- The electrical wiring for heated mirrors is connected to the car's on-board network at twelve volts.
- Closing the contacts with the power button connects the mirror heating (its heating element) to the network; the electric current passing through the heating element heats up the surface of the mirror, the heated surface begins to melt the formed ice, in addition, the warm surface will stop fogging
Installation
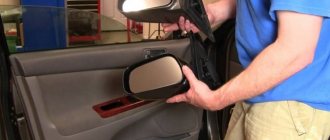
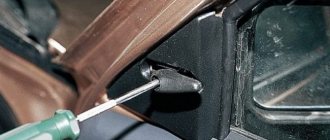
Remove the standard side mirrors (pry off the mirror triangle with a screwdriver and remove the three mounting screws). Install the new mirror in the reverse order.
We stretch the turn signal wires to the mirrors:
- Remove the door trim.
- Remove the turn signal from the fender and disconnect the block. We install plugs instead.
- Pull the wires out of the fender and into the interior. To do this, unscrew the sill trims in the cabin, peel back the carpet and felt and pull the black wire in the engine panel. We determine which of the two +12 V wires using a multimeter or a test lamp. We insulate the second wire.
- Route the wire from the passenger compartment to the car door through the corrugation.
Other methods and connection diagram
The largest category of cars that do not have heated mirrors, of course, are all our domestic car models, so the most pressing question for the VAZ 2112 is how to connect heated mirrors, now we will tell you the answer. So:
Installing heating is a very popular variety of tuning procedures, because it is not particularly difficult and is therefore available to every interested car owner, the connection diagram is shown in the photo below
Electrical diagram for connecting heating elements
Of course, when it is urgently necessary to do heating, then the purchase and installation of new mirror elements with a built-in heater is the most popular and most often used option
After this comes the option of replacing or installing only the heating element, so let’s take a closer look at all the nuances of installing a heater on a car:
- In order to replace the mirror element itself, a VAZ car, the entire body in which it is located does not need to be removed, it will be enough to perform the following steps - we make some efforts to bend the body of our mirror in the direction against the movement of the car
- In the resulting gap you will see the pin (it is usually white) of the adjusting rod
- The pin will need to be removed, removed from the housing, then pull out the old mirror element in any direction to stick your fingers into the middle of this element
- We press on the center of the element, and with slight resistance it should come out of the latch to end up in your hands
- After this, all that remains is to insert a new heated element, proceeding in the reverse order, and bring the heating filament wiring into the interior
Turn on the heating
Usually only two wires come out of the heating element; when connecting them, you don’t have to observe the polarity, since your connection will still be parallel, and the polarity for the element does not matter:
- It is recommended to turn on the heated mirrors together with the heated rear window, then you can directly connect the heating elements to the system
- So that when you turn on the heated rear window, the heated mirror mode also turns on, the plus is that you don’t need an additional relay and a separate power button
- If there is no system for heating the rear window, or you want to make a connection separately from it, then you need to purchase a power button and an additional relay with a 10 Amp remote fuse.
- And if you use a ten-amp button during installation, then you can easily do without a relay, and you can connect the heating of the mirror elements directly, since their power consumption is low
We do it ourselves
When you need to make heating from improvised means, then, as already mentioned just above, the easiest way to do this is to use car light bulbs:
This method is universal and suitable for absolutely all cars. First, you need to slightly modify the mirror housing, you need to create a protective heat shield in it. This can be easily done using foil, you can easily glue the housing from the inside. Then you need to place and secure in the housing a socket with a car light bulb screwed into it. It will be important to ensure that the built-in light bulb does not come into contact with either the mirror itself or the housing (since the light bulb will heat up very strongly, contact can damage either the mirror element or melt the housing) In addition, it is possible to perform heating with two different operating modes, the first is a powerful mode designed for quick defrosting and the second is weaker to protect against fogging. This desire can easily be realized by installing a two-pin power bulb (21\5) inside the rearview mirror housing and connecting it accordingly. Then 21 Watt will be act for quick defrosting, and 5W should be enough against fogging
A real case from practice: There are also situations when an owner who bought a used car contacted a service station with a request to install heated mirrors for him. The staff at the station calculated the amount for the installation and parts, then took the advance and then sent the owner home. And when disassembling it suddenly turned out that the heating was already installed, and from the factory
So, the owner, who did not want to read the technical data sheet and operating instructions and simply did not understand that the heating is already there, it is only important to know where it turns on, paid money for work that was not performed by anyone
Self-replacement of mirror glass on a VAZ 2110
The mirror element is an integral part of the rear view mirror on the VAZ 2110 vehicle. Naturally, there are many modernized mirror designs, but regardless of innovation, a specialized mirror element plays a key role. It is this that provides high-quality display from a certain angle, which allows the driver to see all the necessary obstacles while driving. The creators repeatedly produce these components in the form of a separate spare part, which, if necessary, can be removed and replaced or repaired.
Types of mirror elements and their structure
It is important to note that competent service center professionals claim that it is quite difficult to carry out the procedure associated with replacing mirror parts on the rear view mirror of a VAZ-2110. This is due to the fact that the part has a rather fragile structure and can be damaged. Situations often occur when, during the process of replacing the mirror housing, the element itself is damaged.
This leads to various negative consequences. Before you independently replace such a mirror part, you need to understand exactly that the unit consists of four main components:
- Mirror element;
- Frame;
- Mechanism for setting the deflection angle;
- Bracket.
Professionals believe that such a part has almost the same structure and consists of fundamental parts, namely: a plastic base that secures the mirror, a platform, guides, a latch and a lock.
Naturally, in the course of modern innovations, you can find several types that differ in innovation and design features:
- Electric heating element. This is a great idea to warm up your mirror in winter. All necessary wires are connected to the general heating system of the car;
- LED indicators are unique LED blocks located at opposite ends of the mirror element. Do not forget that the mirror can have a flat spherical shape. Each owner of a VAZ 2110 can choose one or another form of mirror independently.
Coating
The mirror can have several types of surface depending on the preferences of the owner of the unit:
- Untreated surface;
- Colorless coating aimed at reducing glare;
- Color coating with different shades not only aims to reduce glare, but also changes the overall spectrum of reflection of the rays, while improving contrast, visibility and image quality.
Step-by-step instruction
Experienced and competent service center specialists have created individual step-by-step instructions that will allow you to quickly replace the mirror element of the side rear view mirror on a VAZ 2110 vehicle.
- Place the car on a flat surface;
- We dismantle the mirror;
- We remove the broken part from the case;
- We dismantle the part located on the regulator lever;
- We inspect the components;
- We inspect the specialized regulator plate;
- We remove a specialized casing made of plastic, which is attached to several clips or pistons;
- We dismantle the bolts that act as fastening elements for the mirror;
- We carry out installation of specialized Shumka;
- We tuck the part under the side window seal;
- We snap off the spare part. If all actions are carried out correctly, then you can dismantle the failed element in a short time, without any damage to the fragile part;
- It is imperative to dismantle the mirror element in one direction;
- We are installing a new part. It is important to pay close attention to the fact that when installing a new mirror element, you must carefully insert it; a characteristic click is evidence of correct installation.
Choosing mirrors
We decided to purchase and install heated mirrors ourselves, but the choice is not an easy one, since today a huge number of different models are sold on the markets, which differ in appearance, price and technical characteristics
To help with the choice, we will not describe or list unnecessary details, but rather consider the points that will be important to pay attention to when purchasing
Visual characteristics
An important characteristic is the reflection coefficient, in other words, reflectivity:
- You can see this value for your car in its passport
- According to the standard, the reflectance coefficient (reflectivity) for a car mirror must be more than 40 percent
- Otherwise, you run a high risk of not seeing what’s going on behind your car and getting into an accident.
The second equally important characteristic is the correctness of the transfer (without distortion) of the shape of objects:
- It is difficult to evaluate this characteristic
- All you have to do is look at your reflection in the sample being tested.
- And if your reflection resembles the reflections in the funhouse mirrors, then you should not purchase such a product
In addition, you should pay attention to the presence of an anti-reflective coating on the mirror element:
- Only high-quality “tinting” will protect your eyes from being blinded by reflected light.
- However, it is worth considering the fact that excessive darkening further reduces reflectivity and can lead to incorrect color rendering
Mechanical characteristics
When purchasing heated side mirrors, you need to pay close attention to the position adjustment present, as well as on what principle it is implemented:
- For example, if you take standard mirrors from a VAZ 2110, they have a lever adjustment mechanism, which has a number of disadvantages
- Therefore, a cable mechanism is more preferable, since it is smoother and has better adjustment accuracy compared to a lever mechanism.
- However, the ultimate dream of every car owner, without any doubt, is electrically controlled elements
- In this case, a joystick is located inside the car, with which you can easily set the location of the side mirrors as you prefer.
It is worth recalling a point that applies not only to the choice of mirrors. Rather, this is a general recommendation that everyone needs to remember when purchasing any spare part:
Immediately pay attention to the quality of the mirror element, carefully inspect all the parts of the case. The parts should show cracks, scratches, chips, or other mechanical damage. In addition, you should pay attention to the packaging and branded packaging. Any self-respecting manufacturer supplies its products exclusively in branded packaging, it usually indicates the address and telephone number, and also contains detailed information about the model. Therefore, feel free to open the box to make sure that there are instructions inside in your native Russian language, as well as an installation diagram. In addition, an important factor is the presence of the necessary fasteners in this kit, a set of wires and seals, which will allow you, during self-installation, to reduce additional costs, in addition, significantly reduce the time required to complete the work
Heating efficiency
Another parameter that interests us, for the sake of which all the actions were done:
- Because ultimately you need a mirror that will be able to work effectively under adverse conditions
- We need to evaluate the heating rate and quality of the heating element and how quickly moisture, snow and icing will evaporate from the surface
- You won’t be able to evaluate such phenomena on your own without special sensors and a computer program, so all you have to do is connect and test in real conditions, observe visually and record the time
This concludes, additionally watch the video on this topic, good luck in installing the heating.
New style side mirrors with neutral anti-glare
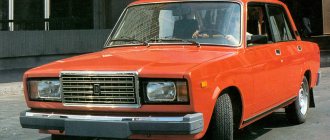
The deterioration of standard mirrors and the reluctance to install freelance models in their place is worth considering a modified version in the usual plastic design.
The price for this variation is about 900 rubles. The modified model differs from the standard ones in the rounded corners of the body and a different plastic texture. The mounting and adjustment method are identical to the factory design. Keep in mind that popular versions of side mirrors of the VAZ 2114 must meet the technical indicators and requirements:
- A clear reflection without glare or abrasions should provide visibility around the machine;
- The folding function will avoid structural damage and reduce the level of injury in the event of a possible accident;
- The body should not stick out too much to the sides.
Otherwise, the choice depends on the owner and budget.
Lada Largus TANK › Logbook › Rear view mirrors. Ready.
Good afternoon. It depends on you, but I didn’t like the standard mirrors. So I saved up some money and ordered... other mirrors. Mirrors from Euro Duster. I've been traveling for 2 months. What can I say. These are just normal mirrors. Left. I’m driving along the ring and in the left mirror I see cars behind driving along the ring, that is, much to the left of me.
On right. A car is in a blind spot in the next lane. I can see either her hood through the window or her stern in the mirror. This is beyond words! I overtook the car and it was immediately in the mirror.
Behind. Easier to park. Head up a little and you can see where the stern is moving, although you can’t see the wheels, but it’s still clear where you’re going.
Fat plus. The side windows are clean! These are just normal mirrors. That's how they should be.
Fat minus. The mirror elements are shaking. I haven’t looked yet to find out what the reason is and how to solve it. But it's a fact. But I won’t return the old ones. Another minus. The adjustment is turned to maximum. Both mirrors are to the left and up, and it’s just not enough, it would be a little more up.
Description of the mirrors themselves. I have a manual one, without heating. They say that with an electric drive there are no downsides. Installation. I took off the trim, unscrewed the bolts, removed the mirror, screwed on a new one, and put the trim in place.
Price: 3,600 ₽ Mileage: 98,000 km
Lada 2110 1.6 gold of the Incas › Logbook › Installation of mirrors from Lada Priora on a VAZ 2110
Hello everyone:) Having stumbled upon prior mirrors at an extremely competitive price, I couldn’t resist and bought this miracle of technology. The product includes electrical adjustment and heating. I’ll tell you right away, look for chips for the connectors! I personally haven't found them anywhere. I had to use collective farm clamps in electrical tape.:(So let’s begin. I’ll say right away that I took the mirrors from my hands. Therefore, there were no fasteners, no wiring, no diagrams.
I needed mounting screws - 6 pcs. Mirror control unit - 1 pc. The mounting wire I had was only 0.75 mm in cross-section, but it could be less than 6 pieces of three meters each (preferably multi-colored. Mounting terminals
Take twenty-five pieces, they will come in handy. Electrical tape Also decorative corner covers - 2 pieces. (I didn’t find them) House connectors 3 pin - 2 pcs. 9 pin - 1 pc.
Attention, I didn’t have time to connect the heating (it needs: Connectors - 2 pcs. wire 4 x 3 meters. If you connect it to a separate button, you will also need a relay with a button. I’ll write about this later. 1
We lower the window to make it more convenient. Remove the decorative cap from the mirror adjustment knob. Unscrew the self-tapping screw and remove the manual mirror adjustment knob. Use a slotted screwdriver to remove the decorative plastic corner. Underneath we see a fastening made of three screws and three washers. ATTENTION! SELF-TAPPING SETS! Take care of purchasing fasteners right away (go and try them on and buy them right away). The new mirrors needed like six cogs. We unscrew these three screws, you can leave the washers. Carefully remove the mirror.2. Next, we take out new mirrors and carefully place them so that the mounting holes match. We pull the connectors with the wiring through the round hole for the manual mirror adjustment rod. See Fig.1
1. Lower the window to make it more convenient. Remove the decorative cap from the mirror adjustment knob. Unscrew the self-tapping screw and remove the manual mirror adjustment knob. Use a slotted screwdriver to remove the decorative plastic corner. Underneath we see a fastening made of three screws and three washers
ATTENTION! SELF-TAPPING SETS! Take care of purchasing fasteners right away (go and try them on and buy them right away). The new mirrors needed six cogs like
We unscrew these three screws, you can leave the washers. Carefully remove the mirror.2. Next, we take out new mirrors and carefully place them so that the mounting holes match. We pull the connectors with the wiring through the round hole for the manual mirror adjustment rod. See Fig.1.
Next, we attach the fasteners, holding the mirror on the other side. Moving it, we find the optimal position and tighten the fastening screws
ATTENTION! be careful not to overtighten, otherwise you will hear a characteristic crunch, which does not bode well))). We repeat a similar sequence of actions for the right mirror.3. We remove the covers with holes for heating the driver's and passenger's feet, the gearshift lever handle together with its corrugated boot, and also remove the decorative insert under the handbrake
We knock out the decorative trim of the installation location of the mirror control unit. pry it up with a slotted screwdriver and take out the power window control unit. I'll explain why. There are two connectors for controlling the power windows of the rear doors installed from the factory. I'm not going to use them, because... The rear windows are tinted and there is no need to pull them here and there. We find such a free connector there
Electrical package control unit in Priora
The car electrical package controller is a unit responsible for the functionality of the car.
The node regulates the operation:
- electric window lifts;
- main panel backlight;
- functioning of turn signals;
- side and fog lights;
- rear lights;
- heated rear view window.
All these devices must work clearly and harmoniously. Since the safety of the driver and passengers during the trip largely depends on them.
Also, the control unit for the Priora electrical package adds additional convenience to the driver in driving the vehicle. Hence its running name “comfort block”.
Life hack: side mirrors on Priora - removal and installation
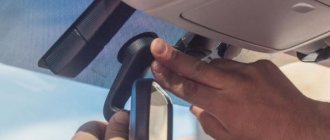
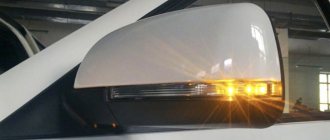
Good visibility is important for safe driving. While driving, the driver always has to “keep his finger on the pulse” so as not to get into an unpleasant situation (accident). The side mirrors on the Priora are initially made quite well - the viewing angle is enough to sit still when reversing or changing lanes. This is not a joke, it’s really like a Kruzak review. After the Priorovskie cars I get into other cars and I miss my familiar overview. Mirrors on Priora come with turn signals (repeaters); this is the Special Edition version of Lada (luxury) Priora cars. The price of these is naturally more expensive, but not by much 900 rubles. They can be installed on a regular Priora. Turn signals in mirrors are a newfangled theme and they look beautiful and are also practical.
All that remains is to properly disassemble the mirror and make friends with the wires. Indeed, to install the modernized version you will have to put a lot of effort into finding reasons. You can do simple tuning, if you want to change the appearance to a more curly one - just put covers on the mirrors. It seems like a small change, but the car looks more solid with them.
Who hasn’t felt the thrill of using a car after ten, or a classic, freezing the car in winter - heating seems to be a common thing, but this was not the case on the VAZ. The heated mirrors of the Priora car are implemented using spirals. Often turning on heating in wet weather, a mark forms on them. Despite this, after 6 years of use, they have not faded.
Mirrors (Topaz), with electric drive and heating, black for VAZ 2110-12, Priora
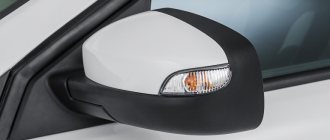
The stylish design of the mirrors will give your car a beautiful appearance , and the increased size of the glass will allow you to fully control the movement of the car.
Installation does not require special skills and tools , because... completely identical to installing standard mirrors. The mirror mounting base does not require modification.
The price is for a set: right and left mirror, mirror adjustment module + mounting brackets.
Mirror adjustment is electrically adjustable .
Made in China
You can ask any question you are interested in about the product or the work of the store.
Our qualified specialists will definitely help you.
How can you receive your order:
Russian Post and EMS
Not always the fastest and most affordable, but sometimes the only possible and familiar delivery method to many. After sending, you will be able to track the parcel on the Russian Post website (the parcel number will be sent to you via SMS and email). Delivery costs are paid by cash on delivery upon receipt of the goods.
Transport companies
- SDEK
- PEC
- Business Line
- ZhelDorExpedition
- TK KIT
- Energy
- Ratek
Courier delivery in Tolyatti
After confirmation of payment, you can order courier delivery in Togliatti, the date and time are discussed with our manager. Cost - 150 rubles.
Pickup from the Electro Stavr warehouse
After the manager confirms the availability of the goods in the warehouse, you can pick it up from our warehouse at the address: Tolyatti, st. Ofitserskaya 14, complex of mini stores (GSK) "Plamya", 3rd floor, from 9.00 to 18.00 on weekdays, on Saturday from 10.00 to 16.00, Sunday - closed.
Communities › VAZ: Repair and Improvement › Blog › Installation of heated “ERGON” mirror elements.
Due to the onset of cold weather and the freezing of mirrors, I was tired of driving in complete ignorance. It was decided to buy ERGON heated mirror elements.
I took it with blue anti-glare, left aspherical, right sphere.
I took off the mirrors, took them home, washed them, and dried them.
And the installation process began. I took a screwdriver and pressed sharply from below, closer to the middle,
click and the mirror came out of the clutch, pulled to remove it from the adjusting plate,
and it ended up in my hands.
I performed a similar operation with the next mirror. I read on the forums that mirrors burst, but for some reason they all remained intact. Then I installed new mirrors, stretched the wires, put them on the adjustment plate and pressed sharply on the center until they clicked.
Then the most interesting thing awaited me - connecting them. Because I laid out the heating wires in advance; when I installed the ESP buttons from Kalina, I didn’t need to remove the door trims, but only connect them to the wires.
After reading the forums, it was decided to connect everything according to this scheme.
The advantage of this connection for me is, obviously, I don’t use the rear heating often, and therefore a separate button is just right for me. In the store I bought a regular 4-pin relay, an air conditioner button, a block, terminals, etc. And according to the diagram, I ran the wires, secured the relay and connected everything.
The power, namely the plus that appears after ignition, was taken from the ChYa from the Sh5 block.
Plus I took the permanent one from the wire that goes to the mayfun. I checked it.
IT WORKS! And since it’s warmer here now, testing has been postponed. But I think this is a necessary thing, and it will help me out more than once. By the way, the mirrors were very pleasing with their visibility, at first it was even somehow unusual, almost the dead zones driving behind were gone the freaks are no longer so blinding, and you get much more pleasure from driving. I didn’t really like the backlighting of the button, it’s kind of dim and you can’t understand what color it’s shining in, either white or green, there’s no indication of switching on yet, but that’s in the next blog post.
source
Basic faults
Additions to the conventional mirror element make driving even more comfortable. Just in case, the repeater makes it clear to inattentive traffic participants where the driver is going to go. Heating will promptly evaporate moisture - raindrops, and will not leave stains that distort the image. The following malfunctions may occur during operation of the machine:
The fasteners have become loose. Each part is held in place by several fasteners at different points. They may become so loose that tightening them will be useless. Everything will depend on the severity of the damage. In some cases, replacing the fasteners will be sufficient. The heating does not work. Check the connection of the wire blocks. Perhaps it is enough to strengthen the wire connections so that they no longer come loose. The electric drive does not work. Adjusting the position of mirror devices while sitting in your seat is much more convenient than doing it manually. Check the wiring. Turn signal repeater. If the repeater does not work, it means the signal is not reaching it. The problem, again, is the wiring. Broken mirror element. It will be enough to replace it with a new part, but during replacement you should be extremely careful
It is important to prevent splinters from getting under the cover.
Malfunctions in the operation of the comfort unit, how to eliminate them
- The turn signals do not light up. First, you should check the continuity of the fuse, lamps and steering column switch. If there is simply no contact somewhere, then the problem can be resolved very simply by resoldering the microcontacts. If there is a fault in the board itself and soldering the contacts does not help, then the controller should be replaced.
- The power window module or central locking does not work. This problem can also occur due to oxidation of the wires. Before removing the comfort unit, you need to check all the wires with a multimeter under the insulation in the control unit, which is built into the driver's door. If only one glass unit is faulty, the wires could become disconnected due to a broken contact.
After checking the wires, if the problem cannot be found. The DA7VN5016A or DA6VN5016A controller should be re-soldered. One of them is responsible for the double-glazed windows and the lock on the right door. The second mirrors the same functions, but on the left side.
Sometimes window lifters only work to lower the windows, but raising them is not available (or vice versa). To do this, check the connection so that all the pros and cons are in place.
Errors occur in the comfort unit when the window lift button to raise the window works to lower the window. With different polarities, when the glass rises instead of lowering, you need to change the connection of two adjacent wires.
- It happens that many problems arise at the same time. The fog lights, side lights, rear lights, heated rear glass, and interior light stop working. In this case, it is obvious that the problem comes from the comfort unit and the DA1 MC33972EW variant is re-soldered. If this does not help, then the entire circuit should be replaced.
- In case of failure of the rear fog lights and instrument lighting in the cabin, the DA9 VND5025AK component is re-soldered. And, as was the case with previous breakdowns. If this does not bring results, the entire scheme is changed.
- The central locking locks begin to operate when the power window keys are pressed. If replacing the comfort unit from another car does not bring any effect, then the essence of this breakdown is in the wiring. To do this, you need to carefully check the integrity of all wires leading to the comfort unit.
Possible causes of malfunctions
Before purchasing a new comfort unit, you need to try to eliminate any malfunction. In order not to make additional costs, because the comfort unit is quite expensive. Often the problem is simply a lack of contact due to aging or chafing of the wires.
Sometimes the comfort unit controllers can burn out, for this you need to inspect them visually or even check them using your sense of smell.
The most common complaints regarding the operation of the comfort unit are the failure of double-glazed windows, turn signals or dimensions.
All problems can occur due to the following events
- break on the W-Line communication line;
- combustion of regulation drivers;
- burnout of controllers responsible for the desired area;
- transponder malfunction;
- burnout or oxidation of contacts.
Before carrying out repair work, to comply with safety precautions, do not forget to disconnect the negative terminal from the battery.
Daewoo Lanos full SX 1.6 16v t150 › Logbook › Installing heated mirrors
Last winter I set myself the task of installing heated mirrors, but it didn’t last the whole summer. And now autumn has come, there is nowhere left to pull, I bought universal heating elements on the market, selected the size of the element according to the location, there were also large ones, but they will need to be trimmed, losing half the threads in this element, and as a result, a narrow heating range is obtained + Well, in fact, the cut threads also carry tension and remain without insulation. This element that I chose does not need to be cut, since it is smaller than a mirror and does not cover only the edges of the mirrors. In my opinion, this is not critical, the edges also heat up, but a little longer, transferred by heat from the center of the mirror (you can see everything in the last photo).
All that remains is to remove the mirror and disassemble it, connect it to the heated rear window and the heated mirrors turn on together with the rear window, this is done on most foreign cars from the factory and does not interfere with each other + easy installation, no relays needed, etc. A few instructions from memory, which I looked at on the Internet.1. Remove the mirror from the car2. We lift the mirror element towards ourselves and try to snap it off. It is held on by 4 latches, the main thing is to at least cut off two, if it doesn’t work, pry off these latches with a screwdriver, while pulling the side you are prying towards you
3. When you take out the mirror, you need to peel off the mirror element from its plastic body, the main thing is to heat it up and everything comes off like clockwork. I heated it with a hairdryer and I think this is the most correct thing, many who don’t have a hairdryer heat the mirror in boiling water, I think this is wrong, because then you collect and also heat the mirror with the plastic on which the sealant remains in boiling water, then when wet this sealant does not stick to the mirror element.
4. We peel off the film that is glued to the back from the mirror element and degrease it with anti-silicone from the remaining sealant so that the heating sticks well.
5. We glue the heating onto the mirror, but initially we need to try it on well so that we can install it as centrally as possible so that the contacts (+ -) do not interfere with reassembly.6. In the plastic housing of the mirror element I drilled two holes for heating contacts7. We heat the mirror element and its plastic body with sealant, glue them back together8. All that remains is to thread the wires, I used 1.5 squares, you must first pull the mirror cables through the shaft, to do this you need to unscrew 3 bolts with a Phillips screwdriver in the place where the mirror bends. Take a screwdriver that is suitable in size and not blunt, otherwise you will knock off the edges, since these bolts are tightly clamped there, they may even have soured, then don’t drill them out anyway. I left the wires in the mirrors a little extra so that there would be no tension if I needed to take the mirror apart again. The “mothers” for the heating contacts were covered with heat shrink.
9. The minus (-) for the mirrors did not go far; it can be connected to any nut or bolt on the door. I connected it under the nut of the window lift motor.
10. Plus (+) stretched through the door block and under the dashboard, both from one door and from the second door to the fuse block at the driver's feet, there we find a braid of wires that goes to the rear of the car, the thickest among all is lilac (purple, like who is comfortable) wire, and without removing the insulation using two wire connectors with a U-contact, I powered the mirror wires to this, why two connectors? The (+) left mirror was connected to the (+) right one, and then the (+) right one was connected to the (+) heated rear window (thick lilac wire in a braid), it could have been done with one, but the connector is designed for a wire of up to 2.5 kV. Then isolate the whole thing well
I measured how much load one mirror takes, it turned out to be in the range of 1.2-1.3A, I attach a photo
source
Heating installation options
How to install heated mirrors on a car with your own hands:
- There are several ways to install heated mirrors on a car.
- Of course, you can purchase and install ready-made tuning ones, where heating is already provided, the price, of course, can hit the budget hard and it is not yet known how high-quality the heating element is installed in them
- Another option, you can purchase separately two universal heating elements, then install them on both mirrors, then connect the heating to the car’s network
- The third option would be to make the heating yourself, the cost would be pennies, and its efficiency would simply be “off the charts”
- Considering that when installing such a system, you can use various time relays, or a relay with a switch-on delay, or connect a heating relay paired with a temperature sensor (which will give automatic switching on in cold weather)
- In addition, there are common circuits for connecting to an installed heated rear window, where connecting the heated mirror on a VAZ 2112 will not be difficult, and in addition, such a system will be able to withstand a small additional load, so such a connection is very advisable
Easy installation method
Of the variety of ways in which you can equip a car with a heated mirror system without much effort, one remarkable option should be immediately noted - heating using regular (or a pair of) car incandescent light bulbs. Here are your instructions:
- We proceed from the knowledge that one small light bulb with a power of only 21 Watt, which is screwed into the housing, will be able to completely defrost even a heavily icy mirror in just 2-3 minutes.
- And if heating using one powerful light bulb (21 Watt) seems impractical to you, and if there is slight fogging, a constantly connected load of such power will be undesirable, you can use two 10 Watt light bulbs or one, but two-pin
- Then we use one of its contacts for defrosting, and the second for preventing fogging.