If the pressure in the lubrication system decreases or dull noises appear when the VAZ 2106 engine is running, the reason may be a faulty crankshaft. The article discusses the causes of malfunctions, as well as how to change the crankshaft of a VAZ 2106. In addition, a video is attached that demonstrates the partial assembly of a VAZ engine with the installation of the crankshaft.
Block head
We complete the finished head with a camshaft and a split gear. We set the camshaft to the overlap and tighten the star nuts well so that the camshaft phases do not “walk”. The camshaft bed is also well lubricated with oil. After installing the cylinder head gasket, we seat the head and use a torque wrench to properly tighten the head. After installation, we adjust the initial valve clearance. This procedure should be repeated on a warm engine. Now you can install attachments and place the motor on the beam. Before mounting the manifold to the cylinder head, check the evenness of their plane and place it on the sealant. Lubricate the manifold mounting studs with copper grease.
After installing the engine, we put the ignition kit in its place, and set everything to 1 mark, where the piston of the first cylinder is at TDC. Connect everything you need and fill in liquids
It is important that before screwing in the oil filter, it must be filled with oil.
Next, we start the engine, first of all we expel the air from the cooling system, and top it up if necessary. Then, with the engine warm, we check the oil level and adjust the valves.
After 1000 km, it is recommended to change the oil and re-press the head and check the connections. Run-in, as a rule, provided that the rings are of high quality, occurs at the first start. A full break-in will require no more than 1000 km. At this stage, the motor shows maximum power and torque. 85 horsepower can be achieved with high-quality repairs. If there is a need to increase power, then you can install a camshaft with a wider phase, a direct-flow exhaust system and a carburetor with increased capacity. As a result, you are guaranteed an honest 100 “horses” and a good resource. Do not forget that the compression ratio of the engine is increased, so fill only with 95-grade gasoline, which will allow you to use all the engine power and achieve minimal fuel consumption.
Symptoms of a problem
If you repair the crankshaft yourself, you can save a lot on car service costs. Therefore, it is worth understanding its diagnosis, repair and installation. If repairs are not carried out in a timely manner, the engine may seize, and this can lead to more serious repairs. The following are signs that serve to identify malfunctions:
- when the engine is running, the oil level control light does not go out, which indicates a decrease in oil pressure in the system;
- at medium and high speeds a metallic knock is heard in the engine, which increases with increasing speed;
- engine jams.
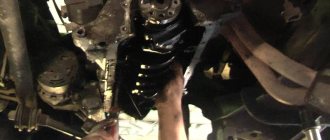
The cause of the first two malfunctions is the wear of the main and connecting rod journals. In this case, the distance between the neck and the liner increases, which leads to a decrease in oil pressure. If the distance is too large, the shaft may run out, causing metallic sounds in the engine. If the engine jams, it is better to replace the crankshaft. To diagnose the serviceability of the crankshaft, it should be dismantled and cleaned. It is better to remove the part together with the engine.
We remove the part from the VAZ 2106 for inspection
After removal, you need to perform a visual inspection of the necks and cheeks, according to which a decision is made on the need for grinding or replacement. No special instruments are needed for inspection; you can tell by touch. If scratches and burrs are found on the journals, the part is sent for boring. Boring can be done 4 times. Each boring increases the dimensions of the liners by 0.25 mm. After dismantling the crankshaft, you need to evaluate the size of the liners and whether they will allow boring. If grinding has never been performed, then the liners have an icon without any numbers.
Main bearings for VAZ 2106
If cracks are found, the crankshaft must be replaced. You can send it for welding, but usually restored parts last no more than 50 thousand kilometers. After boring, you need to polish the journals. Then the journals and crankshaft need to be washed with gasoline. The oil passages should also be thoroughly cleaned to prevent contamination from entering the bearings. After washing with gasoline, you need to blow out the oil channels using compressed air.
Installation of connecting rod bearings VAZ 2106
After disassembling the engine, we thoroughly wash the parts in kerosene, clean them of carbon and tar deposits and check their technical condition. Piston rings and pins, skirts, ring grooves and piston bosses must not have cracks, chips, scuffs or burns. Cracks are not allowed on the cylinder bore, main and connecting rod journals of the crankshaft. Damaged parts must be replaced. We remove burrs on the crankshaft journals by grinding, and on the cylinder bore by honing (at a service station). The wear of parts that do not have noticeable defects is determined using a measuring tool.
The diameter of the piston skirt is measured with a micrometer with a division value of 0.01 mm in a plane perpendicular to the piston pin axis, at a distance of 52.4 mm from the piston bottom.
Crankshaft repair
Repairing or replacing a crankshaft is a labor-intensive process. As a rule, it requires almost complete disassembly of the engine, inspection and troubleshooting of all its components and mechanisms. The crankshaft is removed and axial runout is measured. In case of acceptable wear, the surfaces of the crankshaft journals and connecting rods are ground to fit the repair dimensions of the bearings. The bed with workings is also subject to mechanical processing with “one installation” on a special machine. Boring the crankshaft allows you to install the liner of the next repair size.
Groove of the crankshaft bed
Grinding the crankshaft
Neck sizes have repair tolerances. Simply grinding the crankshaft will not help if the wear or damage is too severe. The crankshaft is not a cheap part, and if we are talking, for example, about large-sized agricultural machinery, the amount will be impressive. Even heavily worn friction surfaces can be restored. The thickness of the excavation is compensated by surfacing using submerged arc welding, plasma spraying of hard alloys, thermal gas spraying, etc. Then the crankshaft is ground and “brought” to the required repair dimensions. This is a technologically complex process, it is better to entrust it to specialists.
Automated gas-thermal spraying of crankshaft journals and balancers
High-quality restoration and grinding of the crankshaft can ensure 100% of its service life. It should be taken into account that with an increase in the repair size, the crankshaft may move from its factory seat. Precise installation of the crankshaft with a selection of bearings will be required. A crankshaft with critical damage or axial bending will have to be replaced.
Measuring axial displacements of the crankshaft using a feeler gauge
Set of measuring steel probe plates
An increased content of metal shavings in the filter and pan indicates wear of the friction pairs. In such cases, it is urgent to find the reason for the formation of such chips.
The diameter of the crankshaft journals can be measured with a regular micrometer. The parameters of unbalance, runout and axial play of crankshafts are determined using special indicators. To do this, you need to either place the shaft on a special stand or machine, or install an indicator with a magnetic stand on the engine block. The measurement is performed while rotating.
A stand with an installed dial indicator for measuring crankshaft runout
Dial indicator mounted on the engine block
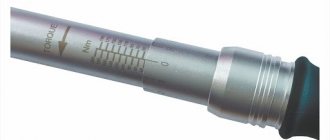
To determine the gap between the crankshaft journals and the bearings, a calibrated plastic wire and a paper template with a special scale are used. The method is quite simple and accessible. A piece of wire is placed on the degreased surface of the crankshaft journal. To fix it, you can use a small amount of thick lubricant. The journal is then covered with a bearing and a cap. The covers are tightened, the wire inside is crushed on the plane of the neck (threaded connections must be tightened with a torque wrench). Unscrew the bolts and remove the cover. Next, it remains to measure the width of the flattened strip with a template. The value will correspond to a fairly accurate gap value.
Measuring the gaps between the journal and the bearing using a calibrated wire and a templatePossible breakdowns, causes
Breakdowns can happen for completely different reasons. It doesn't have to be a defect in one of the parts. It may also happen that the housing itself is cracked, which will require repair work. If you have been using the car for a long time without bothering yourself with preventive inspections, then there is a possibility of mechanical damage. Such a defect can also appear due to ruptures in internal mechanisms.
In this case, a major overhaul of the VAZ engine will also include work on the block. We must not forget about the fact that after overhauling the engine, it should be run in. This procedure helps the new parts “fall into place” correctly. This will require a mileage of 2-3 thousand km. If the car has been used for several years, then even by the color of the smoke from the exhaust pipe you can understand that the vehicle has problems.
- A blue tint indicates that oil fluid is entering the combustion chamber.
- Strong and constant smoke indicates that the cylinder-piston parts are already severely worn out.
- If smoke appears during braking or at idle, this is a sign that the valve caps need to be replaced.
- Black smoke indicates improper carburetor adjustment.
- A bluish tint of smoke with moisture means antifreeze has entered the combustion chamber. This happens when the cylinder head gasket is damaged.
- White smoke is normal, especially during the cold season.
Lada 2106 rally › Logbook › Bottom 1.8 and a lyrical digression about liners.
In terms of motorsport, 2019 began for me with the death of the engine. Well, in general, I gave the green light to these two, provided that they themselves negotiate with the toad. I do not recommend reading further to all admirers of Mr. Travnikov. At the very least, stock up on some validol. As a result, block 213, badly battered by life, was purchased for 3k. Bored to 84 and minus 1mm from the plane. The pistons and connecting rods are also used from Boehme. +3k. KV remained the same - lightweight 213. Rings 2k.
If you are choleric, then such exercises are strictly contraindicated for you. It's better to take sedatives right away. We screw the yokes, pull with a torque, make a few turns, unscrew, look at the contact patch, get horrified, grind, assemble, pull with a torque... And so many times, each neck on the yoke and each neck on the block. Everything was so bad that I even had to replace one yoke. And now the bed is out, you can relax... but not for long. We need to do the same thing, but twice as much - with the connecting rod and main bearings. Not surprisingly, the construction of the bottom took 4 months.
But it was worth it. After all the manipulations, the bottom assembly rotates by hand with all gaps in the nominal dimensions.
For those who don’t understand why all this fucking dancing. Of course, not to turn the motor by hand)) I don’t think there’s any need to explain about the bed. But I have something to say about the inserts. Nowadays, very few people bother to take measurements, but meanwhile the liners are no longer a cake. We suffer from quality of manufacture, but on foreign cars they are simply not the right size. Even very respected manufacturers. Even the original. That's why the engines don't run after capitalization. But let's return to ours. We take the insert from the red pack. Thickness is normal. But there is a problem with quality. Along the edges along the chamfer there is a bead that is invisible to the eye. Apparently residual effects from felling. It is these narrow collars that compress the neck and are easily deformed when tightened, creating the illusion of good contact. The remaining area of the liner does not touch the neck. Here's the proof:
If you look at earbuds that haven't been used much, you'll see the same picture. This can be attributed to various factors. Dirty oil, crooked CV, aliens... But if you assemble everything new with new liners dry and make several turns, the picture will be the same. And that is not all. The outer diameter also does not correspond to what is needed. I don’t know if this is the production culture or if the pressed liners are better than the gap between them. But the fact remains a fact. During assembly, the ends of the liners rest against each other and become deformed. We offer you the following picture:
This deformation is so large that it pinches the HF. It was because of her that our grandfathers carried the car on a tie after capital. And our contemporaries (not all of them, of course), not wanting to understand, simply increase the gaps. Even on the polished KV bed the same thing happened. The illusion of a good tight fit is created. In fact, the HF is simply wedged from the sides. As these deformations and beads develop, the HF begins to wobble. My completely clamped HF, after grinding in the liners, began to move by hand with a knock! At the same time, I did not touch the main area of the liners, only the irregularities.
In the end, I overcame this very thing, which is hidden in the details. Although it would seem what problems there could be in such a primitive piece of hardware. Well, in general, I think that I didn’t waste my time in vain.
Replacing crankshaft bearings
Remove the hood (see Replacing the hood) and the battery. Drain the oil (see Changing the oil). Drain the coolant (see Replacing the coolant). We remove the radiator together with the thermostat (see Replacing the radiator and Replacing the thermostat).
Remove the carburetor (see Replacing the carburetor). Remove the fuel pump (see Replacing the fuel pump). Remove the ignition distributor (see Replacing the ignition distributor). Having sketched the connection order, we disconnect the hoses and wires from the engine, lighten the cylinder block, for which we remove the cylinder head (see Replacing the cylinder head gasket). We remove the generator (see Removing the generator). Remove the starter (see Replacing the starter). Remove the coolant pump (see Replacing the coolant pump). We unscrew the upper or lower nuts securing the engine support cushion (see Replacing the engine support cushion). We unscrew the bolts securing the clutch housing to the engine. We fasten the cables of the lifting device to the block and lift it. By placing a jack under the gearbox and slightly rocking the block, we disconnect the block and the clutch housing.
Replacing the camshaft pressure plate
How to replace crankshaft bearings without removing the engine? A few tips
Sometimes, car enthusiasts and novice mechanics wonder how to replace crankshaft bearings without removing the engine.
There are several reasons for this interest. In many cases, it is simply not possible to remove the motor from the car. This unit is quite heavy, so you will need a hoist or the help of several strong men. If these conditions for removing the engine do not exist, then you will have to get rid of it and do the work directly on the car. But keep in mind that repairs without removing the engine somewhat resemble a perversion, which means you will have to tinker thoroughly. Therefore, still try to get helpers to remove the motor. How to replace crankshaft bearings without removing the engine? Before answering this question, let's figure out what earbuds are and why they should be changed. Everyone knows that bearings are used to ensure long-term operation of all rotating parts. They can be very different; in the engine, sleeve bearings are installed on the crankshaft - liners. They are a steel sheet of a certain shape, which is installed in the engine bed (main) or in the lower connecting rod heads. They have fasteners in the form of a tendril, which allows you to avoid bearing displacement during operation. There is also a special groove or hole for supplying lubricant. The inner surface has an anti-friction coating
, which significantly reduces the level of wear of the part
Please note that different coatings are used for different engine models; when selecting replacement liners, pay attention to this factor
Inserts are changed for several reasons, the initial one being wear, but the consequences can be different:
- Backlash
. In this case, the crankshaft will knock. It is recommended to carry out repairs as soon as possible. In this case, replacement can be done even without removing and disassembling the engine; - Cranking
. As a result of excessive wear, the bearing tendril pops out of it and turns around the crankshaft journal. Sometimes this happens due to insufficient lubrication. Here, scuffs can form on the journal; the only option is to remove the crankshaft and grind it.
As you can see, the reasons for such repairs can be different. When the bearings rotate, further use of the car is impossible; the engine simply jams.
Crankshaft installation process
Before installing the crankshaft on the VAZ 2106, you need to wash, clean and dry the cylinder block. And only after that read the process.
Tools
To complete the installation you will need the following tools:
- a set of keys;
- Screwdriver Set;
- micrometer;
- consumables (liners, seals, half rings);
- torque wrench.
Repair tool kit
If defects in the form of scratches, burrs, or signs of wear are found on the surface of the liners, they must be replaced. The earbuds cannot be adjusted. When using the removed bearings further, you need to check the gap between them and the main and connecting rod journals of the crankshaft. For main shafts, the permissible size is 0.15 mm, for connecting rods - 0.10 mm. If the dimensions exceed the permissible limits, the liners are changed to a greater thickness after boring the necks. If the journals are properly ground and the appropriate bearings are selected, the crankshaft should rotate freely.
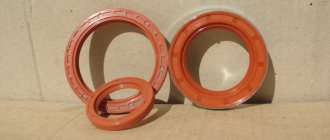
The oil seals that ensure the tightness of the crankshaft are replaced regardless of how long they have been standing. Half rings, like liners, cannot be adjusted. If burrs and scratches are found, the half rings are replaced. They are also changed if the axial clearance of the crankshaft is greater than the maximum permissible, which is 0.35 mm. The selection of new rings is carried out according to the nominal thickness or with a thickness increased by 0.127 so that the axial clearance is in the range of 0.06-0.26 mm.
Stages
Installation of the crankshaft on the VAZ 2106 is carried out in the following sequence:
- First, the support bearing of the input shaft is pressed in.
- Next you need to install new liners. The main liners are installed to the required repair size. The connecting rods are the same size, so they are interchangeable. When installing, you need to be careful not to mix up the bearings. The connecting rod bearings are smaller in diameter than the main bearings and do not have annular grooves.
- Then you need to install the thrust half rings into the bed of the 5th main bearing. In this case, the grooves should be directed towards the crankshaft. Half rings are selected according to tolerances.
Replacing worn parts
The main and connecting rod journals must be lubricated with engine oil. Now the crankshaft should be placed in the block. The bearing caps are installed according to the marks. The surface of the bearings and journals should be wiped well with a clean rag. When installing the covers, you need to ensure that the arrows marked on them are directed forward along the power unit. The fastening bolts must be lubricated with engine oil and tightened to a torque of 68-84 Nm. Next, the connecting rod bearings are mounted and the connecting rods are attached. The tightening torque should not exceed 54 Nm. We check the rotation of the crankshaft; it should rotate freely, easily, without play or jamming. Next you need to install the rear crankshaft oil seal. Next, the engine sump is installed on the block. When grinding, in any case, it is necessary to replace the front oil seal. It must be installed on the block along with the cover. After tightening the front cover, you can install the crankshaft pulley. Then the intermediate shaft, timing parts and cylinder head are installed on the power unit. Then you need to adjust the chain tension. Next, marks are installed on the camshaft and crankshaft. Then the remaining engine parts and components are installed. After installing the alternator belt, it is necessary to adjust its tension. At the last stage, the ignition is installed and adjusted.
When installing gaskets, you should use a sealant to ensure reliable sealing and prevent leakage of working fluids during further operation of the vehicle.
Thus, even a driver with little experience in repair work can perform crankshaft repairs on a VAZ 2106, and you can significantly save on car service costs.
Lada 2106 rally › Logbook › Bottom 1.8 and a lyrical digression about liners.
In terms of motorsport, 2019 began for me with the death of the engine.
Well, in general, I gave the green light to these two, provided that they themselves negotiate with the toad. I do not recommend reading further to all admirers of Mr. Travnikov. At the very least, stock up on some validol. As a result, block 213, badly battered by life, was purchased for 3k. Bored to 84 and minus 1mm from the plane. The pistons and connecting rods are also used from Boehme. +3k. KV remained the same - lightweight 213. Rings 2k.
If you are choleric, then such exercises are strictly contraindicated for you. It's better to take sedatives right away. We screw the yokes, pull with a torque, make a few turns, unscrew, look at the contact patch, get horrified, grind, assemble, pull with a torque... And so many times, each neck on the yoke and each neck on the block. Everything was so bad that I even had to replace one yoke. And now the bed is out, you can relax... but not for long. We need to do the same thing, but twice as much - with the connecting rod and main bearings. Not surprisingly, the construction of the bottom took 4 months.
When and why to change the front oil seal
The manufacturer recommends replacing the front crankshaft oil seal of VAZ 2101-2107 engines every 150,000 km. However, in practice such replacement has to be performed more often. Accelerated wear of the sealing element and the appearance of engine oil leaks are caused by:
- skewed oil seal during installation;
- loss of elasticity due to engine overheating;
- increased radial runout of the drive pulley of mounted units;
- use of low-quality motor oil;
- wear on the crankshaft pulley hub.
In addition, we cannot rule out hardening of the cuff due to natural aging and the possibility of a manufacturing defect - unfortunately, the quality of parts for rear-wheel drive VAZ models leaves much to be desired.
It is impossible not to notice damage to the sealing element - the rotating pulley scatters oil in the front of the engine and throughout the engine compartment. However, do not think that such a malfunction only leads to oiling of the units and a decrease in the lubricant level. If engine oil gets on the generator belt and other rubber parts, it can quickly render them unusable.
Keep in mind that the appearance of a leak through the engine seals is provoked by another factor - increased crankcase gas pressure. For this reason, be sure to check the cleanliness of the engine ventilation system.
In what cases is it necessary to change the earbuds?
1. The main reason is simple physical wear and tear. As the liners wear, free movement of the crankshaft will appear, as well as a reduced degree of lubrication due to a drop in oil pressure.2. Rotating the liners. The most common causes of this malfunction are the following:
- the lubricant has become extremely viscous, abrasive compounds have entered it, and it may be that it has disappeared altogether;
- the bearing caps are not tensioned sufficiently;
- excessively liquid consistency of the engine oil, as well as operation of the power unit at extreme conditions.
Engine assembly VAZ 2101 to 2107
We continue to do a major overhaul of the six engine. Spare parts have been purchased, the block and crankshaft have been bored out. It seems like a trifle, just take it and assemble the engine yourself at home, saving money on the mechanic.
But, I had to remake a lot of engines after homemade ones, and stupid motorists.
Therefore, in this article I will try to explain how to properly assemble the engine, taking into account all sorts of little things, since without taking these little things into account, the engine will not work for a long time.
I start assembling the engine by installing the crankshaft, here there are a lot of little things that need to be taken into account.
When assembling the engine, you can wash it well, or you don’t have to, but the main thing is that everything inside the engine is clean, but I got greedy and basically don’t wash the outside of the engine, and everyone knows that. My only advice is that after repairing the engine, go to a car wash and wash the engine from above, if you wish.
On the other hand, I like the moment when the owner comes to pick up the car after repairs, opens the hood and sees a grimy engine, makes a face, but after starting it, breaks into a satisfied smile.
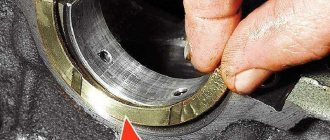
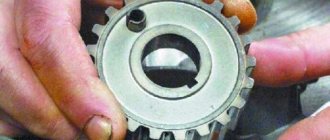
Before installing the crankshaft, you need to install the main bearings in the engine block bed; be sure to wipe the bearing beds clean with a rag before installing the bearings. So that there is not a single speck between the liner and the bed. The photo shows how to correctly install the inserts in the engine block.
Photo. Correct installation of liners in the VAZ engine block.
After installing the liners, be sure to lubricate them with oil.
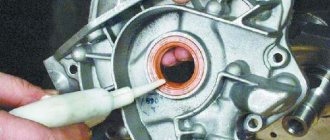
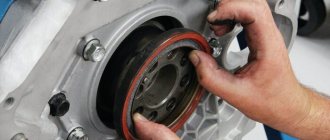
Photo. Installed thrust half-rings (crescents)
And just before installing the crankshaft, install thrust half-rings (half-moons) into the block so that they do not fall and lubricate them with oil. Carefully place the crankshaft on the bearings and make sure that the crescents do not fall off.
I usually install crescents with brass plating, but if you have one crescent with brass plating and the other with aluminum, then install it with brass plating on the flywheel side.
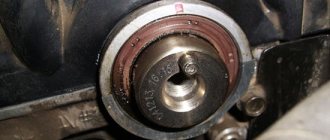
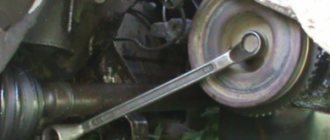
Photo. Checking the longitudinal stroke of the crankshaft.
After installing the crankshaft, be sure to check the longitudinal stroke of the crankshaft. Usually I ensure that the longitudinal stroke of the crankshaft is zero, or a maximum of one tenth of a millimeter. You can check the longitudinal stroke of the crankshaft by inserting a screwdriver between the crankshaft cheeks from different sides. If you do not take into account the longitudinal stroke of the crankshaft, and the stroke is large, then the crescents will fall out, the crankshaft will dangle longitudinally in the engine, when you press the clutch, it will rest against the engine block and gnaw the metal in the block. Since I have been doing repairs for a long time, I have a whole bunch of working and new crescents; they also sell special repair crescents, they are thicker than standard ones. Therefore, it is easy for me to select crescents so that there is no longitudinal movement of the crankshaft. If, after installing standard crescents, there is longitudinal movement in the crankshaft, buy repair crescents, but it often happens that the crankshaft does not fit on the repair crescents, then try placing one working crescent and the other a repair one, or carefully grind off the excess metal from the repair crescent on a grindstone.
Photo. Checking the crankshaft for tightness.
After the crescents are selected, insert the liners into the cushions and attach them to the crankshaft, but do not tighten them too much right away, insert the key onto the crankshaft and start tightening one cushion at a time, and after tightening the next cushion, try to rotate the crankshaft. Details of checking and adjusting the liners can be found on the Crankshaft Repair page.
Photo. The connecting rod and piston are prepared for knocking out the pin.
Lada 2106 rally › Logbook › Bottom 1.8 and a lyrical digression about liners.
In terms of motorsport, 2019 began for me with the death of the engine.
Well, in general, I gave the green light to these two, provided that they themselves negotiate with the toad. I do not recommend reading further to all admirers of Mr. Travnikov. At the very least, stock up on some validol. As a result, block 213, badly battered by life, was purchased for 3k. Bored to 84 and minus 1mm from the plane. The pistons and connecting rods are also used from Boehme. +3k. KV remained the same - lightweight 213. Rings 2k.
If you are choleric, then such exercises are strictly contraindicated for you. It's better to take sedatives right away. We screw the yokes, pull with a torque, make a few turns, unscrew, look at the contact patch, get horrified, grind, assemble, pull with a torque... And so many times, each neck on the yoke and each neck on the block. Everything was so bad that I even had to replace one yoke. And now the bed is out, you can relax... but not for long. We need to do the same thing, but twice as much - with the connecting rod and main bearings. Not surprisingly, the construction of the bottom took 4 months.
But it was worth it. After all the manipulations, the bottom assembly rotates by hand with all gaps in the nominal dimensions.
For those who don’t understand why all this fucking dancing. Of course, not to turn the motor by hand)) I don’t think there’s any need to explain about the bed. But I have something to say about the inserts. Nowadays, very few people bother to take measurements, but meanwhile the liners are no longer a cake. We suffer from quality of manufacture, but on foreign cars they are simply not the right size. Even very respected manufacturers. Even the original. That's why the engines don't run after capitalization. But let's return to ours. We take the insert from the red pack. Thickness is normal. But there is a problem with quality. Along the edges along the chamfer there is a bead that is invisible to the eye. Apparently residual effects from felling. It is these narrow collars that compress the neck and are easily deformed when tightened, creating the illusion of good contact. The remaining area of the liner does not touch the neck. Here's the proof:
If you look at earbuds that haven't been used much, you'll see the same picture. This can be attributed to various factors. Dirty oil, crooked CV, aliens... But if you assemble everything new with new liners dry and make several turns, the picture will be the same. And that is not all. The outer diameter also does not correspond to what is needed. I don’t know if this is the production culture or if the pressed liners are better than the gap between them. But the fact remains a fact. During assembly, the ends of the liners rest against each other and become deformed. We offer you the following picture:
This deformation is so large that it pinches the HF. It was because of her that our grandfathers carried the car on a tie after capital. And our contemporaries (not all of them, of course), not wanting to understand, simply increase the gaps. Even on the polished KV bed the same thing happened. The illusion of a good tight fit is created. In fact, the HF is simply wedged from the sides. As these deformations and beads develop, the HF begins to wobble. My completely clamped HF, after grinding in the liners, began to move by hand with a knock! At the same time, I did not touch the main area of the liners, only the irregularities.
In the end, I overcame this very thing, which is hidden in the details. Although it would seem what problems there could be in such a primitive piece of hardware. Well, in general, I think that I didn’t waste my time in vain.
Crankshaft device
The crankshaft consists of flat machined plates with counterweights (the so-called “cheeks”), which are connected to each other by “necks”. Counterweights are needed to dampen the reciprocating movements of the pistons and stabilize the rotation of the shaft.
Crank mechanism with an additional block of balancers
In V-twin and W-twin engines, connecting rods from opposing cylinders press against interconnected journals. This allows for more uniform operation of the engine and reduces its dimensions. In in-line engines, each connecting rod is mounted on a separate journal with balancers.
Crank mechanism of an inline four-cylinder engine with standard journals and balancers
V6 engine crankshaft with forked adjacent crankpin
The crankshaft journals are cylindrical in shape with a ground surface. The main journals are located along the axis of the shaft, and the “crank journals” are located along the axis of the connecting rods. The rubbing pairs of the crankshaft are usually mounted on plain bearings. To prevent longitudinal displacement of the shaft, support bearings are provided, they are also called crankshaft half rings.
The crankshaft is located in the cylinder block in the reciprocal seats of the “crankshaft bed”. On the crankshaft there is a shank for fastening the timing sprocket, generator pulley and water pump. On the back of the shaft there is a flange for fastening the flywheel. A rolling bearing is installed in the flange, and the gearbox input shaft fits into it. Inside the crankshafts there are channels for forced lubrication of the journal liners, connecting rods and cylinder-piston group. The design of crankshafts depends on the layout of the cylinders and their number. Drive gears for various equipment, such as an oil pump, can be installed on the crankshaft.
Crankshaft device
Replacing the crankshaft
So how do you remove the crankshaft? This will require complete disassembly of the engine. To replace you need:
- standard set of tools;
- torque wrench;
- crankshaft clamp MR 1-233.
Removal of the crankshaft can be performed after dismantling the engine and installing it on a repair stand, timing components, engine equipment, cylinder head, connecting rods and pistons.
Scheme of assembly and installation of the crankshaft Skoda OCTAVIA TDI 1996-2002 in the engine block 1,9,1315,17 - mounting bolts, 3 - flange, front pressure, 4 - bearing shell, 5 - chain sprocket, 6 - crankshaft shaft, 7 — bearing shell, 8 — crankshaft half rings, 10 — bearing cap, 11 — mounting pin, 12 — sensor wheel, 2 — sealing ring (oil seal), 14 — flywheel and drive disk, 16 — intermediate plate, 18 — sealing gasket (with oil seal).
Removal
1. Place the car on an inspection hole or overpass (see “Preparing the car for maintenance and repair”).
3. Remove the holder with the oil seal from the cylinder block (see “Crankshaft rear oil seal - replacement”).
4. Remove the camshaft drive cover with the sealing gasket and the chain from the crankshaft sprocket (see “Timing chain - replacement”).
5. We mark the relative position of the connecting rods relative to their caps and the main bearing caps relative to the cylinder block.
14 mm socket wrench
Unscrew the two nuts securing the connecting rod cover.
7. Remove the connecting rod cover along with the liner.
8. Disconnect the remaining connecting rods from the crankshaft and move them upward.
Valve lapping tool
You all know why valves are needed in an engine. They serve for proper gas distribution. In other words, fuel must enter the combustion chamber in a timely manner, and the situation is similar with exhaust gases. But if there is no gap between the valve plate and the seat, or it is too large, then the gas distribution will be impaired. To get rid of this trouble, you need to grind in the valves. To do this, you will need two types of lapping paste: for rough and fine work. The tools you need are a drill with a reverse function, as well as an attachment for it. You can make the latter from an old valve; to do this, cut off its stem.