Print this article Font size 16
The crankshaft oil seal is far from the most reliable design in any car. Therefore, its replacement with an 8-valve VAZ 2114 is carried out quite often.
Camshaft drive diagram
In this case, the procedure differs depending on which oil seal we are talking about - front or rear. We will talk about each of them separately.
Necessary tool
Wear of the oil seal leads to oil leakage from the engine, which should not be allowed on any car. Replacing a part yourself is only possible if you have the tools and detailed instructions. Let's look at the tool needed for the job:
- Set of wrenches and ratchets with heads. You will need open-end wrenches for 10, 13, 19;
- New oil seal for installation;
- Socket wrench;
- Flat screwdriver;
- Container for draining old oil;
- New engine oil;
- Sealant for a secure fit;
- Oil pump gasket;
- Jacks;
- Hammer.
As you can see, for self-replacement you need a fairly extensive list of tools. Replacing the front crankshaft oil seal of a VAZ 2114 is similar to changing the rear element, so the set of tools to replace it will need the same.
Useful : Where is the DPKV located on the VAZ 2114?
In addition to jacks, you will need wheel chocks to lift the car. You should not use shifting into gear as a way to protect against the car rolling away. Understanding how to replace the crankshaft oil seal on a VAZ 2114 allows even an inexperienced car owner to carry out the work. First, let's look at the instructions with step-by-step actions for changing the front element.
Analogues (manufacturers)
Of course, the manufacturer and many automotive experts recommend installing the original valve cover gasket, but, as practice shows, substitutes are often of higher quality and have a much longer service life.
So, let's look at which analogues of the original part are recommended for installation on a car:
| Manufacturer's name | Catalog number | Cost in rubles |
| Glaser | X08964-00 | 300 |
| Goetze | 50-025881-00 | 750 |
| Ajusa | 56021200 | 1000 |
| Trialli | GZ 101 7022 | 1500 |
As you can see, the cost of alternative gaskets is quite high, but as practice has shown, the service life of the parts is twice as long as the original.
Replacing the front oil seal
Useful video:
Having prepared the tools and spare parts, you can begin work on replacing the worn part. The step-by-step repair process looks like this:
- Remove the protective plastic cover from the timing belt.
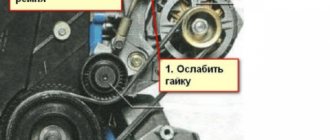
- The next stage is setting the first cylinder of the engine to top dead center. This manipulation is carried out as follows: the camshaft and crankshaft are rotated until the marks on their pulleys coincide with the marks on the timing case cover.
- To remove the timing belt, the front right wheel is jacked up and the engine protection is removed. Before tightening the belt, you need to loosen the tension. To make work easier, you can remove the fender liner and remove the alternator belt. After this, the crankshaft pulley itself is removed and the timing belt tension roller is loosened.
- After removing the crankshaft pulley, drain the engine oil.
- Remove the engine sump, which is secured with 16 bolts.
- After removing the pan, you need to unscrew the oil receiver. After dismantling, check it for debris. Its channels can be cleaned with a compressor.
- The next step is to remove the oil pump. This element is secured with six bolts.
A gasket is placed where the oil pump is attached to the engine block. Over time, it loses its properties, and when the part is removed, it is completely destroyed. During the reassembly process, do not forget to change this gasket.
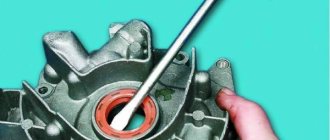
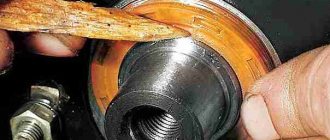
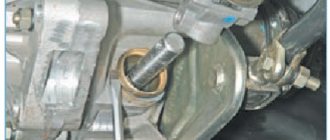
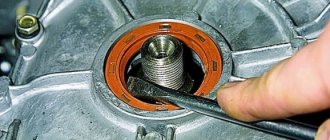
- Having completed dismantling the oil pump, you will have access to the front o-ring. You can pull it out with your fingers or a flat-head screwdriver.
- After removing the old element, clean the surface and seat from oil and dirt. To install the new rubber ring tightly, you can use a 32mm socket socket. Having rested it against the new oil seal, apply a couple of firm blows and insert the rubber ring into the seat. Do not make strong blows, because... The ring is made of soft material.
Helpful : Signs of a faulty crankshaft sensor (9 symptoms)
When completing the installation, reassemble everything in reverse order and fill in with new engine oil. As a recommendation, we note the need to lubricate the internal surface of the part before installation. It is enough to lubricate the surface with a few drops of motor oil. In addition to the front sealing ring, the VAZ 2114 engine also has a rear sealing element. Next, we will consider the step-by-step replacement of the rear crankshaft oil seal of the VAZ 2114 (8 valves).
Step-by-step dismantling
Let's look at how to change the engine oil seal of a VAZ 2114 with an 8-valve engine.
- Place the car on a level surface, support the rear wheel with stops. Set the gearshift lever to the neutral position, remove the front right wheel and engine protection. You can remove part of the fender liner for easy access to the front engine cover.
- Under the hood, unscrew the bolts securing the timing belt protective cover. Loosen the generator and remove the generator drive belt.
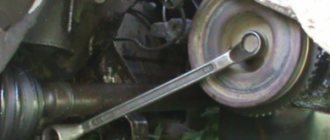
- Set the valve timing marks on the camshaft and crankshaft. To do this, rotate the crankshaft with a socket wrench until the arrows on the pulleys align with the special ebbs on the body. This corresponds to the position of the first piston at TDC.
- Before removing the timing belt, loosen the tension roller and unscrew the bolts securing the upper and lower sprocket. Inspect the belt for damage and traces of oil. Change if necessary.
- Drain the oil from the engine and unscrew the pan. It is secured with 16 10mm wrench bolts. Remove the clogged oil receiver and clean thoroughly.
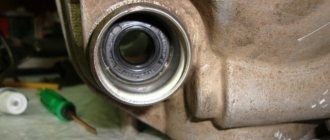
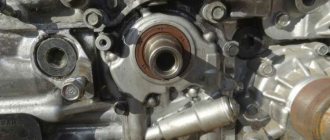
- Using a 24mm socket, unscrew the pulley mounting nut, to do this, secure the crankshaft itself. Under the pulley there is an oil pump, into the cover of which the front engine oil seal is pressed. It is secured with six 10mm bolts.
- Remove the oil seal from the seat using a flat screwdriver or carefully press it out with a socket of a suitable size.
Replacing the rear oil seal
Useful video:
Changing this part is a little more difficult, because... Removal of the clutch kit and the entire gearbox assembly is required. For comfortable work you will need a lift or pit. The step-by-step replacement process looks like this:
- To begin, dismantle the gearbox and clutch assembly.
- Using the “17” head, unscrew the six bolts securing the flywheel.
- We note the position of the flywheel relative to the crankshaft.
- We remove the flywheel.
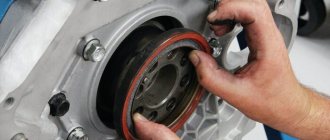
- We remove the element from the landing site using a flat-head screwdriver.
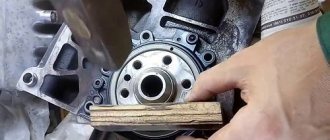
- Using the old oil seal as a mandrel, we insert the new element into the seating area with gentle blows of a hammer.
- We align the flywheel according to the marks.
- Lubricate the fastening bolts with sealant (their threaded part).
- We assemble everything in reverse order.
As you can see from the instructions, it is possible to replace these parts with your own hands, but you will need tools, a lift or a pit. At the service, worn-out elements can be replaced for 1,500-2,000 rubles, which for some 2114 owners is quite an impressive amount.
Reasons for gasket failure
When all the processes have been sorted out and the choice of valve cover gasket has been decided, it is necessary to consider the reasons for the failure of this element:
- Wear. Perhaps the most common reason is that during use this element tends to crack because it is constantly exposed to hot oil.
- Stretching. Constantly high temperature negatively affects the rubber product, which loses its physical properties and stretches, which entails a loose connection and the passage of lubricant.
- Oil streams. Occurs due to gasket breakdown. This usually happens after the engine overheats severely.
- Pressure. Excessively high pressure can squeeze the gasket out of its seat, which will cause oil to flow like a river.
How much do crankshaft oil seals cost for a VAZ 2114?
Carrying out maintenance work on the clutch or timing device should be combined with replacing the specified oil seals. Both the front and rear o-rings wear out over time. The price for a new crankshaft oil seal (front) does not exceed 400-500 rubles . The article number of the original spare part from AvtoVAZ is 21081005034 . In addition to the factory manufacturer, there are parts from foreign companies of higher quality.
The price of the rear o-ring also does not exceed 500 rubles . The article number of the spare part has not changed since the release of model 2108. Domestic spare parts can be ordered under article number 2108-1005160 .
The prices indicated are valid for online spare parts stores. At some points of sale, the cost of parts can reach 700 rubles .
Where is?
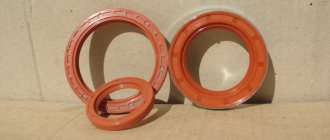
To prevent lubricant from getting onto components outside the oil pan, there is an oil seal at the outlet holes through which the crankshaft is connected to other engine components. One of them is front, the other is rear. Their purpose is to ensure the tightness of the housing.
Crankshaft seals
The front one is located behind the crankshaft pulley on the oil pump. To replace the rear one, it is necessary to dismantle the gearbox, clutch and flywheel, then the rear cuff will be accessible. You can see this clearly in the video posted at the end of the article.
Important points
- When trying to put a new oil seal in place using a mandrel and a hammer, in no case should you hit it too hard, as the mandrel will simply cut the oil seal.
- Before reinstalling the oil pump, the outer edge of the new oil seal must be generously lubricated with oil.
- Before installing a new gasket under the oil pump, it is necessary to apply a thin and even layer of graphite grease to it on both sides.
- Before installing the pan in place, its gasket must be thoroughly wiped with a rag. After this, a thin layer of sealant should be applied to it.
As you can see from this article, replacing the oil seal is not difficult. It's much more difficult to get to. An extremely important point in the above operations is to set 1 cylinder to top dead center. If this is not done, all subsequent engine assembly will be incorrect, and all valves may be damaged during startup. And replacing them will take much more time and money.
Source