Print this article Font size 16
It will take you about an hour to replace the camshaft oil seal. This procedure can easily be done with your own hands.
Under no circumstances should you delay replacing the camshaft oil seal, as otherwise a breakdown could lead to disastrous consequences for your car.
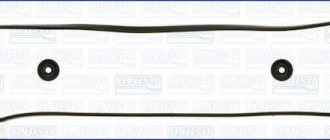
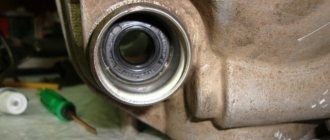
Element appearance
Do you think it is better to spend 1-2 hours in the garage to replace a part costing 100 rubles, or to delay the repair until the last minute and change the entire camshaft? The answer is obvious.
How to replace the camshaft oil seal on a VAZ 2108-VAZ 21099?
Removal: 1) At the beginning of the operation, with the “AKB” (which means rechargeable battery), remove the “negative” terminal. (How to remove the terminal from the “battery”, see the article: “Replacing the battery” in paragraph “1”)
2) Next, be sure to set all the “Gas distribution mechanism” marks, and then remove the “Timing Belt” from the car. (You will find how to set all the marks and then remove the timing belt in the article: “Replacing the timing belt”, in the “Removal” section)
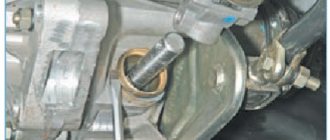
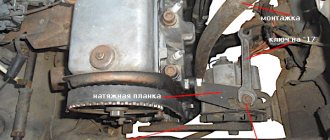
3) When the belt is removed, insert a “10” socket with an extension through the hole in the camshaft pulley, and then put it on the nut that secures the rear timing belt cover, thereby securing the pulley from turning. After the pulley is fixed, using a spanner wrench, unscrew the central bolt that secures the pulley.
Note! Once the center bolt is removed, remove the camshaft pulley from the vehicle!
4) Then, taking a flathead screwdriver in your hands, use it to remove the pulley key from the groove in the camshaft.
Note! The key must be removed, otherwise it may simply get lost when removing the oil seal!
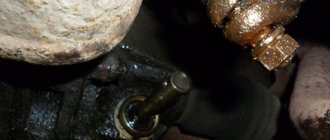
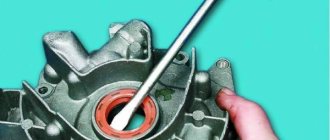
5) After the key is removed, without removing the screwdriver, use it to remove the camshaft oil seal.
Installation: • Before you begin installing a new oil seal, check its condition by inspecting its working edge, which is indicated by the letter “A”. There should be no defects on the working edge; it should be smooth, without dents, without tearing out, and without rubber sagging.
• The camshaft oil seal spring, which is designated by the letter “B,” must also be intact and not stretched, otherwise replace the oil seal with a new one.
1) First, taking the new camshaft oil seal in your hands, lubricate its working edge with engine oil.
2) Then install the oil seal with the working edge towards the cylinder head, and then carefully, using a screwdriver or a wooden stick, tuck the working edge of the oil seal onto the camshaft.
Note! When the oil seal is installed on the camshaft, finally drive it in using a hammer and a suitable mandrel diameter. If you don’t have a mandrel, then you can use a head instead, or a piece of pipe of a suitable diameter!
3) And finally, install all previously removed parts, such as the pulley key, the camshaft pulley itself and the timing belt, in their place.
Note! • For details on installing the timing belt, see everything in the same article that described the instructions for removing it.
• The camshaft pulley must be installed with the protruding part of the hub facing the car engine!
Additional video materials: Below, especially for you, we have prepared a video clip that describes in detail the replacement of the camshaft oil seal on cars of the Samara family.
–> VAZ Masters / Engine / Camshaft
Camshaft oil seal VAZ2109
Replacement Guide
If it is determined that the engine is knocking due to the cuffs, then they need to be replaced.
This video shows how to fix camshaft runout and replace the gasket.
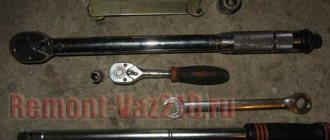
Tools
For repairs you will need a minimum set of tools:
- spanner set to “17”;
- head with extension 10;
- slotted (flat) screwdriver;
- cuff mandrel;
- hammer.
It is better to buy a new consumable than an original one, it depends on how long it will last.
Stages
The procedure for replacing the camshaft oil seal on a VAZ2109 consists of two stages: removal and installation. When removing parts, remember the order in order to follow it when reassembling.
Removal
- First of all, you should turn off the power to the car by removing the negative terminal from the battery.
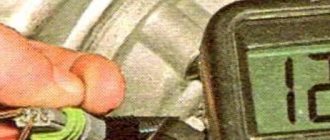
- Next, you need to set the position of the piston in the first cylinder to TDC of the compression stroke. To do this, mark the crankshaft and camshaft.
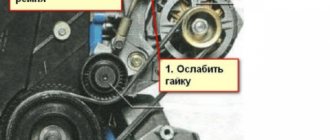
- Now, by loosening the camshaft mounting bolt and the tension roller, you can remove the timing belt.
- Then unscrew the bolt and remove the camshaft pulley and key.
- Using a screwdriver or awl, remove the camshaft oil seal.
The moment of removing the camshaft cuff with a screwdriver
Installation
- Before installing a new consumable, you need to lubricate its edge with engine oil.
Camshaft seal
- The part is installed with the working edge facing the cylinder head. Then you need to use a screwdriver to tuck the edge of the rubber ring on the camshaft.
- After installation, the gasket must be driven in using a hammer and a mandrel of the appropriate diameter until it stops.
- After installing the cuff, all oil stains should be removed so that smudges can be seen later.
- Next, the previously removed parts are installed in reverse order.
After completing the repair, you should start the engine and check its operation: no knocks or extraneous sounds should be heard.
If the engine is knocking, then you need to look for the cause of the knocking and fix the problem, perhaps you need to tighten the bolts.
Sorry, there are no surveys available at this time.
Purpose
Tool
Minimum required tools:
- Socket wrench “17”
- Head "10", with extension
- Flat (slotted) screwdriver
- Hammer
- Mandrel for oil seal
Let's start replacing the cuff
To replace the camshaft oil seal on a VAZ 2109, we perform the following operations:
- Disconnect the wires from the battery
- We install the piston (see Replacing pistons on a VAZ on your own) located in the first cylinder at the TDC point
- The piston located in the first cylinder at TDC (means top dead center) is installed so that when performing work related to the gas distribution mechanism - removing the camshaft drive belt, camshaft gear, etc. the order of the valve timing was not violated
- If you violate the gas distribution order, the VAZ 2109 engine will not work at all, or its performance will be poor and the cost of the issue will be a major overhaul.
- Therefore, we set TDC strictly according to the mark located on the camshaft pulley (then when setting according to the marks on the crankshaft pulley or flywheel, the piston of the fourth or first cylinder may be in this position)
- Then be sure to check that the marks on the flywheel or crankshaft pulley match (when you removed the generator pulley)
- If the mark on the pulley or flywheel does not match, this means the valve timing is incorrect.
- Then, with the camshaft drive belt removed, it is necessary to turn the crankshaft until the marks coincide
Warning: rotate the crankshaft exclusively by the bolt securing the pulley to it (it is strictly forbidden to turn the crankshaft by rotating it by the camshaft pulley - you can damage the valves and pistons). Tip: Since it is inconvenient to rotate the crankshaft by the pulley bolt without a special wrench, you can do this in other ways:
- We engage any gear (preferably fourth) and slowly roll the car until the mark located on the camshaft pulley coincides with the mark located on the rear cover of the camshaft drive belt.
- Shift into gear and hang any front wheel on a jack (using wooden blocks). Then rotate the suspended wheel until the mark located on the camshaft pulley coincides with the mark located on the rear camshaft belt drive cover
Now that the valve timing is set correctly, replacing the oil seal on the VAZ 2109 camshaft continues:
- After this, you need to release the tensioner roller and remove the belt.
- Using the “17” key, unscrew the bolt securing the camshaft pulley
- To prevent the shaft from rotating, pass the “10” head with an extension through the hole in the pulley and put it on the nut securing the rear timing belt cover (photo below)
We unscrew the bolt securing the pulley, fix the pulley from rotation by placing the head “10” with an extension on the nut securing the rear cover of the drive belt casing
- Then remove the camshaft pulley
- To avoid losing the pulley key, we remove it from the camshaft groove.
- We remove the oil seal by prying it with a screwdriver
Removing the oil seal
Before installing a new cuff, VAZ 2109, replacing camshaft oil seals has its own subtleties:
- Check whether the size of the camshaft oil seal on the VAZ 2109 matches the sample removed (it is recommended to choose a new one according to the markings of the old one, or see what the operating instructions recommend)
Important: Not many car enthusiasts know that any cuff has a direction of rotation; if it is mixed up, it will not work
- Check its working edge, there should be no rubber sagging or dents on it
- If defects are found, replace the oil seal; it makes no sense to install a defective one, it will not eliminate the lubricant leak.
- Now we install the camshaft oil seal on the VAZ 2109
- To make it easier to install the cuff in place, we recommend making a small chamfer around the perimeter of its working edge using a file; the edge will be easier to put on the camshaft.
- Be sure to lubricate the rubbing surfaces of the cuff with engine oil and only after that put it on the camshaft
- Correct the edge using a sharp wooden stick if the edge is bent
Correct the edge of the cuff with a sharp wooden stick
- We finally put the oil seal in place using a hammer and a mandrel of a suitable diameter or head
We put the cuffs in place using a hammer and a suitable mandrel or head
- Reassemble in reverse order
- In this case, we install the camshaft gear with the protruding part of its hub towards the engine
The protruding part of the hub (the red arrow points to it) to the motor
At this point, the replacement of the VAZ 2109 camshaft oil seals is completed; one small but important nuance remains:
- Be sure to adjust the tension of the camshaft drive belt
- With the correct tension, the camshaft belt on the VAZ 2109 is rotated 90 degrees with two fingers (with a force of 15-20 N)
- We turn the engine two revolutions of the crankshaft and recheck the belt tension
- Repeat the adjustment if necessary
Replacing the camshaft seals on the VAZ 2109 is completely completed; it does not represent anything particularly difficult or impossible; if any point is not clear to you, watch the video.
Add a commentAdd a comment We recommend reading VAZ 2112: replacing camshaft oil seals if necessaryVAZ 2110 camshaft play - solution to the problemReplacing the VAZ 2110 camshaft oil seal using an independent methodReplacing the VAZ 2110 camshaft and all about it
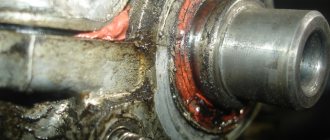
I noticed that the camshaft oil seal was leaking a long time ago - the entire left side of the engine was covered in oil. But it didn’t leak that much, so I wasn’t in a hurry to replace it. I started thinking about this only with the approach of cold weather - it was necessary to prepare the car for winter, so that later I would not have to freeze my hands and butt once again.
I bought a new oil seal on the market - its dimensions are 28x42x7, catalog number 2108-1005034. As you can see from the number, it will fit on the VAZ 2108, as well as on 2110, 2114, 2115, Kalina. In general, for all cars with 8-valve engines, analogues of the 9-valve engine.
I will tell you how to replace the camshaft oil seal using the Kalina car as an example. The essence of the work is absolutely no different.
Replacement
If checking the oil pressure and ventilation system shows that the leak is caused by a violation of the integrity of the camshaft oil seal, the element must be replaced.
Replacement process
We have prepared instructions for such a case.
- Turn off the power to the car. To do this, simply remove the negative terminal from the battery and throw it to the side.
- Set the piston from the first cylinder to the TDC position - top dead center.
- Remove the drive gear from the camshaft.
- After removing the gear, make sure that the key is not left on the camshaft. Be sure to remove the key and set it aside in a visible place so as not to lose this element.
- Using an awl or flathead screwdriver, remove the old oil seal. It usually comes out quite easily with little effort.
- Do not forget to first make sure that the new camshaft oil seal you have chosen is not a fake, has no defects on the working edge, and there are no dents or sagging rubber on the product. Unfortunately, today there are more than enough fakes and products of questionable quality. By installing such an element instead of a damaged old one, the repair will not bring results, since the oil will still continue to leak.
- If the seal turns out to be good, install it. To make your task easier, make a small chamfer around the perimeter of the working edge using a needle file. This will make the edge of the new oil seal fit lighter and easier on the camshaft.
- Treat all rubbing elements with regular engine oil and place a new oil seal on the camshaft.
- Using a piece of wood or a wood stick, straighten the edge a little. It sometimes bends a little during installation.
- Arm yourself with a mandrel that matches the diameter of the oil seal and complete its installation in its seat.
- The process is completed by reassembling the unit, which involves installing the camshaft pulley and returning the negative terminal to the battery.
- Start the engine and check how effectively the new camshaft element does its job.
Reassembly
If suddenly the leak continues, be sure to re-check the condition of the crankcase ventilation system, make sure there are no pinches on the hoses and measure the oil pressure. Perhaps you have overlooked something. Or the seal was defective.
Location
Finding the oil seal is not difficult. To do this, you need to know a basic thing - the location of the camshaft.
The oil seal is located directly behind the camshaft pulley. You can assess its condition by dismantling the pulley or without removing it. In the second case, the assessment will not be so objective.
Location
When is it necessary to replace the oil seal?
The camshaft seals are replaced if oil leaks are detected in the pulley area. In addition, the element is replaced if there is obvious mechanical damage. The procedure is not urgent, so a machine with a faulty cuff can be operated with some caution for a long period.
The exception is when the loss of oil through a destroyed element is sufficiently large or the destruction of the part is so massive that it allows dust to penetrate into the power unit.
Causes of oil leaks
As you know, a damaged oil seal leads to oil leakage, which is unacceptable. But before blaming this element for everything, you need to know about other reasons that lead to similar symptoms.
| Cause | Your actions |
| Dirty crankcase ventilation system | When the system is contaminated, the fluid flow is disrupted, pressure increases, and traces of oil leakage from the crankcase appear. You need to clean the crankcase ventilation system |
| Pinched crankcase ventilation system hoses | If the hoses are pinched, this will also soon lead to a leak. The problem can be solved in two ways - restore the structure of the hoses or replace them with new ones in case of wear |
| Deformation, wear of the oil seal | This is a case that we will talk about in more detail in our article. Replacing the oil seal is not difficult, so it is not necessary to contact a service station. |
Article on the topic: How to change and what is the best oil to fill in the box of a VAZ 2110
Damage to the oil seal leads to leaks. As a result, oil gets onto the timing belt, which negatively affects its condition, performance and efficiency of the entire engine. Therefore, replacement is a necessary measure.
When is it necessary to replace the oil seal?
The camshaft seals are replaced if oil leaks are detected in the pulley area.
In addition, the element is replaced if there is obvious mechanical damage. The procedure is not urgent, so a machine with a faulty cuff can be operated with some caution for a long period.
The exception is when the loss of oil through a destroyed element is sufficiently large or the destruction of the part is so massive that it allows dust to penetrate into the power unit.