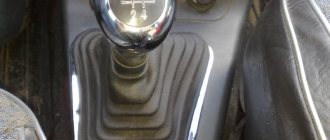
Two ways to replace the gearbox seal on a VAZ-2110
It is easier to change the oil seal with the gearbox removed.
Replacing an element that has become unusable can be done in two ways.
- The first of them is very labor-intensive , since it will be necessary to remove the gearbox. But replacing the oil seal will be much easier.
- The second method seems less time-consuming and labor-intensive , but in practice it is very difficult to carry out this procedure. Only experienced motorists who have repeatedly had to repair their cars can replace the oil seal directly on the car without removing the gearbox.
Troubleshooting
Experienced car owners know the visual reasons why they can determine the failure of the rocker seal. Naturally, for such reasons it is impossible to accurately determine the cause of the leak, but this gives a signal to carry out diagnostics, in which the cause of the oil leak can be accurately identified.
The most important sign is oil stains under the car, especially in the gearbox area.
An oily rubber boot indicates a malfunction of the rocker seal.
But these spots do not always indicate oil seal failure. It happens that this is due to the oil filter, which sometimes does not tighten properly. In any case, the driver is obliged to monitor for any oil leaks in the checkpoint area . To do this, you need to monitor the oil level. This is the only way to save the box from damage, which will certainly happen if it operates with a minimum amount of oil.
Another way that indicates the oil seal is worn out is a characteristic crunch that is heard when changing gears . But only an experienced VAZ-2110 owner can diagnose this crunch. In any case, if you hear unusual sounds when shifting into gear, it is better to diagnose the gearbox.
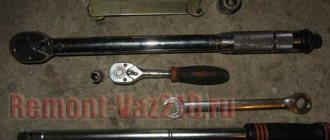
Set of tools required for replacement
A minimum set of tools for replacing the oil seal without removing the gearbox.
In order for the replacement of a part to take place without problems, you need to prepare the place and the necessary set of tools in advance. You will need:
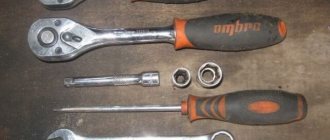
- A set of keys and sockets, and for 13 you need two keys and there must be a key for 10. There must also be a socket head for 22.
- A chisel or screwdriver will be needed to knock out the oil seal.
- The hammer is small so you can get under it.
- Silicone sealant.
- Awl and hook.
Additional accessories
A regular self-tapping screw will allow you to do without a special puller.
For those who decide to replace the gearbox seal without removing it from the car, you will need additional equipment:
- Several long screws.
- A piece of pipe for pressing in a new oil seal.
It should be noted that the replacement process without removing the gearbox is much more complicated. In addition, there is a possibility of damaging the part being replaced during pressing.
Gearbox device
General view of the gearbox
Before proceeding directly to the process of replacing the oil seal, it is necessary to consider the structure of one of the main elements of the car - the gearbox. So, what parts does the unit consist of:
Transmission device diagram
Gearbox: 1 – clutch release bearing; 2 – guide sleeve; 3 – input shaft; 4 – roller bearing of the secondary shaft; 5 – secondary shaft; 6 – retaining ring; 7 – satellite axis; 8 – speedometer drive drive gear; 9 – transport plug; 10 – wheel drive oil seal; 11 – tapered roller bearing of the differential; 12 – axle gear; 13 – satellite; 14 – differential box; 15 – clutch housing; 16 – driven gear of the main gear; 17 – drain plug; 18 – adjusting ring; 19 – driven gear of the 1st gear of the secondary shaft; 20 – synchronizer for 1st and 2nd gears; 21 – driven gear of the second gear of the secondary shaft; 22 – retaining ring; 23 – persistent half ring; 24 – driven gear of the third gear of the secondary shaft; 25 – synchronizer for 3rd and 4th gears; 26 – driven gear of the fourth gear of the secondary shaft; 27 – needle bearing of the secondary shaft gears; 28 – ball bearing of the secondary shaft; 29 – thrust plate; 30 – driven gear V of the secondary shaft transmission; 31 – 5th gear synchronizer assembly; 32 – nut; 33 – thrust washer; 34 – drive gear V of the input shaft; 35 – rear cover of the gearbox housing; 36 – ball bearing of the input shaft; 37 – gearbox housing; 38 – roller bearing of the input shaft; 39 – breather; 40 – input shaft oil seal
What parts to choose for replacement
It is better to immediately change the boot along with the oil seal.
Before you begin repair work, you need to purchase the necessary parts for replacement.
As for the oil seal, Balakovo products are very popular. You need an oil seal with article number 2110–1701043 and 21100-1701043-00 .
Process in detail (algorithm)
It is recommended to carry out replacement work in a pit. In this case, you must take care of safety. The car must be secured using a handbrake and wheel chocks, which must be installed on both sides of the rear wheels.
Having prepared a workplace and a set of tools, you can begin to work. To replace the gearbox seal, you need to do the following:
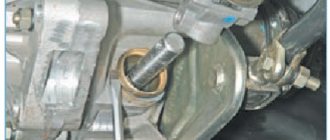
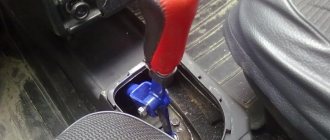
- Most often, the VAZ-2110 wing is closed with a rubber boot. If this part is covered in oil, this immediately indicates that the oil seal is really worn out. The boot needs to be bent. To do this, you just need to pull it by the wide part.
Oil leaking from under the “glass” - the rocker seal definitely needs to be changed.
Before loosening the clamp, you need to put a mark so that you don’t have to adjust the link later.
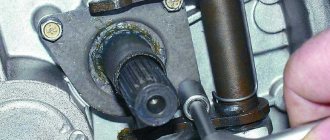
The oil seal is located deep in the bushing.
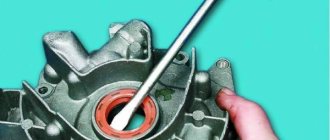
Only after this you need to press the new part into the rod. This procedure is quite complicated, since there should be no distortions. Many drivers use various homemade devices when pressing. When working, it is very important not to damage the new part, otherwise everything will have to be redone.
After the spare part is in its place, assembly is carried out in strictly the reverse order.
Repair and restoration work
Regardless of the repair, adjustment or replacement of the link, the need to disassemble this unit does not disappear.
The parsing process includes the following procedure:
- First, you need to remove the casing from the gearshift lever, or, more precisely, from its handle.
- The front of the car needs to be raised with a jack or placed on a pit.
- Unscrew the mounting bolts that hold the front console, and then remove it.
- Now you need to unscrew the six bolts that hold the rocker and also remove it.
- When dismantling, you should be extremely careful, paying attention to the condition of each part and element, so that if their condition is unsatisfactory, replace it with a working analogue.
- To gain direct access to the cardan shaft, oil seal and support, you need to bend the boot.
Conclusions (video)
If you are not confident in your abilities, you can watch a video that shows the entire replacement process in detail. Self-repair will guarantee that everything will be done efficiently, since the owner of the VAZ-2110 will control the process.
Is the shift rod seal leaking?
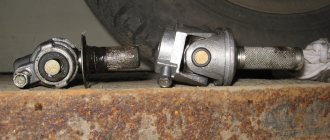
Questions torment me - How to replace the rocker seal? Is it possible to replace the oil seal yourself? If so, then you have come to the right place. An article on replacing the gear shift rod oil seal on VAZ-2112, VAZ-2115, VAZ 2108 cars will be useful for you. After reading it, you will be able to replace the oil seal with your own hands without any problems and in a short time. At the same time, you can enjoy the work done and save the Nth amount of money))). Let's start with choosing a replacement method. There are only two of them. The first one, which I use and recommend to you, is replacing the rocker seal in the inspection hole by knocking out the bushing along with the seal. The second method does not require a viewing hole or overpass, but will require you to have a certain dexterity of hands, body flexibility and the presence of one (two) long screws. Since screwing these screws into the oil seal, pulling it out and pressing it into place while lying under the car... This is not for everyone! Both dexterity and flexibility will be very useful to you here. But, let's take things in order. From the introduction we move on to the main thing. Let's start with the arsenal of the necessary tools for replacing the gear shift rod oil seal on VAZ-2108, VAZ-2109, VAZ-21099, VAZ-2110, VAZ-2114, VAZ-2115: two 13 keys, a 10 key, a wrench or screwdriver for knocking out the oil seal bushing, a small hammer, a 22mm socket, silicone sealant (Abrovsky 999 is perfect). For those who are still going to change the oil seal from the “lying on the ground” position, the list of tools does not change much: two 13 wrenches, a 10 wrench, a small hammer, one or two long self-tapping screws, a piece of pipe of suitable length and diameter for pressing the oil seal. (I can’t tell you the exact dimensions, since I don’t use this method). Spare parts. Everything is simple here. We buy a Balakovo shift rod oil seal and immediately a cardan shaft boot, look at photo number 2. Practice has shown that in most cases this boot is either already torn or will tear during the removal process. So, we don’t rely on chance, and we buy the boot right away, and the costs are small. And you can save your nerves and time. And one more thing... Recently, new gear shift rod seals appeared on the market, codenamed “Reinforced”! Look at comparative photo No. 3, on the left. I won’t praise or recommend them yet, since I’ve only installed one so far. On the problematic rod, which was leaking even with two seals. As they say, time will tell how reinforced it is))) Now the final part is a description of replacing the gearshift rod oil seal on VAZ-2108, VAZ-2109, VAZ-21099, VAZ-2110, VAZ-2114, VAZ-2115:
How to repair a car
Replacing the drive seal of VAZ 2109, VAZ 2110, VAZ 2112, VAZ 2114, VAZ 2115
You can replace the drive seal of a VAZ 2109, VAZ 2110, VAZ 2112, VAZ 2114, VAZ 2115 car with your own hands, in a garage. Now we will look at how to replace the drive seal of a VAZ 2109, VAZ 2110, VAZ 2112, VAZ 2114, VAZ 2115 car yourself. When should you change the seal?
We are all fans of driving cars; we often forget about such an event as replacing the drive seal, or rather the internal grenade seal. Let's remember what signs indicate the need to replace the drive seal?
— oil leakage from the gearbox (formation of an oily film on the gearbox); If you notice an oil film, be aware that over time, more oil will ooze out, even to the point of forming oil droplets on the asphalt under the car.
Do not forget! Oil seals are left and right, and they should not be confused. The left and right drive seals are different in color. The left oil seal of a VAZ is usually brown and is installed on the driver’s side, while the right oil seal is black and is installed on the passenger’s side.
Tool for replacing the drive seal of a VAZ 2109, VAZ 2110, VAZ 2112, VAZ 2114, VAZ 2115:
- Wrench 17;
- 30mm socket wrench;
- Mount ;
- Screwdriver;
- Hammer ;
- Mandrel for pressing the oil seal;
- Container for draining oil.
- Pipe of suitable diameter.
How to buy a VAZ drive oil seal?
Before you run out to buy a drive seal, decide which drive seal you need (left or right). You can buy a drive oil seal at any VAZ auto store or at the car market.
What is the difference between the left and right drive oil seal?
The left-hand drive oil seal differs from the right-hand drive oil seal of the car in that it has oil drainage grooves in different directions.
The main differences between the left and right drive oil seal.
- Different directions of arrows on the inside of the seals;
- The numbering of the right oil seal has an even number at the end, and the left one has an uneven number.
- The color of the left oil seal is brown, and the color of the right one is black.
How to replace the drive seal of a VAZ 2109, VAZ 2110, VAZ 2112, VAZ 2114, VAZ 2115 car yourself?
- Drain the oil from the vehicle's gearbox.
- Loosen the wheel bolts and unscrew the VAZ front wheel bearing nut.
- Using a jack, raise the car and remove the ball joint from the steering knuckle by unscrewing the bolts.
- Using a pry bar, push the lower arm down and pull one end of the drive out of the hub.
- Then we push the drive out of the gearbox (for this we drained the oil from the gearbox))) so that it doesn’t drip into the eyes.
- Using a screwdriver, remove the drive seal from the gearbox.
- Press in a new oil seal. The oil seal should fit freely.
Diagnostics
Replacing the rocker seal on a VAZ 2110
What symptoms indicate that it is time to change the cuff or gearbox rod? Most often, oil stains and marks remaining on asphalt or other surfaces after the car has been stopped for a long time are the very signs. An experienced driver is obliged to notice them in time and draw the appropriate conclusions. But such spots do not always indicate a problem with the cuff of the drawstring. Often the reason for oil loss is the oil filter, which needs to be checked to avoid errors. Often this same filter is poorly screwed in, resulting in leakage.
Note. Needless to say, noticing an oil leak from the gearbox in a timely manner is an opportunity to save an important vehicle mechanism. Otherwise, the danger associated with the complete loss of oil from the gearbox and the replacement of the gearbox, as a consequence, cannot be avoided.
Replacing the oil seal on the wing of a VAZ 2110
Causes of manual transmission oil seal malfunction
If there are obvious signs of oil leakage on the gearbox, then the oil seal has stopped performing its functions. Frequent causes of malfunction:
- Natural wear and tear over a long service life. Nowadays, manufacturers care about the durability of parts, but sooner or later even the most durable materials become unusable. If we talk about seals, then under the influence of high temperatures and oil, rubber cracks and dries out;
- Mechanical damage is often associated with road traffic accidents or poor quality repairs;
- Deformation;
- Use of non-original oil seals made from low quality materials.
Replacing the drawstring cuff
Replacing the backstage seals of a VAZ 2110
First you need to arm yourself with the necessary set of tools, which includes:
- Set of keys (10, 13);
- An ordinary awl or other sharp metal object;
- Screwdriver;
- Hook;
- Plastic stopper.
The oil seal must be replaced in a viewing pit or overpass. If this is not possible, then an option with a lift will do. In addition, there is another option, which involves placing two spare tires flat under the car, like stops. Two strong boards are placed on them, and the car drives onto a makeshift overpass. Simple and brilliant.
Advice. If a motorist drives into a hole or other device, he must take care of the safety rules. In particular, it is necessary to secure the vehicle using the parking brake and wheel chocks.
Replacing the gearbox seal of a VAZ 2110
Let's start the replacement process:
- The slide on a vase is almost always covered with a special rubber boot. If the cuff is faulty, then this same boot will be covered in oil, which will once again indicate the need for replacement;
- We take the wide part of the anther and bend it;
- We see the cardan located at the bottom;
- We disconnect this same cardan from the rod and lever, thus gaining access to the cuff (we use a 13 key in our work);
- The nut is turned out completely, which allows you to loosen the connection between the cardan and the lever;
- The lever is removed from the cardan;
- First or third gear is engaged;
- The cardan is completely disconnected from the rocker;
- The cardan is removed;
- Now you should remove the rubber boot.
Replacing the rocker seal on a VAZ 2110 gearbox
We see the cuff itself, which is located in a certain recess. This is where the rocker seal fits into the gearbox and needs to be removed from this recess.
Note. It is almost impossible to remove the cuff from the rod without using a special tool. An awl and a special hook will help in the work.
- We insert the awl and the hook inside and thus remove the cuff (you can also use a self-tapping screw, which we screw inward, thereby uncorking the seal, like a corkscrew);
VAZ 2110 backstage diagram
After removing the old cuff, you should begin replacing:
- We clean the place where the new cuff will be placed;
- We press the new cuff inside the rod.
Advice. It is easier to replace the seal using a stopper from any plastic bottle. The new oil seal is inserted into the inside of the plug, which is cut out in advance. And then it is pressed in.
- Assembly is carried out in reverse order.
That's all. As you can see, the instructions are not complicated at all and you can easily do everything yourself. During the work process, you can watch a useful video or study photo materials. This way you can save a lot of money. And why overpay if the price for repairs at a service station is not low today.
Replacing differential VAZ 2114
Due to the fact that the drive of the VAZ car of the fourteenth model is the front one, the unit of interest to us is located in the gearbox. Therefore, to remove and replace the differential itself, you will need to dismantle the gearbox itself. We will not describe in great detail all the nuances of the process of removing the box, but will focus only on the main stages.
So, the steps to remove the gearbox are:
- We place the car on the lift.
- Using a screwdriver, hammer and a special wrench, unscrew (loosen) the hub nuts on the two front wheels;
- We raise the car to the height required for work;
- If the crankcase protection is installed, then remove it.
- Drain the oil from the box. If you do not plan to change it, then pour it into a clean container for reuse;
- Remove the flywheel protection;
- Loosen the clamp and unscrew the fastening of the gear shift lever;
- Now you need to disconnect the drive. To do this, on one side, with a sharp movement using a long lever with a flat end, we tear off the joint from the drive. As a result, a small gap should form.
- The second wheel will require similar steps. The only difference is that you will have to disassemble the suspension so that nothing interferes with dismantling (remove the wheel, ball joint, unscrew the stabilizer link, unscrew the lever). Afterwards, we pull out the fastener.
- Before unscrewing all the bolts and removing the box itself, place a stand under it, this way you will avoid falling and damaging the unit.
- Don't forget to disconnect the connector from the speed sensor and the wire to the tail lights, otherwise you will tear them off. In the engine compartment, remove one of the battery terminals. Disconnect the terminals from the starter. From the ignition module, unscrew the bolt that connects it to the box. Release the clutch cable (disconnect it).
- We unscrew all the bolts securing the box and mounting pad.
- Carefully remove the box from the block.
Now all the preparatory conditions have been met, and you can begin to directly disassemble the gearbox itself and replace the differential.
Further steps are shown in this video:
You can pay for your purchase in any convenient way:
- VISA, MasterCard (no commission)
- Receipt for payment
- Sberbank Online
We deliver goods throughout Russia and Kazakhstan
We can send your purchase to you by transport company:
- home
- Catalog
- Transmission
- Blocking