How to replace the oil seal
When the question arises of replacing the gearbox seal on a Kalina, many VAZ car owners don’t even know where to start. But the problem cannot be left to chance.
Auto repair tool set
Prepare the necessary tools: keys and sockets of different sizes, a screwdriver for prying off the oil seal, a small hammer.
Hang the car or park it in a pit
Replacing the Kalina gearbox oil seal will be more convenient if you hang the car or drive it into a pit. Do not forget about safety requirements: it is better to put the car on the handbrake or use wheel chocks.
Remove protection
To easily dismantle the manual transmission shift seal, you need to remove the protection. It is secured with 6 bolts.
First, unscrew the rear bolts, and after the protection sag, holding it, unscrew the front fastening. It is more convenient to carry out these operations using a 10mm head.
Remove the protection from under the car. Make sure the yoke boot is in oil. Otherwise, the cause may not be in the oil seal.
Disconnect the jet rod
Replacing the gearbox seal on a Kalina requires removing the jet rod, but not completely, but only that part that prevents you from getting to the cardan mount.
Using a spanner, unscrew the fastening from the end of the torque rod. Remove the required part.
Remember what position the torque rod shank is in so that there are no difficulties when reassembling the car.
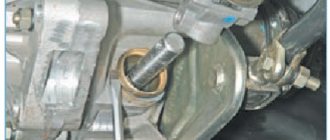
Disconnect the cardan
After releasing the universal joint fastening, use a 10 mm spanner to unscrew the only fastening bolt. Difficulty may arise if you do not have a spanner on hand. It is difficult to unscrew the bolt with a regular open-end wrench, and there is not enough space for the head.
After unscrewing the fasteners, the cardan can be freely removed from the seat.
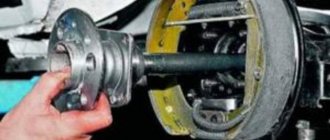
Remove the boot
After removing the cardan, you need to remove the boot (the rubber cover that covers the bushing and protects it from dust and dirt getting inside). But be careful, leaking oil may accumulate inside, so before removing it, carefully drain the remaining oil from the boot.
Gearbox boot
Pull off the boot that covers the desired gear selector shaft seal.
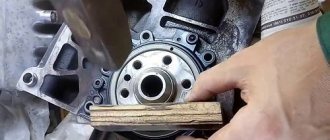
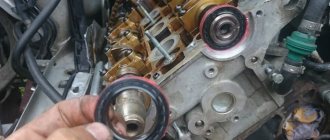
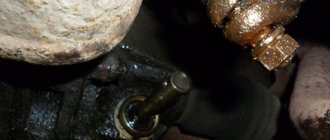
Remove the old oil seal
Replacing the Kalina gearbox oil seal is done using a screwdriver and a hammer, with which you need to knock out the bushing and the old cuff. Do not use too much force, otherwise you risk bending the bushing.
Install a new oil seal
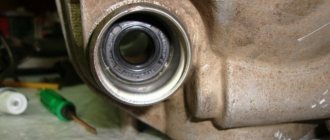
Before changing the oil seal on the gearbox on the Kalina, it is necessary to clean and degrease the bushing. Pay attention to the stem. If you find burrs or scratches on it, do not rush to install a new oil seal - the problem lies in the box. Change the rod.
For further operation, you need a 22mm head or a pipe of suitable diameter for pressing the oil seal.
Text version
Three when we Ritalin joy hello everyone in today’s quick video I’ll show you how to do it correctly and easier. In total, replace the rocker seal, the shift rod seal of the family, you start with the eight, and end with them with instruments, I don’t know, but on grants, well, in short.
According to Prior, one hundred percent of tens are included in 11.
In short, everything on the 9th box means many of you, but who are least likely to encounter repairs.
The problem is that the oil seal is very deep. And it’s not always possible to pick it out from there, but there are cases. When this seal is actually on the rod, when we pull the pieces, it moves in this body, that is, the internal part of the guide is tighter.
Much than the outer one sits, this is also the problem of these seals, two seals grow each so that! One of the other was holding, that is, and the joke here is that someone before me, in short, also held a spring.
I put it, that is, it’s so purely in short, so that the seal, that is, the person gets out of the situation. Somehow, that is, he fooled the spring into the recording, I’m just now.
I’ll show you what you need to do, firstly, what’s the easiest way to get the oil seal out? Is this one of the simplest ways? But also how to make it so that it actually doesn’t slide along the outer part of this body: We use the oil seal itself, which is easier and more convenient than Vanya.
Replacing the backstage oil seal of a VAZ 2108-10
We push the flat mount somewhere on the side and you need to pull it out! Guys, it’s just this body of this oil seal that sits on the sealant: From the factory and in the future it’s generally correct that they don’t sit on the sealant in the same way, don’t worry.
Oil will not flow from here, that is, if it has accumulated there! During operation before, but there were a couple of drops of some kind.
Will we now prepare to dig up further before the production? This is the seal that actually left with his hand, only Sean walked with his fingers now.
There are new questions, there are just 2 of them here, we just see this situation and who is the top 20 with a finger, they are not all:
So, in short, you can put the sealant on the bottom one. More tightly, this is another one of someone’s life hacks when they install two oil seals, which means we’ve removed the body, now we’re going to clean it.
We knock out the seal with mine and then your task. I measured this oil seal, which should stand here as it stands now, and measure about millimeters from here. 6 7 and with a thin turner we make well little things 6 picks of opinions along the axis like this 2 like this 2 so 2 divided into 6 parts.
And we make lazy people bullshit, thereby ethical opinions will come out inside ours.
Replacing the oil seal and boot of the gearbox rod (glass) of a VAZ 2110
The housing is here and when you are in suny, those oil seals are pre-smeared on the outside with sealant.
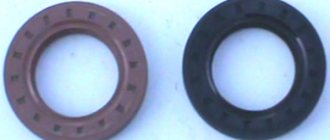
Which oil seal is better to install?
When replacing a gearbox seal on a Kalina, there are 2 choices of this product: regular and reinforced.
A regular seal is made twice as thin as a reinforced one, so the risk of it failing earlier is high. A reinforced one will last longer, and the risk of damaging it mechanically is low.
Many craftsmen manage to press two reinforced seals into the bushing, which provides greater reliability and protection against recurrent leaks. But you should press extremely carefully so as not to damage the bushing, which is made of soft material.
The price for a reinforced cuff does not exceed 200 rubles. The cost is low, but the part can save the car owner from expensive repairs. Therefore, at the slightest appearance of leaks in the area of the gearbox, it should be eliminated immediately.
Source
What indicates the need to replace it?
The primary signs of this problem are strange oil leaks in the gearbox area. Suspicious sounds when changing gears may alert you. A dirty rubber boot also indicates that it is time to change the reinforced cuff of the rocker. It could have been squeezed out of its seat, so oil is oozing out. Using a low-quality product accelerates wear and tear.
Wear and tear can be caused by long-term use or damage from machine impacts. Often under such circumstances the seat is damaged, so the box will need to be repaired.
What is the difference between a cable manual transmission and an ordinary viburnum?
What is this? Is the seal leaking? He's darling!
Jacked it up and removed the front left wheel:
I drained the oil from the box into a basin:
I hung them on a rope) They shouldn’t be hanging from the brake hoses! :
Unscrewed the ball joint from the hub:
We place a thick beam under the hub so that it does not twitch.
Unscrewed the steering knuckle:
Attention! I also unscrewed the two bolts securing the strut to the hub, because I decided to replace the “leaked” strut at the same time. If the rack does not require replacement, then these bolts:
Under no circumstances should you touch it, as it will disturb the wheel alignment. To maintain the “camber” you need to unscrew 3 nuts:
This will allow us to untie the strut from the body, thereby giving the hub more freedom to move when we pick out the CV joint from the leaking oil seal.
To pick out the CV joint we need a high-tech tool:
We insert the end of the nail puller into the gap between the box and the CV joint:
and begin to furiously uproot the CV joint from the oil seal. It comes out very tight! Therefore, you need to do it fiercely)
There is a retaining ring at the end of the CV joint. It must be alive!
We uproot the old oil seal:
We insert a new oil seal. I stuck it in like this: I leaned the old one against the new one and lightly hit the old one with a hammer.
Afterwards, you need to hammer the CV joint back. It should not be particularly bent relative to the shaft. The straighter you keep the CV joint on the shaft, the better.
I inserted the CV joint, supported the shaft, supported the hub and hit the hub a couple of times with a sledgehammer through a wooden board. The CV joint is in place.
Hevea brasiliensis
Rubber or rubber trees. They produce rubber or rubber resin in abundance, i.e. the milky sap of the bark, and more often the sap of the internal cells of woody tissue, is very viscous, viscous and flexible, and does not harden much afterwards.
It grows in fertile soils in the tropical forests of the Amazon River in Brazil.
Most likely causes of leakage
The most common cause of lubricant leakage is defects:
It is not difficult to identify a seal defect; there is oil leakage only around it or under it. If the problem is in the gasket, then traces of transmission fluid will go along the junction of the body parts of the unit. If the bottom of the unit is covered with an oil-mud mixture, but everything is clean on the sides and top, most likely the problem is a crack in the housing. Below we will talk about each of the reasons in more detail.
Damage to the drive shaft seal
This defect occurs on all types of gearboxes, including AMT and automatic transmission. If the Kalina gearbox drive seal is leaking, then the main sign of such a defect is the dirty surface of the box around the drive included in it (constant velocity joint), and the mixture of dirt and soil will be not only from below, but also from above. The cause of this defect is:
- aggressive driving with frequent sharp accelerations and accelerations;
- the service life of the oil seal is too long (it is advisable to change them every 3 years);
- poor quality or incorrectly installed oil seal;
- custom grenade;
- Damage to the constant velocity joint shaft.
Transmission oil leaking from the shaft block
. To determine the exact cause, you need to wash the box from accumulated dirt, then pull out the drive shaft. If the oil flows in a thin stream, it means that the level has not been exceeded, so carefully inspect the surface of the grenade shaft and also run your finger along it. Any scratch indicates that the part needs to be replaced, because even the best seal will not be able to effectively hold oil if there are burrs, scratches or other defects on the shaft.
Measure the thickness of the grenade shaft in the area of the oil seal; it should be exactly 35 mm; if the shaft is larger or smaller, it will be impossible to eliminate the leak in the Kalina gearbox. A larger shaft will quickly destroy the seal, and a thin one will not provide the required tightness, so the CV joint, as well as the seal, will have to be replaced.
Pull the seal out of its seat and turn it back towards you. There is an arrow showing the correct direction of shaft rotation. If it does not correspond to the actual direction, it means that during installation at least one of the seals was reversed.
Having established the cause, replace the defective part, then add a little oil and after 10–50 km check whether the oil leaks have disappeared. If there are no new drips, it means you did everything correctly, otherwise you need to check everything again and then carefully inspect the seal seat. Its defect is extremely rare, but sometimes occurs. If there are cracks or scratches on the seat, then the manual transmission housing needs to be repaired or replaced.
Replacing the gearbox seal on a Lada Kalina (VAZ Lada Kalina)
The gearbox requires special attention from the car enthusiast. Of course, most faults can be diagnosed by uncharacteristic sounds or difficulties in shifting gears. But there are breakdowns that are immediately invisible to the eye, but in the future can lead to big troubles and serious costs. In particular, one of such malfunctions is the occurrence of oil leakage due to failure of the gearbox seal.
How to diagnose?
A malfunction of the oil seal can be noticed by the appearance of characteristic oil stains under the car in the area of the gearbox or by routine inspection of the underbody of the vehicle from a pit. There are no other obvious signs that would indicate the presence of such problems. Therefore, the driver must be extremely attentive to his iron horse, inspect it from time to time for leaks and promptly correct the malfunction by replacing the oil seal.
Most car enthusiasts immediately go to the service station. The reason here is simple - they are simply afraid of doing something wrong. In fact, replacing the oil seal on a Lada Kalina will not cause any problems if you have the necessary tools on hand and strictly follow the instructions. Step by step, you can put everything through your own hands and save thousands of rubles on paying for the services of a master.
Gearbox device
General view of the gearbox
Before proceeding directly to the process of replacing the oil seal, it is necessary to consider the structure of one of the main elements of the car - the gearbox. So, what parts does the unit consist of:
Gearbox: 1 – clutch release bearing; 2 – guide sleeve; 3 – input shaft; 4 – roller bearing of the secondary shaft; 5 – secondary shaft; 6 – retaining ring; 7 – satellite axis; 8 – speedometer drive drive gear; 9 – transport plug; 10 – wheel drive oil seal; 11 – tapered roller bearing of the differential; 12 – axle gear; 13 – satellite; 14 – differential box; 15 – clutch housing; 16 – driven gear of the main gear; 17 – drain plug; 18 – adjusting ring; 19 – driven gear of the 1st gear of the secondary shaft; 20 – synchronizer for 1st and 2nd gears; 21 – driven gear of the second gear of the secondary shaft; 22 – retaining ring; 23 – persistent half ring; 24 – driven gear of the third gear of the secondary shaft; 25 – synchronizer for 3rd and 4th gears; 26 – driven gear of the fourth gear of the secondary shaft; 27 – needle bearing of the secondary shaft gears; 28 – ball bearing of the secondary shaft; 29 – thrust plate; 30 – driven gear V of the secondary shaft transmission; 31 – 5th gear synchronizer assembly; 32 – nut; 33 – thrust washer; 34 – drive gear V of the input shaft; 35 – rear cover of the gearbox housing; 36 – ball bearing of the input shaft; 37 – gearbox housing; 38 – roller bearing of the input shaft; 39 – breather; 40 – input shaft oil seal
Oil seal replacement process
When the design, as well as the principle of operation of the gearbox, has become clear, you can move on to the process of replacing the gearbox drive oil seal. So. Let's look at the step-by-step process:
Part selection
– original catalog number of the gear selector oil seal manufactured by AvtoVAZ. The average cost of a spare part is up to 50
rubles
Backstage oil seal of different prices
Alternative oil seals must be selected according to markings, or rather according to size in automotive stores.
The cost of such a product will not differ significantly from the original. So the quality of such products is approximately the same.
Reasons for failure
Now that the issues of replacement and product selection have been considered, we can study the issue of the causes of failure.
Box drive oil seal and the drive itself
So, let's look at what affects the condition of the oil seal:
What to do if replacing the oil seal does not stop the oil leak?
In this case, the shaft in the satellites is faulty. Because of this, there will be a backlash in the grenade.
Removal and installation of the gearbox
Servicing the gearbox assumes that the mechanism will have to be removed and its position changed. Before doing this, you need to install the vehicle itself on the lift. The ignition must be turned off completely and the parking brake must be used.
How to repair a gearbox? To do this, disconnect the minus terminal from the battery. The hood must be opened completely. Any manual on gearbox repairs writes about this.
The oil filler cap is also removed. It is necessary to install the previous item after the screen is removed. The gearbox requires loosening the clamp responsible for fixing it. The inlet pipe hose must be disconnected from the corresponding sensor. Gearbox lever play requires the same actions in practice. Then you need to unscrew the air intake nut.
The gearbox can be installed in its original place after the 1st speed repair is completed. SHRUS-4 lubricant is applied to the outer surface of the corresponding bushing in the clutch in a very thin layer. This will also help if the gearbox is loose. The pin fixing bolts are removed from the steering knuckles.
Tuning
Many VAZ 2110 car owners, even having purchased a completely new car, strive to change the scenes. This can make it more comfortable, but only if done carefully.
The fact is that the short-stroke rocker is, in fact, a homemade product, a modification. If you have a short-throw shifter, the gearbox wears out less, and in general this is not bad for the gears - they engage more clearly.
In order for the short-stroke rocker to replace the standard one, it does not have to be completely removed.
It is enough for the ball joint to be disassembled from the outside. It is necessary to unclench the metal ring of the support and spread the plastic legs so that the ball comes out.
Next, you need to disconnect the rod from the support and weld a small piece of pipe to the rod, as well as a piece of durable sheet metal. Do not forget to lift up the hinge, which has a hook, to prevent the gears from being engaged by mistake.
Although the short-throw rocker requires more effort to engage, it increases the smoothness and clarity of gear engagement. But, in principle, choosing which is better for him - short-stroke or full-time - is the right of every VAZ 2110 owner.
How to replace wheel drive seals Lada Kalina
The front wheel drive seals can be replaced without removing the gearbox.
We carry out the work on an inspection ditch or overpass.
Drain the oil from the gearbox.
Remove the left and right front wheel drives (see “Removing the front wheel drives”).
1. Use an impact puller to press out the right drive oil seal.
Press out the left drive oil seal in the same way.
2. If there is no impact puller, you can press it out with a mounting blade.
The gearbox can be equipped with two types of oil seals: both with and without oil drainage notches.
Oil seals without notches are interchangeable for left and right drives. Seals with notches differ:
at the left drive oil seal the arrow on the housing points counterclockwise, at the right drive it points clockwise
3. Using a mandrel of suitable diameter, press in a new oil seal for the right wheel drive.
You can use the old oil seal as a mandrel when pressing.
Similarly, press in the left wheel drive oil seal.
Apply a thin layer of transmission oil to the working edges of the oil seals
conclusions
Replacing the gear selector oil seal on a VAZ-2114 is not as difficult as it seems at first glance. Probably, every motorist, even a novice, can handle it on his own, but if not, then it is recommended to contact a car service center. Particular attention should be paid to the choice of parts, or more precisely to the quality of the product. The better the quality of the spare part, the longer it will last.
The article will discuss whether it is difficult to replace the Lacetti gear selector rod seal with your own hands and what nuances may arise when performing this work.
For a long time, the gear shift rod oil seal sweated a little. Then the sweating gradually turned into a big sweat and the box imperceptibly turned black. And the general appearance became like this
Therefore, it was decided to solve this problem when favorable weather conditions occur.
This day has come. Honestly, the work of replacing the rod seal can be completed in an hour and a half. But that’s if you don’t run around with a camera, like me. Plus, there were problems with the rod, so my process took 5 hours! But first things first.
The necessary spare parts for this procedure were purchased in advance:
- rod pin
- pin retainer
- pad
- White's bottle for washing off all this dirt (thinner, gasoline, etc.)
- and, in fact, the oil seal itself
To work you will need a minimum set of tools:
- 11mm socket with matching wrench
- small screwdriver
- hammer
- thin beard
- tassel
- metal brush
- 17 mm wrench
Lada Kalina hatchback Amphetamine™ › Logbook › Gearbox: Changing the gear selector rod oil seal
Through long and complex research in a top-secret laboratory, it turned out that the gear selection oil seal (the “rocker” oil seal) had given in... and the transmission quietly, little by little, but constantly, went into protection and then into the ground. “Looking into tomorrow” it became clear that this cannot continue for long, it is necessary to change:
Unscrew the rod and the rocker...:
...and the first surprise - having pulled the boot a little away from the gearbox housing, oil rushed out of it, probably 200-300 grams just leaked out:
It’s good that the substrate was laid in advance, otherwise they would have added a link and a cardan for 3.14):
Because The oil was almost all gone, and the boot was getting in the way a lot, so I threw it away:
Next it was necessary to unscrew and remove the cardan:
And the **** there)), still can’t get to it. In the end, somehow (I didn’t understand how) I turned it a little with the cap, then completely unscrewed it and removed the cardan:
Then the only thing left to do is to knock out (carefully) the “bucket” from the gearbox, in which this unfortunate oil seal is located. As it turned out, there was no oil seal in it... it was on the gearbox rod, that is, it was stupidly knocked out of its seat... so and such rivers of oil flowed.
Before all this crap, on the advice of KalinAklubnikov, I bought not one oil seal, but two: Kalinovsky and eight-wheel:
And the duster is also unforgotten:
I did not shorten the springs on the seals, because... if I had gone to remove them, I would definitely have messed up and torn them, from experience, it was...nah, I don’t want to)). I just carefully pressed the Kalinovsky one in first, and then pressed it down with an eight-piece... in size they are just like:
Sealant on the “buckle” from the outside and put everything in the reverse order, replenishing the loss of oil from the gearbox. Nothing complicated, though there is one point: adjusting the rocker so that the speeds turn on normally. Before removing it, someone puts a mark on the driveshaft, and then follows it puts on the drawstring, I completely missed this point, I didn’t put marks, I did it according to the ABC book: when putting the drawstring on the cardan, you need to leave a 13-15 mm gap between them. I didn’t climb there with a ruler, I just measured 1.5 cm using a match and set it up like this...well, you understand, in general, who regulated it)):
But no, not everything, I don’t remember, someone was wondering why the block below was covered in oil. Answer: dry crankcase gas hoses and a rubber seal on the dipstick. 1.5 or 2 years ago I changed everything, this is how it is at the moment, relatively clean:
Stories from our readers
“Fucking basin. "
Hi all! My name is Mikhail, now I’ll tell you a story about how I managed to exchange my two-wheeler for a 2010 Camry. It all started with the fact that I began to be wildly irritated by the breakdowns of the two-wheeler, it seemed like nothing serious was broken, but damn it, there were so many little things that really started to irritate me. This is where the idea arose that it was time to change the car to a foreign car. The choice fell on the melting Camry of the tenth years.
Yes, I had matured morally, but financially I just couldn’t handle it. I’ll say right away that I am against loans and taking a car, especially not a new one, on credit is unreasonable. My salary is 24k a month, so collecting 600-700 thousand is almost impossible for me. I started looking for different ways to make money on the Internet. You can’t imagine how many scams there are, what I haven’t tried: sports betting, network marketing, and even the volcano casino, where I successfully lost about 10 thousand ((The only direction in which it seemed to me that I could make money was currency trading on the stock exchange, they call it Forex. But when I started delving into it, I realized that it was very difficult for me. I continued to dig further and came across binary options. The essence is the same as in Forex, but it’s much easier to understand. I started reading forums, studying trading strategies. I tried it on a demo account, then opened a real account. To be honest, I didn’t manage to start earning money right away, until I understood all the mechanics of options, I lost about 3,000 rubles, but as it turned out, it was a precious experience. Now I earn 5-7 thousand rubles a day. I managed to get the car buy after half a year, but in my opinion this is a good result, and it’s not about the car, my life has changed, I naturally quit my job, I have more free time for myself and my family. You’ll laugh, but I work directly on the phone)) If If you want to change your life like me, then here’s what I advise you to do right now: 1. Register on the site 2. Practice on a Demo account (it’s free). 3. As soon as you get something on the Demo account, top up your REAL ACCOUNT and go to REAL MONEY! I also advise you to download the application to your phone, it’s much more convenient to work from your phone. Download here.
To replace the “ten” cardan you will need a pit, keys for 10 and 13:
- The gearbox control rod joint is hidden under the boot.
- We remove the boot and move it to the gearbox.
- Loosen the clamp bolt to 13, loosen it a little and pull the link off the hinge. Then unscrew the 10mm bolt that secures the hinge on the gear selector rod and remove the hinge.
- We install a new hinge without play on the gear selector rod and secure it with a 10-point bolt. To prevent it from turning away from vibrations, we lubricate it with a thread locker.
We put the boot and the drawstring in place and adjust it.
After that we do a test drive. If everything is good, then tighten the clamp. There is an opinion that before installing the glass you need to saw off its tip a little, in fact, everything installs perfectly without sawing. After adjustment, the gearshift lever is located exactly in the middle.
Impressions from the backlash-free driveshaft of the Lada Kalina on a VAZ 2110
It seems that the lateral travel of the lever has decreased. The difference is especially noticeable while driving than when parked. Gear changes have become clearer, there is no “yaw” movements of the lever.
However, do not forget about gearbox vibration . If previously these vibrations were transmitted to the rocker and were partially damped by the play of the standard cardan, now they are transferred in full force to the gearshift knob, which causes rattling, which has to be dealt with over time.
Sources:
https://wiki.zr.ru/127-2_%D0%A0%D0%B5%D0%BC%D0%BE%D0%BD%D1%82_Kalina https://litezona.ru/shtok-vybora-peredach -kalina/ https://ru.megasos.com/wiki/zamena%20salnika-kpp-na-lada-kalina https://avtoazbuka.net/lada-kalina-lada-1117-1119/mekhanizm-vybora-peredach- kpp-vaz-1118-2c-vaz-2190-detail https://xn--2111-43da1a8c.xn--p1ai/tuning-other/524-ustanovka-kardanc