The front oil seal of the VAZ 2101-2107 engine is used to prevent engine oil leaks in the place where the accessory drive pulley is attached to the end of the crank. Although the sealing lip is made of high-quality fluorine rubber, over time its working edge wears out and lubricant leaks into the gap. Today we will share a method for replacing the front crankshaft oil seal of a VAZ “classic”. Even a novice driver can cope with the job, because to do this you don’t even have to remove the camshaft drive cover from the engine.
Why does the oil seal wear out prematurely?
- use of counterfeit spare parts;
- pouring low quality gasoline into the vehicle, constantly running the engine at high speeds;
- motor overheating;
- dirty filter and untimely oil change in the car.
The front oil seal is the easiest to change. The rear one needs to spend much more time.
To replace the oil seal you need to perform a number of simple manipulations:
- The vehicle is driven into a pit;
- The battery is de-energized;
- We start the first gear to fix the crankshaft;
- Fixing the vehicle
Where is?
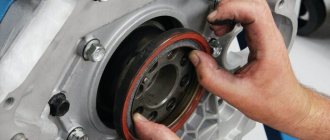
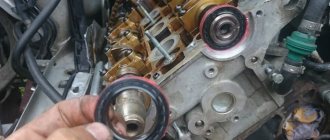
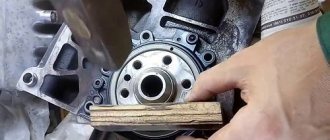
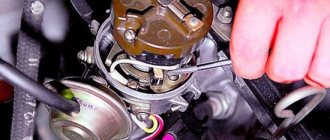
The oil seals are located in small holes on the camshaft drive covers. Being at the ends of the shafts, they perform two roles, the first is to prevent oil from leaking out and the second is to protect the components from dust and dirt entering the system. The camshaft cover is circled in red in the photo. The blue arrow shows where the crankshaft pulley is located, behind which the cuff is located.
Shaft cover
Changing the front oil seal yourself
The first step is to disconnect the protection from the motor. We take an eight millimeter key. It is necessary to unscrew the front, rear and side screws. We remove the protection. If the car is fuel-injected, then removing the additional shield will not be too difficult.
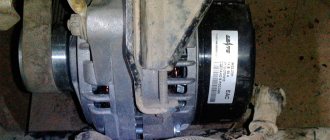
Next, you need to remove the generator, which would make it easier to get to the pulley.
We unscrew the generator nut, then move the generator, the belt will relax and it will be easy to remove it.
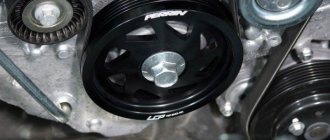
Using a special wrench, unscrew the nut that secures the crankshaft and carefully remove the pulley.
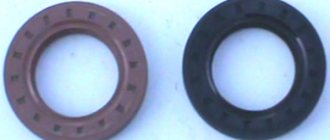
This is where the seal itself is visible. It may have cuts or tears. Carefully remove it with a screwdriver and wipe the area. Lubricate the new oil seal with oil and place it in place. Using a hammer, carefully press the part into the lid.
The work of installing the new oil seal is completed. Then you need to install the pulley and belt. Next, we install the protection back.
Replacing the rear oil seal
Now we are changing the rear crankshaft oil seal (cuff) on the VAZ 2107. This will require more time, patience and strength, since to access it you need to disconnect the gearbox. All preparatory work is carried out to the same extent, but the car is in neutral gear. Since you need to hang the rear wheels, you need to do this in a pit, and not on an overpass. The external size of this oil seal is 90 mm, and the internal size is 70.
First you need to disconnect the cardan from the gearbox:
- jack up and hang out the rear wheels;
- if the VAZ 2107 is an injector, remove the heat shield of the catalytic converter (13 mm socket wrench) by unscrewing the 4 nuts from the studs (see figure). If the VAZ 2107 is not an injector, but a carburetor, we skip this step.
- Now you can start removing the driveshaft. Important! Take a file and make a mark on the universal joint fork and on the gearbox (differential) flange. When everything is put back into place, it must be secured in exactly the same relative position to avoid vibration and imbalance. That's what the label is for.
- Unscrew (with a 13 mm open-end wrench) the cardan shaft from the gearbox flange, while using a pry bar to hold the cardan shaft from slipping. Now let's hang the rear part of the cardan on a wire to the rear suspension, wherever you like.
- We disconnect the front part of the cardan shaft: we unbend the tendrils of the oil seal race (4 pcs.), Slide it along the cardan. We unscrew the bolts securing the intermediate cardan support (2 pieces) from the bracket, and disconnect the shaft from the elastic coupling by moving the shaft back.
Congratulations! The driveshaft is disconnected. Now you need to remove the gearbox to gain access to the rear oil seal. Removing the gearbox and flexible cardan coupling:
- First, the central panel of the radio is removed in the cabin. You will need a 10 mm wrench, pliers and screwdrivers. Unscrew the two console nuts from the top. Then use a flat-head screwdriver to pry up the decorative trim at the bottom, remove it and unscrew the bottom screws. We disconnect the toggle switches for lighting and heated rear window, and push out the connectors, disconnecting them. First you need to remember the connection diagram. Finally, we lift the panel up and back a little, release the gearshift “stick” and remove it.
- Next, remove the decorative covers of the gearshift knob. Then lift the handle up, use a flat-head screwdriver to press the lock and remove the handle. We carefully remove the damper (rubber) from it, using tweezers. Using two screwdrivers, we open the petals on the locking ring and remove it and its two bushings: rubber and locking.
- Unscrew the screws securing the gearshift knob casing (using a Phillips screwdriver) and remove it with the foam seal.
- move the upholstery aside and unscrew the lid in the floor;
- open the hood, unscrew the starter mounting bolts and move it back. As a result, he will release the checkpoint bell.
- disconnect the elastic coupling of the cardan. Attention! To successfully install it in its original place after replacing the oil seal, you must first tighten it with a special clamp.
- Using an open-end wrench (19 mm), unscrew the nuts on the bolts securing the coupling and gearbox shaft crosspiece (3 pcs.). After this, remove the coupling along with the seal and ring.
- Now, using the same wrench, unscrew the nuts securing the front driveshaft flange and remove it. These and the previous 6 nuts are self-locking; new ones will be required when reassembling!
- From the gearbox you need to disconnect the wires going to the white reverse light and the drive to the speedometer shaft.
- Now, without removing the hose, we disconnect the hydraulic drive and the clutch cylinder from the gearbox housing. After this, remove the clutch housing cover itself. You need to unscrew 2 bolts with a 10 mm socket wrench.
- Important! Now you need to install a support under the gearbox so that it does not fall on your head and the bolts do not become distorted!
- take a 19 mm socket wrench with an extension. You need to remove 6 bolts that secure the gearbox housing to the engine block. Now, using a flat-head screwdriver, pry the gearbox housing from the edge, remove it from the studs, rock it and remove the gearbox from the car, pulling the engine input shaft out of the clutch disc. Important! The box must not be skewed.
The preparatory work is finished! You can start replacing the rear oil seal. For this: - remove the flywheel and clutch shield, to do this we use a 10 mm socket wrench. You need to unscrew 2 nuts on the shield;
- Before changing the oil seal, you need to remove its holder so as not to damage the crankshaft flange. The figure clearly shows 6 bolts securing it, and 2 bolts of the rear part of the oil pan, A and B. They also need to be unscrewed, since they are screwed into the oil seal holder body.
Attention! There is a gasket between the oil seal holder and the cylinder block body. And if you have traveled such a long way to the oil seal, do not be lazy and change it regardless of the condition.
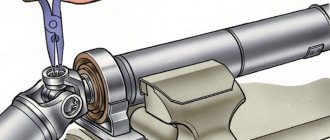
- We release the oil seal from the holder mandrel, to do this we fix it in a vice, and, through a special slot, use a flat-head screwdriver to remove it. The oil seal is inspected for damage and wear patterns.
- The seat is again wiped with clean gasoline, the new oil seal is lubricated with clean engine oil and pressed into the holder using a mandrel from the bearing or an old oil seal.
- Reassembly requires performing all steps in reverse order.
Congratulations! If you managed to independently get to the rear oil seal, change it and reassemble (in reverse order) the disconnected units, then you have passed the exam for an advanced amateur auto mechanic with flying colors.
Detailed instructions for replacing the crankshaft oil seal on a VAZ 2107
The oil seal or cuff of the crankshaft plays the role of a plug and the functionality of this unit largely depends on its condition. According to the instructions, replacing the crankshaft oil seal on a VAZ 2107 must be carried out every 150,000 kilometers.
If you decide to replace the front or rear oil seal yourself, then check the crankcase ventilation system in the engine. If it is clogged, be sure to clean it, otherwise all your efforts may be in vain.
How to Determine a Bearing Failure
The VAZ-2107 axle bearing wears out during operation, and sometimes the seat underneath it breaks. Malfunctions of this element can be determined by several signs:
- A humming noise appears from the rear axle. Sometimes it turns into crackling and squeaking. Moreover, the higher the speed, the louder these sounds. This should not be confused with a similar hum that can be heard when the rear axle gears wear out.
- The balls fall out and the separator is destroyed; the axle shaft jumps out of its seat when moving.
- Increased play of the rear wheels. Diagnostics is quite simple; you just need to place the car on a jack and rock the wheel several times. A knocking sound and free movement indicate that there is a malfunction.
- Sometimes the rear wheels jam, which can result in a serious accident.
The design of the VAZ-2107 axle bearing is simple and reliable; it can last for quite a long time. But if the car experiences very heavy loads, moves on bad roads, or the bearing is made of low-quality material, the service life is significantly reduced. The bearing cannot be repaired; it will only need to be replaced. In case of deformation and excessive wear, new mechanisms must be installed.
Determining a worn oil seal
If the axle shaft was removed for some other purpose, be sure to check the condition of the drive seal. To do this, in addition to the presence of oil leaks, we check:
- The elastic band should be soft and elastic to the touch;
- The cut sliding along the drive has a sharp edge;
- The notches on the rubber part (they will only be visible when the oil seal is removed) are not worn out.
- If the oil seal is “burnt”, that is, it worked with overheating, its sliding edge will be somewhat stiffer than the peripheral part of the rubber. It should only be replaced immediately, even if there is no leak yet.
Tools and materials
To work you will need:
- A set of keys;
- Large flat screwdrivers;
- Massive hammer;
- Jack;
- Wheel locks;
- Mandrel for pressing the drive oil seal.
In addition, of course, you need an axle shaft seal 2101 (or 2123). You may also need an axle bearing. But let’s not rush, if the axle shaft itself has significant runout (more than 0.7 mm) - it also needs to be changed, otherwise it will break both bearings, and the one in the bridge is much more difficult to change. Then it is better to have the axle shaft assembled. Removing the bearing from the axle shaft and then installing a new one is a more complex procedure than replacing the drive seal, but it is better to do the entire described complex once. Defects on the axle shaft can only be done after removal, more on that below.
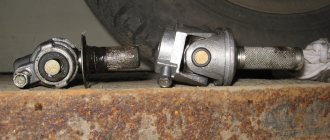
In what cases should the pulley be removed?
Most often, it is necessary to dismantle the crankshaft pulley when changing oil seals. The role of the O-rings is to prevent oil from the crankcase from reaching engine components. Over time, the seals wear out, crack, and as a result, oil leaks appear. To fix this, you need to change the seals. During this procedure, you have to remove the crankshaft pulley.
Also, the need to dismantle the crankshaft disk arises when replacing the timing belt on a VAZ 2107 injector. It is changed according to the regulations specified in the operating instructions for the VAZ 2107 injector, as it wears out after a visual inspection or if it breaks. During a technical inspection, the pulley must be inspected to identify any defects. If chips or scratches are found, the part should be replaced.
Damaged part with broken part
The procedure for removing the product itself is not difficult, but some problems arise.
Firstly, with access. The pulley we are interested in is located in the lower part of the engine compartment behind the generator. It is difficult to get to because other engine components are in the way. Before removing the pulley, you need to remove the alternator and power steering belt.
Secondly, the crankshaft pulley mounting nut is very difficult to unscrew. When it is put in place, it is screwed with great effort. This is necessary so that it does not unscrew accidentally while the car is moving, as this can lead to expensive repairs. While the engine is running, the nut is tightened even more. In addition, the process is aggravated by high operating temperatures, at which oil coking and metal corrosion occur under the influence of the external environment.
How to change valve seals for a VAZ car
Replacing valve seals yourself...
Hello, reader of the blog RtiIvaz.ru. Last time we looked at how to change valve seals in the auto maintenance section. Today we will continue this topic.
The engine of a VAZ car consumes motor oil! The engine eats up a large amount of it per 1000 kilometers! Thick blue smoke with a carbonic smell comes from the muffler! These are the first signs of wear on the valve seals, cylinders and piston group of the engine. Whether or not to carry out a major overhaul, I think it is necessary if the engine power has decreased and fuel consumption has increased.
This problem can be temporarily solved by replacement, since major repairs will still have to be done in the future. The work of changing the oils of a VAZ car can be done with your own hands, without resorting to the help of auto mechanics. For such an operation, a garage is required, since the work may take a long time and YOU will have to leave the car overnight until it is completely restored. You also need a repair tool, the most important of which is a valve mechanism puller.
You can buy it at your nearest auto store or auto parts market. Let's clarify why reflective oils are needed. Its job is to retain excess motor oil. The oil seal fits tightly to the valve and allows only a small amount to pass through, which is necessary to lubricate the rubbing parts. Engine oil reflective cuffs are made of special heat-resistant rubber that can withstand large temperature differences “heat + cold”.
Over time, the valve stem seals begin to harden, the rubber ages, loses its elasticity, begins to adhere to the valve stem with less force, and as a result allows more oil to pass through than it should. Consequently, the consumption of engine oil increases. Typically, on our VAZ cars, the period for replacing oil seals is about 100,000 km. jogging. For the latest generation engines, this gap is doubled.
Let's not go into detail about the procedure for replacing oil seals. The procedure for replacing them can be read in the technical manual for your VAZ car, which is explained in detail in the pictures. But there are some nuances that should be clarified. When “drying” there is a danger of dropping the crackers. For this work, a device is sold in an auto store or auto parts market; it is fixed at one end, and the other end presses on the plate, while compressing the valve spring. In this case, you need to pull out the “crackers” from the end of the valve.
Step-by-step instruction
Due to the limited space between the front of the engine and the radiator, it is difficult to press in a new oil seal without distortion. For this reason, experts recommend replacing the sealing element with the front engine cover removed. Of course, doing this on a mechanic’s workbench is much more convenient, but there are also pitfalls here. As practice shows, after such dismantling it is difficult to restore the tightness along the junction line of the oil pan, and in addition, there is a danger of breaking the internal threads in a rather delicate duralumin cover.
VESKO-TRANS.RU
AutoNews / Reviews / Tests
Replacing the Front Crankshaft Seal of a VAZ 2105
replacing the front crankshaft oil on a VAZ 2101-VAZ 2107
See when the bottom of the engine is splattered with motor oil? Usually, people who don't know much about cars first ask the question: "Why is this happening?"
A car engine can be oiled for various reasons, but basically the oil is exactly the same as the seals become deformed, which sometimes need to be replaced with new ones.
To replace the front crankshaft seal you will need: wrenches, as well as a special “36” wrench designed to loosen the nut securing the crankshaft pulley. You will need a couple of screwdrivers, it would be better to stock up on a fastening blade, a mandrel, a hammer and a beard!
Where is the front crankshaft seal located?
The stuffing box is located in a special hole provided for it in the drive shaft covers. To open the hood, at least visually understand where the oil seal is, look at the photo just below, where the crankshaft drive cover is circled in red and the crankshaft pulley is marked with a blue arrow, immediately followed by the oil seal. ,
When should I replace the front crankshaft seal?
As mentioned above, the oil seal must be replaced if deformation is found on its surface, causing engine oil to immediately flow out of the vehicle's engine through the oil seal.
We all know that when the engine is running, the crankshaft of the car is rotating, and therefore, when the engine is running, oil can come out of the engine through the deformed oil seal with a spray jet, so as a rule, as a rule, the entire front part of the engine will be oily.
Features of the replacement
When replacing a VAZ-2107 axle shaft, you must adhere to certain rules that will help speed up the work process:
When cutting off an old bearing using a grinder, the main thing is not to damage the surface of the axle shaft. Therefore, you only saw the outer part together with the separator. There is no need to cut the inner ring completely; make several small cuts on it. You can finally split it by installing a chisel and applying several sharp blows with a hammer. Install the new bearing onto the axle shaft with a hammer
Please note that you cannot hit the bearing race, in which case it may collapse or become deformed. It is for this purpose that a piece of tube is used, which is put on the axle shaft
It is not recommended to heat the bearing housing, as it may lose its properties. If the metal is annealed, its ductility will increase significantly and its hardness will decrease.
When carrying out work, try not to damage the axle shaft. Use a hammer as carefully as possible, because it is very easy to destroy metal parts. The work does not require high qualifications or special equipment, so it can be done in the garage with your own hands. The main thing is to comply with all the requirements described above.
Views: 2