08.11.2019
| (Votes: 3, Rating: 5) |
Issues discussed in the material:
- What is the function of crankshaft oil seals?
- Why do oil seals wear out?
- Is it possible to drive a car if the crankshaft seals are leaking?
- How to replace front and rear crankshaft oil seals
When grease leaks from under the crankshaft, it means the seal has worn out. You should not be careless about this problem. Replacing the crankshaft oil seal is the only thing that can help in this case. If repairs are not carried out and the leak is not eliminated, the timing belt will fail. Then you will have to spend a large sum on restoring the engine.
Why does the crankshaft oil seal leak?
The main reasons why the crankshaft oil seal constantly leaks:
- Wear due to long-term use. Since the oil seal fits tightly to the shaft, throughout its entire service life, due to vibrations from the crankshaft, the element is deformed and partially detached from the working surface. This malfunction is typical for rear- and front-wheel drive cars with a mileage of more than 100 thousand km.
- Destruction of a part associated with long-term parking of the car on the street in winter. The device dries out or hardens as a result of prolonged exposure to low temperatures; due to drying, the part is deformed and also cannot fit tightly to the shaft.
- Factory defect. The problem of oil leaks may be due to the poor quality of the material used to manufacture the spare part.
- Oil may press out from under the cap or gasket due to errors made during installation of the device. It is possible that the installation of the oil seal on the crankshaft was uneven (during installation, the part was driven into the seat using a hammer), which is why the element squeezes out oil.
- Problems related to engine operation. If several oil seals leak at once, this “symptom” may be caused by an increase in the pressure of crankcase gases in the engine (as a result, the part is squeezed out by force). In the place where the crankshaft is adjacent to the device, a play is formed through which the lubricant escapes.
- Leaking oil filter device. As a result of filter wear, lubricant can get onto the oil seal, causing it to fail.
Causes
First, it’s worth understanding the most basic causes of this problem. This will avoid complications in the future.
Most often, natural wear and tear
. The fact is that when the engine is running, vibrations constantly occur, which lead to gradual wear of the oil seal. It is worth noting here that this reason has a stronger effect on the front oil seal; more vibration load is transferred to it. The rear one is relatively protected from this by the flywheel and gearbox.
How to determine the location of the leak?
It is important to know
Any car can use two crankshaft oil seals - front and rear. The first one fails much more often, and the service life of the second one usually corresponds to the service life of the entire car.
Check Features:
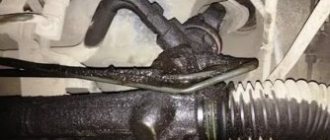
- If traces of engine fluid are found in the rear of the engine, then you need to check the integrity of the sump and transmission module. If the transmission unit and pan are intact, then the rear oil seal must be replaced.
- A lubricant leak may occur in the transmission unit. To check, you need to take the oil that is leaking and drop it into water. If the gearbox seal is worn out, the lubricant will immediately spread over the surface of the fluid. The oil from the engine should remain in the form of a drop after entering the water.
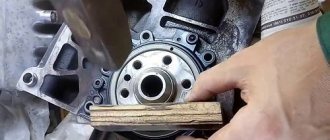
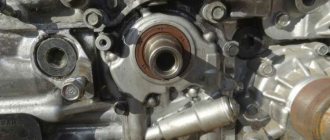
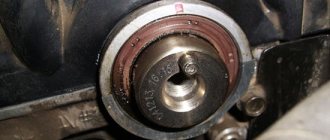
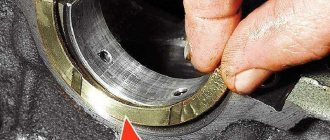
Photo gallery: crankshaft seal leak locations
In the photo - the front crankshaft oil seal is leaking
Rear oil seal leaking
Video: how to find out the cause of a crankshaft oil seal leak
The video, shot by the Alexander Mart channel, explains why the crankshaft oil seals leaked and how to determine the cause of the malfunction.
Consequences
Despite the seeming trifle, this malfunction can lead to a number of very unpleasant consequences. They can result in expensive repairs to your car's engine. That is why it is necessary to quickly respond to such a leak.
It is also worth understanding that in some cases it may be difficult to diagnose. Some car models have an oil pump located next to the front oil seal; its gasket is also prone to leaks. Therefore, always carefully inspect the car before you begin troubleshooting. This way you will be able to avoid additional complications with a high degree of guarantee.
What are the dangers of squeezing out oil?
The main consequence is engine oil starvation. Lack of lubrication will lead to harsher friction of internal components and their rapid wear. The lack of working fluid can completely damage the unit.
How much oil can leak?
The volume of oil released from under the crankshaft oil seal depends on how badly the part is worn (from a few drops to liters per 1 thousand kilometers). If you do not add fluid to the power unit, all the lubricant may come out.
Front oil seal
The main consequence of untimely replacement will be oil leakage and contamination of the power unit crankcase. This is due to the fact that the lubricant will attract wear products. This problem can cause the timing belt to break and damage the valves.
In this case you will need:
- change the torn timing belt;
- change the cylinder head gasket;
- replace the valves and grind them in;
- dismantle and grind the cylinder head of the internal combustion engine, since after replacing the gasket it will not be smooth and will not be able to come into contact with the engine.
It must be taken into account that regular use of a vehicle with damaged oil seals will cause damage to the pistons. Minor defects will not lead to serious problems, but the piston may be punctured by the valve, which will require major repairs.
When carrying out a capital inspection, the car enthusiast will have to replace:
- damaged or defective piston;
- failed crankshaft valve;
- all liners arranged in a circle;
- engine crankcase gasket;
- bolts securing the cylinder head (they must be tightened in accordance with the specific order and force specified in the service manual);
- pan gasket.
You will also need to add oil to the engine and antifreeze to the cooling system.
Rear oil seal
If the rear crankshaft oil seal wears out or fails, you will have to:
- remove the transmission unit;
- dismantle the clutch mechanism assembled with the drive;
- dismantle the flywheel mechanism (dismantling of these units is required in order to gain access to the oil seal).
Regular operation of a car with a damaged part will lead to the fact that engine oil can flood the clutch system, as a result, all the friction characteristics of the device will be impaired.
This will lead to the following problems:
- serious reduction in engine power;
- increased fuel consumption (when you press the gas pedal, the car will drive at the same speed, but gasoline consumption will be higher);
- the driver will have to regularly add lubricant to the engine.
Is it possible to drive with a leak?
Good to know
It is recommended to stop operating a car with a leaking crankshaft oil seal or at least limit it until the problem is completely eliminated.
Short-term use of the vehicle is possible by regularly checking the level and adding oil to the engine. The need to limit the operation of the car is due to the fact that the engine will gradually become clogged and will need to be flushed. In addition, oil can get on the contacts of electrical circuits and equipment, which can lead to malfunction.
What to do?
Having dealt with the causes and consequences of such a malfunction, you should ask yourself what to do about it. Everything is simple here, you will need to fix this problem. This can be done in one way - by replacing the part.
When purchasing, pay attention to the quality of the oil seal. It is better to purchase parts made by well-known brands. It would also be optimal to buy components at large auto stores. In this case, there will be significantly less risk of buying counterfeit goods. Also look at the quality of the part, it should not be damaged. Their presence indicates a defect; it is better not to install such a spare part on a car.
How to eliminate oil leaks from crankshaft seals?
It is important to know
The only option to stop a leaking front or rear oil seal is to replace it.
How to replace the front oil seal?
Replacing the front crankshaft oil seal with your own hands is done as follows:
- The cover is removed from the timing belt.
- The generator drive belt is being removed (to complete the task, you need to loosen the nuts on the pulleys). The belt is removed first from the generator pulley and then from the crankshaft.
- The crankshaft pulley is dismantled; to do this, the screw is unscrewed. To unscrew, you can insert a thick screwdriver into the special inspection hole on the flywheel into its teeth to lock the device. After this, the bolt can be unscrewed.
- After dismantling, the camshaft pulley is brought to the mark, and the tension roller of the timing belt is loosened. The belt is removed, and then the crankshaft gear. The latter is dismantled using a screwdriver or a thin pry bar. To perform the task, you can use a special puller, but if you don’t have one, you need to spray the crankshaft and gear with WD-40.
- After the gear is dismantled, it is necessary to remove the timing belt and the part itself. At this stage you should be careful not to lose the key.
- If the gear is installed tightly on a carburetor engine, then you need to tighten the strap and start the engine so that it can work without the crankshaft pulley. A few seconds after starting, you need to see if the gear comes off the crankshaft; to do this, the part needs to be pryed off. If the product is disconnected, then you need to mark the gear, remove the strap, and then the part itself along with the oil seal.
- This method cannot be implemented on injection engines, since the engine will not start without the crankshaft pulley (the spark moment is read from it by the controller). You can try to pry the gear in a circle by turning the crankshaft with a pry bar. If this does not help, the product can be treated with WD-40 liquid several times.
- After replacing the oil seal, you need to put the gear on the crankshaft with a key. At the final stage, the timing belt is installed. All components are assembled in reverse order. After installing the strap, you need to slightly tighten the tensioner roller.
Video: detailed instructions for replacing the front crankshaft oil seal
The Elsa Studio channel made a video showing the procedure for replacing the front crankshaft oil seal using the example of classic VAZ models.
How to replace the rear oil seal?
Replacing the rear crankshaft oil seal using the example of a VAZ 2106:
- The transmission unit is being dismantled. To do this, you need to drain the oil from the box by unscrewing the plug and first placing a container under the unit.
- Then the clutch is removed. To do this, a special mandrel for centering the driven shaft is installed so that the front part of the part is completely seated in the bearing. The latter is pressed into the end of the crankshaft.
- Instead of the left bolt securing the clutch housing to the engine cylinder block, a screw is screwed in. Next, you need to unscrew the six bolts securing the pressure plate to the flywheel. When performing this task, hold the flywheel with a screwdriver to prevent it from turning. At this stage you need to remove the pressure plate.
- Then the driven shaft is dismantled along with the mandrel, the latter is removed from the hub.
- The flywheel is being dismantled.
- The two screws securing the front crankcase cover are unscrewed and removed.
- Then you need to unscrew the two bolts that secure the oil pan to the oil seal retainer. Carefully prying it with a screwdriver, the latter is dismantled. At this stage you need to be careful and put aside the two bolts equipped with square heads. These elements are loosely located in the holder slots and may fall out.
- If the gasket remains on the holder or cylinder block, it must be separated.
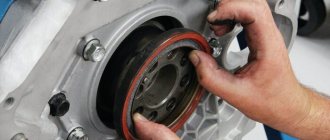
- The crankshaft oil seal is removed from the holder using a screwdriver. The new part is treated with motor fluid and installed in the holder from the outside. When performing the task, you need to orient the device with the working edge towards the centering protrusions. The working part of the product is characterized by the presence of a spring element.
- Using a hammer, lightly tap through the mandrel to press the crankshaft rear oil seal until it stops.
- After the user has replaced the oil seal, it is necessary to check the holder gasket. If this element is heavily compressed or worn out, it needs to be replaced. Before installation, the product is lubricated with silicone sealant, and for greater convenience it is recommended to fix it on the holder.
- The holder with gasket is being installed. To do this, you need to tighten all the screws that secure the device without tightening them all the way.
- A special mandrel is installed on the crankshaft. When performing this task, it is necessary to center the holder in relation to the shaft.
- Lightly tighten the screws securing the holder to the cylinder module. Then they are twisted to the end according to the criss-cross principle.
- The bolts securing the holder to the crankcase pan are tightened. All other components and parts are assembled in the reverse order.
Video: DIY rear oil seal replacement
The “Sunday Garage” channel made a video that shows in detail the process of replacing the rear crankshaft oil seal using the example of a Renault Logan car.
What to do if it leaks after replacing the oil seal?
If the user has changed the oil seal, but the leak problem still remains, then the malfunction is due either to improper installation or to the use of a defective part. To fix the problem, you need to dismantle and reinstall the spare part. If this does not help, you need to remove the old oil seal and install a new one.
How to flush the engine?
The engine flushing procedure looks like this:
- First you need to drain the used oil. To complete the task, place a container under the drain hole and unscrew the plug with a wrench. It is advisable to drain the old lubricant on a warm engine, since in this form it will be more liquid. However, you need to act carefully so as not to get burned.
- The drain plug is screwed in and flushing oil is poured into the engine through the filler hole.
- Then the power unit starts. Depending on the flushing, a test drive may be required or the engine may need to be idled. You can clarify this point by reading the instructions for the oil.
- The draining procedure is repeated. If there are traces of deposits and carbon in the drained oil, you need to repeat the flushing procedure.
- The oil filter is being replaced. To do this, you can use a special key if the device is stuck. If a tool is missing, you can pierce the filter through with a screwdriver or use it as a lever to unscrew it.
- Fresh oil is poured into the engine.
What additives should I use?
It is allowed to use any protective antifriction additives that increase the service life of the power unit. The main thing is that the product contains additives and elements that extend the service life of rubber elements. The use of additives that destroy the rubber structure is not allowed.
Popular compositions and features of their use
Today on the Russian market, two additives for stopping oil leaks are most popular. Let's look at these compositions.
- Hi-Gear HG Quite a powerful composition, which in some cases can stop even old leaks. Available in compact bottles of 355 ml. Recommended for use with fresh oil. The entire volume is filled through the oil filler neck on a warm engine. Stops leaking in 1–2 days during intensive use of the car. If the car is not driven much, the sealing process may take up to one week.
- Liqui Moly Oil-Verlust-Stop and Pro-Line Oil-Verlust-Stop. The difference between the “regular” composition and the Pro version is only in volume. The bottle contains Oil-Verlust-Stop 300 ml, Pro-Line - 1 liter. The additive is poured into a warm engine at the rate of 100 grams of the composition per 1.5 liters of oil. A 300 ml cylinder is used all at once, regardless of the volume of oil in the internal combustion engine. Leakage through the seals stops after 600-800 km.
Both remedies help with commendable effectiveness. But before choosing a repair path using a stop-leak additive for an engine, you need to understand some subtleties. Otherwise, the car owner may be disappointed.
First, any stop oil leak must be used immediately after the leak is discovered. The longer a car is operated with leaking oil seals, the less likely it is that the additive will work successfully.
Secondly, heavily worn oil seals that have cracks or critical wear on the working sponge will not be restored when using the additive. The same applies to damage on the seating surface of the shafts. In these cases, repairs will be required. The additive will most likely slightly reduce the intensity of leaks, but will not eliminate the problem completely.
Thirdly, if the engine has problems in the form of heavy sludge deposits, it is recommended to pre-flush the internal combustion engine. Stop leaks have a slight negative effect: the active components settle to a small extent in areas potentially prone to sludge accumulation. Sometimes, if the engine is very dirty, the oil channels of the hydraulic compensators become clogged. These products will not cause harm to engines that do not have contamination problems.
Video “Visual guide to replacing a device”
How to change the oil seal correctly - the replacement process is described using the example of a VAZ 2114 car and filmed by the Abdulla-69 Warface channel.
A leaking oil seal is always a nuisance; it makes the engine dirty and all the dust collects on the engine. Oil corrodes rubber; a leaking front oil seal will quickly render the timing belt unusable. When the rear crankshaft oil seal leaks, oil gets onto the clutch disc and it loses its friction properties. Most likely, all the oil from the engine will not leak out through a damaged oil seal, but it will cause some problems.
Reviews from car owners
Car owners leave mixed reviews about sealing additives. On some engines, the leak actually stops completely and for a long time. In other internal combustion engines, leaks remain. And sometimes their intensity does not even decrease.
This is usually caused by a violation of the conditions for using the additive. Motorists perceive a simple composition for softening rubber seals as a miracle cure. And they pour it into engines with physically destroyed seals, waiting for them to be restored. Which, of course, is impossible.
Some car owners, in addition to eliminating oil leaks to the outside, note a brightening of the exhaust. The car starts to smoke less. This is due to the fact that in addition to restoring the elasticity of the crankshaft and camshaft oil seals, the valve stem seals also soften. And if the car begins to smoke less, then this indicates a previously existing leak through the valve seals.
To summarize, we can say this: stop-flow compounds are truly effective when used in a targeted and timely manner.
Source