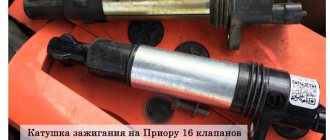
On a Lada Granta car, 1 of 2 ignition systems can be installed, so one of them uses 4 individual ignition coils for each spark plug (for engine 21126 - Lada Priora). More detailed information about this system and operations for removing ignition coils from spark plug wells can be found in the article “Removing and installing ignition coils on a VAZ 2170 2171 2172 Lada Priora.” The second option is when all 4 coils are installed in one housing. This design is used for 8 valve engines of Lada Granta cars; further details about this option
To remove and check the ignition coil of 8 valve engines VAZ-11183, VAZ-11186 and VAZ-21116 installed on a Lada Granta car, do the following.
Replacing individual ignition coils
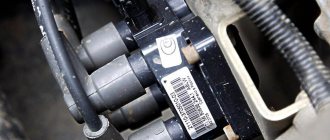
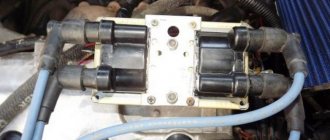
The engine has four individual ignition coils (one for each cylinder). The ignition coils are mounted directly on the spark plugs, and there are no high-voltage wires.
Required
: disconnect the negative wire from the battery and prepare a key depending on the engine:
- for VAZ 21126, VAZ 21127, VAZ-21129 and VAZ-21179: TorX E8;
- on K4M: key “8”;
- on other VAZ engines (including Renault H4M): key “10”.
- Remove the plastic engine cover (pull up against the resistance of the clips).
- Remove the block with wires from the ignition coil (press the lock).
- Remove the ignition coil mounting bolt.
- Remove the ignition coil by pulling it up.
- Apply a special dielectric high-temperature grease to the inner surface of the coil tips with a roller with a diameter of 2 mm (for example, General Motors 12345579, Renault 8200168855, Beru 0890300029, DoneDeal Silicon Dielectric Grease, etc.).
- Install the coil onto the engine in reverse order.
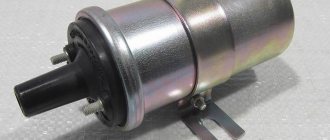
Visual inspection of the IKZ
When visually inspecting an element, you will need to carefully examine the surface of its body; this is necessary to identify chips, cracks and burnt areas on it. In order to remove the IKZ from the engine, use a 10mm socket wrench or Torx E8 (this depends on the engine model).
After removal, carefully inspect each coil, paying special attention to the absence of melted areas and leakage of plastic, as well as the condition of the rubber cap and the correct location of the spring located in the inside of the coil. If any defects are found during a visual inspection, the part will need to be replaced. If they are absent, you can start checking the IKZ with a multimeter.
Replacing spark plugs
Required
: wait until the engine has cooled down, and also the high spark plug head depending on the engine:
- H4M: "at 14";
- K4M, K7M, VAZ-21129, VAZ-21179, etc. 16cl VAZ engines: “for 16”;
- VAZ 8 class engines: “21”.
- Depending on the engine: disconnect the high-voltage wire (pull) or remove the individual ignition coil (see above)
- Clean all dirt from the spark plug well (clean with a narrow, hard brush, then blow with compressed air) to prevent dirt from getting into the engine cylinder.
- Unscrew the spark plug and remove it from the spark plug well.
- Screw the spark plug in by hand (without a driver).
- Tighten the spark plug to 20-39 Nm. (Over-tightening the spark plugs may damage the threads).
Source
Checking the ICP with a spark gap
- Disconnect the IKZ from the spark plug.
- Install a spark gap on the IKZ.
- Apply ground (from the battery terminal) to the spark gap using a wire.
- Turn the crankshaft with the starter.
- If there is a spark, then the IKZ is working.
Let us remind you that you can find a problem in engine operation by independently measuring the pressure in the fuel rail, or by checking the compression in the cylinders.
Share on social networks:
Found an error? Select it and press Ctrl+Enter..
Source
AVTOVAZ instructions for replacing spark plugs and coils on a VAZ engine
According to the regulations, replacement of spark plugs on VAZ engines of front-wheel drive LADA cars is provided every 30 thousand km. mileage How to replace spark plugs and individual ignition coils (IIC) with your own hands is described in the factory’s technological instructions.
1. Unscrew bolts 4, Figure 5, and disconnect ignition coils 5 from spark plugs 6 (replaceable Torx E8 head, wrench).
2. Remove the spark plugs (spark plug key 16).
1. Install spark plugs 6, Figure 5, and tighten with a torque of 20…30 N∙m (2.0…3.0 kgf∙m) (replaceable high head 16, extension, wrench, torque wrench).
2. Before installing the ignition coils, apply lubricant type NIINP-233 TU 38.101687 1 mm thick to the inner surface of the rubber seal of the spark plug. The consumption rate is 1 g per engine.
Test your device yourself
How to fix a weak mechanism with your own hands if there is no current or voltage flowing to it, or another malfunction has occurred with the coil? First of all, you need to make a diagnosis yourself.
There are several checking options:
- The easiest option for diagnosing it yourself is to try disconnecting the connectors from the mechanism one by one at the moment when the engine starts to shake. By disconnecting the connectors from the functioning mechanism, you will be able to hear how dips in speed appear, and some cylinders begin to operate unstably. If, when you disconnect it from a non-working engine with your own hands, the operation of the internal combustion engine does not change, then this weak element needs to be repaired.
- If it is possible to dismantle a weak device, you can try to measure the resistance level on the windings. Measurements are taken directly between the contacts, as well as between the contacts and the spark plug connector. The resistance level on the primary winding should be about 6-8 kOhm, sometimes this figure can increase to 15 thousand Ohms, this is an exception. As for the resistance of the secondary winding, this indicator varies around 0.4-2 Ohms. As practice shows, for faulty mechanisms such indicators will vary greatly.
- Sometimes you can identify the malfunction of a weak coil by self-diagnosis of the car. In some cases, the error code may indicate a specific cylinder that is not working.
Sequence of actions to independently replace the ignition module on a Lada Grant
- We install wheel chocks on the rear row of wheels for safety purposes.
- Using a key set to “12”, unscrew the terminals from the battery. It is enough to turn off the negative power, but experts recommend both.
- In the center of the engine compartment we find the contact chip for the ignition module. It is held on by a special latch. We unclip it and take it out.
We detach the contact chip
- Disconnect the four high-voltage wires from the coil module. We hold it by the rubber base and remove it from its seat.
- By analogy, disconnect the remaining three wires.
Disconnecting the wires
- Unscrew the four screws with a Phillips-head screwdriver and remove the ignition module of the Lada Granta 8-valve. It is placed on a metal bracket.
Removing the ignition module
- We remove the module.
Afterwards we carry out troubleshooting, diagnostics, and inspect the seat. We install the new module and assemble the mechanism in the reverse order.
Replacing the ignition module on the Lada Grant is completed.
Note to the driver! During the assembly process, be extremely careful and follow the order in which the high-voltage wires are connected to the module. Inconsistency in “polarity” leads to unstable operation.
Checking the secondary windings of the module:
- So, we take the ignition module of the Lada Kalina and turn it so that the conclusions of the high-voltage wires are facing us. Now we connect the device wires to the outputs of the 1st and 4th cylinders. And then we check the 2nd and 3rd cylinders in the same way.
All these testing procedures are best carried out with the module removed; this is much more convenient than doing everything directly under the hood of the car. Removing this part is quite simple, you only need a 5 hexagon and a couple of minutes of time.
Ignition system malfunctions, solutions
| Symptoms of a problem | Remedies |
| Intermittent engine idling | Unit dismantling, diagnostics, replacement with a new one |
| When driving “downhill” the engine does not have enough power and “asks” for a downshift | Checking the cleanliness of the fuel filter, ignition diagnostics |
| Difficulty gaining speed | Checking the serviceability of the fuel system and ignition system |
| Detonation (friction) of the power unit | Replacing coils, cleaning fuel equipment |
| Jerks when accelerating | Checking the serviceability of the fuel system, spark supply |
Signs of malfunction of the IKZ on Grant
Signs of ICP failure include:
- Engine instability. This symptom is characterized by the appearance of specific vibrations that arise due to the idle operation of one of the cylinders - the combustible mixture simply does not ignite in it.
- Difficulties when accelerating the car. With one or more cylinders inoperative, the car is unable to accelerate smoothly; it will jerk and pick up speed very slowly.
- A breakdown of the IKZ can be indicated by indicator lamps on the dashboard. However, their signals often indicate other engine malfunctions. In any case, such a machine must be thoroughly diagnosed.
- Increased fuel consumption. This is due to the fact that the load carried by the idle cylinder is taken up by the remaining ones. Resuming the previous level of power will require more energy, which will entail an increase in fuel consumption, which will range from 10 to 50% of the norm.
- It is difficult to start the engine. If the IKZ breaks down, the car owner will have problems starting the engine, regardless of whether it is warmed up or not. Particular difficulties are observed during the onset of wet weather.
Sequence of actions for self-diagnosis of ignition on a Lada Grant
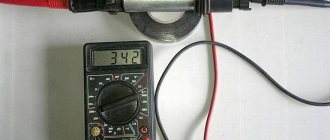
- To check the module, connect the terminals (crocodiles) of the multimeter to the central terminal of the wire block. We activate the ignition, the tester shows the voltage, which should be close to 13 - 14 V.
Check
Note to the Driver! If there is no voltage on the central harness, then look for the cause of the malfunction in the electrical wiring connecting the coils and the contact group of the lock.
- To diagnose the health of the control circuit, we use a probe with a 2 W lamp. We connect the tester terminals to the outputs of the block. If there is no damage to the circuit, the lamp will flash.
Tester with a lamp
By analogy, we take measurements on the remaining three pads.
- To check the proper operation of the coil, first disconnect the block with the high-voltage wire harness. We connect the terminals to the extreme outputs and measure the voltage.
To check the secondary winding, we connect the tester to the coil according to the scheme: 1 – 4 / 2 – 3 cylinders.
In good condition, the coil will show a resistance of 4.0 Ohms. Gravity towards infinity is the first sign of circuit damage.
We check the spark plugs according to the following scheme: unscrew them from their standard place, put on the cradles, start the engine. In good condition, a spark jumps between the electrodes.
We replace faulty parts with new ones.
Operational Aspects
Frequent cases when owners call for service are when the coil fails or does not function correctly. You can also diagnose the ignition module yourself. To do this you will need to acquire the appropriate equipment. One such diagnostic tool is a multimeter. It is used to measure the actual resistance value at the coil terminals in the 8-valve versions of the Lada Kalina, as well as in the 16-valve version. In order for the results of measuring actions to have maximum correctness, the procedure should be followed at least twice.
Damage to the ignition system can occur in any part of the circuit. This circumstance requires maximum care and attention during diagnostic procedures. The check begins with making sure that the winding is connected correctly to ground. Now let's diagnose the central terminal of the coil. We apply the positive contact of the device to it, and connect the negative contact with the vehicle ground. We look at the screen. If there is a symbol of infinity resistance, then this indicates the absence of a short circuit on this section of the circuit. From this information, the owner must conclude that the ignition module is working.
Now we connect the device with the terminals of the module located at the edges. A specific parameter on the screen indicates the presence of a malfunction inside the LADA Kalina ignition switch. If a defect is not found here either, then the next step will be to diagnose the secondary winding of the coil. We place the ignition module in front of us so that both contacts are facing us. We connect the diagnostic device with the terminals for the 4th and 1st cylinders. Having made sure that there is no malfunction (short circuit), we proceed to checking the circuit for the 2nd and 3rd cylinders. There should also be no short circuit here.
List of online stores selling reels (Moscow, St. Petersburg, Kyiv regions)
| № | Name | Address |
| 1. | "AUTOKLAD" | https://www.autoklad.ua/ |
| 2. | "AUTOKLONDAYK" | https://autoklondayk.com.ua/ |
| 3. | "PITBIKECLUB" | https://pitbikeclub.ru/ |
| 4. | "ASTARTER" | https://www.astarter.ru/ |
| 5. | "AUTOPRIWOS" | https://www.autoprivos.ru/ |
| 6. | "DENSO" | https://www.denso-am.ru/ |
Relays and fuses Lada Granta
Fuse and relay box in the passenger compartment
| № | A | Protected Circuits |
| F1 | 15 | Ignition coils Injectors Engine control system controller |
| F2 | 25 | Norma, Lux: Central body electronics unit Driver door module |
| F2 | 5 | Standard: Daytime running lights |
| F2 | 30 | Window lifters |
| F3 | 15 | Norma, Lux: Automatic gearbox control controller Automatic gearbox control drive |
| F3 | 10 | Standard: Hazard Alarm |
| F4 | 15 | Airbag system controller |
| F5 | 7.5 | Terminal 15 devices |
| F6 | 7.5 | Reversing light VAZ-2190 Turn indicators (Standard) Automatic gearbox control controller (Norma, Luxury) Safe parking system control unit (Norma, Luxury) |
| F7 | 7.5 | Canister purge valve Mass air flow sensor/pressure sensor Phase sensor Oxygen concentration sensors |
| F8 | 25 | Rear window heater Heated exterior mirrors (Normal, Lux) |
| F9 | 5 | Side lights on the starboard side |
| F10 | 5 | Side lights on the left side Illumination of instruments and keys License plate lights Luggage compartment light Glove box light |
| F11 | 5 | Rear fog lights |
| F12 | 7.5 10 | Low beam, right headlight Electrical corrector for right headlight |
| F13 | 7.5 10 | Low beam, left headlight Electrical corrector of the left headlight |
| F14 | 10 | High beam, right headlight |
| F15 | 10 | High beam, left headlight |
| F16 | 10 | Right fog lamp |
| F17 | 10 | Left fog lamp |
| F18 | 20 | Front seat heaters Cigarette lighter |
| F18 | 10 15 | Cigarette lighter |
| F18 | 15 | Front seat heaters |
| F19 | 5 | Norma, Lux: Anti-lock brake control unit |
| F19 | 20 | Standard: Door locking motors |
| F19 | 15 | ABS Lada Granta |
| F20 | 15 | Sound signal |
| F20 | 15 | Horn Trunk lock Gearbox Cigarette lighter Diagnostic connector |
| F21 | 15 | Fuel pump |
| F22 | 25 | Windshield washer Central body electronics unit Rear window washer Rear window wiper |
| F22 | 15 | central locking |
| F23 | 5 | Instrument cluster Diagnostic connector |
| F23 | 10 | Daytime Running Lights |
| F24 | 7.5 | Norma, Lux: Air conditioning compressor clutch Automatic climate control system controller |
| F25 | 7.5 | Brake lights Interior lighting (Standard) |
| F26 | 10 | Norma, Lux: Central body electronics unit |
| F26 | 25 | ABS/ESC |
| F27 F31 | 25 | Anti-lock brake control unit |
| F28 F32 | 30 | Electric heater fan Automatic climate control system controller Electric power steering 3) |
| Relay | ||
| K1 | Radiator cooling fan relay | |
| K2 | Window lifter (standard version) Minimum cooling relay for cooling module (luxury version) | |
| K3 | Starter relay | |
| K4 | Ignition switch unloading relay | |
| K5 | Turn signal and hazard warning relay | |
| K6 | Windshield wiper relay (standard version) Seat heating relay (luxury version) | |
| K7 | High beam relay | |
| K8 | Horn relay | |
| K9 | Low beam relay | |
| K10 | Heated rear window relay | |
| K11 | ECM relay VAZ-2190 | |
| K12 | Fuel pump relay | |
| K13 | Additional alarm relay | |
| K14 | Additional alarm relay | |
| K15 | — | |
| K16 | — | |
| K17 | — | |
Review of manufacturers, article numbers of coils for 8 (16) valve Lada Granta
| Catalog article / OEM | Price, rub.) | Pump mileage (thousand km) |
| Coil BREMI 20466 | From 1300 | 85 – 95 |
| MEAT & DORIA 10573 | —/— | —/— |
| NGK 48336 | —/— | —/— |
| U5116 6545432 | —/— | —/— |
| NGK 48312 | —/— | —/— |
| U2065 5646534 | —/— | —/— |
| (module) SOATE 2111-3705-03 | From 950 | 55 – 65 |
| MZATE-2, article number 3705010-01 | —/— | —/— |
| FENOX IC16004O7 | —/— | —/— |
| SOATE 3705-03 | —/— | —/— |
| MZATE-2, 4601.3705 | —/— | —/— |
| RENAULT/LADA 3705010-03 | From 1100 | 65 — 75 |
*prices are current as of November 7, 2018.
Another online store selling spare parts for the ignition system:
Detailed diagrams of nodes and blocks
1 — right headlight; 2 — electric motor for washers; 3 — left headlight; 4 — VAZ-2190 starter; 5 — rechargeable battery; 6 — main fuse block; 7 - generator; 8 — sound signal; 9, 10, 11 — front wiring harness blocks to the instrument panel wiring harness blocks; 12 — reverse lamp switch; 13 — electric fan of the engine cooling system.
1 – oil pressure warning lamp sensor; 2 – generator; 3 – throttle pipe with electric drive; 4 – coolant temperature sensor; 5 – ignition system wiring harness block to the instrument panel wiring harness block; 6 – solenoid valve for purge of the adsorber; 7 – speed sensor VAZ-2190; 8 – mass air flow sensor; 9 – crankshaft position sensor; 10 – oxygen concentration sensor; 11 – controller; 12 – diagnostic oxygen concentration sensor; 13 – ignition coils; 14 – spark plugs; 15 – Lada Granta injectors; 16 – blocks of the wiring harness of the ignition system and the wiring harness of the injectors; 17 – knock sensor.
Electrical diagram of the Lada Granta lighting control module
1, 2 – rear wiring harness blocks to the instrument panel wiring harness blocks; 3 – right side direction indicator; 4 – left side direction indicator; 5 – hand brake sensor; 6 – rear window heating element; 7 – interior lamp; 8 – switch in the driver’s seat belt; 9 – trunk lighting; 10 – electric fuel pump module; 11 – right lamp; 12 – trunk locking motor; 13 – interior lamp switch; 14 – additional brake signal; 15 — left lamp; 16 – rear wiring harness block to rear left door wiring harness block; 17 – rear wiring harness block to rear right door wiring harness block; 18 – rear wiring harness block to the front right door wiring harness block; 19 – rear wiring harness block to the front left door wiring harness block; 20 – airbag control unit; 21 – rear wiring harness block to the wiring harness block for license plate lights.
Front right door wiring harness connection diagram
1 – block of the wiring harness of the front right door to the block of the rear wiring harness; 2 – electric window lift motor; 3 – right front lock Lada Granta; 4 – power window switch; 5 – blocks of the wiring harness of the front right door to the front right loudspeaker.
Front left door wiring harness wiring diagram
1 – block of the wiring harness of the front left door to the block of the rear wiring harness; 2 – electric window lift motor; 3 – front left lock; 4 – switch block; 5 – blocks of the wiring harness of the front left door to the front left loudspeaker.
Wiring diagram for license plate lights wiring harness
1 – wiring harness block for license plate lights to the rear wiring harness block; 2 – license plate light for VAZ-2190; 3 – license plate light.
Reviews
| № | Positive |
| 1. | Victor: I’ve been driving Grant for the second year, no complaints, the ignition works properly. Even in winter the car starts with a half turn. |
| 2. | Vasily: I strictly adhere to the manufacturer’s recommendations, carry out scheduled technical inspections, and buy original consumables. |
| 3. | Gennady: at 50,000 km the spark plug of the second cylinder failed. I don’t consider this a defect, since the deadline for domestic parts is quite acceptable. |
| 4. | Ignat: I’m pleased with the build quality of the Lada Granta; for a budget car it’s very good. Minor flaws are always present, but they can be eliminated. |
| 5. | Vitaly: during the next maintenance, the mechanic pointed out the need to replace the spark plugs. Relatives traveled 65,000 km. The store advised me to buy BREMI 20466. I've been driving it for two months, no complaints. |
| 6. | Igor: in two years of driving the Lada Granta, I replaced several spark plugs once, and there were no more breakdowns. I believe that careful treatment of the car and original parts are the main factors that ensure long service life. |
| 7. | Vasily: I’m happy with my car, it hasn’t let me down once in two years, I haven’t made any investments other than scheduled maintenance. |
| Negative | |
| 1. | Victor: the first time the ignition module flew for 45,000 km, it was replaced under warranty. Second time at 75,000 km. I bought BREMI 20466 in the store. The cost is 300 rubles more, but the quality is good. |
| 2. | Gennady: I do not recommend purchasing a domestic Lada Granta. The car is crude, there are many flaws and defects. I am considering the option of Renault Logan. |
| 3. | Dmitry: I’m dissatisfied with the car, there are a lot of comments, shortcomings, there is a defect. |
General diagram of electrical equipment 2190
1 — block headlight; 2 — windshield wiper gear motor; 3 - generator; 4 - battery; 5 - starter; 6 — sound signal; 7 — fuse box in the engine compartment; 8 — power window switch for the right front door; 9 — motor-reducer for window lifter of the right front door; 10 — right front door connector; 11 — connecting blocks of wires for connecting the right front speaker of the audio system; 12 — electric drive for locking the lock of the right front door; 13 — electric windshield washer pump; 14 — connecting block of the wiring harness for connection to the computer; 15 — electric fan of the engine cooling system; 16 — sensor of insufficient brake fluid level; 17 — left front door connector; 18 — central locking switch; 19 — interior lamp switch; 20 — connecting blocks of wires for connecting the left front speaker of the VAZ-2190 audio system; 21 — right front door power window switch (installed on the driver’s door); 22 — power window switch for the left front door; 23 — window lift motor of the right front door: 24 — airbag control unit; 25 — electrical equipment control unit; 26 — instrument panel; 27 — mounting block; 28 — right side turn signal; 29 — brake signal switch; 30 — seat belt unfastened sensor: 31 — ignition switch (lock); 32 — lighting control unit; 33 — steering column switches; 34 — left side direction indicator; 35 — connecting blocks of wires for connecting the left rear speaker of the audio system; 36 — electric drive for locking the left rear door; 37 — electric heater fan; 38 — additional heater resistor: 39 — heater switch: 40 — airbag module; 41 — hazard warning switch: 42 — trunk lock switch; 43 — rear window heating switch: 44 — connecting blocks of wires for connecting the right rear speaker of the audio system; 45 — electric drive for locking the right rear door; 46 — reverse light switch; 47 — parking brake warning lamp switch; 48 — cigarette lighter; 49 — connecting blocks of wires for connecting the head unit of the audio system: 50 — backlight lamps on the trim of the center console of the instrument panel: 51 — control unit for electric power steering; 52 — interior lamp; 53 — rear light; 54 — trunk lid lock; 55 — license plate lights; 56 — additional brake light; 57 — rear window heating element; 58 — luggage compartment lamp