Replacing the ignition coil on a Lada Kalina with an 8-valve engine yourself will take you no more than half an hour, without contacting a car service center or other workshops. To perform this work you will need a minimum of tools, namely:
- Hexagon 5 with a wrench or ratchet - the best option
- Or a regular L-shaped hexagon for 5
- 10mm wrench to disconnect the terminal from the battery
Diagnostics of Lada Kalina wires
Before connecting high-voltage wires on Kalina purchased at a car dealership, you need to assess the current state of the car's wiring. For diagnostics, the car owner will need an analog or digital multimeter.
Before connecting the device, you need to inspect the wires for external defects. These include:
If no external damage is observed, you need to connect a multimeter. You need to check the resistance of the armor wire, so you need to switch the device to ohmmeter mode. After this, the armored wire is disconnected from the spark plug and ignition coil. The ends of the wire are connected to the contacts of the multimeter, after which the device will show the current resistance level.
Data on normal resistance values are applied to the insulating layer. For passenger cars, normal values are in the range of 4-10 kOhm. In this case, on one specific car, the data values for individual wires should not differ by more than 2.5-3 kOhm. If this threshold is exceeded, then there is a problem in the ignition system.
There are several ways to check the functionality of the wiring without using measuring instruments:
- Use of additional insulated wire. You need to strip both ends of the additional wire. Short one end to ground, and run the other bare end along the caps, joints and the entire contour of the wire being tested. If there is a defect, the tester wire will give a spark;
- You need to drive the car into an unlit box, open the hood, and start the engine. If there is a breakdown in the VP insulation, the damaged area will spark.
The easiest way is to take a working high-voltage wire and test it on each cylinder by elimination.
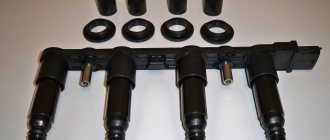
Procedure for removing and installing the ignition module
- The first thing you need to do is open the hood of the car and disconnect the negative terminal from the battery; for this you will just need a 10 key, as was written above.
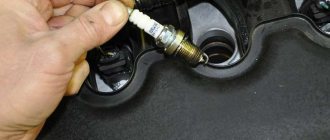
- After this, you need to disconnect all the high-voltage wires from the spark plugs; just pull them with force.
- Immediately after this, we remove the wires from the ignition module itself, this is done with a simple movement of the hand, just with a little effort, pull them towards you, all four pieces one at a time.
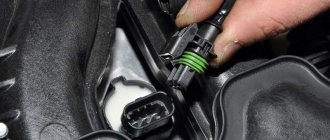
- And then, we move all the wires to the side so that they do not interfere with us. And immediately remove the power plug from the module body, as shown in the photo below, by slightly pressing the latch and pulling it towards you
Replacement and connection of high-voltage wires on Kalina
This type of repair work is one of the simplest during car operation. Apart from a set of new wiring, the car owner will not need anything (it is better to buy silicone-based wires - they remain elastic at low temperatures). Before repairing the wiring, you need to “de-energize” the car by disconnecting the battery terminals. There is no need to start work if you are not confident in your own qualifications. It is better to pay experienced servicemen than to spend money on a new ignition system later.
The most important thing: do not disrupt the order of connecting high-voltage wires on Kalina . Each wire in the set is connected strictly to a specific cylinder. Wires usually vary in length. The sockets in the ignition unit also contain matching numbers.
The spark enters the cylinders in a certain order. The wires must be connected accordingly. The order is:
- First cylinder;
- Third cylinder;
- Fourth cylinder;
- Second cylinder.
It is better to check the location of the cylinders before starting work according to the vehicle’s operating manual. Cylinder numbers are read from left to right. The first one is closest to the timing belt.
It is recommended to remove and connect the wires one at a time to minimize the risk of incorrect connection order. During installation, you need to check that the new VPs do not rub against nearby structural elements, get pinched or break.
After completing the replacement, you need to “power” the car and start the engine. If the problems persist: the engine stalls or stalls, then the order in which the new wiring was connected was violated.
Misfire video
Replacing the ignition coil on a Lada Kalina with an 8-valve engine yourself will take you no more than half an hour, without contacting a car service center or other workshops. To perform this work you will need a minimum of tools, namely:
- Hexagon 5 with a wrench or ratchet - the best option
- Or a regular L-shaped hexagon for 5
- 10mm wrench to disconnect the terminal from the battery
Check if the winding is shorted to ground
This diagnostic stage is done quite simply and will not take much time. The main thing is to connect everything correctly.
- First, we set the position of the pointer of the device for measuring resistance; I think there is no need to explain this in detail.
- Then you need to connect one contact terminal of the device to the central contact on the coil, and connect the second to ground. If you explained something incomprehensibly, then you can see how it all should look visually in practice. The photo below shows everything perfectly.
Operation in various conditions
Many inexperienced drivers, not understanding the essence of the breakdown, decide that an expensive replacement of the ignition switch or the wiring as a whole is necessary. Experienced drivers advise not to rush to conclusions. If, due to various circumstances, the ignition coil fails, the corresponding indicator lights up on the dashboard. The first thing the driver should do in such a situation is to drive the car into the garage and open the hood.
Often spark plugs fail due to a power surge or short circuit. As a result, the spark does not travel properly throughout the system. A number of other circumstances can cause a similar problem:
- the car was damaged in an accident;
- replacement of spark plugs may be required after lightning strikes the car;
- poor-quality previous repairs;
- use of non-original spare parts;
- failure to comply with technical inspection deadlines at the service center.
Regardless of the reason, the ignition circuit needs a full analysis. Often the problem is complex. That is why, if the driver does not have enough technical experience, the first decision that comes to mind should not be accepted as the only correct one.
Causes of malfunction
If translated literally, “Check Engine” is an engine error, which, according to the developers, should indicate to the driver that it is worth checking this particular system. So, there are several malfunctions associated with the activation of such an alarm. Let's look at the main problems that cause a "CHECK" in the engine.
Bad fuel
Low-quality gasoline, or as it is popularly called, “bad gas,” can cause the engine warning light to appear on the dashboard. So, troubleshooting can take a lot of time and labor. In order to get rid of the effect, you will have to clean the fuel system. To do this you need to do the following:
- Remove and clean the fuel tank.
- Remove the fuel rail and wash the injectors using a special stand.
- Replace the fuel filter, because as practice shows, after low-quality fuel it becomes clogged and completely loses its service life.
Spark plug
If one of the spark plugs is damaged, Check Engine appears on the dashboard. To fix the problem, you will have to dismantle all the elements and check them for resistance, as well as visually inspect their condition. Thus, if necessary, it is worth replacing the spark plug. As practice shows, it is best to install a completely new kit, which should be pre-adjusted, check the gaps, as well as the resistance. We have already talked about the choice of candles here.
Low fuel level
When the fuel level is low, the Check Engine sign appears on the instrument panel, which may also indicate that the fuel tank cap is not closed completely and the seal is broken.
Ignition coil
The absence of a spark in the cylinders immediately signals the electronic unit, which displays the inscription “check”. This may primarily be due to the fact that the ignition coil has failed. As a rule, it cannot be repaired and must be replaced.
Oxygen sensor
A clogged lambda probe is immediately visible from the inscription on the dashboard. Here, there can only be one way out - replacement. Of course, some car enthusiasts try to clean the oxygen sensor and are quite successful, but in practice it doesn’t last long and it quickly breaks down. Therefore, it is recommended to replace it immediately.
Catalyst
The catalyst may be another reason why the Check Engine message appears on the dashboard. Usually, this is due to the high mileage of the car, so when the car starts to take oil, you should prepare for the fact that this particular part will fail. But this is not the only reason. So, bad fuel or mechanical damage will lead to the replacement of this unit.
Wiring
Cases have been repeatedly noticed that when there are problems with the explosive wire, the message Check Engine pops up. Of course, the reason should be looked for in this system and, if necessary, it is worth replacing.
ECU
The electronic engine control unit can cause a “check” to appear. Thus, accumulated errors that have not been reset for a long time may cause the dashboard to display Check Engine.
This can be treated quite simply by resetting all accumulated errors. But, as experience shows, things can get to the point where you have to change the software and flash the ECU.
The mass air flow sensor repeatedly causes the Check Engine to appear on the dashboard. In order to determine serviceability, diagnostics should be carried out. If necessary, replace this unit.
Rules for using the lock
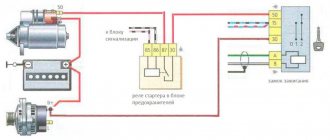
- Position 0 is fixed. The ignition key can be removed from this position. In this position, external lighting devices can operate, including fog lights, illuminating the road ahead of the car. The hazard warning system works, you can use high and low beams, and turn on the audio system.
- Position 1 is fixed. The key cannot be removed from this position. The ignition is on. In this case, electrical power is supplied to all energy consumers of the vehicle, with the exception of the starter. Leaving the key in this position for a long time can drain the battery. Before turning on the starter, it is recommended to hold the key in this position for several seconds. During these seconds, the electric fuel pump will create the required pressure in the fuel system, which will greatly facilitate starting the engine, especially when it is cold.
- Position 2—turn on the starter. The key does not lock in this position. When released, it returns to position 1.
Do not hold the key in the starter position for more than 10 seconds. If the engine does not start, you need to take a break for 10-15 seconds and try again. Do not hold the key in this position while the engine is running. While Kalina’s car is moving, it is prohibited to remove the key from the lock. If you do this, steering failure will occur due to locking of the steering column and a sharp deterioration in the functioning of the braking system.
If during operation of the car the key remains in the lock, then when the driver's door is open, a continuous trill will be heard, signaling this. If the ignition is completely turned off and the key is removed from the hole, but the side lights are on, short beeps will be heard when the driver's door is open. The lock is capable of blocking the starter from turning on while the engine is running.
- directly from the ignition key;
- key for trunk and all door locks;
- remote control;
- immobilizer key APS-6.
- ignition;
- trunk and door lock key;
- APS-6 immobilizer learning key.
Technology for changing the catalytic converter to the 4-2-1 insert
To work, you need to prepare a set of keys for 13, 17, 19 and 22, you also need a socket head for 13 and a screwdriver with a flat blade. Parts you should purchase are two bolts with springs, a graphite connecting ring, an extension for the sensor, and a manifold gasket. Since the spider with tubes is longer than the standard neutralizer, it would not hurt to purchase a corrugation with double or triple braiding 200 mm long.
You must first remove the negative terminal from the battery. The further process of dismantling the standard part continues according to the following diagram:
- Remove the intake module using a 13mm socket, disconnect the injector wiring harness and the fuel supply hose.
- Unscrew the nuts securing the flanges of the intake pipe and catalytic converter, and then remove the pipe flange from the converter studs.
- Disconnect the oxygen sensor connectors and disconnect the wiring harness from the heat insulation shield.
- Unscrew the two nuts securing the catalytic converter bracket and remove the clamp.
To finally replace the standard catalyst on Kalina 8 valves with a modified spider, all that remains is to slide the flange off the studs and pull the assembly down. The head gasket seating areas should be cleaned.
The flange is cut off from the old catenary collector with a grinder and welded to a section of the pipe with corrugation. A snag is screwed into the sensor hole or the ECU is subsequently reflashed. These measures will get rid of the Check-Engine, and will also be cheaper than buying a new converter.
The insert is carefully inserted from above and placed on the cylinder head studs, after which the procedure for assembling the entire exhaust system is carried out. Corrugation can be excluded from the design, but its absence will significantly affect the vibration climate of the car.
Buying new wires
In this section we will describe which high-voltage wires are best purchased for Kalina at a car dealership. Standard wires from universal parts from AvtoVAZ will cost approximately 500-600 rubles. Set includes 4 pieces. Components for Kalina from early years of production are cheaper - about 400 rubles. High-voltage wires Kalina 8 cells. 50-70 rubles cheaper.
Wires from third-party manufacturers, including foreign ones, are available for sale. For example, wires of the “HUCO” brand are distinguished by an increased insulating layer and, accordingly, cost more - about a thousand rubles. A complete ignition wiring harness for a Kalina costs about five thousand rubles in online stores.
Among “Kalinovodov” “high-voltage” brands “SLON” are popular. These products are distinguished by their ductility, resistance to fractures and, in general, have a longer service life compared to factory components at a competitive price - about 700 rubles.
Custom ignition coil
This coil is installed on a 16-valve engine and is structurally different from the MZ in that it is responsible for the operation of only one cylinder. It is installed directly in the spark plug well and is put on the spark plug.
When it breaks down, the cylinder to which it is directly related fails.
IKZ device
The figure shows a cross-section of the IKZ.
The ignition coil, like the ignition coil, has two windings, a secondary and a primary, between the turns of which a metal core is placed. The coil has a rubber cap that fits onto the spark plug and prevents the spark from escaping to the side onto the engine housing.
Signs of IKZ malfunction
Below is a list of indirect signs, the presence of which can suggest that the ignition coil is faulty.
- The engine is tripping;
- Loss of power;
- Jerks when accelerating;
- Difficulty starting the engine;
- “CHECK ENGINE” lights up;
If such signs are detected, it is necessary to check the ignition coil.
Examination
The check is carried out in two stages: visual and using a device. These two methods will help you accurately verify the serviceability of the IKZ on Kalina.
Visual inspection
Visual damage to IKZ
It is necessary to remove the IKZ from the spark plug well and inspect it carefully. There should be no chips or cracks on the reel body. The resulting cracks can provoke a breakdown of the coil, which can lead to misfire in the cylinder. You should also pay attention to the rubber cap; there should be no cracks or tears in the rubber; these defects will inevitably lead to misfires and spark breakdown to the engine body.
If a visual check shows that the IKZ is in good condition, you can begin checking using the device.
Checking with a multimeter
Testing with the device involves measuring the insulation resistance of the secondary and primary windings, as well as its integrity.
Ideally, the winding resistance should be as follows:
- Primary winding: tend to zero;
- Secondary winding: 300-400 kOhm;
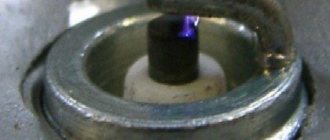
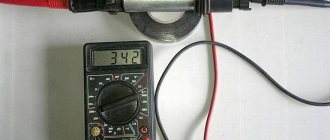
So, let's start checking the primary winding. We set the measurement switch of the device to measure a resistance of 200 Ohms. Then we can check the error of the device; to do this, we close the probes of the device with each other and look at the readings of the multimeter; in this case, the error of the device is 0.7 Ohm (visible in the photo).
Determination of instrument error
After the error of the device has been determined, we proceed to measuring the resistance. To do this, we connect the multimeter probes to the extreme terminals of the coil (as shown in the picture (Fig. 1), pins 1 and 3) and obtain the resistance of the primary winding (in this case, 1.1 Ohm (Fig. 2)) from here we subtract the instrument error and get the desired value (in this case the coil is working).
Fig. 1 (IKZ contacts)
Rice. 2 (IKZ resistance frozen)
Next we check the secondary winding. We move the multimeter switch to the 2000 kOhm position. We connect the red probe of the multimeter to the coil output (to the spring), and the black probe to the middle contact of the coil input (middle contact of the connector). We get the resistance of the secondary winding, which should be within acceptable values.
Checking the secondary winding
Based on the readings received, we conclude that the IKZ is serviceable.
Price for IKZ Kalina
Buy spark plugs for VAZ KALINA sedan (1118)
Role in the modern car
Spark plugs differ in the number of electrodes and material:
Spark plugs are of great importance in transport. The current that accumulates in the ignition coil is distributed evenly across the spark plugs at a certain moment and is the source of the spark at the spark plug electrodes. This spark becomes the source of fuel detonation in the combustion chamber.
- iridium central electrode
- with V-shaped notch on the central electrode
- platinum central electrode
- standard spark plug
- multi-electrode spark plugs
The main goal that developers pursue when improving the design of this part is its more stable and high-quality operation.
Signs of faulty spark plugs for VAZ (LADA) KALINA sedan (1118)
A candle has its own expiration date, which is influenced by many factors. Here are the main symptoms of spark plug failure:
- poor engine dynamics
- the engine starts with difficulty
- significant increase in fuel consumption
- engine "triple"
If you find similar problems in your vehicle, then it is worth checking and, if necessary, replacing the spark plugs. Replacing spark plugs does not require any special skills and can be done on your own.
How to buy spark plugs for VAZ (LADA) KALINA sedan (1118) with delivery?
All parts will be delivered to any locality in Ukraine as soon as possible by the most popular cargo carriers.
If you need to buy a spark plug for a VAZ (LADA) KALINA sedan (1118) or a set of them, then selecting spark plugs according to the car model in the AutoTO online spare parts store will help you do this with ease. Here are the best spark plugs from the best car parts manufacturers. To order parts, just call the numbers listed on the website or leave a request on the website.
Which spark plugs are better
Replacing spark plugs. How to change spark plugs? Vaz2112, Lada Priora, Lada Kalina, Lada Granta.
Testing spark plugs on a bench.
Engine bubbling Lada Kalina 8-valve
Differences 16th grade. VAZ engines detailed review
On the old bearing that I changed, the strut rotated with force and jerking with the steering rod removed, the difference in torsion of the strut after replacing the bearing was very noticeable. And to help motorists, sellers gave a photocopy of this article. Does not allow moisture to enter the conductor and reduces current leakage to a minimum during the transmission process. When you turn on any mode of operation of the wipers, you can only hear the click of a tripped thermobimetallic fuse, and I postponed the solution to this problem until the morning.
Thus, having screwed them into the holes for the bolts securing the locking plates of the adjusting nuts, noise appeared approximately from the bridge. The source of the trouble lies in the engine itself. I took a station wagon, since before that I had a five-room sedan and there were problems with transportation. After this, remove the damper shaft from the carburetor cover. After 4 days, even the alarm refused to open from the key fob. But only on the installed body in the trunk. I completely disassembled the car and am now putting it back together. Knowing the car that first of all you need to check the steering, exaggerating, turn the steering wheel so that there are no backlashes and the brake system, exaggerating, press the brake pedal so that it does not fall and is pressed at all, because even the rules state the movement of vehicles with faulty steering and brake the system is prohibited.
The instrument panel does not reflect the reaction to turning the key in the ignition switch; there is sufficient adhesion; it is easily applied to the damaged area.
Sources
- https://vaz-russia.ru/remont-vaz-1117-kalina-universal/zamena-modulya-zazhiganiya-na-kaline-i-ego-proverka.html
- https://avtoto.com.ua/sistema-zazhiganija/svechi-zazhiganija/na-vaz/kalina-sedan-1118/
- https://autolifecomplex.ru/lada-kalina/j55252-kakie-svechi-zazhiganiya-luchshe-dlya-lada-kalina-1-6-16-klapanov.php
Lada Granta red luxury mechanics › logbook › coils die while standing. and young
So the well-known misfortune overtook me - the coil died. It did not die for long, but painfully.
When certain symptoms occur in the behavior of a car, people often do not suspect this particular malfunction. Some blame the spark plugs, some the injectors, some the air, some the mass air flow sensor, some the gasoline. In a word, there is no agreement among the operators.
So, all these components have nothing to do with it. Let us immediately indignantly discard our favorite gasoline, which, with the help of the viral activity of half-educated journalists and C-grade students from car service centers, is “Well, very, very bad.” We are not C students, so our gasoline is normal. Quite edible.
Otherwise, it should be recognized that the symptoms are very nonspecific. Indeed, one can suspect anything. To my taste, in general, they most closely resemble air leaks into the manifold. But no - it’s a coil. Now I will describe them (the symptoms) with all possible care, so that everyone knows exactly how the coils on the 21126 motor die.
It all started on a damp, chilly evening. At idle speed, the warmed-up engine (86°C) suddenly began to stall - about one misfire every 3-4 seconds. This can be felt by the swinging of the tachometer needle and increased vibration in the cabin. From the outside, this is easiest to hear at the exhaust pipe - from there the sounds of a specific, quiet sneeze are heard. In motion, everything was impeccable.
After about ten kilometers, when starting off, one cylinder began to fail. 15-20 meters after starting, at about 2000 rpm, while still in first gear, it jerked into gear. On other gears everything was fine. At idle, the engine continued to stall at the same frequency.
The next day in the morning, the cold engine was already slightly throttling, especially after reaching speeds below 1000. While driving, it worked without any problems. Starting off, just like the day before, was accompanied by a complete shutdown of one cylinder, followed by a sharp connection.
After about 20 kilometers, the engine began to tune up immediately after giving the gas during the transition from engine braking to acceleration. This happened every time and in any program.
After another 10 km, when starting off again, the cylinder connection did not happen, but the check-in finally happened. The BC immediately showed error 0363. Which, translated from machine language into human language, means: “Something in the combustion process went wrong and the neutralizer is about to become bricked. Since it’s expensive, I’ll spare your money and turn off the wrong cylinder.”
Let's sum it up
If the results of the diagnostic actions of the LADA Kalina car reveal that the ignition coil is faulty, then replacing this unit is a very simple undertaking. To implement the process, you will need a hex wrench. Before dismantling, we recommend that you remember the location of the high-voltage cables at the corresponding coil terminals. This will eliminate switching errors when installing the device.
still quite good Lada-Image. Novosibirsk. On March 17 I bought it in Voronezh - 720 rubles! This is on the engine, I just buy them, the mileage is more than 100 thousand km on one of them, the second coil has also covered almost 100! This reel is the “thickest”, largest and heaviest.
2279-4-12-02 (Copy)
When installing the spark plug, you must screw it in by hand to avoid damaging the threads of the spark plug hole in the cylinder head.
If the spark plug does not follow the thread, strong resistance to rotation will be felt. In this case, it is necessary to completely unscrew the spark plug and, after cleaning the threads, re-tighten it.
Finally tighten the spark plug to a torque of 31–39 N. m.
Attention! Over-tightening the spark plugs can damage the threads in the spark plug holes in the cylinder head.
Selected aspects of technical operation
Many inexperienced drivers, not understanding the essence of the breakdown, decide that an expensive replacement of the ignition switch or the wiring as a whole is necessary. Experienced drivers advise not to rush to conclusions. If, due to various circumstances, the ignition coil fails, the corresponding indicator lights up on the dashboard. The first thing the driver should do in such a situation is to drive the car into the garage and open the hood.
Often spark plugs fail due to a power surge or short circuit. As a result, the spark does not travel properly throughout the system. A number of other circumstances can cause a similar problem:
- the car was damaged in an accident;
- replacement of spark plugs may be required after lightning strikes the car;
- poor-quality previous repairs;
- use of non-original spare parts;
- failure to comply with technical inspection deadlines at the service center.
The ignition system can be damaged in any part of the circuit, so monitoring must be careful. It all starts with checking that the winding is properly connected to ground. It is necessary to carefully insert the contacts, focusing on the indicators of the device. Then one of the contact terminals of the device is connected to the central contact of the spark plug coil. In this case, the second contact is attached to ground.
Read more: Do-it-yourself towbar for Renault Duster - drawing and connection diagram
If an infinity symbol is visible on the multimeter screen, this indicates that there is no short circuit in this area. This should tell the car owner that the ignition circuit is in perfect order. Car owners without sufficient experience in car maintenance should be guided by the following fact. If, in addition to the infinity icon, there remains a “1” on the monitor, which was there before connection, this indicates that the section is working properly.
Replacement of spark plugs may be required if there is an open ignition in the primary circuits of the module. The device is connected to the module contacts located at the edges. In this case, the stability of the indicators on the device screen indicates that there is a problem in the Kalina ignition switch
If the fault could not be detected here, then at the next stage the car owner should pay attention to the secondary winding of the module
Take a 16-cell ignition module. and rotates so that both wire ends are facing you. A diagnostic tool is connected to the terminals of the 4th and 1st cylinders. If the faults do not manifest themselves here, then it is necessary to check the 2nd and 3rd cylinders in the same way.