01/24/2022 4,913 timing belt
Author: Victor
When operating the machine, the alternator drive belt wears out quickly. It is necessary to constantly monitor its condition, since the functioning of the entire car depends on the proper operation of this mechanism. The procedure for replacing the alternator belt on Kalina is not a labor-intensive operation and can be done with your own hands.
[Hide]
Photo 789
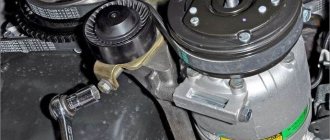
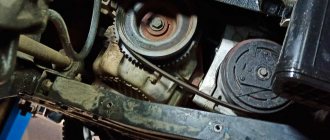
Diagram of the drive of auxiliary units: 1 - drive pulley of the auxiliary units;
2 — tensioner roller; 3 — tension device; 4 — generator pulley; 5 — air conditioning compressor clutch pulley; 6 — auxiliary drive belt; 7 — bracket for the right support of the power unit. Diagram of the drive of auxiliary units: 1 — drive pulley of the auxiliary units; 2 — tensioner roller; 3 — tension device; 4 — generator pulley; 5 — air conditioning compressor clutch pulley; 6 — auxiliary drive belt; 7 — bracket for the right support of the power unit
Let's sum it up
This completes the dismantling procedure. Now you know how to tension the alternator belt. The steps for reinstallation are also very simple, so there is no particular need to comment on them. Upon completion of the entire list of installation procedures, we check the tension level for compliance with the specified requirements. We start the engine and observe the operation of the unit. If no side factors are detected, then the work was done correctly.
Also in LADA Kalina it is possible to remake the tensioning device, which is confirmed by this video:
Snapshot53252323
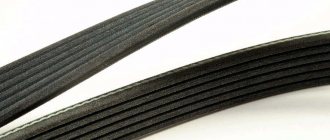
Marking of the drive belt for auxiliary units 6РК 995 (six-V-ribbed, length - 995 mm).
Marking of the drive belt for auxiliary units 6РК 995 (six-V-ribbed, length - 995 mm).
In order to improve visual control, remove the plastic engine casing. To check the condition of the belt, engage fifth gear in a manual transmission, push the car (or rotate the suspended wheel) and inspect the belt along its entire length. On a car with an automatic transmission, remove the right mudguard of the engine compartment and, by rotating the crankshaft by the bolt of the auxiliary drive pulley, check the condition of the belt.
With any of the gearboxes, the following method is also possible: apply chalk marks to sections of the belt and, turning on the starter for short periods of time, turn the crankshaft at small angles. We inspect the belt along its entire length, checking the areas covered by the marks.
The belt should not have cracks, tears or separation of rubber from the fabric base. A defective belt must be replaced. To do this, from the engine compartment side...
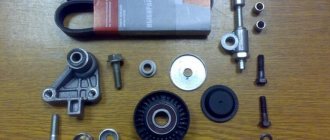
Belt selection and price
If the generator design has a tensioner, then the belt length is 883 mm. In the vast majority of cases, Kalina has 8 valves. If the generator is like on Grant, the length is 823mm.
When choosing a manufacturer, you should take into account that the official supplier of these belts for AvtoVAZ is GATES, so preference should be given to its products. Belts are also produced by BTR (lots of bad reviews), Continental, Finwhale, and ANDYCAR. It is better to buy Dayco 825 (manufacturer GATES), elastic belts are marked Poly-V, if not, then the belt is rigid. The price of belts is approximately from 500 to 1000 rubles.
Prices for alternator belts vary on average from 300 to 400 rubles, depending on the manufacturer, which is not affordable.
We recommend: How to remove the window regulator on a Priora
2302-6-01-03_cr
Holding the nut, rotate the lead screw clockwise, loosening the belt tension.
Holding the nut, rotate the lead screw clockwise, loosening the belt tension.
So far, we have shown operations that will allow, if necessary, to change the tension of the accessory drive belt. But to replace the belt, we have to dismantle the right support of the power unit, since it passes through the belt.
From the bottom of the car, remove the middle and right mudguards of the engine compartment. You can see how to do this in the article “Replacing Lada Granta coolant”. Next, we should remove the fender liner of the right front wheel or, having freed all the fastenings of the fender liner in the front and middle parts, bend the fender liner by the brake disc of the wheel.
We hang and remove the right front wheel and release the fender liner fastenings according to the diagram.
Symptoms of a problem
Damage to the tensioner is usually easy to diagnose. It is often noticeable visually. Running the car for a short time without an alternator belt helps to identify the problem. This often allows the damage to be localized. You should think about replacing the Kalina generator belt tensioner in the following cases:
- Presence of traces of rust and corrosion on the roller axis.
- A characteristic whistle when the engine is running.
- Short service life of the alternator belt.
- Curvature of the roller relative to the belt.
Take off777777777ok
Mounting points for the mudguard and fender liner: 1 — screw with a Torx T-27 key for general fastening of the mudguard and fender liner to the wheel arch;
2 — two Torx T-20 screws for general fastening of the mudguard and fender liner to the wheel arch and fender; 3 - Torx T-20 key screw for fastening the fender liner to the wing; 4 — four self-tapping screws “8” for fastening the fender liner to the wheel arch; 5 - four Torx T-20 screws for fastening the fender liner to the front bumper. Mounting points for the mudguard and fender liner: 1 — screw with a Torx T-27 key for general fastening of the mudguard and fender liner to the wheel arch; 2 — two Torx T-20 screws for general fastening of the mudguard and fender liner to the wheel arch and fender; 3 - Torx T-20 key screw for fastening the fender liner to the wing; 4 — four self-tapping screws “8” for fastening the fender liner to the wheel arch; 5 - four Torx T-20 screws for fastening the fender liner to the front bumper.
We install a height-adjustable stop under the engine oil pan so that it takes on the weight of the engine.
What is it needed for?
As mentioned above, any vehicle is equipped with such an important device as a generator. If it fails, the operation of the vehicle will be impossible. Therefore, special attention should be paid to the performance of all elements of the device, be it a Lada Kalina with a 16- or 8-cl. engine, with or without air conditioning. What is the component size? How is the roller strap adjusted and replaced? How to tighten up? You can find out the answers to these questions in the article.
Car Lada Kalina tuning
Before answering questions that interest Lad Kalin owners, you should understand why this component is needed. Not every motorist knows what role he plays in the functioning of the car.
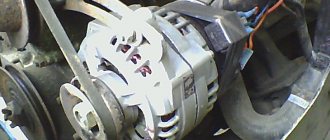
In modern cars, this belt is the only element that allows you to transmit crankshaft rotation to the generator. When the crankshaft transmits rotation to the device pulley, energy appears in the vehicle's electrical network, thanks to which all electrical equipment operates.
With him
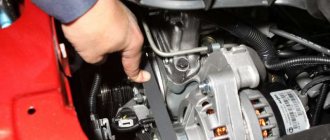
Using the E-14 head, unscrew the two screws securing the support to the engine cylinder block bracket.
Using a 17mm socket, unscrew the two nuts and the bolt securing the support to the body side member (shown by arrows). Using the E-14 head, unscrew the two screws securing the support to the engine cylinder block bracket. Using a 17mm socket, unscrew the two nuts and the bolt securing the support to the body side member (shown by arrows).
When is it time to change?
On Lada Kalina cars, the manufacturer does not regulate the replacement of this part. However, its failure is a common problem. In particular, we are talking about Lada Kalina cars. This applies to both 16-cl and 8-cl engines.
This is what a deformed element of a Kalina generator with an 8-cyl internal combustion engine looks like
Therefore, let’s look at the signs that indicate that the belt may fail in the near future:
- Whistle when moving. As a rule, this whistle appears when the electrical appliances of the vehicle begin to load. For example, if you start the car, and when you press the gas, a loud whistle is heard from the engine compartment, this indicates that the belt is loose. In this case, it must be tightened using a tensioner or replaced.
- Cracks on the strap. If you open the hood, look at the belt and see cracks on it, then you know that it’s time to change the element. Neither tensioning nor adjusting the rollers will help here. The component can be tightened, but this will not be enough for a long time. The only option left is replacement.
- Deformation. As in the previous case, neither tightening the tensioner nor adjusting the rollers will give much effect. You just need to change the element.
- Noise when the engine is running. If the element has already served its service life, this can be understood by the noise that appears when the motor is running. For example, some Lad Kalin car owners report loud knocking and even impacts when the engine is running.
The assembly is disassembled: this is what the strap looks like on the shafts
If the vehicle is equipped with a generator sensor that determines its performance, then it will be easier to identify the malfunction. For example, if you heard a whistle from under the hood, and at this time the indicator on the sensor came on, then you need to pay attention to the strap. This indicates that the belt needs to be tightened, since it may be in a weak state or that its service life has been exhausted.
One way or another, if the slipping and whistling of the strap cannot be eliminated by adjusting the belt or rollers, it needs to be changed.
2302-3-2-13-05 (Copy)
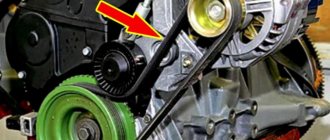
The belt deflection in the area between the pulleys of the engine and the air conditioning compressor with an applied force of 100 N (10 kgf) should be within 6–7 mm.
The belt deflection in the area between the pulleys of the engine and the air conditioning compressor with an applied force of 100 N (10 kgf) should be within 6–7 mm.
Attention! Do not overtighten the belt. Excessive belt tension causes premature wear of the alternator belt and bearings.
Next, assembly is carried out in reverse order.
However, please note that...
Advantages of a tensioner
Why weren't designers happy with the previous adjustment methods? Why did they add an extra video? It's not just about convenience. The tensioner significantly increases the service life of the generator. Without a roller, the entire load falls on its bearings. If the belt is tensioned normally, then there is nothing to worry about. In this case, the generator will last many thousands of kilometers. However, very often car owners overtighten the belt, and this is bad.
The load on the bearings increases many times over, so they quickly fail. In itself, this is not so scary and expensive, although repairing a generator is quite labor-intensive. But the car owner does not always recognize the breakdown in time. The bearings gradually “break”, the rotor moves and begins to cling to the stator winding. The result is the need to purchase a new generator. Of course, the Kalina generator belt tensioner pulley can also fail, which happens quite regularly, but that’s only 400 rubles, not twelve thousand.
Sn323
The upper screw securing the support to the bracket is shorter than the lower one - do not mix it up during assembly.
The upper screw securing the support to the bracket is shorter than the lower one - do not mix it up during assembly.
[14 Lada Granta maintenance operations that will help you save]
[How to save money on scheduled maintenance of Lada Granta] [Maintenance of Lada Granta at 2.5 thousand km] [Maintenance of Lada Granta at 15,000 and 105,000 km] [Maintenance of Lada Granta at 30,000 and 60,000 km ] [Maintenance of Lada Granta at 45 thousand km] [Maintenance of Lada Granta at 75 thousand km] [Maintenance of Lada Granta at 90 thousand km] [Carrying out maintenance yourself - general recommendations] [Safety rules for doing it yourself carrying out maintenance] [Tools required for maintenance of Lada Granta] [Lamps used in the Lada Granta car]
Lada Granta and Kalina: checking and replacing the auxiliary drive belt
Video “Replacing the belt on Lada Kalina”
The author Kalinin talks about the procedure for replacing the belt on his Kalina with a tensioner.
Do you have any questions? Specialists and readers of the AUTODVIG website will help you ask a question
Was this article helpful?
Thank you for your opinion!
The article was useful. Please share the information with your friends.
Yes (85.71%)
No (14.29%)
X
Please write what is wrong and leave recommendations on the article
Cancel reply
Rate this article: ( 7 votes, average: 4.86 out of 5)
Discuss the article:
conclusions
Replacing the belt and generator roller on an 8-valve Lada Kalina is very easy and simple. A wide range of product choices will not suit every consumer's taste. Moreover, even analogues of original parts are of fairly high quality. Diagnosing faults is easy and can be done by any motorist.
I didn't think it was that simple. Before, I didn’t even really look under the hood, but now I’ve changed the belt itself to a new one. Useful material.
Some kind of bullshit. A belt with a length of 1018 is for Kalina with an air conditioner, but for cars without an air conditioner the belt is shorter, I don’t remember the exact numbers. Everything in the article is mixed up. The torn timing belt was especially annoying, even though it was an alternator belt. Even on Kalina with an air conditioner, in order to change the belt, just the 1018th, you will have to remove the engine mount.
Source