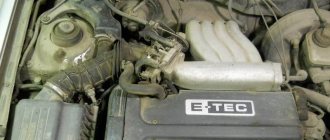
Chevrolet Niva
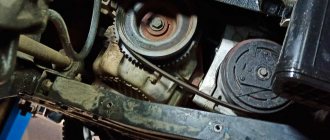
To check the belt tension, press your finger on the belt in the middle between the generator and coolant pump pulleys.
To check the belt tension, press your finger on the belt in the middle between the generator and coolant pump pulleys.
With a pressing force of about 8.0 kgf, the belt deflection should be 12 ± 1 mm.
To adjust the belt tension, remove the rubber hoses for supplying air to the throttle assembly.
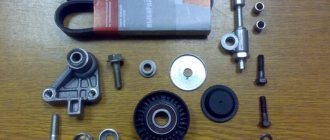
Checking installed parts
After this, a final check of all mechanisms is carried out and the elements are collected in the reverse order.
If the belt is tight and the force is not enough to loosen or tighten it, there are several ways:
- You can put the car in 4th gear, put the belt on the roller and push in the direction of rotation of the crankshaft. When it starts to turn, you need to pull the belt onto the generator pulley, and it will fall into place on its own.
- In the same way, you can not push the car, but lift the wheel and spin it, or spin the generator itself.
This makes it easy and quick to replace the Chevrolet Niva generator belt rollers. You should regularly diagnose the moving parts of the car in order to prevent possible breakdowns in time and replace faulty parts.
We recommend replacing the bearings and belt every 40 thousand kilometers.
Chevrolet Niva
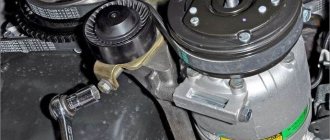
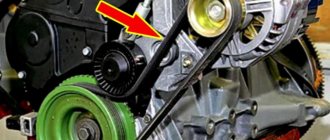
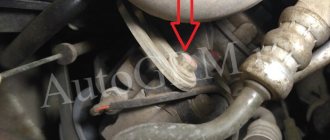
Location of the accessory drive belt and tension roller bracket mounting nuts (for clarity, shown with the engine cooling system radiator removed).
Location of the accessory drive belt and tension roller bracket mounting nuts (for clarity, shown with the engine cooling system radiator removed).
Replacing rollers lada 2123 (vase 2123)
The alternator belt on a Chevrolet Niva performs a connecting function between the engine and the generator, helping the latter produce the necessary energy. However, there is a special roller between the crankshaft pulley and the generator pulley, which helps the belt to be in the required tension and not slip out of its place of fixation.
Over time, this connecting element may need to be replaced. This procedure is quite simple and you can do it yourself, without any help.
Why does the roller fail?
Before inspecting the roller for damage, you need to know why it breaks:
- A foreign body has entered - traces and marks on the roller body will indicate this.
- The belt adjustment is not performed correctly - this applies to both too weak and too strong belt tension.
- Entry of a foreign body. This is indicated by impact marks on the body and marks on the flat side of the belt.
- Incorrect belt tension - it is overtightened or weak. This negatively affects both the tension roller and the insufficient outgoing voltage from the generator.
- The part works in a skewed state - this will cause belt marks on the body.
How to identify a faulty belt tension roller?
The presence of extraneous noise or increased vibration may indicate that you should start replacing the rollers; first of all, they may appear during engine operation. Also, replacement will be necessary during a visual inspection if:
- Part backlash.
- Mechanical damage to the body.
- Damage to the bearing or bracket.
- There is difficulty when turning the shaft.
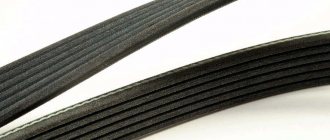
You should also inspect the belt for cracks, delamination, cuts and, if any are found, it must be replaced.
Step-by-step procedure for replacing a Niva Chevrolet
First of all, it is necessary to prepare all the tools so that dismantling is quick and easy. You must have keys for “10” and “17” on hand.
- So, in order to dismantle the roller, you need to loosen and remove the belt. And to do this, you need to loosen the tension roller along with the landing pad, where you need to unscrew the three nuts to “10”. However, such work is not necessary, and if not necessary, you can only loosen its central bolt with a key set to “17”.
- When the belt is “thrown off”, it is necessary to engage first gear, thereby blocking the crankshaft from turning.
- Unscrew the nut on the roller and remove it along with the spring washer.
- When starting to dismantle the generator roller itself, you must first remove its protective cap.
- Then, using a wrench set to “17”, remove the central nut.
- And after that we remove the spacer ring, which prevents the rollers and the motor housing from aligning.
Installation of new parts
- Before installing a new, working roller, you must first mount the ring, then the roller itself.
- Next, using a washer with a spring mechanism, tighten the bolt.
- After this, put on the belt and tighten the tension roller so that the belt is pressed no more than 1 centimeter from its position.
Thanks to such a well-coordinated and precise procedure, it is possible to replace the alternator belt rollers on a Niva Chevrolet quickly and in the shortest possible time.
Such checks should be carried out every 30 thousand kilometers, thereby eliminating the possibility of new malfunctions.
In the Dimavto.com online store, any car enthusiast customer can choose and buy drive belt rollers for the Lada Chevrolet Niva with a 1.7-liter engine capacity from such manufacturers as INA, RUVILLE.
If you have questions, or they appeared during the selection process, and this prevents you from making a final decision, our support service will come to your aid.
This will help you choose the right parts that match your car model.
The success of finding the required part in our store is due to the widest range of spare parts supplied to us from manufacturers from different parts of the world.
Our store's policy is based on careful checking of the quality of the spare parts we sell and their compliance with the highest standards. All products sold by us are of original origin.
Each buyer buying drive belt rollers for Niva Chevrolet 2123 selects a spare part according to the search pattern from a huge catalog that suits him best.
Spare parts search options:
- By product code;
- By car manufacturer and model.
- With tips from a parts specialist.
The selected product can be immediately picked up in the cart on the website online, or you can call 096 258 29 80 or 093 630 27 55 and place an order in person.
Using the catalog, our customers can not only find the product they need, but also read its characteristics. Here you can see a detailed image of the product from photographs and videos. Our pricing policy is always transparent and accessible.
To make it easier for you to understand the features of spare parts Drive belt rollers and their compatibility with Niva Chevrolet 2123 by year of manufacture, modification and type of car, it is better to play it safe and clarify the nuances with our managers.
Before purchasing drive belt rollers (tensioner, bypass) for replacement, it is better to consult with specialists. Taking precautions will help you easily replace an old part with a new one the first time. To do this, our managers are guaranteed to help you with your choice and quickly complete your purchase with delivery.
Replacing the drive rollers of VAZ-2123 auxiliary units
The condition of the belt tension rollers should always be checked when removing or replacing the drive belt. When rocking and rotating the rollers by hand, there should be no play, jamming, or noise in the roller bearings.
- In many cases, noise when the roller bearing wears out is observed when the engine is running.
- We carry out the work on an inspection pit or on a lift.
- Remove the accessory drive belt. For this:
- Remove the mudguards from the engine compartment.
Chevrolet Niva
Using a 13mm wrench or socket, rotate the adjusting bolt clockwise, tensioning the belt.
Using a 13mm wrench or socket, rotate the adjusting bolt clockwise, tensioning the belt.
Tighten the nuts securing the tension roller bracket. We start the engine, stop it and check the belt tension again.
Attention! Do not overtighten the belt! Excessive belt tension leads to premature failure of the alternator belt and bearings, coolant pump and power steering pump.
We replace the drive belt for auxiliary units when cracks, ruptures and detachments of rubber from the fabric base are detected on it. On a car with air conditioning, remove the air conditioning compressor drive belt.
Loosen the nuts securing the tension roller bracket (see above) and rotate the adjusting bolt counterclockwise, loosening the belt tension.
Let's sum it up
Taking into account the above information, it becomes clear that the alternator belt on a Chevrolet Niva needs to be changed more often than many car owners believe. It is also important to monitor the general condition of the belt, checking it for wear, cracking, etc. At the same time, it is necessary to evaluate its tension and make adjustments if necessary.
We also recommend reading the article on how to replace the Lada Kalina alternator belt tensioner. From this article you will learn when and why you need to change the Kalina generator belt tensioner, as well as what you need to consider when performing this procedure.
Finally, we note that if the alternator belt is being replaced, it is important to purchase not only a product that matches the markings, but also a high-quality product. In fact, it is better to refuse the expensive original, while it is quite possible to purchase a cheaper, but high-quality analogue from a well-known manufacturer.
As a result, you can count on a fairly long service life of the generator belt, as well as reliable and stable operation of auxiliary equipment (provided there are no other breakdowns, liquids getting on the belt, etc.).
What are the signs to recognize a malfunction?
A number of signs indicate the need to replace old rollers with new ones. They appear both directly while driving, in the form of extraneous noise, and during visual inspection.
Replacement is necessary if:
- mechanical damage on the surface of the rollers;
- noticeable play;
- grinding noises when turning. This is a clear sign that the car needs repairs;
- damaged bracket or bearing;
- leaking oil;
- high temperature during operation;
- strong vibration during operation;
- difficulty in turning the shaft.
It would also be a good idea to check the serviceability of the belt. It should not have cracks, cuts or delaminate. If it has defects, it must be replaced.
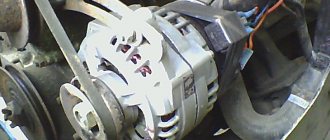
How to remove the generator.
To remove the generator you need to use a ten key, loosening the nut that holds the base with the tension roller, removing all the nuts from their seats. Then unscrew the adjusting screw, having first found it. After making sure that the screw moves freely, unscrew it to the top of the platform. In the photo you can see where all these bolts are located.
We fold the belt off the pulley and unscrew the bolts that hold the device, this can be done with a thirteen key, and on the other hand with a seventeen key. We disconnect the two wires that are connected to the back of the generator, one is connected to the head of the bolt, the other is plugged in, and we disconnect them. Then we remove it from the seat.
A tightened belt makes a whistling sound during operation. In this case, the bearings wear out faster than expected. In addition, the belt overheats, which means it wears out quickly.
Please note: the cooling system pump hangs on the alternator belt. These are the features of the VAZ-2123 internal combustion engine. Stopping the pump will not necessarily lead to overheating. But the engine cannot be operated without it.
Inspection, replacement and adjustment of the Chevrolet Niva generator drive belt
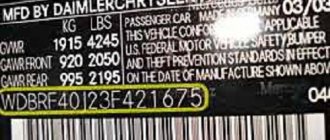
Chevrolet Niva According to the Committee of Automobile Manufacturers, Chevrolet Niva was one of the best-selling SUVs in Russia in the period from 2004 to 2008. Motorists appreciated the increased comfort compared to the previous model, as well as high maintainability and the ability to fix simple breakdowns in garage conditions. This, you see, is an important factor during the uncontrollable rise in prices for service. Carrying out preventive inspections and minor repairs, such as changing the oil and alternator belt of a Chevrolet Niva car, is quite possible even for a novice driver. But first you need to make sure that such events are necessary.
When to change accessory drive
The manufacturer recommends installing a new gear every 50,000 km. Some items may go through more, so periodic inspection of the product is important. To check the technical condition of the rubber drive, you need to perform the following steps:
- Mark the starting point of the inspection with chalk.
- Set the gear selector to neutral position.
- Brake the car with the parking brake.
- Rotate the crankshaft and at the same time inspect the condition of the belt drive making a full revolution.
- Rotate the shaft a few more times.
- Check the outside of the part.
The belt must be replaced if:
- signs of wear;
- cuts;
- porosity;
- delamination;
- traces of oil;
- dishevelment.
In addition to external examination, manifestations of a malfunction in the form of an extraneous whistle are also possible when the electrical circuits are at maximum load or the warning light of the battery discharge comes on.
Belt installation:
If the belt is purchased and it is new, you can begin installation:
1. De-energize the car by disconnecting the terminals from the battery.
2. Pull out the connector from the crankshaft sensor; this can be done by unscrewing the mounting bolt with a Phillips screwdriver. Then remove the sensor.
3. Lightly unscrew the device that is secured with a nut and move it towards the block.
4. Remove the belt that is worn out; this is easy to do since the device is loose.
5. The right side should be jacked up, placing emphasis on the wheels in advance. We put the field in fourth speed, since we will rotate the right wheel.
6. We pull it gradually, removing it from the pump pulley, we turn the wheel, gradually pulling out the belt from the pulley.
The belt that you have removed, as a rule, cannot be repaired, so after removing the old one, we immediately proceed to installing a new one.
1. First we throw it on the crankshaft pulley, and only then on everything else.
2. It is best when the procedure ends by putting it on the generator pulley. The wheel rotates all the time until it is completely dressed.
3. After the device is installed in its seat, it should be secured with a bolt.
You should know in what order it is thrown onto the pulleys:
· This is the Crankshaft Pulley.
· Then onto the tension roller.
· Then the right lower pulley.
· A roller that is located under the generator.
· Then the pump pulley
· And at the end is the generator pulley.
After all this, it should be tightened well. Since if the tension is weak, then the battery will not be provided with the charge it needs.
4. Install the sensor in its place.
On Chevys, LUZAR belts have proven themselves to be the best.
The only easy repair option is to replace it or you can tighten it; other problems that arise are usually eliminated only by removing it.