We have been waiting for this for a long time and finally it came to us, we meet the three-cylinder beast Daewoo Matiz, replacing the timing belt and roller. The engine capacity is 0.8 liters, the speedometer shows almost 40 thousand kilometers across the vast expanses of our vast homeland. Since the car had just been purchased, the owner decided to play it safe and that’s right, because no one can guarantee that what’s on the speedometer is the same as in real life.
Attention! When the timing belt on this engine breaks, all the valves bend.
What is the replacement time frame?
The Daewoo company recommends replacing the timing belt on the Matiz every 40 thousand kilometers. But this is a general recommendation. The frequency of replacement depends on the nature of the vehicle's operation and the conditions in which the vehicle is operated. An equally noticeable influence on this is the quality of the oil poured into the power unit.
The service life of the timing belt directly depends on the technical condition of the Daewoo Matiz engine. This is explained by the fact that this part is “afraid” of contact with engine oil. Because of this, the rubber swells, which causes contact between the belt drive and the teeth of the pulleys. This ultimately leads to premature wear of the part.
Preparatory operations
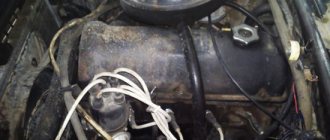
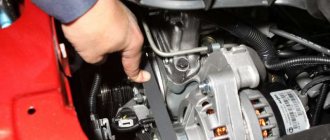
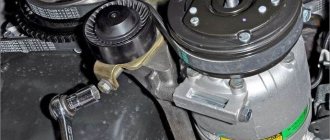
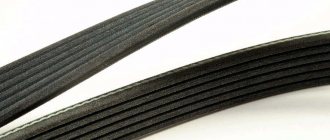
To get to the timing belt we will need to remove two belts, the generator and the power steering with air conditioning. First, loosen the two twelve bolts securing the power steering pump. One at the back.
One in front.
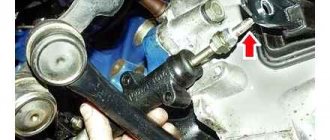
Move the pump to the cylinder block and remove the belt. Next, loosen the two lower bolts of the generator.
And one on top.
We also move the generator towards the block and remove the belt.
Possible troubles if the belt breaks
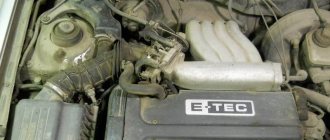
Daewoo Matiz is equipped with a 0.8-liter engine with an injection. The design of this power unit includes a camshaft installed in a block with three cylinders.
The timing mechanism of Daewoo Matiz is presented in the form of a toothed belt. The latter transmits traction torque from the crankshaft to the camshaft and rotates the pump, which ensures the operation of the engine cooling system. This design causes consequences arising from a break or incorrect installation of the belt drive.
The engine of the Korean hatchback is compact in size. The engineers managed to reduce the dimensions of the power unit, among other things, by increasing the compression ratio in the working cylinders. Thanks to this solution, the volume of the chambers in which the fuel burns is reduced, and, as a result, the size of the engine. However, despite the effectiveness of the described measures, this feature poses a danger.
Often, when inspecting the engine compartment, owners of Daewoo Matiz discover that the valves are bent. This occurs due to a broken timing belt or in cases where the latter is not installed according to the marked marks. Such consequences also lead to damage to the valve sleeves, connecting rods and piston.
Replacement must be carried out in a timely manner. Automotive engineers recommend visually inspecting this part every 10-15 thousand kilometers and installing a new one if abrasions and other defects are found. If this procedure is not carried out, then due to a worn belt drive, the failure of the camshaft and crankshaft will accelerate.
Engine F8CV
The 0.8 liter three-cylinder internal combustion engine began to be installed on the Daewoo Matiz
from the very beginning of the production of this car, and at first it was the only power unit of
the Matiz
. Replacing the timing belt for Renault Logan 1.4 and 1.6 8 and 16. In 2003, the car also received an internal combustion engine with a volume of 1.0 liters (64 hp), and it was already 4-cylinder. The 3-cylinder S-TEC engine for the Korean car was developed jointly by Daewoo Motors and Suzuki, it is intended for use in small and compact cars.
The 0.8 liter engine has a somewhat unusual sound; it works as if it were a motorcycle engine. Despite the low power, Daewoo Matiz
With the power unit, the F8CV picks up speed quite quickly - for the small weight of the car (less than one ton), the engine is completely enough.
What to buy - original or analogue
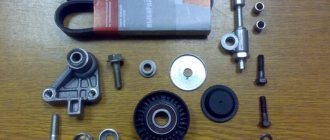
A timing belt is suitable for Daewoo Matiz, which is sold under article number 96352965. Along with this component, replacement of the rollers is required. This is due to the fact that both parts must exactly match each other. The consequences that arise in case of label mismatch were indicated above.
As an alternative, you can purchase timing belts from Bosch, Gates and others. But in order to avoid the described consequences, it is recommended to buy original parts. Some timing belts sold are made from low-quality rubber, which causes the components to wear out early.
Good advice
Experts dealing with timing belt replacement give a number of very useful tips.
- During operation, the crankshaft and distribution unit must not be allowed to rotate.
- It is better to replace the old model with an original timing belt recommended by the manufacturer.
- When unscrewing the crankshaft pulley, it is worth engaging fifth gear on the cylinder “beast”, the handbrake must be tightened all the way. This is necessary to block the engine. The mark on the pulley will “run away” a little, you need to put it back on the camshaft.
It is better to change the belt on time, otherwise a break will inevitably lead to the valves meeting the pistons. All this will result in cost-effective repairs. To perform an inspection, it is sometimes necessary to disassemble some engine elements. Not all motorists are capable of this. In such a situation, you should not neglect the conditions of the car service workshop. On average, the functionality of the belt lasts for five years. After this period, the part loses its elasticity. You should pay particular attention to this fact when buying a used car.
A small part of a big deal - the timing belt - plays an important role in the car. It ensures the normal functioning of the combustion chamber and the tightness of the structure, giving the “steel beast” the opportunity to achieve greater power. Remembering driving safety is the “mission” of every vehicle owner, and timely replacement of elements is a mandatory step for a responsible motorist.
Self-replacement
Despite the apparent complexity of the procedure, you can replace the timing belt on a Daewoo Matiz with your own hands. But when carrying out this procedure, you must strictly follow the recommendations below and ensure that the marks match.
Tools and materials
In addition to new components, to replace the belt drive on a Daewoo Matiz you will need a set of open-end and ring wrenches. It is also recommended to take:
- jack;
- flat and slotted screwdrivers;
- wheel stops.
It is recommended to carry out the replacement by driving the Daewoo Matiz into a pit.
Installation by marks
In order for the engine to function in accordance with the factory settings, it is necessary to synchronize the operation of all valves and elements that ensure the start of the power unit. To do this, even at the engine production stage, timing marks for Matiz are applied. These risks are located on the pulleys of both shafts, the protective casing and the cylinder block.
It is also necessary to take into account that the crankshaft mark should be positioned straight up (engineers say at “12 o’clock”). You can achieve this result by following the following steps exactly:
- Place the car on the overpass (inspection hole).
- Raise the parking brake lever and place wheel chocks under the wheels.
- Open the hood and remove the terminals from the battery.
- Unscrew the cover that protects the belt drive and remove the latter.
- Unscrew the fastenings of the right wheel located at the front.
- Raise the car on a jack and remove first the right wheel and then the arch (this creates interference during further work).
- Remove the dipstick, which controls the engine oil level.
- Unscrew the dipstick mount and move it to the side.
- Rotate the crankshaft until the marked marks align with each other.
Finally, you need to remove the crankshaft pulley. This component must first be secured in a convenient manner, and then the lower protective casing can be removed. Next, the remaining fliers are removed.
Belt tension rules
The work of tensioning the drive on a Daewoo Matiz begins with the part being attached to the camshaft pulley. Next, the belt is transferred to the rollers. The latter do not need to be bolted yet. Finally, the belt drive is transferred to the crankshaft pulley.
After this, the component is fixed with a plastic clamp. Now you can insert the tensioner mounting bolt. There is no need to tighten this lock too much, since in the future you will have to adjust the position of the shafts relative to the marks.
After completing the described steps, you need to turn the camshaft pulley counterclockwise. This way the right side of the belt mechanism is tensioned. At this stage, you can fully tighten the bolt that holds the tensioner roller. Next, you need to turn the crankshaft several times (usually two are enough), ensuring that the marks match.
If all marks are completely synchronized, you can begin to reassemble the motor and reinstall the wheel and plastic arch.
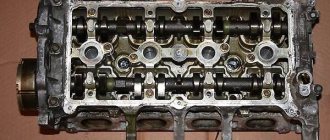
2.5.1. Checking the installation and adjusting the toothed belt tension
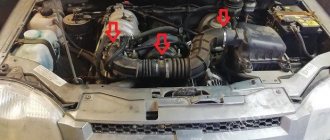
Check the installation of the timing belt in the following order: - remove the headlight;
| Rice. 2.18. Location of bolts (1) securing the upper part of the toothed belt casing (2) |
— Unscrew bolts 1 (Fig. 2.18) and remove the upper part of the toothed belt casing 2;
| Rice. 2.19. Using a wrench to turn the crankshaft pulley (1) until the mark “a” on the crankshaft pulley aligns with the mark “b” on the bottom of the timing belt housing |
— use the bolt securing pulley 1 (Fig. 2.19) to turn the crankshaft 2 turns until mark “a” on the crankshaft pulley aligns with indicator “b” on the bottom of the toothed belt housing;
| Rice. 2.20. Aligning the mark on the camshaft pulley “a” with the triangular indicator “b” on the rear timing belt casing |
— check: the mark on the camshaft pulley “a” (Fig. 2.20) should coincide with the triangular indicator “b” on the rear toothed belt casing. If necessary, adjust the timing belt installation in the following order:
| Rice. 2.21. Direction for unscrewing the pulley mounting bolt (1) and using a screwdriver (2) to block the crankshaft from turning |
— use a screwdriver 2 (Fig. 2.21) to block the crankshaft from turning, unscrew bolt 1 and remove the toothed belt pulley;
| Rice. 2.22. Location of the bolts for fastening the dipstick guide for measuring the oil level (1) and the lower part of the timing belt casing (2) |
— Unscrew the bolts and remove the dipstick guide for measuring the oil level 1 (Fig. 2.22) and the lower part of the toothed belt casing 2;
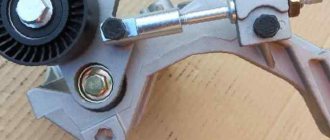
| Rice. 2.23. Location of the toothed belt tensioner (1) mounting bolt (2) |
— Unscrew the bolt and remove the toothed belt tensioner 1 (Fig. 2.23) and toothed belt 2;
| Rice. 2.24. When installing the piston of the first cylinder at top dead center (TDC) during the compression stroke, the mark (“c”) on the camshaft pulley must align with the triangular indicator (“d”) on the rear timing belt casing, and the mark (“a”) on the pulley crankshaft align with the indicator (“b”) on the rear timing belt guard |
— use the pulley mounting bolt to turn the crankshaft clockwise until the mark “c” (Fig. 2.24) on the crankshaft pulley aligns with the indicator “d” on the bottom of the toothed belt casing; — turn the camshaft so that the mark “a” on the camshaft pulley aligns with the triangular indicator “b” on the rear toothed belt casing; — install the toothed belt, belt tensioner and secure with a bolt, tightening it to a torque of 15-23 Nm; — use the pulley mounting bolt to turn the crankshaft 2 turns and check that the mark “c” (Fig. 2.24) on the crankshaft pulley aligns with the indicator “d” on the bottom of the toothed belt housing, and the mark “a” on the camshaft pulley aligned with the triangular indicator “b” on the rear timing belt guard; - Install all removed parts.
Is it necessary to change the pump?
After replacing the belt drive, the question arises about the need to carry out this procedure in relation to the pump. The engineer recommends doing this after a run of 120 thousand kilometers. The replacement of the pump on a Daewoo Matiz will have to be carried out earlier than the specified period if:
- when examining the engine compartment, traces of antifreeze are revealed;
- extraneous noise occurs from the engine;
- I'm worried about a grinding noise coming from where the pump is located.
It is also necessary to replace the pump if the cooling system pump bearing jams. In addition, this procedure is recommended to be carried out in cases where defects are detected on the surface of a given part. But identifying cracks on the pump is quite difficult due to the design features of the Daewoo Matiz. The fact is that on a Korean hatchback this component can only be inspected after removing the timing belt.
Engine repair Daewoo Matiz 0.8
Repairing a 0.8 liter engine on a Matiz is not difficult - the engine design is simple, many drivers can figure out the engine on their own. Daewoo Matiz
0.8 can be either current or major; current repairs include:
- adjustment of valves;
- replacing
the cylinder head gasket; - replacing
piston rings; - eliminating oil leaks;
- replacing the oil pump.
Overhaul is required if the motor has already served its intended service life, or there are serious breakdowns:
- the crankshaft knocked;
- cylinder liners are worn.
To overhaul the engine, the power unit must be removed. After removing the internal combustion engine, worn parts should be discarded and replaced with new ones. Communities › Renault Dacia Logan Club › Blog › Timing belt replacement 1.4 8 marks. lower Logan 2007 at. After repair, the engine will need to be run in:
- limit the maximum number of revolutions;
- do not overload the engine.
Why is it important to align the timing marks?
It is impossible to obtain full performance from the specified motor parameters without meeting certain conditions. One of them is the correct installation of valve timing. For this purpose, there are installation marks in the timing mechanism drive. Without them, it is impossible to correctly set the position of the camshaft relative to the crankshaft. If the position of the gear is shifted even by one tooth, the engine operating parameters will be greatly impaired. The ignition will be set early or late. This will affect not only the parameters of the motor, but also its technical condition. Carrying out the operation of installing the marks of the timing drive mechanism is not a difficult operation, but it requires care when performing it. You can read more about the belt replacement procedure in this article.
Camshaft marks
This part in the cylinder head is responsible for opening and closing valves in the intake and exhaust channels. Only complete filling of the cylinders with the air-fuel mixture and subsequent removal of exhaust gases will ensure that the specified engine parameters are obtained. The camshaft is driven by a pulley, which is driven by the rotation of a toothed belt. The correct installation of the pulley on the camshaft is ensured by a pin that will not allow it to rotate arbitrarily relative to the shaft.
In order for the cams to open or close the valves at the right time, installation marks are applied to the timing mechanism drive. The upper inner part of the protective roof has an arrow on the body, obtained by stamping during its manufacture. The camshaft pulley also has a mark, which is a mark on one of the teeth. The pulley should be rotated until the mark and the arrow are directed exactly opposite each other. After this, you can continue working further. The mark is installed with the belt removed, otherwise the motor can be damaged. In this case, you should carefully inspect the shaft seal; if engine oil leaks through the seal, it should be replaced with a new product.
Crankshaft marks
When the intake valve is open, the piston must be at top dead center so that when it moves down, the cylinder is filled with the working mixture. The piston is driven by the crankshaft through a connecting rod. If the operation of the crankshaft is not synchronized with the camshaft, you can not only fail to start the car’s power unit, but also disable it for a long period. To prevent this from happening, installation marks are applied. The shaft pulley is installed through a key; it will not be able to rotate arbitrarily. It has a tooth with a notch, which was obtained during the manufacturing process of the pulley.
The crankshaft oil seal protective cover also has an arrow-shaped mark obtained during casting. The shaft together with the pulley is rotated until the mark on the tooth is located exactly opposite the mark on the oil seal cover. This operation should be performed with the timing belt removed to prevent the pistons from meeting the valves. If there are traces of engine oil leaks on the oil seal cover, it should be replaced, otherwise the lubricant will accelerate the failure of the drive belt.
If the marks don't match
This problem can occur in two cases:
1. A new power unit is being assembled or after repair. 2. The drive belt has broken.
If in the first case there are no problems for the motor, then if the belt breaks while the engine is running, parts of the crank mechanism will break. To avoid such problems, you should carefully select spare parts, perform high-quality engine maintenance, and timely replace worn parts.
Source
Why is it important to align the timing marks?
It is impossible to obtain full performance from the specified motor parameters without meeting certain conditions. One of them is the correct installation of valve timing. For this purpose, there are installation marks in the timing mechanism drive. Without them, it is impossible to correctly set the position of the camshaft relative to the crankshaft. If the position of the gear is shifted even by one tooth, the engine operating parameters will be greatly impaired. The ignition will be set early or late. This will affect not only the parameters of the motor, but also its technical condition. Carrying out the operation of installing the marks of the timing drive mechanism is not a difficult operation, but it requires care when performing it. You can read more about the belt replacement procedure in this article.
Camshaft marks
This part in the cylinder head is responsible for opening and closing valves in the intake and exhaust channels. Only complete filling of the cylinders with the air-fuel mixture and subsequent removal of exhaust gases will ensure that the specified engine parameters are obtained. The camshaft is driven by a pulley, which is driven by the rotation of a toothed belt. The correct installation of the pulley on the camshaft is ensured by a pin that will not allow it to rotate arbitrarily relative to the shaft.
In order for the cams to open or close the valves at the right time, installation marks are applied to the timing mechanism drive. The upper inner part of the protective roof has an arrow on the body, obtained by stamping during its manufacture. The camshaft pulley also has a mark, which is a mark on one of the teeth. The pulley should be rotated until the mark and the arrow are directed exactly opposite each other. After this, you can continue working further. The mark is installed with the belt removed, otherwise the motor can be damaged. In this case, you should carefully inspect the shaft seal; if engine oil leaks through the seal, it should be replaced with a new product.
2.5.1. Checking the installation and adjusting the toothed belt tension
Check the timing belt installation in the following order:
— remove the headlight;
| Rice. 2.18. Location of bolts (1) securing the upper part of the toothed belt casing (2) |
— Unscrew bolts 1 (Fig. 2.18) and remove the upper part of the toothed belt casing 2;
| Rice. 2.19. Using a wrench to turn the crankshaft pulley (1) until the mark “a” on the crankshaft pulley aligns with the mark “b” on the bottom of the timing belt housing |
— use the bolt securing pulley 1 (Fig. 2.19) to turn the crankshaft 2 turns until the mark “a” on the crankshaft pulley aligns with the indicator “b” on the bottom of the toothed belt housing;
| Rice. 2.20. Aligning the mark on the camshaft pulley “a” with the triangular indicator “b” on the rear timing belt casing |
— check: the mark on the camshaft pulley “a” (Fig. 2.20) should coincide with the triangular indicator “b” on the rear toothed belt casing.
If necessary, adjust the timing belt installation in the following order:
| Rice. 2.21. Direction for unscrewing the pulley mounting bolt (1) and using a screwdriver (2) to block the crankshaft from turning |
— use a screwdriver 2 (Fig. 2.21) to block the crankshaft from turning, unscrew bolt 1 and remove the toothed belt pulley;
| Rice. 2.22. Location of the bolts for fastening the dipstick guide for measuring the oil level (1) and the lower part of the timing belt casing (2) |
— Unscrew the bolts and remove the dipstick guide for measuring the oil level 1 (Fig. 2.22) and the lower part of the toothed belt casing 2;
| Rice. 2.23. Location of the toothed belt tensioner (1) mounting bolt (2) |
— Unscrew the bolt and remove the toothed belt tensioner 1 (Fig. 2.23) and toothed belt 2;
| Rice. 2.24. When installing the piston of the first cylinder at top dead center (TDC) during the compression stroke, the mark (“c”) on the camshaft pulley must align with the triangular indicator (“d”) on the rear timing belt casing, and the mark (“a”) on the pulley crankshaft align with the indicator (“b”) on the rear timing belt guard |
— use the pulley mounting bolt to turn the crankshaft clockwise until the mark “c” (Fig. 2.24) on the crankshaft pulley aligns with the indicator “d” on the bottom of the toothed belt casing;
— turn the camshaft so that the mark “a” on the camshaft pulley aligns with the triangular indicator “b” on the rear toothed belt casing;
— install the toothed belt, belt tensioner and secure with a bolt, tightening it to a torque of 15-23 Nm;
— use the pulley mounting bolt to turn the crankshaft 2 turns and check that mark “c” (Fig. 2.24) on the crankshaft pulley is aligned with pointer “d” on the bottom of the toothed belt housing, and mark “a” on the camshaft pulley aligned with the triangular indicator “b” on the rear timing belt guard;
- Install all removed parts.
| previous page2.5. Checking and adjusting the ignition timing | next page 2.5.2. Replacing the air filter |