Malfunctions of the VAZ 2108, 2109, 21099 generator
The generator is responsible for power supply to the entire on-board network of the car with the engine running. Signs of a malfunction of the generator of VAZ 2108, 2109, 21099 cars
After starting the engine, the battery discharge warning lamp in the instrument panel lights up
The generator does not produce the required charging current. Simultaneously with the light on, the voltmeter readings tend to zero. The battery is constantly not recharged. Using a voltmeter (multimeter), we check the voltage at the battery terminals (the engine is idling). The voltmeter readings should be as follows: generator 37.3701 - 13.6 V, generator 9402.3701 - 13.2 V.
The “folk” method of checking a generator by removing the terminal from the battery while the engine is running is only suitable for carburetor engines. If the engine stalls after removing the terminal, it means the generator has stopped producing electric current.
If it is less, then the problem is not in the faulty wiring going to the control lamp and voltmeter, but in the generator. Next, sequentially, from simple to complex, from the most probable to the least probable, we look for the cause of the malfunction.
— The generator drive belt tension is loose
The belt slips on the pulley, and the generator rotor stops rotating at the required frequency. In this case, a “whistle” from the generator drive is possible. We check and adjust the belt tension if necessary.
— The generator voltage regulator is faulty
There may be a short circuit between its terminals “B” (“D+”), “W” (“DF”) or “stuck” (the brushes of the brush assembly have worn out). The easiest way to check the voltage regulator is to install a known good one. We replace the faulty regulator with a new one. Read more: “Checking the generator voltage regulator for VAZ 2108, 2109, 21099 cars.”
— The diode bridge (rectifier unit) of the generator is faulty
Most likely there is a “break” in its valves or a short circuit in the negative valves. The power diodes of the excitation winding may also be damaged. The diode bridge can be checked using an ohmmeter (multimeter in ohmmeter mode) both directly on the car and on a removed generator.
Checking the diode bridge of the generator of VAZ 2108, 2109, 21099 cars
— The generator stator is faulty
“Open” or short circuit in the stator winding. We check the stator with an ohmmeter, and if there is a malfunction, replace it with a new one.
checking the stator windings of generator 37.3701 for “break”
— The generator rotor is faulty
Perhaps the leads of the excitation winding located on the rotor have become detached from the contact rings to which the brushes are pressed. We check the rotor and replace it with a new one if necessary.
generator winding terminals 37.3701 for VAZ 2108, 2109, 21099 cars
The battery is recharged and “boils”
The generator produces too much charging current, higher: generator 37.3701 - 14.6 V, generator 9402.3701 - 14.7 V, which is checked with a voltmeter at the battery terminals. The needle on the standard voltmeter is in the red zone at the end of the scale.
— The voltage regulator is faulty
Most likely there is a short circuit between its terminal “Ш” (“DF”) and “ground”. Replace the voltage regulator with a new one or a known good one.
The generator makes noise or “howls” when operating
The nut securing the generator pulley has come loose, the generator bearings are worn out, there is an interturn short circuit or a short circuit to ground in the stator winding (the generator “howls”), a short circuit in one of the generator valves.
Notes and additions
— The causes of such malfunctions as: the warning lamp does not light up after turning the key in the ignition switch and starting the engine (the standard voltmeter shows normal voltage) or the lamp does not light up and the voltmeter does not work (or the control devices do not work completely) are not a malfunction of the generator, but a burnout of the control panel lamp, a break in its power supply circuit, a blown fuse No. 5 (F16) in the mounting block (responsible for supplying current to the excitation winding of the generator), a break in the power supply circuit of the instrument cluster (orange and orange-blue wires), a malfunction of the ignition switch.
— If the discharge warning lamp lights up at idle, and goes out when you press the gas pedal and while driving, you must first check the tension of the generator drive belt, and if that doesn’t help, then the problem is most likely in the additional resistors located in the relay mounting block and fuses. If they fail, the generator is not excited at low speeds, and therefore does not charge. It is necessary to either completely change the mounting block, or unsolder additional resistors and replace them with new ones.
More articles on generators for VAZ 2108, 2109, 21099 cars
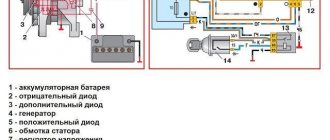
Charging scheme "Six"
The circuit for the VAZ 2106 includes the following components:
- generator device with excitation winding;
- diode rectifier bridge, which is part of the generator design;
- battery;
- voltage regulator, which can be either mechanical or electronic;
- battery charge lamp;
- relay for this indicator.
The VAZ 2106 charging circuit is activated when the ignition is turned on. When the engine is running, the battery is recharged by the generator unit, which in turn is driven by the crankshaft. The rectifier device that any generator is equipped with is designed to convert voltage to DC. After this, the regulator comes into operation, thanks to which the voltage level in the network fluctuates around 13.5-14.3 volts. Today, “sixes” usually use electronic regulators, which are characterized by a longer service life.
When the driver turns the key in the ignition, a current appears at the relay contacts, causing the battery charging lamp to blink on the dashboard. The lamp lights up until the engine starts - when the power unit is started, the current is generated at the output of the generator mechanism.
Wiring diagram for the "six"
Causes of generator malfunction on the VAZ-2107 (injector)
Experts suggest that on a VAZ-2107 with an injector, the standard generator is 5142.3771 (eight). It has one very important feature: it produces more current - not 55A per hour, like other generators, but about 80-90 A. This is due to the properties of the injector, which requires more electricity (but also has a higher power density).
Experts advise checking the generator for malfunctions in the following order:
- inspect the diodes that supply electricity to the excitation winding of the generator (if they are burned out, they should be replaced with new ones);
- use a tester to measure the voltage level in the current-carrying circuit (if its value is less than 12 V, then there may be a short circuit, which means the wiring is overheating).
If it is difficult for the car owner to carry out such diagnostics, he can contact the nearest car service center for help from qualified specialists.
Generator belt
Of course, the G-221 will not work without a drive belt. The belt for the VAZ 2106 generator is 10 mm wide and 940 mm long. It is wedge-shaped and toothed in appearance, which allows it to easily cling to the teeth of pulleys.
The belt resource is designed for 80 thousand kilometers.
How to tighten a belt
Tensioning the alternator belt after installing it is considered the final stage of work. For fast and high-quality work, you will need to comply with the factory tension regulations:
- Loosen the self-locking nut (on the top of the generator).
- Loosen the lower generator fixing nut.
- The body of the device should move slightly.
- Insert a pry bar between the generator housing and the pump housing.
- Move the pry bar to tighten the belt.
- Without releasing the mount, tighten the self-locking nut.
- Then check the belt tension.
- Tighten the bottom nut.
No charge or bad charge.
If the value is less than the minimum allowable, check the voltage without load. It is also necessary to measure the voltage between terminal 30 of the generator and its housing. If, when checking the VAZ 2107 generator, the voltage value, when the high beam headlights are turned on, at the battery terminals is below 13.5.V, and when the lights are off, the voltage slowly increases to a value of 13 - 13.4V. The reason in this case must be sought in poor contact from terminal 30 of the generator to the battery, poor contact between the negative terminal and the engine housing.
To check the reliability of the connection in terminal 30 of the generator, it is necessary to measure the voltage between the terminal and the generator housing. If the voltage is significantly higher than the value at the battery terminals, then you should unscrew the nut securing the wire and clean the connection points and stretch the nut of the terminal itself located between the wire and the generator. Poor contact in this place will also be accompanied by strong heating of the contact bolt. If the voltage at the output is more than 13.5.V, then take a measurement between the positive terminal of the generator and the generator housing. If the value is equal to the voltage between terminal 30 of the generator and its housing, eliminate the contact between the negative terminal of the generator and the engine housing. If the value is less, then check the voltage value in the contact connections of the circuit from the generator to the battery. If the voltage value at the battery terminals and terminal 30 of the generator are the same, then the generator itself is faulty. The most common malfunction in this case is a breakdown of one diode of the rectifier bridge.
Voltage regulator malfunction.
If, when checking the VAZ 2107 generator, the voltage at the battery terminals is the same with the high beams on and off. In this case, the voltage value between terminal 30 and the generator housing does not differ from the voltage value at the battery terminals. This is possible if the generator voltage regulator is faulty or there is no voltage for the initial excitation, or the generator itself is faulty.
First you need to check the presence of voltage to excite the generator. It is better to do this using a test lamp, connecting one end to the housing, and the other to a wire suitable for the generator brushes or terminal 61 of the generator, if the generator has a built-in voltage regulator. If there is no power on the wire, then it is necessary to check the integrity of the wires, the fuse and the serviceability of the voltage regulator on cars with a remote regulator.
Built-in voltage regulators must be checked when there is power, on the wire connected to them or terminal 61 of the generator. How to do this is described in the article “Checking the voltage regulator” and there is no point in dwelling on this issue here. If the excitation power is suitable and the regulator and brush assembly are in good working order, then the fault must be looked for in the generator.
Drive belt slipping.
Let's consider another version of the events identified when checking the VAZ 2107 generator. After starting the engine, without turning on the load, the voltage value is less than normal, but after some time it returns to normal. When the load is turned on, it drops sharply. The drop may also be the result of a sharp increase in engine speed, followed by normalization when operating at constant speed. This indicates slippage of the generator drive belt, which can be caused by weakening or wear of both the belt itself and the pulleys. Wear in this case can be easily determined by the presence of shine on the bottom of the pulley. In this case, the belt must be replaced; tightening it is useless in this case. Moreover, an over-tensioned belt can cause destruction of the generator bearings.
When installing a new belt, you need to pay attention to the amount of its immersion in the pulley groove. If the belt fails completely, the pulley must also be replaced. Well, finally, and lastly, when the voltage at the battery terminals when checking the VAZ 2107 generator is above 14.5V
this indicates a malfunction of the voltage regulator or poor contact at its negative terminal with the generator housing if the regulator is installed built-in or with the car body if installed remotely
Well, finally, and lastly, when the voltage at the battery terminals when checking the VAZ 2107 generator is higher than 14.5V. this indicates a malfunction of the voltage regulator or poor contact at its negative terminal with the generator housing if the regulator is installed in a built-in position or with the car body if it is installed remotely.
10/09/2014
Problems with the battery: charging the VAZ 2106 and diagnosing faults
As a rule, before checking the regulator of a VAZ 2107, 2106 or any other car, it is necessary to review in general terms the design and operating principle of such a regulator.
Let's start with the fact that the design of the regulator may differ. Old VAZ 2106 models have outdated contact regulators. At the same time, newer versions already use an electronic regulator.
So, the contact external regulator is still the basis. This is a semiconductor type device manufactured on a single board. The main element is the winding (brass wire is used), the winding consists of just over a thousand turns, and there is a copper core inside the winding. The winding has a constant resistance of 16 ohms.
How to determine the charge level?
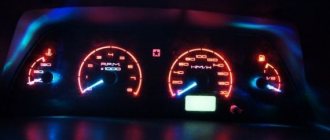
Primary control of the charge level on the VAZ 2107 is carried out by instruments on the panel: a control lamp and a voltmeter. If the charge is normal, the indicator arrow will be in the green area, and the control lamp should go out when the engine is running.
To more accurately check the voltage level, you need a voltmeter. As mentioned earlier, the correct charge is 13.6 - 14.1 volts.
You can purchase a special automotive electronic voltmeter or one combined with a watch. Installed both instead of the standard clock and on the dashboard.
Preparing to Troubleshoot
If a problem is detected, we begin diagnostics. First, let's prepare the tools.
- Multimeter (voltmeter);
- Emery cloth or needle file;
- Knife;
- Pliers;
- 12-volt indicator lamp (control).
Theory of the issue
While the car is moving, a dead battery receives a charge voltage of 13.6 to 14.2 V. For the correct and stable operation of all systems in the car, these voltages must be maintained until the engine starts and the crankshaft rotates. Together with the motor, torque is supplied to the generator through the drive belt. At this moment, an amount of energy is generated that will be sufficient for the stable functioning of all systems and to maintain a charge on the battery.
The internal combustion engine can operate in different modes. At the same time, the number of revolutions on the crankshaft changes. The number of revolutions of the pulley also changes, this leads to an increase in the voltage produced by the generator. To maintain a level of 13.6-14.6 V in the on-board network, there is a special relay in the excitation circuit. It regulates the voltage level. When the rise exceeds the normal value, then the current supplied to the winding will decrease. At the same time, the magnetizing force of the rotor also decreases. This leads to a decrease in output voltages.
If the generator does not charge, then in most cases the reasons must be sought in the excitation circuits, as well as in the output voltage circuits from the generator to the battery. But this is not always the case. Sometimes problems are related to the generator itself.
When the driver turns the key in the lock, the relay in the ignition system also starts at the same time. “Plus” flows through the relay and fuse in the mounting block. Next, the voltage passes through the on-board network, reaching the battery charge lamp and charge sensors. It then passes through diodes, relays, elements in the mounting block and finally to the connector in the generator. There, electricity comes to the relay-regulator and, passing through brushes and slip rings, enters the exciting winding.
As the crankshaft speed increases, the phase stresses increase. Then, through a diode block, they increase the voltage on the excitation winding and on the diode of the control lamp. When the output phase voltage reaches 12 V on both terminals, the voltage will be equalized. Due to the lack of voltage difference, the control lamp will go out. In this case, the generator produces a voltage that is higher than 12 V.
Table of energy consumption by different equipment.
Charging the battery is necessary in cases where it takes on part of the load of the energy supply system. How much energy does the equipment in the car need?
| Side lights and vehicle lighting | ~40 watt |
| Headlights and fog lights on both sides | ~250 watt |
| Stove fan at maximum power | ~200 watt |
| Cooling fan runs briefly | ~250 watt |
| Heated rear window | ~150 watt |
| Fuel pump and engine management | ~80 watts |
| Radio (medium sound level) | ~100 watt |
Table 1. Electricity consumption in the car by additional equipment.
By simple calculations we get a total consumption of 1070 watts, which when converted to amperes will be approximately 90A. For many car generators, such a load, and they are the first to take it upon themselves, is at the limit of the equipment’s capabilities. When a certain threshold is reached, the system will transfer part of the load to the battery. Therefore, it is necessary to carefully calculate the characteristics of the generator and battery.
Short circuit to the rotor housing
In the event of this malfunction, the entire field winding will be closed and the generator will not be able to operate. Often, short circuits to the frame occur in places where the ends of the winding are connected to the slip rings on the rotor. You can check this using a 5 V lamp. To check, the wire should be connected to one of the slip rings, and the second to the rotor core or its shaft. In the event of a short circuit, the lamp will light up. This generator is faulty. You can insulate the short circuit or replace the winding completely.
Replacement Tablet Generator VAZ 2107
Replacing a brush make yourself a VAZ 2107 generator
Replacement nozzles VAZ and tips 2107
Welcome friends to the car repair site. Despite the huge number of foreign cars, cars of the VAZ family are still needed and are found among motorists who are knowledgeable about technology and appreciate the advantages of the Russian automobile industry.
Of course, operation and repair are indivisible concepts, and in the event of a failure of a particular unit, fault identification and troubleshooting can be carried out completely independently. Let's look at a simple example of repairing a VAZ 2107 car generator.
Malfunctions and principle of operation of generator brushes
The electrical system of your steel stallion shows defects, when the VAZ 2107 generator does not work, a reddish warning light with a battery symbol lights up on the dashboard.
Quite often, wearing or freezing brushes is a must. Those who are familiar with the mechanism of operation of the generator understand that an excitation voltage is supplied to the armature through the brush, which not only drives the electronic machine (generator), but also regulates its output power.
In particular, the regulation itself is determined by a special device, a relay controller, which can be implemented specifically on the brush holders or installed separately (on earlier models).
READ How to Disassemble the Passat B3 Gas Pump
As a rule, this malfunction manifests itself gradually, initially accompanied by minor interruptions in the operation of the generator, which leads to its uniform failure, but other options are also possible, such as an unexpected malfunction.
How to remove the brushes and check the VAZ 2107 generator
VAZ 2106.
VAZ 2107
, No downtime. parking while shifting gears.
Replace the VAZ 2107 generator brushes yourself
The brush repair itself usually comes down to replacing them, but first you need to remove the brush assembly from the generator body and assess the degree of wear, check for chips and cracks.
replacing generator brushes The VAZ 2107 procedure is simple and usually takes a few minutes, you do not need to remove the generator to replace the brushes, just disconnect the power cable, unscrew the two screws that secure the brush holder housing and carefully remove this assembly, make sure to disconnect the negative terminal in advance .
Warning! The battery(s) must be disconnected when performing any electrical work on the vehicle!
READ Replacing Car Interior Trim With Your Hands
Check the disassembled assembly for freezing, jamming of the brushes and their protruding part, which should be at least 12 millimeters. In case of non-compliance, the part must be replaced. Brushes for the VAZ 2107 generator can be bought at almost any auto parts store.
After fixing the problem or purchasing a new one (it's better to buy small parts with a sample of the old ones so you don't have to change them), install them in reverse order.
Prank tips
If you noticed noise from your car's generator brush before repairs, this may mean that the bearings of the VAZ 2107 generator may be worn out, in which case it is necessary to remove and disassemble the VAZ 2107 generator. A worn bearing has an increased clearance of the rolling elements and is susceptible to it. This is the case replacement with a new one. Keep in mind that premature bearing failure is not only due to lack of lubrication.
Keep in mind that premature bearing failure is not only due to lack of lubrication.
A worn bearing has an increased clearance of the rolling elements and is susceptible to it; this is the case when replacing it with a new one. Keep in mind that premature bearing failure is not only due to lack of lubrication.
This is often caused by excessive tension on the alternator drive belt; in addition, a tight belt can damage the cooling system pump bearing.
Therefore, check this device regularly in accordance with the manufacturer's recommendations. It is better to habitually and regularly inspect the engine compartment while the engine is running; this will allow you to identify and eliminate previously encountered problems at minimal cost.
READ Ford Focus 3 Transmission Error
Correct diagnosis will help you avoid unnecessary work and unexpected breakdowns.
Is it possible to charge a full battery?
Reasons for discharging the VAZ 2110 battery Many motorists know the phenomenon of battery overcharging. It occurs when, for some reason, the voltage regulator starts to work incorrectly, so the voltage at the generator output exceeds 14.5 Volts. The optimal voltage of a fully charged battery is 14 Volts. When the voltage difference between the generator and the battery exceeds one volt, the latter begins to absorb additional energy, which leads to boiling and evaporation of the electrolyte, as well as destruction of the lead plates. As a result, the electrolyte level first decreases, then the battery capacity decreases.
If the generator voltage regulator is working normally, then the voltage is maintained at 14 - 14.5 Volts, due to which the battery avoids overcharging. All this fully applies to stationary battery charging, which is carried out using a special charger.
If the voltage at the output of the device does not exceed 14.5 Volts, then the battery will take the amount of electricity that is necessary to change the density of the electrolyte. When the voltage of the generator and the charger are equal, the rate of absorption of electricity will drop so much that further charging becomes meaningless.
How to determine the lack of battery charge
Checking the battery charge
The easiest way to determine the lack of charging is using the car’s instruments, that is, the charging indicator lamp and the sensor (voltmeter) on the instrument panel. The sensor arrow should be in the green sector, and the battery lamp should not light up when the engine is running. Otherwise there is no charging.
But the best way is to check the voltage on the battery with a multimeter. When there is a charge, the voltage on it lies in the range of 13.6-14.2 V, and when there is no charge, it will only have its own voltage of 12 V (± 0.6 V). Under no circumstances remove the terminals from the battery to check to avoid damage to the RR, ECU and other electronic devices on your car.
To troubleshoot battery charging problems, you must use the following tools:
- control lamp 12 V;
- multimeter with a measuring range of up to 60 V AC and DC voltage;
- flat blade screwdriver;
- shaped screwdriver with a Phillips blade;
- pliers;
- knife;
- emery cloth.
How to check the generator
Checking the functionality of the device will give the driver confidence that it is working properly and there is no cause for concern.
It is prohibited to check the generator on a VAZ 2106 when it is disconnected from the battery while the engine is running, as a voltage surge is possible. In turn, instability of operation can damage the diode bridge.
Checking the functionality of the generator can be done in various ways. The most common are:
- checking with a multimeter;
- at the stand;
- when using an oscilloscope.
Self-check with a multimeter
This technique is the simplest and does not require special devices or extensive knowledge of how the car works. However, it is necessary to purchase a digital or indicator multimeter, and also enlist the help of a friend, since the test involves the work of two people at once:
- Set the multimeter to DC measurement mode.
- Connect the device to each battery terminal in turn. The voltage should be between 11.9 and 12.6 V.
- The assistant should start the engine and leave it idling.
- At this time, the measurer must carefully monitor the multimeter readings. If the voltage in the network drops sharply, it means that the generator is not working fully, or its resource is not enough to charge.
- If the indicator is more than 14.5 V, the driver needs to know that such operation of the device will in the near future lead to the boiling of the battery.
Testing at the stand
The check is carried out on a computer stand by service station specialists. In this case, the generator will not need to be removed from the car, since the computer is connected to the device through special probes.
The stand allows you to simultaneously check a working generator in all respects with high accuracy. Current performance indicators will be displayed on the computer screen, so the car owner can determine the “weak” points of his generator in real time.
Checking with an oscilloscope
An oscilloscope is a device that reads basic voltage readings and converts them into waveforms. The device screen displays curved lines, from which a specialist can immediately identify defects in the operation of the generator.
Determining electrical system faults
One of the main advantages of the new VAZ 2109 is fuel injection. This type of supply of the fuel mixture is significantly more economical than the carburetor method. In addition to fuel consumption, the injector also improves the vehicle's driving characteristics. For the injector to work properly, the computer or, as motorists call it, “brains” must also work correctly.
In turn, the operation of the computer, as well as all electrical sensors and devices, directly depends on the constant current power. The device that is responsible for supplying power to the vehicle's devices is called a voltage regulator. The main sign of a malfunction of this element is the readings of the voltmeter on the instrument panel.
Also, if while driving the car your fuel consumption has noticeably increased, but at the same time the car began to pull worse, then this is one of the main signs of failure of the voltage regulator relay. This type of breakdown manifests itself especially well in the dark. At this time, dimensions and other electrical appliances are involved, which significantly increase power consumption. If it is not enough, then the instruments and dimensions light up very dimly - it’s time to change the relay!
Reasons for this phenomenon
Guys, I’ll say a few words about “special” recharging from a charger - many people do this on purpose! REMEMBER! Thus, they increase the density of the electrolyte to the required level - in our range it is approximately 1.27 g/cm3, if the density is lower (already with a charged battery), then the battery may freeze at subzero values. We need to raise it! And how to do it? It’s very simple - you need to evaporate a small amount of water from the electrolyte, thus the acid concentration will increase and the density will increase.
Now “non-special” overcharging, as they say under the hood of the car, its main reasons:
The generator charge regulator relay has failed. This relay “sees” charging, and when it reaches 12.7 Volts, it turns off the power supply from the generator. If this relay fails, then the generator will constantly charge the battery, and its currents are considerable, it will boil very quickly! This is the most common reason. Fortunately, this relay costs a penny. A short video, let's watch.
The generator does not charge the battery
In this case, there may be several possible problems. It is necessary to check the drive belt and fuses.
- First, check the generator drive belt for integrity and normal tension. Normally it is about 10-15 mm. It is recommended to change the alternator belt as the car runs. The number is different for each car. It should be found in the vehicle manual.
- If the belt is fine, check the fuses that match the battery - they may have blown. You can find the location of the fuses in the vehicle repair manual in the electrical section. If the fuse is blown, it should be replaced and then checked again to see if the charge is working.
- If the belt and fuses are in order, you should check the wire running from the generator itself to the battery terminal with the “+” sign. If it is broken, the wire should be replaced.
The main problems with battery charging are listed above; for in-depth diagnostics, you should use special equipment.
Dismantling and removal
How to remove a VAZ generator and how to disassemble the device? Which generator is better to install on a VAZ 2106?
To repair a VAZ 2106 generator, follow these steps:
- First you need to disconnect the plug from output 67 on the node.
- After this, the plug is disconnected from the output of the so-called neutral wire.
- Next, you need to move the insulating cover a little, after which, using a 10-mm wrench, you need to unscrew the nut that secures the wiring, in particular, we are talking about the thirtieth pin. The wiring can be disconnected.
- Now you can remove the strap. If you only need to replace it, then buy a good belt - check its condition, there should be damage on the strap. The size of the VAZ 2106 alternator belt must correspond to the nominal one; it is indicated in the service manual.
- Using a 17mm wrench, you need to unscrew the two nuts that secure the adjustment bar; it needs to be removed.
- Then unscrew the nuts of the lower mechanism clamp, remove the bolt, as well as the bushing. The assembly itself will be fixed on the bracket.
- After this, the unit can be dismantled. If necessary, the generator is replaced. Further connection of the generator is carried out in the reverse order of removal.
Sorry, there are no surveys available at this time.
Malfunctions of the VAZ 2108, 2109, 21099 generator
The generator is responsible for power supply to the entire on-board network of a car with a running engine.
Signs of a malfunction of the generator of VAZ 2108, 2109, 21099 cars
After starting the engine, the battery discharge indicator lamp in the instrument panel lights up
The generator does not produce the required charging current. Simultaneously with the light on, the voltmeter readings tend to zero. The battery is constantly not recharged. Using a voltmeter (multimeter), we check the voltage at the battery terminals (the engine is idling). The voltmeter readings should be as follows: generator 37.3701 - 13.6 V, generator 9402.3701 - 13.2 V.
The “folk” method of checking a generator by removing the terminal from the battery while the engine is running is only suitable for carburetor engines. If the engine stalls after removing the terminal, it means the generator has stopped producing electric current.
If it is less, then the problem is not in the faulty wiring going to the control lamp and voltmeter, but in the generator. Next, sequentially, from simple to complex, from the most probable to the least probable, we look for the cause of the malfunction.
— The generator drive belt tension is loose
The belt slips on the pulley, and the generator rotor stops rotating at the required frequency. In this case, a “whistle” from the generator drive is possible. We check and adjust the belt tension if necessary.
— The generator voltage regulator is faulty
There may be a short circuit between its terminals “B” (“D+”), “W” (“DF”) or “stuck” (the brushes of the brush assembly have worn out). The easiest way to check the voltage regulator is to install a known good one. We replace the faulty regulator with a new one. Read more: “Checking the generator voltage regulator for VAZ 2108, 2109, 21099 cars.”
— The diode bridge (rectifier unit) of the generator is faulty
Most likely there is a “break” in its valves or a short circuit in the negative valves. The power diodes of the excitation winding may also be damaged. The diode bridge can be checked using an ohmmeter (multimeter in ohmmeter mode) both directly on the car and on a removed generator.
Checking the diode bridge of the generator of VAZ 2108, 2109, 21099 cars
— The generator stator is faulty
“Open” or short circuit in the stator winding. We check the stator with an ohmmeter, and if there is a malfunction, replace it with a new one.
checking the stator windings of generator 37.3701 for “break”
— The generator rotor is faulty
Perhaps the leads of the excitation winding located on the rotor have become detached from the contact rings to which the brushes are pressed. We check the rotor and replace it with a new one if necessary.
generator winding terminals 37.3701 for VAZ 2108, 2109, 21099 cars
The battery is recharged and “boils”
The generator produces too much charging current, higher: generator 37.3701 - 14.6 V, generator 9402.3701 - 14.7 V, which is checked with a voltmeter at the battery terminals. The needle on the standard voltmeter is in the red zone at the end of the scale.
— The voltage regulator is faulty
Most likely there is a short circuit between its terminal “Ш” (“DF”) and “ground”. Replace the voltage regulator with a new one or a known good one.
The generator makes noise or “howls” when operating
The nut securing the generator pulley has come loose, the generator bearings are worn out, there is an interturn short circuit or a short circuit to ground in the stator winding (the generator “howls”), a short circuit in one of the generator valves.
Notes and additions
— The causes of such malfunctions as: the warning lamp does not light up after turning the key in the ignition switch and starting the engine (the standard voltmeter shows normal voltage) or the lamp does not light up and the voltmeter does not work (or the control devices do not work completely) are not a malfunction of the generator, but a burnout of the control panel lamp, a break in its power supply circuit, a blown fuse No. 5 (F16) in the mounting block (responsible for supplying current to the excitation winding of the generator), a break in the power supply circuit of the instrument cluster (orange and orange-blue wires), a malfunction of the ignition switch.
— If the discharge warning lamp lights up at idle, and goes out when you press the gas pedal and while driving, you must first check the tension of the generator drive belt, and if that doesn’t help, then the problem is most likely in the additional resistors located in the relay mounting block and fuses. If they fail, the generator is not excited at low speeds, and therefore does not charge. It is necessary to either completely change the mounting block, or unsolder additional resistors and replace them with new ones.
More articles on generators for VAZ 2108, 2109, 21099 cars
Which cars are affected by the problem?
Naturally, the probability of the battery receiving an excess charge on new foreign cars is significantly lower than on products with a significant mileage from the domestic automobile industry. However, there are a number of models where overcharging is considered a common problem.
We are talking about classic VAZ cars. Among the “classics”, this malfunction most often occurs on the “six” (VAZ 2106).
Trucks and some UAZ models are equipped with on-board voltage sensors and sometimes these sensors begin to signal an increase in the charging current between the generator and the battery (18V or more). This is not normal and may lead to rapid overcharging. However, often the problem is in the sensors themselves, which show incorrect information.
Naturally, the probability of the battery receiving an excess charge on new foreign cars is significantly lower than on products with a significant mileage from the domestic automobile industry. Nevertheless, there are a number of models on which overcharging is considered a common problem. We are talking about VAZ cars in the classic version. Among the “classics”, this malfunction most often occurs on the “six” (VAZ 2106).
What else to check
- Voltage regulator;
- Generator rectifier unit;
- Diodes;
- Generator for broken windings;
- Generator brush assembly;
- Contacts on the terminals of the generator, mounting block.
Let's continue... Diodes are checked with a test light or multimeter. If one of them is broken, the entire rectifier will have to be replaced.
To check the stator winding you need the same device. The resistance between the fasteners of the rectifier unit is measured. If there are no contacts between them, you need to replace either the winding or the entire generator.
The generator itself often fails due to wear on the brushes. To check them, you need to remove the brush assembly and measure the length of the elements. If it is 5 mm or less, the brushes must be replaced.
Almost all of the above system components are replaced when they fail, since they cannot be repaired. Only some of the generator problems can be repaired, but this can only be done by a qualified auto electrician.
The worst thing is if problems with recharging occur while on the road. Without recharging the battery, it will eventually run out completely. And even if you manage to find the cause of the breakdown and eliminate it, you will no longer be able to start the engine with the starter. It will be possible to start a VAZ-2017 with a dead battery only from a tug or pusher.
Breaks in the winding
If there is a break in the excitation winding, then the generator does not charge. This is determined simply. It is enough to touch the generator with your hand. If the winding breaks, the device will heat up. To diagnose more accurately, the end of the excitation winding is disconnected from the brush and connected to a terminal on the generator. The measurement is carried out using a multimeter from the battery.
If there are breaks, the multimeter will not show anything. If a signal lamp is used instead of the device, it will not light up. In order to find the problematic coil, wires from the battery are connected to each of them in turn. If the break is inside, the coil is replaced. External breaks are removed using a soldering iron.
What to consider when choosing a new battery
According to the passport, the battery is designed for 3-5 years of active use (in reality it turns out to be less). Therefore, over time, it becomes necessary to buy and connect a VAZ 2107 battery instead of a failed one.
When purchasing a new battery, you should consider a number of parameters and characteristics. Battery type: serviced and maintenance-free. The first option allows you to check and replenish the electrolyte level. This makes it possible to use the battery longer.
The next question is: what power will the battery on the VAZ 2107 be most efficient. Batteries with a capacity of 50–60 Ah are suitable for this model. However, given that modern cars are equipped with energy-intensive equipment, it is better to opt for more capacious batteries. In addition, carburetor VAZ models require more powerful batteries - they consume more energy when starting. In terms of dimensions, the VAZ 2107 requires power supplies with dimensions of 242*175*190 mm. The vast majority of samples available on the market fit them.
When choosing a battery, you should also take into account the place of residence of the owner of the “Seven”. For those who live in the south, you can purchase a less powerful battery. Northerners are advised to prefer a battery with a higher capacity: in the cold, the car starts with high energy consumption.
Algorithm for finding the cause
We looked at typical faults. But it is important to find the main reason. If the car has standard equipment and there are no abnormal energy consumers, then you can begin to diagnose the generator directly. If there are additional consumers, it is better to turn them off. In this case, it must be disconnected physically, from the on-board network.
First, measure the current output with the motor turned off. Here it is important to find out whether there is energy consumption when the engine is not running and the ignition is turned off (the key is also removed from the lock hole). It is important that even the alarm is turned off during the measurement process. Most domestic cars exhibit small current leaks. It always gets stuck somewhere “to ground” (that is, the negative wire comes into contact with the body). But often they are not able to completely discharge the battery even in two or three weeks.
Next, all consumers are connected and the leakage is measured in the same way with a multimeter. If it is large, then the reason should be sought not in the generator or battery, but in one of the devices in the on-board network. If no leakage currents are detected at rest, then most likely the VAZ generator is not charging. We have already discussed the reasons.
Diagnostics and repair work
If you suspect that the battery is not charging, you need to carry out a series of diagnostic and repair work in this order:
- Stop the car, turn off the engine.
- Raise the hood and check the integrity of the drive belt. If it is intact, check its tension by pressing with a screwdriver or other tool on the belt branch in the middle between the generator and crankshaft pulleys. The deflection in this place should be 12–17 mm.
- If the deflection is greater than the specified value, tighten the belt. To do this, use a 17 mm wrench (for units type 9412.3701, a 13 mm wrench) to unscrew the nut that secures the generator to the tension bracket. Use a screwdriver (pry bar) to move the generator away from the cylinder block. Tighten the nut and re-measure the belt tension.
- Connect one probe of the car tester. set to continuity or resistance measurement mode, to the positive terminal of the battery, and the second to contact “30” of the generator. If the device does not beep, replace the wire. Next, check the ground by connecting the tester probes to the negative terminal of the battery and the generator housing. If there is no contact, check all the negative connections of the battery to the body and engine. Clean and lubricate contacting surfaces (wire lugs, bolts, washers, nuts) with an anti-corrosion agent (WD-40 or similar). It is also worth checking the condition of the battery terminals and the reliability of their connection to the wires. In any case, it is better to remove the wires, clean their tips and battery terminals with fine sandpaper and treat them with WD-40.
- Using a multimeter (voltmeter), measure the voltage at the battery terminals. The device should show 11.7–12.6 V. Then start the engine and repeat the measurements. When the generator is working, the voltage at the terminals should be 13.9–14.5 V.
If the voltage is lower, the cause must be sought in the rectifier, stabilizer or generator windings. In any case, further diagnostics require dismantling the generator.
Video: tensioning the alternator belt
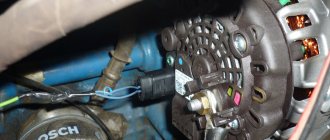
Dismantling the generator
To remove the generator set, you must:
- Open the hood, disconnect the wires from the battery.
- Using a 17 mm wrench (for units type 9412.3701 a 13 mm wrench), completely unscrew the nut securing the device to the adjusting bracket.
- Move the generator towards the cylinder block.
- Remove the drive belt.
- Disconnect the terminal block from the device.
- Remove the protective cap from terminal “30” and use a 10 mm wrench to unscrew the nut securing the wire terminals. Disconnect the wires and take them to the side.
- Using a 13 mm wrench, unscrew the nut securing the unit housing to the bracket on the cylinder block. Remove the bolt from the bracket.
- Remove the generator by lowering it under the car.
Video: removing the generator
Checking the rectifier module, stabilizer and windings
To diagnose the rectifier, regulator and windings, you will need a multimeter and two pieces of wire with clamps. To check, you need to carry out the following work:
- Switch the multimeter to resistance measurement mode.
- Connect the positive probe of the device to terminal “30” of the device, and the negative probe to its “ground”. The resistance between these points may vary, but if it is close to zero, the windings may be shorted to ground or one of the rectifier diodes may be broken.
- Check the positive diodes of the rectifier for breakdown. To do this, connect the positive probe to terminal “30”, and the negative probe to any of the bolts that secure the rectifier. If the resistance value tends to zero, a breakdown is evident.
- Check negative diodes. To do this, the positive probe of the device must be connected to one of the rectifier fixing bolts, and the negative probe to the device body. Here, too, the resistance should not be close to zero.
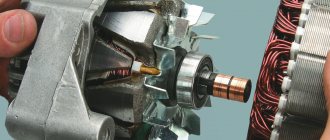
- Check whether the rotor winding is shorted to the housing. Attach the tester probes to the rotor slip ring and the generator housing. If current passes between them, the armature needs to be replaced.
- Remove the voltage regulator by unscrewing two screws with a Phillips screwdriver.
- Remove the device complete with brush assembly from the generator housing.
- Assess the condition of the brushes and their mobility. They must be intact, move freely in the brush holders and protrude from them by at least 5 mm.
- Connect the wire from the positive terminal of the battery to terminal “B” of the regulator, and connect the wire from the negative terminal of the battery to terminal “A”. Switch the multimeter to voltmeter mode and measure the voltage on the regulator brushes. If there is no voltage, the regulator is faulty and must be replaced.
Generator repair
If problems are detected with the rectifier module or windings, the faulty part must be replaced. To do this you will need:
- Use a screwdriver to secure the generator impeller by resting one of the blades against it.
- Using a socket or 19 mm socket wrench, unscrew the pulley fixing nut.
- Remove the pulley elements from the device shaft.
- Using a Phillips screwdriver, unscrew the four bolts securing the front and rear covers. Remove the connecting pins.
- Leaning the front cover of the unit against a wooden or plastic block, lightly hit the shaft with a rubber hammer or mallet to knock the cover off the stator.
- Remove the front cover and the bushing located under it.
- Place the back cover of the generator in a vice (you can use two bars) and carefully knock the rotor out of it.
- Using an 8 mm socket, unscrew the three nuts that secure the rectifier module and winding terminals. Remove the bolts and windings from the housing.
- Using a 10 mm socket, unscrew the generator output nut “30” and remove the washer. Remove the rectifier module.
- Replace faulty parts with new ones. Reassemble the generator in reverse order.
Video: repair of VAZ 2107 generator
No charging: signs and reasons
If the voltage from the generator for some reason stops supplying the battery, it will be discharged in a few days. And in the event of a complete failure of the battery installation, you will have to provide the entire on-board network, including the ignition system, yourself. So she can work for no more than an hour.
Signs of no charge
Symptoms that the alternator is not charging the battery include:
- a constantly burning or intermittently turning on warning light on the dashboard;
- rapid battery discharge;
- reduction in the performance of individual electrical devices on the machine's on-board network.
Signal lamp
There is a special lamp on the dashboard of the “Seven” that indicates that the battery is not charging. If the generator circuit is operating in normal mode, the lamp lights only when the ignition is on until the power unit starts operating. It should go out after the engine starts.
. If it continues to light, most likely the battery is not charging.
It also happens that the control lamp turns on periodically. This is a sign that voltage is either not supplied to the battery at all, or is supplied inconsistently.
Battery drains quickly
If the generator or its circuit malfunctions, the battery will not receive the voltage necessary to charge it. In addition, she will have to power part of the car’s electrical equipment, consuming her own electricity. In such a situation, the battery will quickly run out. You will be able to understand this when difficulties arise in the process of starting the engine. Receiving insufficient energy, the starter will sluggishly turn the crankshaft flywheel or only “click” the traction relay.
Reduced electrical performance
Some electrical appliances will also help you understand that the generator is not operating normally. If you suspect a malfunction in the operation of the generator set, you can, for example, start the engine, turn on the headlights (if they have conventional incandescent or halogen lamps) and see how they shine. If the generator malfunctions, their brightness will be an order of magnitude lower, because the lamps are also designed for a certain rated current. A decrease in performance may also be observed at the heater fan. It will spin the blades noticeably worse. When it is turned on, the light from the headlights will be even weaker.
Reasons for lack of charging
There are few reasons for the battery not charging. These include:
- violation of the integrity (break) of the drive belt;
- belt loosening;
- a break in the wiring of the electrical circuit of the generator or severe oxidation of the connecting terminals;
- rectifier malfunctions;
- voltage regulator failure;
- a break in the generator windings or a short circuit.
Belt break
Although the belt is designed for 50 thousand km, it can break even after several days of use. Especially if there are defects in the pulleys of the device itself, the crankshaft or the pump. In itself, a break in the generator drive belt is not dangerous for the engine, but only if this malfunction is detected immediately. And the point here is not so much the lack of charging, but the pump stopping. If it stops working, the engine will instantly overheat. And this is already fraught with burnout of the cylinder head gasket with all the ensuing consequences. So if the warning light comes on or other symptoms of alternator malfunction occur, the first thing to do is check to see if the drive belt is intact. To do this, you need to stop the engine, open the hood and perform a visual inspection of the generator set drive.
Loosening the belt
The drive belt must have a certain tension. When the tension is weakened, it will slip on the crankshaft pulley, not providing the number of rotations of the generator rotor that is necessary to generate current with the required parameters. A sign of a loose belt is a characteristic whistle, which most often occurs when air humidity increases. When the belt slips, the warning light usually does not come on, but in some cases it may turn on for a while or blink.
Open circuit and terminal oxidation
The battery will not charge even if the integrity of the wires in the generator connection circuit is damaged. The battery charging circuit is quite simple: just one wire connects the positive terminal of the battery to terminal “30” of the generator set. It is through this that the voltage is supplied. The battery negative is connected to ground, to which the generator housing and the corresponding winding terminals are also connected. You just need to check for contact between the indicated points in the circuit.
Oxidation of the battery terminals, as well as their unreliable connection to the wire tips, can also significantly affect the current supply. You can check the condition of the terminals visually, but you cannot determine how the current flows by eye. It is better to once again clean and retighten all wire connections on the battery and generator.
Failure of the rectifier module
If the rectifier breaks down, no current will flow from the generator to the battery. The block itself is a board with six silicon diodes (3 positive and 3 negative). If at least one of them burns out, the rectifier will need to be replaced, since it cannot be repaired.
Regulator failure
A stabilizer malfunction is characterized by a change in the characteristics of the current supplied to the battery. In other words, the charging voltage is supplied to the battery, but it is higher or lower than required. The regulator also cannot be repaired and must be replaced if it fails.
Malfunction of phase windings
If a break occurs in the windings, the generator stops performing its tasks. When an interturn short circuit occurs, the installation may behave differently. Typically, a sign of such a breakdown is a characteristic burning smell and a hum during operation. These two faults can only be diagnosed after removing the device from the car. Repairing a generator in the event of a break or short circuit involves replacing the burnt winding or stator assembly.
Let's start the renovation
There may be several reasons for the battery not charging. The instructions below are quite universal and are suitable for any case.
Troubleshooting algorithm:
- First of all, we check the serviceability of the belt and its tension. If it is damaged or loose, charging will be less than normal and will ultimately lead to battery failure. The belt is also partly responsible for the operation of the cooling pump, so a damaged belt can cause other problems as well.
The problem can be determined by the sign when, when the engine is running, the voltage in the power circuit is within the normal range, but immediately after connecting the load it disappears. Another sign of a weak belt may be a whistling sound. It may appear immediately after starting the engine or when large current consumers, such as lights, are turned on.
This needs to be corrected, since a poorly tensioned belt slips during operation of the mechanism, which accelerates its wear. It must be tightened to a deflection level of 12 - 17 millimeters with a pressure of 10 kgf, or replaced with a new one;
You can check the relay by applying a battery voltage of up to 12 volts to it and connecting a multimeter to the brushes. There should be tension. Next, you need to apply a voltage of 16 - 18 volts to the relay. There should be nothing on the brushes;
It’s worse when a diode breakdown occurs, then there is no voltage drop, but this has a detrimental effect on the battery. An alternating voltage enters the machine's power circuit, which leads to boiling of the battery, destruction of the plates and a decrease in its service life.
- If the VAZ 2107 battery charging does not light up, or rather, the indicator light on the instrument panel does not light up, despite the fact that the voltage gauge shows normal voltage and despite all this there is no charging, then the problem lies in the contact at the terminals. To fix this, you need to disconnect the wire and clean it with sandpaper or a file and check the integrity of the wire from the battery to the generator.
- Another reason why the battery charge lamp does not light up at all is a break in the armature winding. It can only be determined after disassembling the generator and measuring the winding for an open circuit using a tester or a multimeter.
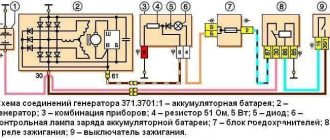
Below is a diagram for charging the VAZ 2107 battery:
VAZ battery charging circuit
Sometimes it disappears not because of an electrical fault, but because of the weather. The problem time is spring and autumn, when when driving through puddles the charge is lost, until the light bulb comes on. It does not recover immediately, but after some time, even in a few minutes. This is due to water getting on the belt, but the protection will not help.
The time it takes for the charge to disappear depends on belt wear and tension. Naturally, the tighter the belt is, the better. If you install DRL, the load on the generator will become less and the current drop will not be so significant.
Cars are equipped with alternating current generators. Depending on the model and electrical equipment installed on the vehicle, Delco Remy CS generators of various capacities CS-121 and CS-130 can be installed. The numbers indicate the outer diameter of the stator plates in millimeters.
CS generators are equipped with a built-in voltage regulator. The electrical characteristics of the Delta stator, rectifier unit and rotor with slip rings and brushes are similar to those used in earlier generators. A standard pulley and impeller are used, however, no hole is provided for testing.
Relay
An automobile relay is a switch that serves to close and open sections of electrical circuits at certain levels of electrical and non-electrical input quantities. It acts as a load current switch when the performer, for example, a starter, generator, fan or other structure, consumes more current.
Electric relay device:
electromagnet - a wire that is wound on a coil with a core of magnetic material;
anchor - a special plate that controls the contacts;
switch (switching, opening, closing).
When an electric current passes through the winding of an electric magnet, an electric field arises, pressing the armature to the core, using a pusher to move it, switching the contacts. There are two main types of autovoltage regulator relays used on Zhiguli 2106 cars.
Non-contact electric relay-regulator type 121.3702. A fairly new unit used by drivers these days, which does not require any settings or additional regulation.
The magnetic electric regulator with the index PP-380 is an old-style device, currently its production has been suspended, it is not produced as a part for the VAZ 2106.
The interchangeability of the relay allows you, when changing from one type to another, to not have to modify the electrical charging circuit of the machine.
Before you begin replacing the voltage relay, you need to check the functionality of the regulator. You should start the car, and the crankshaft rotation speed should be 2500-3000 rpm. Then you need to turn off all electrical consumers, except the ignition, and measure the voltage at the battery terminals with a voltmeter.
Missing, reasons
Charging on the VAZ 2106 disappears for the following reasons
1. Wear of generator brushes
2. Failure of the generator diode bridge
3. Charging relay malfunction
4. Problems with the generator.
The generator won't work
If there is no battery charging in a VAZ 2106 car, then the brushes in the generator set may be to blame. They may have extreme wear or jam in the brush holder sockets.
To check the brushes, the generator does not need to be removed from the vehicle, since the brush assembly is accessible and easily removed. Worn brushes are either replaced or the entire assembly is replaced. The movement of the brushes is checked by pressing. The brushes should slide into their wells easily and return easily. Otherwise, the brushes are removed and the wells are cleaned, and burrs are also removed from the brushes themselves.
The contact of the generator with the vehicle ground is also checked and, if necessary, restored. Sometimes it is enough to slightly release the fastening of the wire with ground and move the wire from side to side, which will be enough to restore reliable contact. For complete control, the wire is removed and the tip is stripped.
Connection
Work on replacing the VAZ 2106 charging lamp relay should be carried out in the following sequence:
We unscrew the 2 fasteners of the charging lamp relay and remove the product from the installed studs.
We mark the supply wiring with a marker or felt-tip pen to control the correctness of the reverse connection of the updated product. If the relay is incorrectly connected to the vehicle's power supply network, it stops functioning, which will create an emergency situation due to a sharp increase in the potential difference at the output contacts of the generator device.
We disconnect the wire circuit, replace the relay with a working product and carry out the reverse installation.
When testing the charging lamp relay, it is strictly forbidden to make a short circuit between the output elements of the circuit, because this will cause defects in the current rectifier unit. Before testing the charge regulator relay, you must ensure that the alternator belt tension is optimal. Other energy resources should not be connected to the electrical circuit of the generator excitation winding, because the voltage drop on the VAZ 2106 charging relay under study may exceed the optimal values.
How to check
Checking the VAZ 2106 voltage regulator is performed on a car with a fully charged battery:
Start the car and set the crankshaft speed to 2500-3000 rpm.
Turn off all unnecessary electrical consumers, with the exception of the ignition itself, of course.
Measure the voltage at the battery terminals with a voltmeter. It should be equal to 14.2V plus or minus tenths.
For any significant voltage deviations from the norm, the regulator must be replaced. For this:
Unscrew the two nuts securing the relay and remove the regulator from the studs.
Mark the wires with a marker so that during further assembly you do not mix them up, and this is important, because if you mix up the wires, the regulator will stop working and, as a result, the voltage at the generator output will increase.
After disconnecting the wires, replace the regulator with a new one and install in the reverse order of removal.
Good day, dear reader. In this article, I will tell you as simply as possible about the operating principle of the VAZ 2109 - 2114 generator and about the reasons why the generator does not charge. So that everything is clear to an ordinary person who has not studied electrical engineering, I will not delve into the physics of what is happening and use scientific terms, but I will explain everything, as they say, “on the fingers.” So, let's begin!