What are the reasons for the charging failure, how to fix the problem on the road or in the garage - this is discussed in this manual. The electrical circuit of the LADA Niva 4×4 is built according to a classic layout and has undergone virtually no changes since the start of production. Why, knowing its weak points and moving from the obvious to the complex. You will quickly find the root cause.
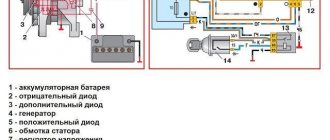
Generator connection principle, drawing:
Basic information about the state of the charger can be obtained from the behavior of the instrument cluster - flashing of the indicator, emergency operation of electrical equipment (headlights, interior lighting, heater) and the engine.
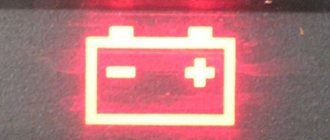
Niva charging lamp is on
The charging lamp on a Niva car is necessary to monitor the operation of the generator.
If the generator and its electrical circuit are working properly, it should light up after turning the key in the ignition and go out after starting the engine.
If the charging lamp does not go out after starting the engine, there may be a malfunction somewhere.
Using the example of the charging warning lamp for a Niva 21213 car, we will go through the faults leading to such a problem, and we will also try to fix it ourselves.
The Niva battery charging lamp is on, causes of malfunction
— The generator drive belt (and pump) is loose
The belt slips on the generator pulley. Not letting it gain momentum. There is no charging, the generator lamp is on.
It is necessary to check the belt tension by pressing on it with your hand. Permissible deflection is 10-15 mm. If we pull the belt more, moving the generator away from the engine, or replace it with a new one.
— The generator voltage regulator is faulty
In this case, the generator will not charge. The charging indicator lamp in the instrument panel will light up after the engine starts.
It is difficult to check the voltage regulator; it is easier to replace it with a known good one and see if the lamp goes out. Here, just in case, is a diagram that can be assembled to test it.
Checking the generator voltage regulator
— “Open” in the electrical circuit to terminal “61” of the generator
Before starting the engine, terminal “61” is the ground of the battery charging indicator lamp. After starting, this is a plus (the lamp goes out). But, if the plus from the output is not supplied to the lamp, then instead the minus comes from the ground wire of the instrument cluster and the lamp does not want to go out.
It is necessary to check the brown-white wire going to pin “61”. Perhaps its tips have oxidized or it has broken off. Here's a diagram to help.
Connection diagram for generator 371.3701 of a Niva 21213 car with a 1.7 l carburetor engine
— Brushes are stuck (or very worn)
As a result, they do not come into contact with the slip rings of the rotor (the charge is not removed), and the generator does not generate electric current. You will have to remove the voltage regulator with the brush holder and check the condition and mobility of the brushes. Maximum permissible wear 6 mm.
— The generator excitation winding is damaged
Perhaps the winding terminals have become unsoldered from the slip rings. Or there is a “break” or short circuit in it. In this case, the generator will produce voltage only at high speeds (the lamp goes out after pressing the gas and lights up at idle).
In any case, you need to remove the generator from the engine and check it. We check for a short circuit in the rotor windings.
The ohmmeter shows that the resistance tends to infinity - there is no short circuit in the generator rotor windings
Then we check the resistance between the rotor slip rings. If it is less than 3 ohms or it tries to go to infinity, then the winding is damaged.
— The generator stator winding is damaged
A “break” or short circuit has appeared in the winding. When the windings are short-circuited to ground, the generator howls. To identify a malfunction, you will have to check the winding with an ohmmeter for the presence of these faults.
The diode bridge of the generator has failed
Moreover, if there is no charging at all, the main (positive and negative) diodes are most likely damaged. If charging appears only at high speeds, the additional diodes from which the excitation winding is powered have failed. See “Checking the diode bridge of the Niva 21213 generator.”
Notes and additions
The listed faults can be supplemented by a blown fuse No. 2 in the mounting block. But if it burns out, not only the battery charge lamp will not work, but also all other warning lamps. As well as other consumers of the vehicle’s on-board electrical network, which it protects.
Source
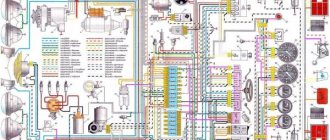
Relay block diagram above the gas pedal
| F1 (16A) | Heater fan, rear window defroster, rear wiper and washer system, windshield washer pump |
| F2 (8A) | Steering column switch, windshield wipers, hazard warning lights, breaker relay (in turn signal mode), reverse light, instrument cluster (coolant temperature gauge, fuel level gauge, tachometer, warning lights: turn indicators, differential lock, parking brake, emergency condition of the working brake system, insufficient oil pressure, fuel reserve, battery charge) |
| F3 (8A) | Left headlight (high beam), high beam indicator lamp |
| F4 (8A) | Right headlight (high beam) |
| F5 (8A) | Left headlight (low beam) |
| F6 (8A) | Right headlight (low beam) |
| F7 (8A) | Side light lamps in the left front and left rear lights, license plate lights, side light indicator lamp |
| F8 (8A) | Side light lamps in the right front and right rear lamps, backlight lamps for the instrument cluster, cigarette lighter, switches, heating and ventilation control unit |
| F9 (8A) | Hazard switch, breaker relay (in hazard mode), heated tailgate glass relay contacts |
| F10 (8A) | Sound signal, interior lamps, brake lamps in the rear lights |
| F11, F12 (8A) | Reserve |
| F13 (8A) | Fog light relay contacts in rear lights |
| F14 (16A) | Cigarette lighter |
| F15 (16A), F16 (8A) | Reserve |
| Fuse number and rating | Protected circuit |
| Main unit | |
| 1 (16A)* | Electric windows for front doors Electric side mirrors |
| 2 (16A)** | Air conditioning fan, air conditioning compressor |
| 9 (16A)* | Side mirror heaters |
| 10 (16A)* | Central interior lamp |
| Additional block | |
| 15 (16A)* | Air conditioning fan, air conditioning compressor |
Also interesting: Generator Niva 2121, 21213, 21214: which one is installed, replacement
Located under the glove box on the passenger side.
Source
Chevrolet Niva battery lost charging - how to find the reason and what to do
The light with the battery icon coming on does not bode well. You need to understand that this happens if the battery does not receive charge from the generator. There may be many reasons for this, but in any case, it can be stated that the car is powered only from the battery, and its capabilities are very limited: even with consumers turned off, the range will be enough for no more than 30 km. Therefore, information about the causes of such a malfunction will not be superfluous.
Where to start checking
If the VAZ 2107 battery icon does not light up, the voltmeter gives normal readings, but the battery does not charge, which means there is no (or insufficient) contact at the terminals.
Their severe oxidation can cause the voltage from the generator to the battery simply not to flow. Therefore, it is necessary to remove the terminals, thoroughly clean them, as well as the battery terminals, then reconnect the battery to the on-board network and check the functionality of the charging system. In the case when the voltage on the VAZ 2107 battery is still below normal, you need to measure it at the output from the generator with the engine running. Is there a big difference between the readings on the terminal and on the battery? Try cleaning the contacts and checking the wire connecting the battery to the generator. Broken - requires replacement.
The next element that is checked is the generator drive belt. If it becomes loose, it will slip along the pulley, which is why the generator will not be able to generate the required amount of electricity. And although charging will be carried out (provided the circuit is in good condition), it will not be enough. At the same time, the engine is running, the voltmeter shows the norm. However, if the system is loaded a little more - for example, by turning on the headlights - then the voltage drops sharply. Then, if the battery charge on a VAZ 2107 disappears, this indicates that the tension belt is loose and slipping. The belt should be tightened; if it wears out during operation, replace it. But you can’t overtighten either: excess belt tension puts an overload on the pumps and generator bearings.
The third component of the circuit that is checked during the initial diagnosis is fuse No. 10 (in the fuse box). It is he who is responsible for supplying voltage to the battery: the VAZ 2107 battery charging fuse has blown - the system will not work.
Why does the Chevrolet Niva battery charging light come on?
Only at first glance it seems that the electrical circuit in the battery-alternator section is simple, and therefore it is quite simple to find the cause of the malfunction if the battery charging lamp is on.
In fact, the battery recharging system includes many components, so such a task can be quite non-trivial. Of course, normally the battery warning light should go out soon after the engine starts. If this does not happen, this means only one thing: the supply of electricity spent on cranking the crankshaft is not replenished.
Possible reasons for lack of charge
The lighting of a light bulb is not a breakdown that promises catastrophic consequences. We are only talking about the fact that there are problems with the power supply, and that, most likely, after a while the engine will stall. In any case, the driver has time to stop or drive to a place where they can start looking for a problem.
Let's look at the most likely reasons why the Chevrolet Niva battery is not charging.
Belt break
One of the most common and commonplace reasons. As you know, the generator is powered by the engine; its shaft is driven by the crankshaft via a belt drive.
Even if all the parameters of this transmission are configured correctly, time and loads do their dirty work. The belt is wearing out. This means that it may develop problem areas in the form of thinning or tearing, which ultimately leads to the belt breaking. As a result, the generator stops working, and the electrical circuit automatically switches to powering the equipment from the battery.
Damage caused by old age is quite common and can be eliminated by simply replacing the belt with a new one. But sometimes damage to other circuit components leads to the same result. For example, one of two videos. In such cases, simply replacing a torn belt will give a temporary result, so in any case you need to make sure that the malfunction arose precisely from old age. Otherwise, you will have to look for the cause of the belt break.
Stator burnt out
A generator is a device that converts a mechanical type of energy into electrical energy due to the induction of a magnetic field. This process requires the presence of a movable and stationary element. The last one is the stator. If overloaded, the stator winding may burn out. This malfunction occurs if:
The immediate cause of stator failure is the destruction of the wiring insulation and subsequent short circuit.
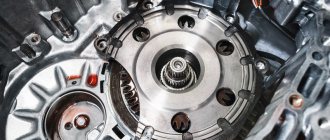
Rotor damage
The rotor, as you already understood, is the rotating part of the generator, responsible for generating electricity.
Violation of normal electrical contact between the commutator and the rotor is the most common reason why charging a Chevrolet Niva battery is so bad that the light comes on. The second cause of rotor failure is operational wear of its components, in other words, old age.
Bearing or pulley wear
The generator bearings work with almost the same load as related parts on the engine itself, because thanks to the belt drive they rotate synchronously. It is no coincidence that they sometimes fail, especially if they are made of poor quality material. The cause of their wear may also be mechanical contamination, that is, the ingress of solid or liquid substances.
As for the pulley, its wear is also due to aging. The situation is aggravated by inaccurate installation of the half-wave belt, leading to the formation of a curtain that is uneven in geometry.
Diagnosing “flying” bearings is usually not difficult, as is a problem with a pulley, which can be detected by visual inspection.
In general, generator faults, especially if the car is not new, can be complex. In other words, if you find that the problem lies in a faulty relay-regulator, it must be unconditionally replaced. But during this operation it is worth checking the functionality of other structural elements of this unit. Otherwise, after such repairs, it may turn out that after a few weeks it will be necessary to fix other problems - for example, change bearings, a belt or a pulley.
If the breakdowns are serious, internal, it makes sense to purchase a new generator. If you are convinced that it has failed due to excessive load, buy a generator with increased power and get ready to part with an amount of 4,000 to 10,000 rubles.
In most cases, the factory regeneration procedure will cost you much less, and performance will be restored almost to the nominal level. It is even more profitable to carry out repairs yourself, if qualifications allow.
However, the figures given apply only to domestic cars. On some foreign cars, the price tags for new generators reach $1,000–2,000, and they cannot be repaired.
Burnt out wiring, poor contact in the circuit
Violation of normal contact is typical for the entire circuit in the generator-battery section, as well as a violation of the integrity of the wiring. Typically, a visual inspection allows you to identify the problem, and its solution is not a financially expensive undertaking.
Quite often, the lack of charging of the battery is explained by the banal abrasion of the generator brushes (when their height decreases to 5 mm or more). The same problem often occurs with the slip rings of the generator.
Failure of the relay regulator
It is this unit that is responsible for distributing the electricity generated by the generator in order to supply it to the battery. You can check the performance of the RR using a voltmeter or multimeter set to voltage measurement mode. The parameters are measured at the battery terminals; for the Niva, 13.85 V ±0.35 V is considered normal. If the actual voltage is outside this range, we can conclude that the Chevrolet Niva battery has lost charging precisely because of a malfunction of the relay regulator.
The location of this element depends on the year of manufacture of the car. On old Nivas with a classic engine compartment layout, the relay is located in the area of the right wing, that is, it is remote. On more modern versions of generators, the relay-regulator is structurally combined with the brush assembly, and you need to look for it on the generator.
The RR cannot be repaired; if it malfunctions, the unit is replaced with a new one.
The charger on Niva 21214 has disappeared
What are the reasons for the charging failure, how to fix the problem on the road or in the garage - this is discussed in this manual. The electrical circuit of the LADA Niva 4×4 is built according to a classic layout and has undergone virtually no changes since the start of production. Why, knowing its weak points and moving from the obvious to the complex. You will quickly find the root cause.
Generator connection principle, drawing:
Basic information about the state of the charger can be obtained from the behavior of the instrument cluster - flashing of the indicator, emergency operation of electrical equipment (headlights, interior lighting, heater) and the engine.
The battery charge indicator light is constantly on.
The phenomenon indicates that the generator has stopped its normal operation; at this moment, the BS is powered by the battery. With a normally charged battery, you have 30-40 km of mileage left to get to the repair site. Disconnect consumers as much as possible, arm yourself with a multimeter and a set of keys.
A) Belt break.
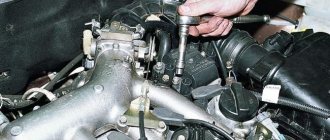
Pay attention to the presence of a belt on the pulleys of the water pump and generator. To return it to its place, you will need 17 or 13 socket wrenches, depending on the year of manufacture of the car, as well as a strong flat-head screwdriver.
Disconnect the HF position sensor (for example, on 21213,21214).
Loosen the nuts securing the tension bar and slide it to the side towards the cylinder block.
Place the belt on your seat.
Upon completion of installation, adjust the tension, controlling the deflection when pressing with your thumb on the belt gap between the generator and pump pulleys - 10-15 mm, pump and crankshaft - 12-17 mm. Failure to comply with this requirement may result in the belt slipping with further damage and rupture.
B) Burnout of wires, poor contact in the circuit.
If the circuit opens at terminals B, V and Ш, tighten the nuts or replace the terminals with new ones.
C) The charging relay-voltage regulator has failed.
To initially check the performance of the LV, use a multimeter (voltmeter), which allows you to record the voltage directly at the battery terminals. Normal voltage is considered to be in the range of 13.85±0.35V . If it is different from this, we diagnose the element. The location where the charging relay is located near the Niva is determined by the age of the car. Thus, a remote relay can be found on the right fender liner of a car with a classic engine compartment layout; more modern modifications of generators are equipped with a LV combined with a brush assembly.
The element is not repaired, but replaced completely. To assess the condition, you will need power supplies of 12-14 V, followed by replacement with 16-22 V, and also an incandescent lamp of 1-3 W. According to the diagram drawing, apply current to the voltage regulator in series. If the first test is characterized by the operation of the lamp, and the second - by the absence of glow, then the LV is working.
If there is a break, the lamp will not light up at all; if there is a breakdown, it will glow constantly. In addition, weak charging, as well as its absolute absence, is often explained by abrasion of the brushes (residual height less than 5 mm) and slip rings of the generator. If the first part is changed along with the brush holder, then the second is restored by grinding, grooving or removing the remains of the old rings and pressing in new ones. It is recommended to supplement the disassembly of the unit with a total cleaning.
D) Diodes or rectifier unit are faulty
To assess the condition of the mentioned components (negative, positive and additional diodes), arm yourself with a low-power lamp and battery. Diodes are indicated by numbers in the diagram: 1. Positive
Performance is determined by connecting “+” to terminal 30 of the generator (for positive), bolts of the rectifier block (for negative) or to 61 (for additional), and “-” to its body (for negative) or to any of the bolts of the rectifier block ( for positive and additional). The glow of the lamp indicates that the diodes have been shorted, which leads to the conclusion that the diode bridge will have to be replaced. Be attentive to the indications on the instrument panel. Often the icon lights up half-heartedly and is not noticeable in bright light.
The belt has stretched or broken
The drive belt for the generator and water pump from the engine shaft does not break very often, but it stretches regularly. As a result, it begins to slip on the pulleys, the generator, especially under load (high beams plus air conditioning, etc.), does not develop the required speed, and the voltage at its output drops. As a result, the battery is undercharged and may even be discharged, helping the “exhausted” generator and feeding the on-board network with its energy.
Poor belt tension is characterized by a drop in the voltage of the on-board network and a peculiar whistle when the speed increases sharply, especially in wet weather. The problem is treated quite simply. Find the generator mounting bolt on the tension bar. We loosen it, use a pry bar to move the generator to normal belt tension and tighten the bolt.
Bolt fixing the tension bar of the generator on NivaExpert opinionAlexey BartoshSpecialist in repair, maintenance of electrical equipment and industrial electronics.Ask a questionHelpful! An over-tightened belt is just as bad as a loose one. It can tear, leaving you spending the night on the road, and will very quickly stretch again. So you shouldn’t tighten the belt “for future use”. Its tension force should be approximately the same as indicated in the diagram below.
With normal belt tension, deflection A under a force of 10 kgf should be within 10-15 mm, and deflection B within 12-17 mm
The charging lamp does not light up.
Since the indicator on the instrument panel is a link in the generator excitation circuit, the absence of flashing when the ignition is turned on leads to loss of its functionality. Whether the lamp is to blame or the reason lies elsewhere (voltage regulator relay, lock contact group), can be understood by disconnecting terminal 61 from the generator with the ignition on, followed by shorting the wire from the instrument panel to the car body. If it catches fire, check the serviceability of the rotor winding, brushes and “chocolate”. If the circumstances are otherwise, examine the performance of fuse No. 2 (8A) and the light bulb by replacing the ones mentioned with known good ones.
How to replace the tension roller
The design of the generator roller is quite simple. The bearing is its main part. If the belt loosens or slows down, you need to check the bearing itself by turning it by hand. A serviceable roller rotates quietly, without jerking or biting. If the roller is faulty, it is necessary to replace it, which is possible even in the garage, with a minimum set of tools.
Install a pry bar or other tool that can prevent the crankshaft from moving so that the clutch disc is blocked. By loosening the bolt that secures the roller, relieve the tension on the belt. Having completely unscrewed the axial bolt, the tension roller is removed. Then a new roller is installed and the belt tension is adjusted.
The signal lamp is blinking
Blinking of the battery indicator, as a rule, indicates problems in the brush assembly, as well as the occurrence of a short circuit in the “W” and “-” terminals of the voltage regulator. The brushes, in turn, can “freeze”, not reaching the rotor slip rings at low and medium speeds. You have already read how to fix them in our instructions. However, the reason why charging on the Niva 2121, 2131, 21214 and 4×4 Urban disappeared is not always the above-mentioned components under the hood. In particular, the culprit of weak charging or its complete absence is an unmaintained battery with an insufficient volume of electrolyte or closed banks, loose and oxidized terminals, broken and melted wires. Additional difficulties arise when dirt, dust, traces of fuel and lubricants, etc. accumulate on suspended equipment.
No battery charging reasons: 2 comments
I think that many Niva owners have had to deal with such a problem when the battery lost its charge.
Certainly. If you have only recently been using your car, you may not have had to deal with such a problem, but still, most drivers have already solved this issue more than once. Based on my experience of owning a Niva and other domestic cars, I can give quite a few cases and reasons that are the main ones when charging fails. Here you can familiarize yourself with many problems: https://atlib.ru/blog/136-neispravnosti-generatora—priznaki-diagnostika-prichiny-proverka Below I will try to describe each of the problems in more detail.
Generator brush wear
Usually, brushes make themselves felt gradually and charging does not disappear immediately, but over time. That is, it becomes smaller and smaller with every kilometer traveled. Eventually, one day the brushes will wear down to such an extent that the generator will not be able to fully charge the battery, and you will have to recharge it from a charger. What should be done:
If upon measurement it turns out that their residual length is less than 12 mm, then this indicates that it is time to change them. Also, uneven wear is not allowed.
What else to check
- Voltage regulator;
- Generator rectifier unit;
- Diodes;
- Generator for broken windings;
- Generator brush assembly;
- Contacts on the terminals of the generator, mounting block.
Let's continue... Diodes are checked with a test light or multimeter. If one of them is broken, the entire rectifier will have to be replaced.
To check the stator winding you need the same device. The resistance between the fasteners of the rectifier unit is measured. If there are no contacts between them, you need to replace either the winding or the entire generator.
The generator itself often fails due to wear on the brushes. To check them, you need to remove the brush assembly and measure the length of the elements. If it is 5 mm or less, the brushes must be replaced.
Almost all of the above system components are replaced when they fail, since they cannot be repaired. Only some of the generator problems can be repaired, but this can only be done by a qualified auto electrician.
The worst thing is if problems with recharging occur while on the road. Without recharging the battery, it will eventually run out completely. And even if you manage to find the cause of the breakdown and eliminate it, you will no longer be able to start the engine with the starter. It will be possible to start a VAZ-2017 with a dead battery only from a tug or pusher.
Failure of the rectifier unit (diode bridge burnt out)
This is the most common reason why there may be either weak charging or its complete absence. In order to find out whether this is the reason, you must perform the following steps:
Usually, if one of the diodes burns out, the charging does not disappear completely, but becomes only slightly less than the nominal value. But even in this case, the generator will not be able to properly charge the battery and it will run out more and more often. If all the diodes burn out, which also happens quite often, then charging disappears completely.
Failure of other generator parts
More complex and expensive generator parts such as the rotor and stator (winding) can also fail over time. But this happens extremely rarely, so it’s worth checking them at the last moment. If you are still sure that everything is in order with the remaining elements, then you should do the following:
Most owners experience failure of such serious elements. like a rotor or stator, they prefer to buy a new generator, but it is still worth checking everything first and it is better to buy burnt parts and replace them. It will be much cheaper.
The above tips and recommendations apply not only to the classic Niva 21213 and 21214, but also to the more modern Niva Chevrolet, since the principle of operation of the car’s main power sources is almost the same.
Because You are not logged in. To come in.
Because you are not a trusted user (phone number is not verified). Enter and confirm your phone number. Read more about trusts.
Because The topic is archived.
Replacing the power supply with your own hands
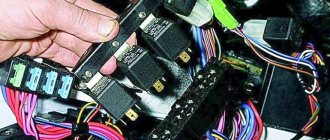
If any electrical circuit fails, the first thing you need to do is check the condition of the fuses and relays. This simple operation can be performed independently. The driver needs to know where the Niva Chevrolet fuse box is located and the purpose of the fuse links installed in it.
To protect electrical circuits on cars, fuses are used, located in a special mounting block. On a Chevrolet Niva VAZ 2123, this block is located inside the instrument panel, to the left of the plastic steering column cover.
In addition to the main unit, the Chevrolet Niva has an additional unit that is responsible for the operation of the car’s engine. This safety element is located in the passenger compartment and is located on the right side of the instrument panel behind the glove box.
The placement of blocks in the cabin is the same for cars of all years of manufacture.
The main blocks of machines are divided into two types - before 2009 and after. These devices are not interchangeable. The blocks behind the glove box are identical in design.
On a 2005 car, you can easily install a block from a 2011 car. The designation of the fuse rating is marked on the body; on the assembly itself there is a number of the fuse link and a pictogram of the purpose.
There are no fuse markings on the main unit cover.
If any electrical circuit in the vehicle fails, the condition of the fuse must be checked.
If it is necessary to replace parts, it should be taken into account that the VAZ 21214 fuses on the Niva injector belong to two different types:
Therefore, when you go on a trip, you need to take with you spare inserts of different types.
If, for example, a cigarette lighter fails on the road, you must:
The remaining fuses and relays on the VAZ 21214 are changed using a similar scheme.
In case of burnout or mechanical damage, it is necessary to repair the unit by replacing its components or the entire assembly.
To replace the main unit, follow these steps:
The photo shows some stages of dismantling the block.
Disconnecting the wiring plugs
Other fuse or relay blocks on the VAZ 21214 are replaced in the same way.