Maybe someone is interested! Fuel injectors standard installed on VAZ vehicles
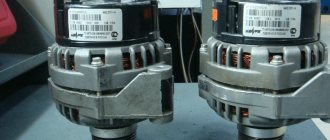
Recently, AvtoVAZ has significantly expanded the range of injectors installed on the assembly line. Currently, 4 types of Siemens Deka injectors are “seen” on VAZs: “thin” 20734 (orange) / 20735 (blue) and “thick” 6393 (beige) / 20734 (yellow). The situation with the same number of injectors of different design is incomprehensible, but it is a fact.
BOSCH injectors with catalog numbers 0 280 158 502 and 0 280 158 022 are also installed.
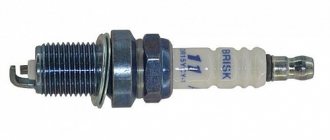
Bosch 0 280 158 022
“Thin” Siemens differ in the location of the nozzles, in 20734 all 4 nozzles are located in the same plane in a cone-shaped recess, and in 20735 they are spaced apart in pairs in two different planes (see photo). Such injectors are called “double-flare”, each torch pours fuel onto “its own” inlet valve, and not onto the partition between them.
“Thick” Siemens Deka nozzles are available in two types: 6393 (beige) and 20734 (yellow). It is unclear what caused the use of the same code (20734) for structurally different injectors. I don’t want to think that there weren’t enough numbers or imagination :). There is an assumption that the “thin” nozzles for some reason did not suit Siemens-Deka and they were replaced with ordinary ones.
No clear relationship has been found at this time between engine type and installed injectors. At this time, statistics are being collected on installed injectors on different engines. At the moment, the generalized table looks like this:
A month ago, trouble happened - the car began to stall at idle, the speed began to pick up worse, and traction appeared only after 2,500 thousand revolutions. Using a simple method of checking the spark on the spark plugs and turning them off one by one, I found out that the 3rd cylinder was not working. The compression in it is about 11. That is. the problem was with the fuel supply. Suspicion fell on the injectors. I tried to check the injectors myself - when voltage is applied to the contacts, a working injector should make a quiet clicking sound. I also measured the resistance of the injector windings - everything was normal. I went for diagnostics, connected it, checked it, looked at the graphs, used an oscilloscope and came up with a verdict: the injector on the 3rd cylinder is not working, the rest are on the way. By the way, I have SIEMENS
DEKA VAZ
6238
And then the question arose:
Option 1.
Clean the old ones.
the pleasure costs fifteen hundred. But there is no guarantee that they will not be covered soon. Option 2.
Install BOSH, the ones that fit my 8 - these are BOSCH 0 280 150
996
are not currently produced and they are very difficult to find and the price is very high, and their replacement, which is now on the market - this is BOSCH 0 280 158 110 requires firmware adjustments .
Because I didn’t intend to flash it - this option is due to the price and difficulty in finding spare parts. didn't fit. The advantage of Bosch injectors is that they have 4 nozzles and should work better (Siemens has 2 nozzles) Option 3.
Install the same
Siemens 6238
gray ones.
I started looking for injectors and called several stores. Some people didn’t even know about Siemens injectors and hadn’t even heard about BOSCH replacements. Not anywhere, not even in the Ladovsky store near the VAZ Auto Show - there was only one type of injectors and on another fuel rail assembly (I have an aluminum square one), which also did not suit me. In the end, I found a Siemens kit, the price is for all 4 pieces. 2150 rub. Replacement work cost 600 rubles, and at the same time we changed the fuel line gaskets.
FakeHeader
Comments 18
What kind of brain do you have?)
And on 8k there was a BOSCH one, it seems, with a chip that had to be soldered and programmed for firmware)
Guys, tell me who changed the force to BOSCH 0 280 158 110? Is it necessary to flash it? VAZ 2109i 2001
If you change the forces and their performance differs from the parameters specified in the firmware, then inevitably you need to adjust the firmware, which is complete crap, because from the section and parameters “VAZ injector” and that’s it. That's why they shove it at people who don't understand and install it. For example, there were Siemens deck 6238 - 4 pcs. with a performance of 1.6537 and one piss began to leak, or worse, flow through the housing or the winding resistance was zero, which is not uncommon. So, a man goes to the store and buys a VAZ injector, and the seller pushes him, for example, Avtelov’s 6393! They look completely identical, only the color is different, but the performance is different! The poor fellow sticks her into the ramp and gets sausage. Then he starts to get his mind blown in the store that the force is dead, and they tell him that we don’t sell dead meat, only fresh stuff. In this performance category, Siemens deck 6238 and Bosch 0280150996 green are identical. But the Boshevsky ones are structurally different and fit a different ramp. Something like this. It’s the same with DMRV 037 and 116. The firmware for them has different calibrations, which need to be changed to the type of DMRV and registered in the firmware. Install spark plugs with resistance that is not suitable for short circuit? And what ? Can you tell me for a moment that it runs and starts? Yes, I agree that perhaps they have less resistance and therefore a stronger spark, but then the question is, how long will the coil last or what is worse than the coil? Even, I didn’t sign for jokes))))) Here is a table of interchangeability of VAZ engines, where the asterisks indicate identity in performance, but this does not mean that they are structurally identical. The plant always swims against the current ((((
Interior and salon
The interior of the VAZ-2112 (16 valves) features all the best from two brothers. The best features of the station wagon's interior are combined here. The backs of the rear seats are divided into two parts. Each of them can be folded. This significantly increases the volume of the trunk. And this is the only advantage. Inside, everything is more modest than in all foreign cars of the same classes and the same years.
Another disadvantage, according to owners of the VAZ-2112 (16 valves), is the complete absence of any sound insulation. When driving with music on, you can clearly hear the engine and power steering working.
Which injectors are better to install on a VAZ-2114
The first, but not the last sign of injector failure is increased fuel consumption.
In addition, detonation, failures when changing engine operating modes, and unstable idling may occur.
For 2016, AvtoVAZ installs several types of injectors and many of them are interchangeable. Today there are several main types - three types of Bosch injectors and three types of Siemens injectors. First, let's look at Bosch injectors.
BOSCH injectors
Their use depends on the engine size and the number of valves. There is no particular variety in VAZ-2114 engines, so there are only the following options:
- Injector BOSCH 0280 158 022. The nozzle is marked black, has a productivity of 1.9644 mg/sec, and operates at a standard pressure of 3.8 atmospheres. Installed on a 1600 cc engine with 16 valves. Works with January 7.2 controller.
BOSCH nozzle: productivity 1.9644 mg/sec
BOSCH nozzle: productivity 1.922 mg/sec
The new injector may have a thicker O-ring and, accordingly, a longer nozzle. The injectors are completely interchangeable. These injectors can only work with the January 5.1 controller.
In addition, you need to know which engine control controller is installed on the car, since January 5.1 and January 7.2 may require injectors of different capacities.
Siemens Deka injectors
There is no certainty with Siemens injectors, since the plant can install injectors of different markings on the same engine. However, there is a clear difference between the injectors for eight-valve and 16-valve engines .
In the first case, the nozzle is single-flame, in the second - double-flame, that is, it sprays fuel onto each of the intake valves separately.
They are marked as VAZ20734 (orange markings) and 20735 (blue markings). On eight-valve engines, a Siemens 6393 nozzle with a thick torch can be used. Its productivity is 1.662 mg/sec, and its operating pressure is 3 atm . Each of these injectors can be installed on a VAZ-2114 engine.
Repair
Before removing the injectors from the dismantled rack, it is advisable to check their functionality. To check you will need:
- four identical containers,
- tester,
- wires.
Functionality check
- Connect the gasoline supply and drain hoses and the power connector to the rail with injectors.
- Place the rack over the measuring cups.
Place the rack over the measuring cups
The shape of the cloud should be approximately the same for all nozzles
After the war, Germany received a ban on the development of injectors for aircraft engines. And engineers began adapting direct injection systems for passenger cars, discovering another important advantage compared to carburetors - efficiency.
Vladimir Berestenev
Replacement or flushing?
Some problems can be eliminated by cleaning and flushing. Others are “treated” only by replacement.
Table: problems with injectors
| Malfunction | Remedy |
| reduced performance | flushing, replacement if flushing fails |
| leakage | flushing, replacement if flushing fails |
| increased productivity | replacement |
| valve sticking | replacement |
| unstable valve sticking | flushing, replacement if flushing fails |
| overestimated or underestimated winding resistance | replacement |
In these cases, flushing is not a panacea. This method should be used taking into account the mileage and quality of service during operation.
During operation, the injector nozzles inevitably become coked and clogged with resinous deposits. The picture is aggravated by low-quality fuel, which can introduce additional pollutants.
For some time, fuel atomizers continue to operate without any visible changes, but sooner or later contaminants accumulate, changing the shape of the spray and reducing performance.
When to change: self-diagnosis
The fuel system of an injection engine has a fairly extensive architecture and faults can only be identified after an accurate diagnosis of each of the system elements. For example, a drop in engine power may be the result of either a malfunction of the injectors, insufficient performance of the fuel pump or a clogged fuel filter.
In addition, jerks and dips, unstable idle and difficult starting, increased consumption, can occur when the injector is simply clogged.
You can check the injectors themselves directly on the engine without removing them. To do this, just start the engine and remove the wires from the connector one by one. If the stability of the engine changes at the same time, the engine starts to oscillate, then the injector is in order. If, when removing the wires from the connector, the stability of the motor does not change, the injector needs to be cleaned or replaced.
Preparation for dismantling
Replacing injectors may not be necessary for much longer if you purchase special additives added to the fuel. Thanks to them, the injector stays clean longer. But you shouldn’t shift all the responsibility onto them, because with prolonged use, dirt and deposits formed create a kind of blockage for the passage of fuel, and this, in turn, causes irreparable damage to the engine.
Of course, you can contact a service center, where they will not only clean the injectors, but also check the machine. However, you can carry out the repairs yourself, because this way you can save a lot. Please keep in mind that the ramp on which the injectors are located is a kind of “center” in each machine. Any independent intervention, including cleaning the injectors, can result in significant damage.
To replace, you must purchase the goods that will be required for the job. First of all, this is a special product for cleaning the injector; it is sold in special aerosol cans. It is advisable to replace the rings on the injectors themselves. It would be useful to purchase any button, a light bulb whose power will not exceed 21 W, and a chip used to connect the wires to the injectors.
Replacing injectors (full technology)
Before replacing injectors on a VAZ-2114 of any generation, it is necessary to relieve the pressure in the power system.
To do this, remove the rear seat cushion, open the hatch and remove the contact block from the fuel pump. Now it is de-energized and will not build up pressure.
We start the engine and wait a few minutes until all the fuel in the system is used up. The pressure has been relieved, now you can safely remove the old injectors and replace them with new ones. We proceed according to the following algorithm:
- We de-energize the car by removing the negative terminal from the battery.
Disconnect the negative terminal from the battery
Remove the hose from the pressure regulator
Disconnect the electrical connector of the throttle position sensor
Disconnect the connector from the idle air regulator
Disconnect the connector block from the injector wires
Unscrew the fuel rail mounting bolts
We dismantle the fuel rail with injectors
Squeeze the spring clip and disconnect the electrical connector of the injector.
Rock the injector and remove it from the fuel rail.
Installation of injectors is carried out in the reverse order. Before installation, it is advisable to check the integrity of the o-rings ; if they have lost their elasticity, it is better to replace them with new ones. The injectors are installed and ready for further use. Good luck to everyone!
Video about removing and cleaning injectors on a VAZ-2114
It may be leaking, you forgot to check it, if you inflate the ramp with forces up to 3 bar and the forces get wet from the side of the mesh, then your cleaning is a “dead poultice”, and therefore, without further disassembling, you put the ramp in place and go buy a new injector.
It may be leaking, you forgot to check it, if you inflate the ramp with forces up to 3 bar and the forces get wet from the side of the mesh, then your cleaning is a “dead poultice”, and therefore, without further disassembling, you put the ramp in place and go buy a new injector!
Checking the performance of the fuel pump on a car.
There are 2 objective methods for checking the performance of a fuel pump, this is assessing the fuel pressure in the rail while driving with a large fuel supply, and directly measuring the performance of the pump with the back pressure created by the regulator. The latter method is more accurate and simpler. Performance must be checked if there is any suspicion of problems in the fuel supply system; it is recommended to check performance after replacing injectors or replacing a fuel pump, as well as before setting up the car program, in order to eliminate possible problems during setup and save time by immediately replacing those that are not suitable for your engine or faulty components.
To check using the first method, you need a pressure gauge with a sufficiently long fuel hose (1.5 meters). The pressure gauge is connected to the fuel rail and output through the edge of the hood onto the windshield (under the wiper). Having connected the pressure gauge, turn on the ignition, the readings of the pressure gauge should be about 300-380 kPa (depending on the regulator), make sure there are no leaks in the connections and start the engine, after that you need to move off and engage 3rd gear by pressing the gas to the floor and holding it there position, accelerate the car to the cutoff, while in the fuel cutoff range, monitor the behavior of the pressure gauge needle. The pressure indicated by the pressure gauge should be 300-380 kPa (the same as what was measured with the engine off) for naturally aspirated cars or 300-380 kPa + boost pressure for turbocharged or compressor cars. If the pressure drops, there are problems in the system, usually this is a mesh the fuel pump, the fuel pump itself, or (which is rare) the fuel supply pipe may be pinched.
The advantage of the second method is that you do not need to leave the garage and the car may not be tuned and its engine may not be broken in. You will need a 5-liter container (for example, a bottle of drinking water), a stopwatch (found in many mobile phones), 2 wrenches for 17. This technique can only be used on cars that have the regulator installed in the fuel rail (classic design) and have a return line to return fuel to the tank! Using 2 keys on 17, loosen the connection on the return line; on 2108-15 this connection is located in the middle of the engine shield above the rack, to the left of the vacuum booster. On a 2110-12, simply follow the path of the return line from the regulator to the transition point to the body, and disconnect it there. Don't lose the rubber ring on the tube. Place the rubber hose with a nut into an empty, dry five-liter canister. After this, remove the plastic panel cover on the passenger side and look for the fuel pump relay there. It can be identified by a thick dark gray wire suitable for the contact group. Pull out this relay and short-circuit its contacts with a jumper wire. (if you have a diagnostic program and a laptop, you can control the fuel pump from it, then there is no need to disassemble the panel). As soon as gasoline starts flowing into the canister, start the stopwatch. After five liters are collected, stop the stopwatch, turn off the pump and calculate the performance of the fuel supply system: