Domestic G8s are equipped with non-contact ignition systems. This means that the process of accumulating the energy necessary to ignite the combustible mixture is controlled using a distributor. In this article we will tell you where distributor 2108 is located on a VAZ car, what are the signs of its breakdown and what the car owner needs to know about replacing the unit.
How does a distributor work?
The distributor design is based on a rotating shaft (the so-called roller), driven by the engine camshaft. Devices and elements of the distributor are mounted on the shaft, which operate from the rotation of the shaft.
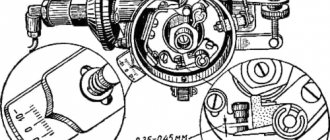
Operating principle of the distributor (ignition sensor-distributor) VAZ 2108, 2109, 21099
The operating principle of the distributor includes the operation of all its elements.
The rotor (runner) rotates and distributes the spark over the side contacts in the distributor cover. Then it goes through high-voltage wires to the spark plugs. The spark is supplied to the slider itself from the ignition coil through a movable central contact in the cover.
The Hall sensor has a gap through which a rotating screen with four teeth and four slots passes. When a screen slot passes through the gap of the sensor, a pulse is sent to the ignition system switch, which is a signal to supply a spark.
The centrifugal ignition timing regulator increases the ignition timing when the distributor shaft rotation speed increases due to the divergence of its weights and the impact on the Hall sensor screen, which allows the fuel mixture to burn in a timely manner and with maximum efficiency.
Operating principle of a centrifugal regulator
The vacuum ignition timing regulator, due to the vacuum transmitted to its housing, also affects the Hall sensor screen and increases the ignition timing angle when the load on the engine increases (the greater the load, the greater the vacuum, the greater the angle).
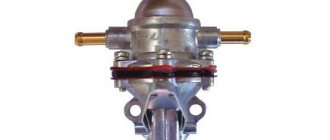
Vacuum ignition timing regulator for VAZ 2108, 2109, 21099 cars
By changing the position of the distributor relative to the scale on the housing of the auxiliary units, you can manually adjust the ignition timing up or down.
Adjusting the angle with a distributor, VAZ 2108 car
Notes and additions
— Two different ignition distributors (distributors) with different covers were installed on VAZ 2108, 2109, 21099 cars. For engines 2108 and 21083 this is distributor 40.3706, for 21081 – 40.3706-01. They are structurally identical, but differ in the characteristics of the vacuum and centrifugal ignition timing regulators. The distributor cover 40.3706-01, for engine 21081, is marked with yellow paint, the distributor 40.3706 is red. There are no differences between them, they are interchangeable.
Operating principle
On a VAZ-2109 car, the distributor works as follows:
- high voltage voltage is generated by a coil according to the principle of electromagnetic induction;
- This voltage goes through the high-voltage wire to the central contact in the ignition distributor cap, which is constantly in interaction with the slider;
- the latter distributes the electrical impulse over four contacts, each of which corresponds to a specific spark plug;
- The slider constantly rotates when the engine is running and thereby closes the central contact with the contacts of each spark plug.
The voltage to generate a spark is supplied to the spark plugs through wires in the order of operation of the cylinders - this is 1-3-4-2. The slider moves due to the drive shaft connected to the engine camshaft.
Replacing the distributor
Before you begin to remove the distributor (ignition distributor) on the VAZ 2109-2108, you must disconnect the negative terminal from the battery. This procedure is not as difficult to perform on your own as it might seem, but there are very important points that are worth paying attention to.
This will be discussed in detail during the description of the procedure. To perform this repair you will need the following tools:
- 10 open-end wrench or socket wrench
- Socket head and ratchet handle
- Phillips blade screwdriver
The procedure for removing and installing the distributor on a VAZ 2109-2108
So, before you begin removal, pay attention to the installation position of the distributor relative to the body. Be sure to remember or mark it so that when installing it, put it in the same position.
distributor position marks on VAZ 2109-2108
Then you need to disconnect the high-voltage wires from the distributor cap: 4 spark plugs and one central one from the ignition coil: disconnecting high-voltage wires from the distributor on a VAZ 2109-2108
It is also necessary to disconnect the plug with wires, which is clearly shown in the photo below: disconnecting the plug of wires from the distributor on a VAZ 2109-2108
Then we pull off the thin hose from the distributor vacuum corrector: disconnecting the hose from the distributor vacuum corrector on a VAZ 2109-2108
Now you can proceed directly to unscrewing the nuts securing the VAZ 2109-2108 distributor itself. There are three of them in total: one is located in the center at the top: nuts for fastening the distributor on the VAZ 2109-2108
And the other two are located on the sides, and it is more convenient to unscrew them with a regular open-end wrench, since a ratchet with a head simply cannot get there. Do not unscrew the side ones completely yet, as you need to set the TDC marks.
But before removing the ignition distributor, it is necessary to install the piston of the 1st cylinder at TDC. To do this, through the hole in the gearbox housing (after removing the rubber plug), you need to align the marks on the housing and the flywheel. With the gearshift lever in the neutral position, use a 19mm key to turn the crankshaft pulley to the required torque. This is what it should look like: setting timing marks on a VAZ 2109
And only after this we unscrew the two remaining nuts and begin to remove the distributor, removing it from the studs to the side: replacing the distributor with a VAZ 2109-2108
If you decide to replace the distributor, then you need to buy a new one, the price of which for VAZ 2109-2108 cars is about 1000 rubles. Before installation, you must remove the cover by unscrewing the two bolts securing it: remove the distributor cover on the VAZ 2109-2108
And when you put it in place, make sure that the outer contact of the slider during installation is exactly opposite the output of the first cylinder on the cover: installing a distributor on a VAZ 2109-2108
That is, after the distributor has been placed on the housing studs, lean the cover and see if the contact position of the runner coincides with the output of the 1st cylinder: correctly set the position of the distributor runner on the VAZ 2109-2108
And after that, we finally tighten all the nuts securing the distributor and install the cover in its place. And do not forget that it is necessary to maintain the original position of the distributor relative to the body in order to maintain ignition timing.
Causes of failure
There are several main reasons why a distributor may break and only need to be replaced:
- The appearance of cracks on the cover;
- Broken Hall sensor;
- Burnt out slider;
- Burnt contacts on the cover;
- Loose bearing holding the Hall sensor;
- Poor contact in the Hall sensor plug.
All these situations, in addition to poor sensor contact, are a signal to replace the distributor.
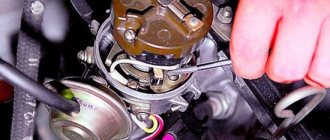
Unit location
Adjustment
In some cases, it is enough to adjust the ignition system to return the engine to its previous performance.
There are several symptoms that indicate this.
| Symptom | Causes |
| Excessive detonation of the piston system | A characteristic feature of this problem is a ringing sound when you press the gas pedal. The reason is early ignition, which can cause deformation of the piston rings. |
| Black smoke from the chimney when starting the engine | This indicates that the ignition is too early. |
| Engine power has decreased, fuel consumption is increasing | Here the ignition is already late, so the mixture cannot burn completely |
| The engine begins to idle unevenly | Caused by both early and late ignition. |
To adjust the distributor, you will need:
- Tachometer;
- Slotted screwdriver;
- Strobes;
- Wrench.
Let's get to work.
- Start the engine, increase idle speed to 800 units. Make sure that the engine temperature is at least 90 degrees.
- Align the crankshaft according to the marks on the cylinder block cover.
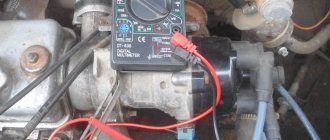
- Connect a 12 Volt light bulb to the output wire from the distributor. The second contact goes to ground.
- Turn on the ignition and watch the lamp. If it does not light up, loosen the nut that holds the distributor plate and begin to carefully, slowly turn the distributor body counterclockwise until the lamp lights up.
- Drive several kilometers at speeds up to 50 km/h. If the symptoms of the problem disappear, you have made the correct setting.
- If there are no consistent detonation sounds, you have set the ignition too late. Here the distributor needs to be turned clockwise.
- If there is no positive result, the distributor will have to be repaired or replaced.
Replacement of distributor and its parts on VAZ 2108, VAZ 2109, VAZ 21099
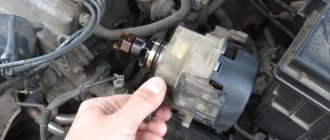
Distributor location: Located next to the battery, at the end of the cylinder head cover. See the photo below for more details:
When to change the distributor? It fails quite rarely; most often the distributor parts, such as the slider, distributor cover and others, must be replaced. Below is a list of malfunctions that occur in the engine when the distributor or its components fail:
- the car starts to jerk;
- the car simply won’t start;
- loss of power from the car engine, the car drives worse;
- increase in vehicle fuel consumption.
Replacing the distributor (ignition distributor) on a VAZ 2108-VAZ 21099
Direct replacement
Removal
1) First, de-energize the engine system by disconnecting the negative terminal from the battery.
2) Next, disconnect the high voltage wires from the distributor cover.
3) Remove the vacuum hose from the vacuum regulator fitting.
4) Then completely unscrew the top nut securing the distributor and wire holder.
5) Remove the holder from the car engine.
6) Use your hands or a screwdriver to disconnect the wire block from the distributor.
7) Now unscrew the two remaining nuts that secure the distributor at the bottom: use a wrench to unscrew the left nut of the distributor.
Then unscrew the right nut.
 Remove the distributor directly from the engine of the car.
Installation: 1) First, remove the two screws from the cover and remove it.
2) Then turn the slider with strictly outer contact opposite the “first cylinder” terminal located on the cover.
3) Install the distributor in the reverse order of removal.
4) Place the negative terminal on the battery and set the initial ignition timing.
Changing the cover
1) First, disconnect all high-voltage wires from the cover.
2) Then use a Phillips screwdriver to remove the screws holding the plastic cover to the distributor.
3) Remove the cover and replace it with a new one.
Note! The cover on the distributor is installed in only one position. And the high voltage wires are put on the cover in the order: 1-3-4-2. There is a marking “1” on the distributor cover itself, start counting from there in order, counterclockwise.
Replacing the slider:
1) First, remove the cover according to the instructions described above.
2) Next, remove the slider from the shaft by pulling it with your hand.
Note! The slider is installed in its place only in one position, when the slot on the shaft is directed in the opposite direction from the contact!
Methods for converting a contact ignition system into a contactless one
Naturally, a huge number of cars (both imported and domestic) equipped with a standard ignition system travel along the roads of our vast Motherland. Increasing the efficiency and reliability of its operation is the dream of any vehicle owner. Nowadays, doing it yourself is quite easy. There are two main ways (we do not consider the option of a completely homemade device) to modernize the ignition system:
- Purchase and installation of a complete set of contactless ignition. Although this tuning option is quite expensive, experts consider it the most “correct” from a technical point of view. Only by completely replacing the standard ignition system can you get a new one that has all the advantages of contactless sparking.
- Modification of the “native” distributor by installing a special module, which is a small-sized “3 in 1” device (sensor, signal amplifier and switching transistor). This modernization option is less expensive and allows you to slightly improve the technical characteristics of the traditional ignition system by eliminating the “problematic” mechanical breaker from the circuit.
On a note! Manufacturers of automobile parts offer users kits that allow them to modify ignition systems for various vehicle models, in accordance with the options described above.
Repair of the ignition distributor (distributor) on a VAZ 2108, VAZ 2109, VAZ 21099
The ignition distributor (distributor) consists of the following parts (see figure below): 1 – o-ring; 2 - coupling; 3 — adjusting washers; 4 — roller with a centrifugal regulator; 5 — support plate; b — dust screen; 7 - slider; 8 - Hall sensor; 9 – lock washer; 10 - thrust washer; 11 – distributor body; 12 - vacuum corrector.
1. Remove the distributor from the VAZ 2108, VAZ 2109, VAZ 21099.
2. Unscrew the two fastening screws and remove the distributor cover. Then remove the slider by pulling the slider up.
3. Replace the slider with cracks, signs of burning, significant wear or corrosion of the outer contact 1. The slider must be tightly installed on the distributor shaft. This is ensured by leaf spring 2. A slider with a weakened or broken spring must be replaced. Using an ohmmeter, measure the resistance of resistor 3, it should be equal to 1 kOhm. Otherwise, replace the slider.
4. Remove the dust shield from the distributor.
5. Unscrew the screw securing the low voltage wire terminal and remove the terminal from the distributor body.
6. Unclench the holder's claws with a screwdriver and remove the wire from the holder.
7. Remove the two screws securing the Hall sensor support plate.
8. Remove the retaining ring from the backing plate pin.
9. Unscrew the two screws securing the vacuum corrector.
10. Using a screwdriver, remove the vacuum corrector rod from the support plate pin.
11. Remove the vacuum corrector from the distributor.
12. Using a screwdriver, lift up the support plate and remove it.
13. If the bushing is scuffed or significantly worn, replace the support plate.
14. Remove the retaining ring from the ignition distributor shaft, and then the thrust washer.
15. Remove the snap ring holding the clutch mounting pin.
16. Replace the torn or lost elasticity o-ring.
17. Drive out the coupling mounting pin using a suitable punch.
18. Remove the ignition distributor drive clutch and adjusting washers. Replace a coupling with severely worn studs.
19. Remove the roller with the centrifugal regulator.
20. Inspect the bushings in which the shaft rotates on both sides of the distributor body. If there are scuffs or significant wear on the bushings, replace the distributor body complete with bushings.
21. Using a screwdriver, remove the two weight springs from the struts. To avoid confusing the springs during assembly, mark the post to which the small spring is attached.
22. Remove the driven plate of the centrifugal regulator with the screen.
23. The weights of the centrifugal regulator must turn freely on the axes. Otherwise, remove the retaining rings securing the weights.
24. Then remove both weights from the axles. Clean the holes of the weights and lubricate them with grease. Replace the roller if it is badly worn or burred.
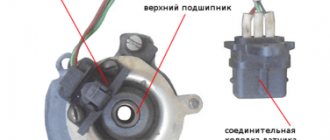
25. To replace the Hall sensor, unscrew the two mounting screws and remove the Hall sensor from the base plate.
NOTE On parts of the ignition distributors, the Hall sensor is attached to the support plate using rivets. In this case, the Hall sensor is replaced as an assembly with a support plate.
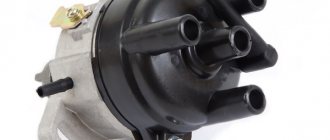
26. Wipe the distributor cover outside and inside. Replace the distributor cap with cracks, signs of puncture (very thin cracks), chips or badly worn contacts. The contact ember should move freely inside the distributor cover. If the contact angle is chipped, cracked, badly worn, or the angle spring is broken, remove it with the spring from the distributor cover and replace it.
27. Reassemble the ignition distributor (distributor) in the reverse order, having first lubricated the bushings and roller with a thin layer of engine oil.
28. Before installing the clutch, install the slider with the outer contact towards the contact of the 1st cylinder in the cover.
29. Then install the coupling on the shaft so that the spikes of the coupling coincide with the slots on the camshaft with the piston of the 1st cylinder installed at TDC.
parts of the ignition distributor (distributor) of the VAZ 2108, VAZ 2109, VAZ 21099
How to properly install the distributor on the 21083 engine
We install the distributor on the 21083 engine independently, without errors.
Let's consider the features of installing a previously removed or new distributor (ignition distributor) on the 21083 engine of VAZ 21083, 21093, 21099 cars. We will carry out the installation taking into account the fact that the position of the distributor on the engine, before removal, is not was not remembered or noted, and the required relative position of the crankshaft and camshaft was not established.
Therefore, it is necessary to install the distributor so that the ignition timing is as close as possible to the required one, so that you can then start the engine.
Features of installing distributor VAZ 2108, 2109, 21099
We install the pistons of the first and fourth cylinders of the engine at the highest dead center
To do this, turn the crankshaft clockwise until the mark on the camshaft pulley matches the protrusion on the rear timing cover.
Fitting marks on the camshaft pulley and rear timing cover
In the hatch on the clutch housing, the long mark (mark) on the flywheel should be opposite the triangular cutout of the scale.
Scale with triangular cutout and long mark on handwheel
You can turn the camshaft pulley mounting nut with a 17mm wrench (to do this you will have to remove the protective cover of the timing drive) or with a large slotted screwdriver by the flywheel teeth in the clutch housing hatch.
Preparing the distributor for installation
Let's remove the cover from it. We install the contact of the slider on the output of the high-voltage wire of the first cylinder. This can be done by placing the cover on the distributor and finding the mark for the output of the first cylinder on it.
Contact of the slider to the output of the first cylinder of the distributor cover
Installing the distributor on the engine
Lubricate the sealing ring of the distributor with engine oil. We insert it into the mounting socket on the studs. In this case, the protrusions on the distributor shaft coupling should fit into the slot at the end of the camshaft. If the first two points are fulfilled, then they will coincide.
The protrusions on the distributor shaft coupling should fit into the slot at the end of the camshaft
We secure the distributor, but do not tighten the nuts completely, since later we will set the ignition timing and it will be necessary to rotate the distributor. Replace the cover and tighten the two screws securing it. We connect high-voltage wires to its terminals.
Setting the ignition timing
We start the engine and rotate the distributor left and right to achieve stable speed. To reduce or increase the ignition timing angle, there is a special protrusion mark on the body of the auxiliary units, and a scale on the distributor body. One scale division is 8 degrees of ignition timing.
Distributor octane corrector
In the future, it will be necessary to set the ignition timing more accurately using a strobe light.
Adjusting the ignition yourself
To normalize engine operation and fix problems, you need to correctly set the ignition timing of your car. Only if these conditions are met can the engine operate correctly. To diagnose and correct errors in the ignition angle, you will need the following tools:
- strobe (desirable);
- tachometer. Most often, such a tool is built into the autotester, so there should be no problems with it;
- slotted screwdriver;
- wrench 10 (socket or open-end).
Having a strobe light will make all your work much easier, so it is better to purchase it for private use.
Before you start directly adjusting the ignition timing and angle, you need to do some preparatory work. First, place the key in the ignition and start the engine. Afterwards, you need to bring the system to a temperature of 90 degrees and increase the idle speed to 800 rpm (using a tachometer) using the fuel regulator knob on the carburetor body.
Hatch in the gearbox
After the engine has warmed up, remove the silicone tube that supplies vacuum from the fitting. You will find the adjusting lever on the panel of the ignition torque distributor, otherwise called the distributor. Its base is attached to the carburetor. Place the free edge of the silicone tube close to your finger to find out if there is a vacuum. If there is one, then the finger will stick to the tube. Reduce the number of revolutions until the vacuum disappears.
Next you need to turn off the engine. The tube should be bent until the lumen completely disappears. Use a wrench to loosen the nuts securing the distributor. The picture shows the flywheel and crankcase hatch. On the gearbox housing there is the same hatch with the flywheel scale. Remove the plug and clean the inspection hatch with the scale from dirt. You will see special strips to help you determine the correct ignition timing.
This is where we will focus our attention.
Take a slotted screwdriver and turn the flywheel until it reaches the long scale bar. Before installing the ignition, this long strip must be strictly opposite the triangular cutout on the scale. This position corresponds to the zero position of the ignition angle. With this arrangement, the first and fourth cylinders with pistons are at the extreme dead center.
If you have difficulty seeing the scale and you are not sure that this particular strip is the longest, check its location on the camshaft pulley. To do this, remove the timing belt cover. The desired mark will coincide with the mark on the back cover of his belt.
Now it's time to connect the strobe. To do this you need to follow a simple sequence of actions:
- connect the red wire to the positive on the coil;
- We throw a dark wire over an arbitrary system in the housing;
- We attach the mount to the wires on the fourth cylinder.
If you are not sure about this sequence of connecting the strobe, it is better to check the sequence of actions according to the instructions from the device.