Error p0340 is defined as a malfunction of the camshaft position sensor circuit (in English - Camshaft Position Sensor A Circuit). It can occur for various reasons - when the camshaft sensor fails, there are faults in its wiring, problems in the operation of the engine control unit (ECU). The error itself is not critical, and if it occurs, the machine can be used. However, some inconveniences arise - increased fuel consumption, reduced power, etc. Eliminating the reasons why error code p0340 was generated is not difficult, and most car owners can handle it.
Technical description and interpretation of error P0340
This diagnostic trouble code (DTC) is a generic powertrain code. The P0340 code is considered a generic code because it applies to all makes and models of vehicles (1996 and newer). Although the specific repair steps may vary slightly depending on the model.
This code indicates that a problem has been detected in the camshaft position sensor circuit. Since we are talking about a circuit, this means that the problem could lie in any part of the circuit - the sensor itself, the wiring, or the ECU. Therefore, the malfunction does not always lie in the camshaft position sensor itself.
Conditions for generating error p0340
It is immediately worth noting that these conditions may differ for different electronic control units on different machines. However, most often, to generate an error signal p0340, the following factors must be met:
- no signals are received from the camshaft sensor for more than 5 seconds of starter rotation;
- No signals are received from the camshaft sensor to the electronic control unit at engine speeds of 600 rpm or more.
For some cars, this error is formed not in one trip, but in three. However, in this case, diagnosis will be difficult.
How to Troubleshoot or Reset Trouble Code P0340
Some suggested steps to troubleshoot and fix error code P0340:
- Visual inspection of all electrical wiring and connectors in the circuit.
- Checking the integrity of the circuit wiring.
- Check the operation (voltage) of the camshaft position sensor.
- If necessary, replace the camshaft position sensor.
- Also check the crankshaft position diagram.
- Replace circuit wiring and/or connectors as necessary.
- Diagnose/replace ECU as needed.
Reasons for the error
There are only three main causes of engine error p0340:
- Damage to the camshaft sensor wiring . In particular, we are talking about her breakup. As a rule, the DPRV has three wires - power, ground and signal. Due to certain mechanical damage, they can fray and the signal will stop going through them. Most often this happens at the terminals or at the contacts (the so-called “chips”, connected to the sensor or connectors of the electronic control unit). Another option is damage to the insulation, which causes them to short to the housing or to each other. The result of such a breakdown will be sending incorrect data to the ECU.
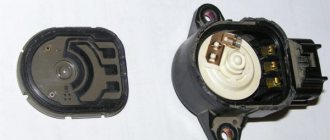
- Damage to the camshaft sensor . DPRV is a fairly simple and reliable device, and it rarely fails. However, when a P0340 error code signal is generated, it makes sense to check the camshaft sensor.
- Incorrect operation of the ECU . This is a fairly rare case, since if the electronic control unit partially fails, not only errors p0340 will be observed, but also many others. However, such a situation is possible, for example, if the control unit software was flashed before the error was generated (for example, when tuning the engine, installing gas equipment, etc.). Accordingly, if there were “glitches” in the firmware procedure or the software itself caused malfunctions, then the ECU may not operate correctly. In even rarer cases, the sensor installation may be misaligned or the unit may experience mechanical damage (for example, after an accident).
Sometimes the cause of error p0340 is incorrect installation of the sensor. However, this is a rather rare case, since it only has one seat. Perhaps the fastening is not strong enough (small tightening torque, which is why the sensor can vibrate when driving) or there is a large gap between the working (sensitive) part of the sensor and the so-called rapper - a tooth on the indicator wheel located on the camshaft.
Diagnosis and problem solving
Check the engine or review the vehicle's service history for recent timing belt repairs. As well as the camshaft sensor or crankshaft sensor.
With the ignition off, remove the chip from the camshaft sensor. Turn the ignition switch ON and verify that the tester illuminates between the ignition voltage circuit terminal 1 and ground.
We check with a tester whether there is a short circuit to ground or an open/high resistance in the ignition voltage circuit. If the circuit test passes and the ignition circuit fuse is open. Check all components connected to the ignition circuit and replace them if necessary.
Connect the tester between ground terminal 2 and ignition voltage terminal 1. Make sure the tester lights up. If the tester does not light up, check the ground circuit for an open/high resistance.
Ignition ON, test for 4.2 to 5.2 V between the signal circuit terminal 3 and the ground circuit terminal 2. If the signal range is less than specified, test the signal circuit for a short to ground or an open/high resistance. Make sure the circuit test is correct and replace the electronic module.
If above the specified range, test the signal circuit for a short to voltage. If the circuit test is correct, replace the electronic module.
Check for the following conditions if repairs were made before P0340 appeared:
- Correct installation of the camshaft sensor.
- Correct installation of the crankshaft sensor.
- Problem with the timing belt tensioner.
- Incorrectly installed timing belt.
- Jump of sprocket teeth through the timing belt.
- The crankshaft sprocket or camshaft sensor is misaligned from the top dead-end (TDC) position on the crankshaft.
If any of the above conditions occur, make the necessary repairs.
Recommended Tools to Troubleshoot P0340
- Reading error codes and engine parameters - LAUNCH X431.
- Car charger - this or similar.
- To measure wiring use a digital multimeter.
- Electrical contact cleaner.
- Advanced diagnostics - oscilloscope.
Previous post Error P0562 - what it means, symptoms, causes, diagnosis, solution
Next entry Error P0137 - what it means, symptoms, causes, diagnosis, solution
On which cars is this problem most common?
The problem with the P0340 code can occur on different machines, but there are always statistics on which brands this error occurs more often. Here is a list of some of them:
- Alfa Romeo
- Audi (Audi A4, Audi A6)
- BMW
- Chery (Chery Indis, Kimo, Tiggo, Fora)
- Chevrolet (Chevrolet Aveo, Cruz, Lanos, Lacetti, Orlando, Epica)
- Chrysler (Chrysler Voyager, PT Cruiser, Sebring)
- Citroen (Citroen Xsara Picasso, Jumper)
- Daewoo (Daewoo Matiz, Nexia)
- Dodge (Dodge Durango, Caravan, Neon, Stratus)
- Fiat (Fiat Albea, Doblo, Ducato, Punto, Stilo)
- Ford (Ford Galaxy, Kuga, Mondeo, Transit, Fiesta, Focus, Fusion, Escape)
- Honda (Honda Civic)
- Hyundai (Hyundai Accent, N1, Getz, Matrix, Santa Fe, Solaris, Sonata, Terracan, Tucson, Elantra, ix35)
- Infiniti (Infiniti fx35, fx45, m35)
- Jeep (Jeep Grand Cherokee)
- Kia (Kia Bongo, Carnival, Optima, Picanto, Rio, Sid, Sorento, Spectra, Sportage, Cerato)
- Land Rover (Land Rover Range Rover, Freelander)
- Lexus (Lexus rx330)
- Mazda (Mazda 3, Mazda 6, Mazda 626, Mazda cx5, Mazda cx7, Tribute)
- Mercedes (Mercedes c180, w203, w204, w212)
- Mitsubishi (Mitsubishi Airtrek, Outlander, Galant, Karizma, Colt, Lancer, Montero, Pajero, Space Star, L200)
- Nissan (Nissan Almera, Bluebird, Beetle, Cabstar, Qashqai, Cube, Maxima, March, Micra, Murano, Navara, Note, Pathfinder, Primera, Sunny, Skyline, Teana, Tiida, X-Trail)
- Opel (Opel Agila, Antara, Astra, Vectra, Vivaro, Zafira, Corsa, Meriva, Omega)
- Peugeot (Peugeot 406, 807, 3008, Boxer)
- Renault (Renault Megane, Scenic, Traffic)
- Rover (Rover 75)
- Saab
- Skoda (Skoda Octavia)
- Ssangyong (Sanyeng Aktion, Kyron)
- Subaru (Subaru Outback, Impreza, Legacy, Forester)
- Suzuki (Suzuki Wagon, Jimny, Grand Vitara, Ignis, Liana)
- Toyota (Toyota Avensis, Vitz, Camry, Corolla, Land Cruiser, Prado, Prius, Highlander, Hilux, Yaris)
- Volkswagen (Volkswagen Golf, Passat)
- Volvo (Volvo s40)
- Vortex (Vortex Tingo, Estina)
- Volga Cyber
- VAZ 2109, 2110, 2111, 2112, 2114, 2115
- Lada Vesta, Kalina, Niva, Priora
- UAZ Bukhanka, Patriot, Hunter
Other errors can sometimes be encountered with fault code P0340. The most common ones are: P0016, P0108, P0113, P0118, P0138, P0158, P0335, P0345, P0351, P0365, P0443.
Replacing the DPRV
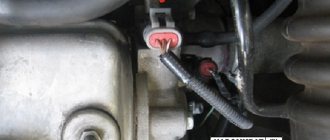
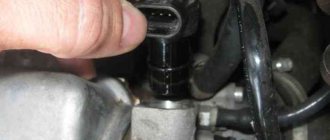
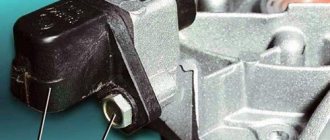
If there is no wire break, and the power supply is not in place, then most likely the problem is in the DPRV itself. It needs to be changed. To work, you will need a 10 mm socket wrench (head). The sensor is located in a visible place, on the right side of the head. Attached with only 2 bolts. But despite the close and convenient location, getting to the distant bolt is very inconvenient. There have been cases in practice when owners removed the intake manifold and the ramp with injectors. Other owners simply broke the sensor housing and then removed the bolt. In general, the process of replacing the DPRV looks like this:
- Disconnect the negative terminal from the battery.
- Disconnect the DPRV plug.
- Unscrew the 2 sensor mounting bolts.
- Install a new DPRV.
- Connect the power plug.
- Place the negative terminal on the battery.
There is no need to start the car right away. First, turn the ignition on and off 2-3 times. Let the ECU see the working sensor. Then you can start the car and check the quality of the engine. If the Check Engine icon is still on, you need to connect the controller and erase error P0340.
Symptoms of the error
On modern vehicles, the P0340 error code is one that causes the Check Engine Light to illuminate on the dashboard. But this is not the only symptom characteristic of such a malfunction.
Experts identify several signs that could potentially indicate problems with the camshaft sensor.
- Problematic ignition. If the sensor does not function or does not perform its tasks correctly, the engine may not start. Ignition problems manifest themselves as the need to turn the starter longer than usual. But it is possible that the engine will not start at all.
- Instability of speed. This appears at idle. The engine may stall; you have to keep it running by pressing the gas pedal.
- The internal combustion engine is tripping. Another sign in which the cylinders miss the ignition phases. Signs resembling tripling appear. The engine sound changes.
- Loss of power and dynamics. The engine begins to gain speed worse, the car accelerates more slowly. Possible failures of the gas pedal, difficulties in accelerating uphill and when the car is loaded.
- Increased appetite DVS. Fuel consumption increases, while at the same time the dynamics deteriorate. This is due to the ECU switching to emergency mode. Phased injection stops working.
Checking the valve's serviceability
It is located in the same horizontal line with the camshaft. The plug is removed and the condition of the contacts is inspected.
The dismantling process is simple - it includes several operations.
The fixing bolt is unscrewed.
The element is carefully removed from the mounting socket. A slight oil leak indicates its presence in the system and is considered a good sign.
Significant efforts should not be made; sealing is ensured by a rubber ring; it is to remove it from the block that requires force.
Accordingly, you just need to overcome her resistance. The mechanism is much easier to remove with a slight twist; the body can be held with pliers.
Visual inspection of the condition of the element.
All grooves should be clean; the presence of hard deposits and dirt indicates problems with the filter.
Removing blockages.
To clean, you need to lower the metal part into a container of gasoline and often disconnect/connect the coil power cable to the battery (it is extremely important to follow safety precautions).
The mechanism should click and remove dirt and hard deposits using a brush.
You can use liquid to clean the carburetor, it takes longer and is less effective, but it is completely safe.
Installing the valve into the socket.
To facilitate valve fixation and increase tightness, it is recommended to lubricate the rubber ring with silicone.
Power connection.
It is recommended to treat the contacts with a special liquid to remove rust and protect against oxidation.
IMPORTANT. You should never remove the factory meshes on the valve stem to “ensure oil passage” - they perform their function and prevent critical breakdowns. Experienced designers worked on the design of the car; each element proved its functionality through numerous tests.
After assembling the mechanism, it is necessary to erase the error and re-check its functionality. In most cases, the problem is solved this way.
What was the problem?
And the problem was in the timing marks. How to check timing marks is available on the Internet. There are a lot of articles and videos. In some incomprehensible way, my timing belt jumped by 2 teeth and because of this, errors began to appear. I had to go and set the marks again.
Updated August 7, 2022.
It's been exactly a month since my timing marks were adjusted. The error never appeared again. I hope this post helps you.
In general, with the VAZ I realized one thing - you don’t need to run and change the sensors first, as I often did, you first need to figure out what the reason is. In my case, errors P0340 and P0335 were a consequence of replacing the timing belt, although for some reason I didn’t think about it.
Source
DPRV error. Malfunction of the crankshaft position sensor (CPS)
During engine operation, the ECU monitors the synchronization between the DPRV and DPCV. Therefore, if the DPKV malfunctions, the engine control unit can easily throw out an error on the DPKV. This happens all the time. Therefore, be sure to check the serviceability of the DPKV circuit if there is an error according to the DPKV.
I showed how to do this in this video.
Especially if these problems began after washing the engine or driving through deep puddles. Treat the DPKV connector with special means
And if you have a car with an MR-140 control unit, for example, a Chevrolet Lacetti 1.8, then it may be worth carrying out the DPKV training procedure
Re: 2114 high signal level of the phase sensor
I couldn't find a topic for my question, so I'll ask it here. The essence of the question: VAZ 2115 error: low signal level from the phase sensor. The client has already changed 3 sensors. This car came to me with a request to turn off the 2nd DC (leave the 1st DC partially). I did my job, but the client came with a complaint “the check light is on”, I connect the scanner and take a look. I say that there is an error in the phase sensor, but he tells me that he has already changed 4 sensors, but the result is the same. The sensor that was on his car was really “dead”, the voltage at the output “C” of the connector was really 0V. He replaced the sensor with another (which he was told was faulty) - the voltage rose to the required 11.8 V, installed it on the machine, the oscilloscope showed the pulses, even, with the marks in place. Released the client. Yesterday he arrived - the check light is on again, the error is again low signal level from the phase sensor. I connect, look, it’s really 0v. I disconnect the sensor (on the connector) 11.8 V, connect it to 11.8. I start the car - it works, the pulses go. (!) BUT the pulses go until you turn off the ignition and the main relay turns off, after which 0.43 V hangs at terminal “C” for some time, and then the voltage rises to 1, 35c. After this, turning on the ignition, the sensor displays 0.38V, which does not rise when starting. If you disconnect and connect the sensor connector, the voltage is restored to 11.8 and the sensor starts working. Again until the ignition is turned off. That's the problem. Today the client will bring another phase sensor, I'll try it. But for some reason I’m sinning on the ECU (it has a Bosch M7.3). If all else fails, I'll reflash it without a phase sensor. Has anyone encountered this problem?
How seriously does the error affect engine performance?
Deviations of valve actuation phases from the calculated values cause:
- increased fuel consumption;
- the appearance of uncharacteristic knocks and noises;
- deterioration of engine technical characteristics;
- increased wear of connecting rod bearings, piston rings and cylinder liners due to the appearance of critical dynamic loads;
Failure to correct the malfunction in a timely manner can cause complex breakdowns of the gas distribution mechanism, requiring its complete replacement.
Re: 2114 high signal level of the phase sensor
A high level is, as you were correctly told, a cliff. When the sensor is disabled, the level will be “High”. The sensor is checked very easily: remove the connector from the sensor, find 1 contact of the connector (wire white/black) - this is ground (GND), on the next contact (pink/black) - +12V (sensor power supply, this is constant power from the output of the main relay ), on pin 3 (pink wire, I think) when the sensor is disconnected there should be 11.8-12.2 V, this is the signal power supply from the ECU. If all these voltages are present, then we proceed to checking the phase sensor itself: pull out the sensor, connect it to the connector, use a tester to test the negative probe on 1 contact, the positive probe on 3 contact. The voltage should be 11.8-12.2V, now bring a knife, screwdriver or flat metal plate to the end of the sensor (where type 13K is written) - the voltage should drop to 0V, removing the plate the voltage will rise to 11.8-12.2 volts. If all these conditions are met, the sensor is operational.
How I fixed errors P0335 and P0340 on a VAZ car
For those who don't want to read: check the timing marks.
My car is Lada Kalina 8kl, 21114.
That day they changed my timing belt, pulley and pump.
For the 8-valve VAZ-21114 engine (11183, 11186), I use the original Gates K015521XS reinforced kit.
They say that Gates is now being installed at the AvtoVAZ plant, but the information is at the level of rumors, I have not found exact confirmation of this.
