The VAZ 2107 gearbox is a structurally complex device designed to convert torque from the vehicle’s internal combustion engine and transmit it to other transmission elements. Switching speeds (gears) in such a box occurs in steps.
The specified gearbox 2107 began to be installed on cars since 1982, and to this day this gearbox is considered the most advanced unit among “classical” mechanics.
Box 2107 is a five-speed manual transmission with a total of six speeds: five forward gears and one reverse speed. Next, we will take a closer look at how the VAZ 2107 gearbox is structured and works.
Five-speed manual transmission
The seventh model Zhiguli has a five-speed gearbox with five forward speeds and one reverse.
It is made of duralumin and has similar covers on the front and back. The clutch cover is attached to the front of the box using studs. A steel cover is installed on the bottom of the device. There are sealing gaskets between the box body and each lid.
The front cover is connected to the clutch housing using a press fit. There is a hole in it for the input shaft to exit and install the cuff.
Inside the box, shafts with gears, synchronizers and gear shifting devices are installed in a certain order. There is an oil filler hole on the right, and a drain hole with a magnetic plug on the bottom.
At the bottom left of the cover comes the speedometer cable, which is driven by the secondary shaft using a gear.
The gear shift lever is on top. Consists of a gear selection device, rods and a locking mechanism. A handle is attached to the lever on top. This entire structure is attached to the lid using three studs.
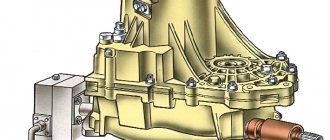
Type of gearbox:
- Clutch cover.
- Breather.
- Box body.
- Rear cover.
- Gear shift lever.
- Lever housing.
- Coupling flange.
- Screw.
- Speedometer drive.
- Tray cover.
- Hole for filling.
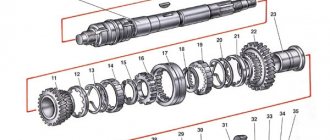
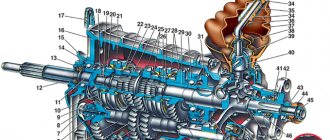
Exploded parts:
- Fork for engaging 3rd and 4th gears.
- Fork for engaging 1st and 2nd gears.
- Fork fastener.
- Engraving washer.
- Fork rod for engaging 1st and 2nd gears.
- Rusk.
- Fork rod for engaging 3rd and 4th gears.
- Gear shift lever.
- Fork rod for engaging 5th gear and reverse.
- Rusk.
- Rusk.
- 5th gear and reverse detent spring.
- Retainer cover with gasket.
- Retainer springs.
- Ball retainers.
- Fork for engaging 5th gear and reverse.
- Sleeve.
Moving parts of the gearbox:
- Intermediate shaft.
- Front intermediate shaft bearing.
- Rear main shaft bearing.
- Input shaft with 4th gear gear.
- Synchronizer clutch for 3rd and 4th gears.
- Synchronizer clutch hub.
- Synchronizer clutch for 1st and 2nd gears.
- Synchronizer clutch hub.
- Front secondary shaft bearing.
- Secondary shaft.
- Intermediate bearing of the secondary shaft.
- Rear secondary shaft bearing.
- 5th gear synchronizer clutch.
- Synchronizer clutch hub.
- Reverse gear.
- Gear with 5th gear synchronizer.
- Speedometer drive gear.
- Gear block for 5th gear and reverse gear.
- Gear block bearing.
- Reverse intermediate gear.
- Reverse idler gear axis.
- Rear intermediate shaft bearing.
- Gear with 1st gear synchronizer.
- Gear with 2nd gear synchronizer.
- Gear with 3rd gear synchronizer.
Types of VAZ gearbox breakdowns
Here are the main types of faults in manual transmissions:
- noise in a used gearbox when the neutral position is engaged may be caused by high wear on the drive shaft bearing or low oil level;
- noise (crunching) when the gears are engaged occurs as a result of wear of the synchronizer or clutch. The box mounting bolts may be loose or the clutch may not be disengaged;
- noise during operation of the box occurs due to wear of some bearings, deterioration of synchronizer clutches, or low/no oil level;
- Difficulty shifting gears occurs due to wear of synchronizer couplings, gears, low oil level, under-disengagement of the clutch, damage to the traction, loosening of the gearbox to the car body.
- spontaneous gear disengagement can be caused by loosening of the gearbox, jamming of the drive rod, wear of the synchronizer clutches and the synchronizers themselves, wear of the gears or shift rod, shift fork, and may also be due to wear of the intermediate shaft bearings;
- Oil leakage usually occurs due to wear of the oil seals or loosening of the gearbox threaded connections.
Gear ratios at the gearbox
The seventh model of the Zhiguli received a good version of a five-speed gearbox. The designers of the Volzhsky Automobile Plant took a box from a VAZ 2105 as a prototype, replaced the gear ratio of the main gearbox pair from 4.3 to 4.1, then to 3.9 and obtained the following gear ratios.
| home | 1st gear | 2nd gear | 3rd gear | 4th gear | 5th gear | Reverse |
| 4,1/3,9 | 3,667 | 2,100 | 1,361 | 1,000 | 0,820 | 3,530 |
The gear ratio is the ratio of the number of teeth on the driven gear to the number of teeth on the drive gear.
Primary shaft
The input shaft transmits torque from the engine crankshaft through the clutch disc to the gearbox. The disc is located on the splines of the front part of the shaft. A constant mesh gear is rigidly mounted on the shaft.
For free rotation, it is placed in two bearings. One bearing is located at the end of the crankshaft, the other is in the front cover of the gearbox.
Secondary shaft
In a complex gearbox mechanism, the secondary shaft is the final stage in converting torque and transmitting it to the cardan. The gears of the first three speeds move freely on this shaft. At a certain gear, they engage with the intermediate shaft gears and provide the required torque.
The shaft is placed in bearings, there are three of them. One is pressed into the end of the input shaft, the other into the box body, and the third into the rear cover.
Intermediate shaft
The intermediate shaft transmits rotation from the primary shaft to the secondary shaft.
He plays the role of a satellite. The gears and shaft are made from a single piece. It is installed on three bearings. The gears for fifth and reverse speed are located on it.
Forks
In the process of switching speeds, forks are involved, which move gears along the shaft to a certain place.
The gear shift lever moves the forks.
Transmission device diagram
The gear shift pattern of a 5-speed gearbox itself is almost the same as a 4-speed gearbox, with the only difference being that another 5th speed has been added to it, which is activated by moving the lever all the way to the left and forward. A schematic representation of the main components of the structure looks like this:
The VAZ 2107 transmission is contained in housing No. 3, which is closed with covers. Shift lever No. 5 is located at the top.
Main details
The main systems and parts of the gearbox are located in building No. 3.
The transmission system consists of three shafts:
- primary with four gears;
- secondary No. 10 with gears;
- intermediate.
Since the schemes of these mechanisms are complex, we will dwell on them in more detail.
Primary shaft
The input shaft is one piece with gears rotating on bearing No. 3, which is located in the gearbox housing.
Secondary shaft
The secondary shaft is in some way an extension of the primary shaft. It contains gears of the 1st No. 23, 2nd No. 24 and 3rd No. 25 speeds, which move in predetermined positions, which mesh with the corresponding gears of the intermediate No. 1. The gears differ in diameter, as a result of which the amount of torque changes.
The secondary shaft rotates on bearings No. 9, No. 11 and No. 12. The first one - the roller one is placed in the primary one, the others - in the crankcase and the rear cover.
Intermediate shaft
The intermediate shaft is necessary to transmit the required torque to the secondary from the primary. Rotation occurs on ball bearings No. 2, No. 22 and No. 19. The gears and shaft are one unit. This block contains the gears of the 5th No. 18 and rear No. 20 gears. The rear one is placed on shaft No. 21 and connected to secondary splines.
Transmission lubricant is poured into the VAZ 2107 gearbox through hole No. 11, which is located on the left side of the case and is closed with a special plug. The lower part of the body is closed with a steel lid secured with nuts. The places where the cover and body connect are sealed with gaskets that prevent possible lubricant leakage. The bearings of all axes are sealed with special seals that prevent the lubricant from leaking out.
The volume of oil required to refill the VAZ 2107 gearbox is approximately 1.6 liters. Some drivers pour lubricating fluid through the place where the handle is inserted into the box. This method is much easier than the usual one, because the handle is located in an easily accessible place, which cannot be said about the oil filler neck.
Speed shifting occurs through forks driven by a lever. The key parts of the gearshift system are shown in the diagram.
Rules for disassembling and assembling the gearbox
If the user has never encountered the repair of such a complex unit, the procedure should be carefully prepared.
- Disassembly of the mechanism is carried out only after it has been completely cleaned of dirt.
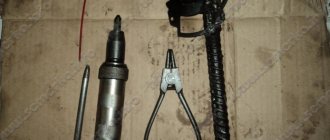
- All the tools required for disassembly are pre-prepared - keys, squeezes, pliers, lock ring pullers. It is also advisable to have a separate container for storing small bolts, nuts, and washers.
- It is necessary to dismantle the mechanism parts by first treating the bolts with an anti-boiling agent.
- When disassembling, the units are folded in the dismantling sequence.
- Human memory is extremely unreliable - a photograph of a disassembled mechanism before its reassembly is the best reminder.
- All gaskets without exception must be replaced. Recycling of seals is strictly prohibited.
- No one has canceled the abundance of the cleaner. When washing the structure, you should not skimp on the cleaning material; the better you wash it, the more fun it will be.
- Assembly of the unit is carried out exclusively in the reverse order.
- If after installation there are excess parts left (which is not uncommon), the entire gearbox is completely rebuilt.
It is also necessary to maintain maximum cleanliness during work. Dust, metal shavings, or foreign objects can cause serious damage to the gears.
Types of gearboxes in a car
Let's look at the distinctive features of each type.
- A manual transmission, or, in other words, manual, is a classic type of gearbox. However, it has proven itself to be excellent among car owners who prefer maximum control over the car.
- Automatic transmission has also been known since relatively ancient times. The gears in this gearbox change automatically, but driver intervention is still required to change direction. The disadvantage of automatic transmission is higher fuel consumption and slow acceleration compared to manual transmission. Although in new automatic transmission models the acceleration is improved.
- The robotic gearbox is a manual gearbox with integrated automatic control. This variety combines the capabilities of an automatic (no need to monitor engine speed) and manual (for those who like fast acceleration).
The robotic (variable) gearbox has a significant drawback - the possibility of full use only on small cars. However, there are cases when a CVT was installed on crossovers such as the 2022 Honda CR-V with a 2.4-liter engine. The variable transmission design allows you to change the gear ratio thanks to continuously variable gear shifting or through electronic control. By changing the diameters of the pulleys, the speed of the car increases or decreases.
Technical characteristics of manual transmission
In the operating instructions, the technical characteristics of the box are indicated together with the characteristics of the transmission. This is given in tabular form:
| Clutch | Single-disk, dry with hydraulic drive and central diaphragm spring |
| Transmission | Mechanical, five-speed, three-way, three-shaft, with synchronizers on all forward gears |
| Gear ratios | |
| First | 3.667 |
| Second | 2.100 |
| Third | 1.361 |
| Fourth | 1.000 |
| Fifth | 0.820 |
| Reverse | 3.530 |
| Cardan transmission | Twin-shaft with intermediate support and elastic coupling |
| main gear | Hypoid |
| Final drive ratio | 3.9 or 4.1 |
| Differential | Conical, two-satellite |
Transmission malfunctions
The box on the seventh model Zhiguli is considered a reliable unit. If you maintain it regularly and treat it with care during operation, then repairs will not be needed for a long time. However, all components and parts are subject to wear. There are many reasons for this. In any case, if a malfunction is detected in the gearbox, it is necessary to carry out diagnostics and repairs.
Most malfunctions occur of the following types.
One of the gears does not engage
Without opening the box, we can assume that:
- the hinges and springs are worn out and need to be replaced, or better yet, a complete repair;
- on synchronizers, the rings have become unusable and need to be replaced;
- synchronizer spring burst, replace;
- The teeth on the transmission gears are worn, replace the gear.
Knocks out gear when driving
It happens that when you turn on a gear, it does not turn off randomly. Possible reasons:
- the lever hinge is jammed, inspect and clean;
- the clutch is faulty, it may not engage completely, adjust it, if the disc is worn, replace it;
- The shift lever is broken, replace it with a new one;
- Forks, shift gears are bent, replace with new ones.
Crunching and grinding in the box while driving
This problem appears for the following reasons:
- the bearings are worn out, they should be replaced, and at the same time check the seals;
- the teeth of the gears are worn out, in this case it is better to make a major repair;
- There is not enough or no lubricating fluid in the gearbox, find the leak and fix it, add oil.
Grease leaking from box
The gearbox is designed so that lubricant cannot leak out spontaneously. But if an oil stain has formed under the car, an inspection should be made and the leak eliminated.
The reason may be:
- wear of oil seals and sealing gaskets due to natural aging of rubber must be replaced with new ones;
- the fastenings of the covers on the box have become loose, tighten all the nuts and bolts completely;
- mechanical damage to the body or lids of the box; if the steel lid is damaged, it can be welded. If the crankcase is damaged, it is better to replace it, since it is cast from an aluminum alloy.
Difficulty switching
The reasons for difficult gear shifting may be severe contamination of the lever linkage or jamming of the sliders.
In order to determine the cause of this malfunction, you need to take the shift lever housing and check if there is any jamming when the lever moves. If there is one, you need to establish the cause and eliminate it.
If the lever in the body moves without much effort, then the reason is in the sliders. After removing them from the gearbox housing, you need to carefully inspect them. Usually, in places where the sliders jam, marks remain in the form of abrasions and scratches.
Then you need to inspect the seats of the slides for the presence of particles that cause jamming. Alternatively, there may be a slight bend in the slider itself. In this case, the slider is replaced.
Work on dismantling the five-speed gearbox VAZ 2107
Installing the car on a lift (you can use an overpass or a pit) is preceded by disconnecting the battery and removing the radio panel:
- Remove and disassemble the gearbox rod.
- Remove the cover from the gap where the lever attaches and remove the foam filling.
- Remove the exhaust pipe from the exhaust system.
- Move the starter, disconnect the speedometer wire.
- Unscrew the bolts holding the cardan and remove it.
- The clutch cylinder is removed using the same method.
- After this, the gearbox is removed from the car. To do this, it is best to invite assistants who will support the mechanism while you unscrew the mounting bolts. At this stage, it is also advisable to drain the transmission oil.
After all these steps have been completed, we repair the VAZ 2107 gearbox.
Which bearings are better for a VAZ 2107 box?
Transmissions of classic models from AvtoVAZ are distinguished by good reliability, ease of maintenance and relative, compared to foreign models, ease of repair. However, given the advanced age of even the youngest models, many may have problems not only with the body, electrical and other parts, but also with the operation of the gearbox. Its system contains a large number of parts, the operation of which as a whole is critical for the system. These components include the bearing of the input shaft of the VAZ 2107 gearbox. This small part is responsible for the operation of the gearbox shaft itself, which ensures unimpeded transmission of torque and changes in gear ratios.
Similar functions are performed by other bearings in the box - the secondary shaft and the intermediate shaft. These parts are made of especially strong metal cases in the shape of a circle, with a large number of moving parts in the form of metal hinges, which allow the shafts to freely carry out their direct functions.
At the same time, the reliability of these parts is quite high; they fail only at very high mileage or when critically high loads are applied to the gearbox. Also, such parts undergo simple diagnostics. There are many different components on the market in the form of spare parts for VAZ cars.
Attention! Foreign brand companies that supposedly produce products specifically for the classic VAZ 2107 model often hide cheap Chinese products, which, even if they fit into the seats, will not be able to fully ensure trouble-free long-term operation of the box.
Signs and causes of box malfunctions
The gearbox on the VAZ 2107 is considered a fairly reliable unit, however, during long-term use, some of its elements may fail for one reason or another. If the first disturbances in the operation of the gearbox appear, in order to avoid more serious breakdowns, it is necessary to diagnose and fix the problem as quickly as possible.
The list of main breakdowns of the VAZ 2107 manual transmission, the causes of their occurrence and methods of elimination are varied. It is important to pay attention to the following signs, as well as choose the right repair methods:
- The gears are engaged randomly or not at all (wear of the moving parts of the gearbox (spring, hinges), wear of the locking rings on the synchronizers, wear of the synchronizer spring, wear of the teeth on the gears). The problem is eliminated by replacing faulty parts, or by carrying out a major overhaul of the box;
The gear is knocked out when switched on, the engine is subjected to heavy loads (the clutch is not fully engaged, the hinge on the shift lever is jammed, the shift lever is faulty, the forks in the gearbox are deformed). The problem is eliminated as follows: adjusting the clutch mechanisms, cleaning the hinge joints, replacing the lever or replacing a whole set of forks;
VAZ 2107 box repair
Taking into account all the design and operational features of the VAZ 2107 gearbox, carrying out repair work independently is only possible if you have extensive experience in servicing and repairing such units. If the box on a VAZ 2107 needs repair, the main stages of repair work are:
- preparation (availability of the necessary tools, pit or overpass);
- installing the car on a pit/overpass, draining the oil from the gearbox, etc.);
- dismantling the box;
- disassembly and troubleshooting;
- trouble-shooting;
- assembly and installation of the box in place.
- socket wrench at “10” and “19”;
- Phillips-blade screwdriver;
- tweezers and two screwdrivers with a thin flat blade;
The general procedure is as follows:
- install the car on a viewing hole or on an overpass;
- by disconnecting the wire from the negative terminal on the battery, drain the gearbox lubricating fluid (gear oil);
- Having removed the radio panel and pressing the lever, insert a flat-head screwdriver into the hole in the locking sleeve of the box to bring it out;
- Having removed the rod from the lever, use tweezers to remove the elastic rubber insert of the damper from the lever;
How to repair a gearbox on a VAZ 2107
A four-speed gearbox was installed on the “old” model VAZ, and a five-speed gearbox on the “new” model VAZ. However, working with both mechanisms is not much different from each other. The essence of the repair work is to perform the following steps:
- Removing the box from the car.
- Disassembling the gearbox into its component parts.
- Replacement of failed elements with new ones.
- Assembling the box.
- Installation of a gearbox on a car.
With such a defect, the shaft will not be able to work correctly, which will immediately affect the convenience of gear shifting.
Preparing tools
To carry out all of the above work, you will need to prepare in advance:
- heads for 13 and 17;
- extension to the heads;
- Phillips screwdriver;
- flat screwdriver with a thin blade;
- flat screwdriver with a powerful flat blade;
- impact screwdriver;
- tweezers;
- wrenches 13 (2 pcs), 10, 17, 19 and 27;
- circlip puller (or pliers);
- hammer.
How to remove the gearbox
The box can only be repaired after it has been removed from the car, so you will need to be patient and time-consuming. Repairing a gearbox is clearly a difficult and slow task.
To remove the box from a VAZ 2107, you will need to drive the car into a pit or viewing platform. The jacking option will not work, since it will be impossible to complete all stages of the work:
- Remove the wire from the negative terminal of the battery.
- The first stage of work is carried out directly from the salon. For convenience, it is necessary to remove the panel in which the radio is located.
- Press the gear shift lever and insert a flat-head screwdriver into the hole in the gearbox locking sleeve.
- Using a screwdriver, pull the bushing towards you.
- Disconnect the rod from the gear shift lever.
- Use tweezers to hook the edge of the damper insert and remove it.
- Using two flat screwdrivers, press apart the petals of the damper insert and move them apart.
- Then remove the damper and bushings from the gear lever.
- In the cabin, move the foot mat near the gearbox.
- Using a Phillips screwdriver, unscrew the four screws on the box lid.
- Remove the cover from the gear shift lever.
- The second stage of work is carried out directly under the car. The first step is to remove the exhaust manifold pipe from the box.
- Disconnect the clutch mechanism.
- Immediately remove all connections from the gearbox (at the same time, you can check the integrity of the wires).
- Disconnect the cardan drive.
- Remove the flexible shaft mounting mechanism from the speedometer.
- Unscrew the two bolt connections on the side cover of the gearbox.
- Remove the box from the car.
- Place something strong and stable under the body of the box, as it may fall out.
Video: dismantling instructions
The box body weighs more than 20 kg, so it’s better to ask your friends for help to safely remove it from the car
How to properly disassemble the box
Repair work on the gearbox is possible only after identifying the real cause of the breakdown. Therefore, it will be necessary to disassemble the device correctly and safely for each component of the box and perform troubleshooting.
To ensure the disassembly process goes quickly and without interference, it is recommended to immediately prepare the following tools:
- impact screwdriver;
- wrench 10;
- socket wrench 13;
- three-jaw puller;
- vice;
- tweezers;
- torque wrench.
Of course, as necessary, gaskets, oil seals, and those parts that were discarded during the work will be needed.
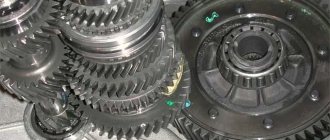
There are many large and small parts in the box design
Operating procedure
Disassembling the box yourself in a garage is a completely doable task. However, the work will require maximum concentration and attention:
- After removing the gearbox from the car, it is recommended to wash the housing from dirt. You can even use kerosene or white spirit to ensure the surface of the box is clean.
- Remove the bell (casing).
- Turn the box over and unscrew the cover bolts.
- Remove the gear block plug from the rear cover.
- Pull out the retaining ring with tweezers.
- Press out the gear block bearing.
- Press out the reverse gear bearing.
- Remove the secondary shaft oil seal.
- Pull out the thrust washer from the rear bearing of the secondary shaft.
- Press out this bearing.
- Remove the speedometer drive gear and pull out the roller ball (clamp) behind it.
- Remove the gear fork mounting bolt.
- Block the shafts by inserting a thick bolt or a powerful screwdriver between them.
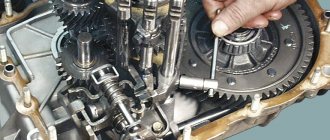
- While turning the input shaft, pull it towards you along with the gears and bearings.
- Then pull out the secondary shaft.
- The intermediate shaft comes out easily.
Video: instructions for disassembling the gearbox on a VAZ classic
Gearbox seals and their replacement
Oil seals in any mechanism where they exist act as gaskets. In this case, they are designed to seal the holes from which the primary and secondary shafts come out. Previously, oil seals were cast from rubber.
Currently made from modern composite materials, more resistant to temperature changes and aggressive environments.
Input shaft oil seal
The oil seal, which is installed on the input shaft, has the following dimensions:
- • outer diameter – 47 mm;
- • internal diameter – 28 mm;
- • width – 8 mm;
- • weight – 20 grams.
It is installed in the shaft output hole in the clutch housing and serves to prevent lubricant from flowing through the shaft.
There is no difficulty in replacing the oil seal, but the gearbox will have to be removed.
The order of work to change the oil seal is as follows:
- Remove the clutch cover from the gearbox.
- Remove the release bearing and clutch fork.
- Remove the used oil seal by picking it up with a screwdriver or knife.
- Clean the place where the oil seal was located and wipe it dry.
- Install the new oil seal in its original place.
- Replace all the parts that were removed from the box in reverse order.
Secondary shaft oil seal
The oil seal, which is installed on the secondary shaft, is larger and has dimensions:
- outer diameter – 56 mm;
- internal diameter – 32 mm;
- width – 10 mm;
- weight – 10 grams.
It is installed at the output of the secondary shaft at the rear of the box.
The order of work to change the oil seal is as follows.
- Unscrew the nut securing the flange, having previously secured it.
- Remove the centering metal ring from the shaft.
- Remove the flange and washer using a puller.
- Pull out the old oil seal using a tool.
- Clean and wash the seal area.
- Install a new oil seal.
Device location and characteristics
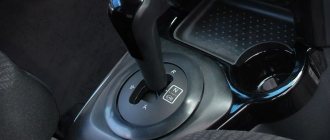
The gearshift lever of the VAZ 2107 is located directly in the car's interior. It is used to be able to change gears while moving. The gear lever fails only in rare cases, and the reason for this is negligence towards the product. If the product fails, it must be replaced. But before replacing, it is necessary to remove the product in question. We’ll find out in more detail how to remove it, as well as replace it on the “seven”.
On the “seven” the gear shift knob has a common problem - rattling and chattering. If you fix such a malfunction using improvised means, then replacing the device will not be necessary. Before you begin replacing the device, you will need to find out the exact causes of the malfunction. After all, sometimes not only the part in question can “fail,” but also the gearbox or clutch.
Replacement features
Before you begin the replacement, you need to stock up on tools such as wrenches and a screwdriver. We start with the following steps:
- Set the lever to neutral position.
- After this, you need to slide the top cover up. There is no need to completely remove the cover.
- The next step is to move the cover, which is located below, to the top. This cover is also called a thermal protection valve. In the photo below it is shown with a red arrow.
- Now you need to press the device, pushing it to the bottom. After this, you need to insert a screwdriver into the lower part of the product, where the plastic sleeve is located. The bushing is located at the very bottom of the device, as shown in the photo below.
- It is necessary to move the locking sleeve to the lower part, and then remove the product from the box.
- If the device emits strong vibrations, it needs to be replaced with a new one. In this case, you can exchange the part for a product of shorter length, as on foreign cars. A short device is much more comfortable to operate than a standard product.
After the standard product is dismantled, we install a new handle in its place. Let's look at what the installation is.
Installing the device on a VAZ 2107
After the standard mechanism has been removed, you will need to remove the rubber bushing from it, if it remains inside. To remove the bushing, you need to use a screwdriver or hook. By prying the sleeve, we remove it from the device, as shown in the photo above.
If you plan to install a standard product in place, then it is advisable to replace the bushing by purchasing a repair kit in advance. When choosing a repair kit, preference should be given to products manufactured by VAZ. The installation process is similar to removing the device. Initially, a rubber bushing is installed, recessing it into the device. Following the bushing, it is necessary to install a rubber band in the form of a washer, which softens the control of the mechanism. Next, you need to install a plastic lock inside the mechanism, due to which the device is fixed to the gearbox “scene”. The assembly is completed by installing the locking sleeve, which had to be moved down at the initial stage in order to dismantle the gearbox lever.
Once the product is ready for installation, you will need to insert it into the drawstring. To do this, you should initially lubricate the slide, and then hit the mechanism handle well with your hand until you feel that the lever has settled into place. This is how the installation of both new and old mechanisms, which were dismantled to replace component parts, is carried out.
Self-tuning of the handle
Some drivers are not satisfied with the quality of repair kits for installation, and they came up with a kind of tuning of the gearbox handle itself: to reduce rattling and vibration going to the shift handle, instead of standard plastic bushings and rubber bands, they insert a piece of hose that fits the outer and inner diameters. This upgrade also allows for easier future installation of the handle.
Additionally, you can make the gear shifting process more convenient by slightly reducing the length of the standard handle. To do this, you need to remove the lever, cut it with a hacksaw to 5-6 cm in length and cut a thread at the end, the same as it was on the cut piece (if you wish, you don’t have to cut the thread). These upgrades are advisory in nature and have their pros and cons. Each driver decides for himself whether to produce them or not.
https://youtube.com/watch?v=afglBm-C0ng
When choosing products for foreign cars, you should make sure that it can be reliably installed on the VAZ-2107. Otherwise, an incorrectly secured mechanism will lead to an emergency situation while driving.
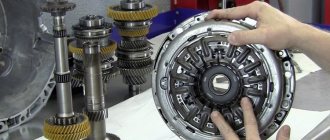
Replacing gears and synchronizers
The work of replacing gears and synchronizers is one of the most difficult when repairing a gearbox. There is a standard repair kit containing all the necessary parts to help cope with the task. It is advisable to prepare a special tool.
Gears and synchronizers on the primary and secondary shafts are changed in almost the same way.
The process goes like this:
- remove the shaft from the box;
- clamp the shaft in a vice, wrapping it in something soft;
- Remove the retaining ring from the shaft using a special tool or a screwdriver:
- press the bearings off the shaft;
- remove the shaft from the vice, place it vertically, resting the first gear on two supports;
- carefully press the gear off the shaft;
- Carry out similar operations with the remaining gears and synchronizers.
Removing and replacing the fifth gear gear occurs differently.
Replacing bearings
It is impossible to repair the bearings - when they wear out, the non-separable structure changes entirely.
Main shaft bearing
For dismantling you will need:
- clamp the input shaft into a yew;
- Using a special puller, remove the bearing from its seat.
The removal procedure is accompanied by slight tapping of the part. The installation procedure is performed in reverse order.
Secondary shaft
The only difference between the procedures is the use of different sized bearings.
Intermediate shaft
The procedure is similar. Using yews and a special puller.
Transmission oil for gearboxes
To select gear oil for the Lada gearbox, you need to take into account the region where the car will be operated.
Two types of oils are offered. The first - with a temperature range from +35 to -26, this is SAE 80W85 and the second - with a temperature range from +45 to -40, this is SAE 75W90.
The best oil is synthetic, but semi-synthetic and mineral oils will not harm the Seven’s transmission. The amount of oil in the VAZ 2107 gearbox is about 1.6 liters. The oil change time is carried out according to the instructions in the technical instructions supplied with the car.
Manual transmission oil level
The oil level in the box is checked as follows:
- drive the car onto an overpass or pit;
- clean the filler plug;
- unscrew the plug;
- measure through the hole with a probe or other object resembling a probe. The oil should be level with the end of the filler hole; top up if necessary.
Oil change
It is better to change the oil on an overpass or pit with a warm engine, so the oil will drain faster. Prepare the tool in advance, a container for working out at least two liters, oil for changing.
The order is as follows:
- clean the fill and drain plugs from dirt;
- Place the prepared container for used oil under the drain hole;
- open the drain hole and wait until the oil completely drains into the container;
- clean the plug of old oil and close the drain hole;
- pour 1.5 liters of new oil into the box through the filler hole (it’s better to fill it with a supercharger);
- let it sit for ten minutes, then check the level and top up if necessary.
Backstage at the checkpoint - what is it for?
In the language of service station specialists, the rocker is called “gearbox control drive rod.” The shift lever itself is mistakenly taken for the backstage when the backstage is a multi-component element:
- gear lever;
- craving;
- fork;
- seal fastening.
As part of the gearbox, the link plays the role of a connecting link between the lever and the driveshaft. Being a mechanical device, it can wear out, so the driver will immediately begin to notice problems in driving the vehicle. Current breakdowns are usually associated with the exhaustion of the life of the link, and less often with a drop in the oil level in the gearbox.
The device has an increased service life if the vehicle is used correctly
Self-adjustment of the scenes
If you have the first problems with shifting gears, you can first try adjusting the rocker. It is quite possible that some connections have become loose and a little intervention can fix this problem:
- Drive the car onto the overpass.
- Move the lever to the left to the maximum.
- Tighten the clamp under the car between the rocker and the shaft.
- Lubricate the parts with special lubricant through the joints in the box body.
Usually these actions are quite enough to return the car to its original controllability.
Video: instructions for adjusting work
How to remove and install the rocker on a VAZ 2107
In fact, the process of dismantling the old stage and installing a new one is quite simple. Car enthusiasts themselves explain in accessible language on forums exactly how to carry out the work.
As Raimon7 correctly wrote, this can be done from the interior. It’s quite simple: just unscrew the 3 bottom nuts (see photo) and pull out the entire mechanism. If you have a 5speed, then there are no problems at all, but if you have a 4speed, then you will need to disconnect the “gear shift lever” from the spring (see photo) (this is what you broke off). The spring will need to be pulled out so that it doesn’t accidentally fall down, we have a friend here who drives around with this spring, it’s not clear where. Then you just take everything apart: the gear selection mechanism, throw out the broken lever, insert a new one, reassemble it, screw the selection mechanism back and everything is possible drive
Magadan
https://vaz-2106.ru/forum/index.php?showtopic=7549&st=40
Thus, it is not for nothing that the gearbox on the VAZ 2107 is considered one of the most complex design elements of the model. The owner can do some of the operation, inspection and repair work with his own hands, but do not overestimate your strength in the event of serious large-scale problems with the gearbox - it is better to pay for the services of specialists.
Transmission repair: when to do it
Repair of the VAZ 2107 gearbox may be required in the following cases:
- Excessive noise is produced when the box operates. This noise is caused by increased wear of bearings, gears and synchronizers.
- It becomes difficult to change the transmission. The reasons for this consequence are hidden in the wear of the lever, the lack of lubricant inside the box, and the deformation of the gearbox lever. Also, the cause of this phenomenon may be jamming of the blocking cracks or damage to the coupling splines.
- Spontaneous transmission shutdown. The reasons for this consequence are wear of the ball holes on the rods, jamming of the clamps, blocking rings and the synchronizer itself.
- Oil leakage occurs. Repair of the VAZ 2107 gearbox must be carried out when oil leaks are detected on it. The causes of leakage can be either serious damage or simple wear of oil seals and seals.
In any case, disassembling the gearbox will be required if one of the above symptoms occurs, which will allow us to identify the exact cause of the malfunction and eliminate it. If even the slightest malfunction of the gearbox is detected, it is necessary to begin repairing it, which will prevent unforeseen consequences in the form of complete failure of the gearbox.
Features of repairing a gearbox on a VAZ 2107
The design of the gearbox is no more complicated than the design of the engine itself, but in order to carry out repairs correctly, a certain sequence must be followed. We will find out in more detail in what sequence the disassembly and assembly of the gearbox is carried out.
- Initially, the gearbox should be removed from the vehicle. We will not consider how to remove the gearbox, since there is appropriate material for this. One has only to note that first you need to drain the oil from the gearbox. We will begin repair work immediately.
- The box is dirty and oily, so it is recommended that you take your time with the repair and clean the outer surface of the product.
- Using a screwdriver, you need to pry off the cover of the fork, which is used to disengage the clutch. The fork is moved to the side. To remove the plug, you need to rotate it 90 degrees and remove it from the hole.
- The gearbox disassembly scheme is common for both 4 and 5 mortars. You need to unscrew the clutch housing mounting nuts, then unscrew and remove the spring washers. These washers are located directly behind the nuts.
- When the fasteners are removed, you can continue to disassemble the gearbox. To do this, you need to pull the crankcase, disconnecting it from the main device.
- There is a sealing element behind the crankcase that also needs to be removed. If the gasket is worn, it should be replaced. There is a spring washer on the shaft, which also needs to be removed.
- Using a “10” wrench, you need to unscrew the 10 nuts securing the crankcase cover. After unscrewing all the nuts, remove the spring washers located behind these nuts. The cover also needs to be removed.
- Behind the cover there is a seal, which should also be removed by prying it off with a screwdriver.
- The photo below shows the nuts that need to be unscrewed. These nuts secure the rear engine mount to the gearbox housing. Behind the nuts there are washers that must be removed, as well as a cushion complete with a cross member.
- Do-it-yourself disassembly of the gearbox continues with unscrewing the speedometer drive nut. After unscrewing this nut, it is necessary to dismantle this drive.
- The VAZ 2107 transmission is a mechanism with a set of gears and forks through which the vehicle moves. Having turned the gearbox over to the other side, you need to remove the reverse light switch.
- The bolt securing the fork, which is responsible for switching third and fourth gears, is unscrewed.
- You need to turn on the first transmission using the gearshift lever on the VAZ 2107.
- At the same time as first gear is engaged, fourth gear must also be engaged. Using a screwdriver, move the synchronizer clutch to the side to connect it to the gear.
- You may ask, why is it necessary to engage 2nd gears at the same time? This is done in order to block the rollers from turning.
- The retaining ring is dismantled by prying it with a special puller on the secondary shaft.
- Using chisels and a hammer, bend the locking plate securing the flange nut.
- The nut must be loosened by 2-3 turns, which will allow the coupling centering ring to be removed. After moving the ring, you need to screw the nut.
- Using a special kind of puller, you need to dismantle the coupling ring.
- After removing the ring, it is necessary to dismantle the centering ring seal.
- Now you can use a wrench to unscrew the nut.
- There is a retaining ring behind the nut that also needs to be removed.
- Using another puller, it is necessary to dismantle the flange.
- The gearshift lever must be set to the neutral position, and then the sealing collar must be pulled up.
- Behind the cuff there are nuts that need to be unscrewed. After unscrewing them, the lever or rocker is dismantled.
- Behind the scenes there is a seal that must be removed.
- The gearbox on the VAZ 2107 is further disassembled by unscrewing the two nuts securing the exhaust pipe.
- There is a bolt behind the bracket that should also be removed.
- To remove the back cover of the box, you need to unscrew the 5 outer nuts.
- Another nut secures the cover from the inside, so after unscrewing the 5 outer nuts, you should proceed to the last one - the inner one.
- It is necessary to disconnect the back cover and the box housing, which requires moving the back cover. The fastening nut is unscrewed, and then the washer is removed.
- After unscrewing all the nuts, it is necessary to remove the rear cover from the crankcase, rocking it. The crankcase cover will come off on its own.
- After removing the cover, it is necessary to remove the inner ring from the secondary shaft. Behind the ring is the speedometer drive gear, which must also be removed.
- The cover of the clamps is found, after which the two bolts securing it are unscrewed. After removing the bolts, you must remove the cover.
- There is a gasket under the cover that needs to be removed.
- The spring clips are removed.
- The gearbox must be turned over, thereby removing the retaining balls.
- You need to find the drive gear retainer ball and remove it. The oil deflector washer also needs to be removed.
- You should continue further if two gears are engaged at the same time. With two gears engaged, it is necessary to unscrew the bolt securing the 5th gear gears. As you guessed, this procedure is performed for the VAZ 2107 5 mortar gearbox.
- The fastening of the 5th gear shift fork, as well as the reverse gear, is unscrewed. After unscrewing, you must remove the plug.
- By holding the rod of the 5th gear, as well as the reverse transmission, you need to remove the rod from the crankcase and the shift fork.
- The gear block of the 5th gear and reverse gear is dismantled manually.
- The gear bushing is removed in the same way from the secondary shaft.
- Once the bushing is removed, you will need to remove the gear, ring gear, locking ring and synchronizer clutch for the five-speed transmission.
- The 5th gear synchronizer clutch hub is removed.
- The reverse control gear is also removed.
- From the inside, the intermediate shaft bearing is pressed out. To do this, you will need to take a hammer and a punch, and apply light blows.
- Next, the bushing is removed from the secondary shaft. It is also necessary to remove the outer ring from the rear bearing.
- Using a puller, you need to unclench the locking ring and remove it.
- Two gears are engaged at the same time - first and fourth. The bearing securing bolt is unscrewed.
- Place a screwdriver between the outer side of the ring and the shaft gear, thus removing the bearing ring together with the balls.
- The rear inner ring is pressed out.
- The intermediate shaft is removed.
- The locking block of the transmission rod 3 and 4 is removed.
- Crackers vary in size, so remember their location.
- The shift rod 3 and 4 of the transmission is removed.
- The 3rd and 4th gear shift fork is removed.
- The bolt securing the fork 1 and 2 of the transmission is unscrewed.
- The transmission rod 1 and 2 is removed.
- The locking block 1 and 2 of the transmission is removed.
- The fork for selecting these gears is removed.
- The complete input shaft is removed.
- The needle bearing is removed.
- It is necessary to unfold the locking plate until it disengages from the groove.
- The reverse gear axis is removed.
- The intermediate ring is removed.
- The key is removed from the groove of the secondary shaft.
- The intermediate bearing is removed.
- The secondary shaft is recessed into the inside of the crankcase, thereby removing it.
- Using a hammer, it is necessary to press out the secondary shaft bearing.
- The sealing gland is removed.
- The bearing from the 5th gear can be removed with a screwdriver, using it as a lever.
5-mortar repair
The above procedure involves complete disassembly of the unit as a preventative measure. However, it happens that the manual transmission unit knocks out or slips during driver manipulations. Moreover, the VAZ five-speed transmission suffers from such things all the time. The reason for the repair may be one of the following factors:
- the rocker lever gets stuck;
- extraneous noise when driving;
- one of the gears falls out;
- Positions are difficult to switch on.
For a more accurate understanding of the process, you can watch video master classes of the process from experienced specialists.
4th gear slips out
On a five-speed VAZ 2107 gearbox, fifth speed overshoot can provoke wear of the gear, synchronizer, and related parts.
During the repair, the 3/4 clutch, the damaged element and a complete set of seals that are subject to separation during disassembly are replaced.
5th gear slips out
The five-speed gearbox of the “seven” periodically gives out vagaries to the user due to insufficient gear lubrication. It is recommended that in case of knockout or tight engagement of a position, completely change the synchronizers, gear, fork and bushings - this will ensure stable operation of the unit.
Repair of gearbox lever (backstage) VAZ 2107
If the gearbox linkage (handle) becomes loose, repairs can be carried out even without removing the unit from the car. However, some experts recommend using “garage” repair parts. For the convenience of the reader and a clearer explanation of the process, it is better to complete the description in pictures.
- Dismantle the cover and remove the locking bar from the rocker bushing.
- After release, the lever axis is removed; for convenience, you can push the insert with a screwdriver or a pusher.
- Usually the bushing itself wears out; you can replace it with a new insert or a standard M10 bolt.
- Next, fasten everything in the reverse order and tighten the structure.
Old style gearbox repair
Before repairing an old-type VAZ gearbox, it is advisable to study the user manual or technical documentation. The main nuance is the absence of 5th gear - the classic system has only 4 positions. Therefore, the reverse gear is located separately. This should be taken into account during repairs.
Splines and forks
There is a reverse gear between the wall of the VAZ-2107 gearbox housing and the fifth gear. Since it produces a reverse movement, the part is not connected directly, but through an intermediate gear. It is installed on the axis of the rear wall of the transmission housing. The gear fork fits into the groove of the gear. When it moves, the intermediate element engages with the reverse gear. The secondary shaft has synchronization clutch hubs. They are motionless. A speed synchronization clutch is put on the gear ring of the hub.
As for the shift fork, it fits into the annular groove of the synchronization clutch. The latter moves along with the movement of the rod. The clutch begins to act on the synchronizer blocking ring and, as a result, moves it. Thanks to the friction force, the rotation speed of the hub and gear is equalized. The teeth mesh with the gear timing ring. Torque begins to flow to the secondary shaft through the hub and clutch from the gear.
Intermediate shaft
Designed to transmit a certain amount of torque from primary to secondary. Rotates on bearings 2, 22 and 19. The gears are integral with the shaft. In the same block, gears of the fifth speed 18 and rear 20 are installed. The latter is installed on a separate shaft 21, connected to the secondary one on splines.
To fill the VAZ 2107 gearbox with oil, there is a special hole 11 on the left side of the housing, which is closed with a plug. The bottom of the case is closed with a steel lid, which is secured with ten nuts. All connections between the lids and the box body are sealed with special gaskets that prevent oil leakage. The bearings of the primary, secondary and intermediate shafts are sealed with seals that prevent oil from leaking out of the transmission pan.
The filling volume of oil for the VAZ 2107 gearbox is approximately 1.6 liters. Some car enthusiasts prefer to fill oil through the top, at the place where the handle is inserted into the gearbox. This method is much simpler than the standard one, since the handle is located in the interior and access to it is not difficult, which cannot be said about the filler hole.
Gear shifting is controlled by a set of forks that are driven by a handle. The structure and main details of the gear shift mechanism are clearly illustrated by the following diagram.
Here numbers 1, 2 and 16 indicate the gear shift forks: third and fourth, first and second, rear and fifth, respectively. Numbers 5, 7 and 9 indicate the rods of the corresponding forks, which are driven by handle 8, located in the interior of the VAZ 2107 car.
The operating diagram of the switching mechanism is as follows: when handle 8 changes its position, its hinge engages with a recess on one of the rods, the other end of which is rigidly coupled to the fork with a bolt 3. The fork, in turn, fits into a groove on the corresponding front gear (16 , 23, 24, 25) or intermediate (20) reverse. Thus, handle 8 ensures the movement of the fork and a certain gear of the secondary shaft is engaged with the corresponding intermediate gear. In this case, the torque transmission chain is closed, the secondary shaft begins to rotate at a speed corresponding to the gear ratio of the gears currently engaged. When the reverse gear is engaged, unlike the others, the handle is “recessed” down when moving.
As you can see, the design of the VAZ 2107 gearbox is quite complex, so it is not recommended to repair it without having the appropriate skills. It is better to entrust this matter to specialists.
The VAZ 2107 is equipped with two types of gearboxes, one of which is four-speed and the other five-speed. Sooner or later, these devices begin to malfunction, as a result of which it becomes almost impossible to drive a car. In this material, we will find out what the repair of both types of gearboxes on a VAZ 2107 is, what are the differences between these two mechanisms, and when repair work is required.
Front cover
It is installed in the clutch housing. Inside there is an oil seal for the input shaft. On the end wall there is a hole for draining transmission oil, which can flow out of the crankcase if the oil seal is worn. In addition, the box housing contains:
- Primary and secondary shaft.
- Gears, synchronizers.
- Intermediate shaft with shift drive elements.
There is a filler hole in the left wall of the new VAZ-2107 gearbox. It is closed with a metal plug with a conical thread. At the bottom, the box housing is closed with a stamped steel cover. The crankcase is secured with ten nuts. There is a breather in its cavity. There is a passage for oil in the rear wall of the crankcase. it enters the cavity of the lid
Sources
- https://7vaz.ru/remont/kpp-na-vaz-2107.html
- https://rus-avtomir.ru/remont/kpp-vaz-2107
- https://prometey96.ru/tyuning/korobka-vaz-2107.html
- https://kalina-2.ru/remont-vaz/razborka-sborka-kpp-vaz-2107-5-stupka
- https://iga-motor.ru/avtomobili/kak-raspolovinit-korobku.html
- https://GrandFart.ru/tormoza/korobka-pyatistupka.html
- https://AvtoSotka.ru/korobka-peredach/sborka-kpp-vaz-2107.html
- https://CoptersWorld.ru/pro-dvigatel/transmissiya-vaz-2107.html
[collapse]