The transmission of the “Seven” is exceptionally reliable and unpretentious during operation. Natural wear of parts of units can cause the appearance of extraneous sounds during operation; the gearbox howls, usually due to an increase in gaps in the interfaces between parts. Diagnosing the cause of a breakdown of a complex mechanism is quite difficult; this requires knowledge about the device and the principle of its operation.
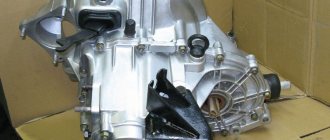
The VAZ 2107 is equipped with a five-speed manual gearbox, which consists of the following parts:
- Housing with oil sump.
- Drive and driven shafts, which are mounted on bearings.
- Main gear.
- Five pairs of gears with different gear ratios, constantly meshed.
- Reverse gears.
- Synchronizers and couplings.
- Gear shift mechanism
The occurrence of a malfunction is mainly due to wear of parts, while the box makes different noise depending on the nature of the breakdown.
Gearbox noise
- 177 1 153k
The causes of noise in the gearbox depend on the type of transmission.
So, in manual transmissions, a hum may appear, for example, due to wear of bearings, shaft gears, springs on the rocker, or differential. As for the automatic transmission, most often it hums due to low oil level, due to problems with the torque converter and the lever linkage. To eliminate noise in the area of the box, it first makes sense to check the oil level in it. If it is not enough, then you need to top it up or replace it. As a temporary solution, an anti-noise additive is sometimes used in the box (it will not completely remove it, but at least reduce the operating noise). To effectively eliminate hum, the box should be dismantled, checked and fully repaired. Read about all the causes of noise in the gearbox in the article, and for brief information on why various types of noise appear in the gearbox, see the table.
Gearbox oil for VAZ 2101
The oil in the “penny” gearbox, like in any other vehicle unit, needs to be replaced periodically. But before you perform this procedure, you need to know when and how to replace it and what lubricant to use.
What kind of oil to pour into the box of a VAZ 2101
Today there is a wide selection of transmission oils for cars. The difference between them lies in the additives used, or, more precisely, in their classes. There are the following classes of markings: from GL 1 to GL 5. For the VAZ 2101 gearbox, the best option is considered to be GL 5 class oil with a viscosity grade of 85W90 or 80W90. This lubricant is intended for hypoid gears and provides good lubrication of rubbing elements even under high loads. In addition, GL 5 oil can be used not only for the gearbox, but also for the rear axle. Of the manufacturers, preference should be given to those who are suitable in terms of price.
The VAZ 2101 gearbox must be filled with GL5 class gear oil with a viscosity of 85W90 or 80W90
Checking the oil level
For the gearbox to function properly, the oil level in the crankcase must always be optimal. It needs to be checked periodically. If the grease level in the box is normal, it should be level with the bottom edge of the filling hole. The oil volume in the VAZ 2101 gearbox crankcase is 1.35 liters.
How often to change the oil in a VAZ 2101 gearbox
Although transmission oil is rarely changed, you still need to know when this procedure is necessary. As a rule, on a “classic” it is done every 40–60 thousand km. mileage or 3 years from the date of filling.
How to drain the oil
To drain the oil from a VAZ 2101 gearbox, you will need a hex wrench and a container of suitable volume, for example, a cut-off plastic bottle. Using a hexagon, unscrew the drain plug, which is located in the lower cover of the crankcase, and drain the oil.
To drain the oil from a VAZ 2101 gearbox, unscrew the drain plug in the bottom cover of the box using a hexagon.
The drain plug is wiped clean of dirt and screwed back into place.
In addition, you need to pay attention to the drained oil and, if there is metal dust in it, you will need to repair the box as soon as possible
How to fill oil
To fill the gearbox with lubricant, you need to unscrew the filler plug with a 17mm wrench and clean it of dirt. The oil is poured in the required volume using a special syringe. Many people do not measure the required volume of lubricant, but simply fill it in until it begins to flow back out. After filling, immediately screw the plug into place. Instead of a syringe, you can use homemade devices if you have the desire and time to make them.
Oil is poured into the gearbox using a special syringe through the oil filler hole.Why is the gearbox noisy?
Most often, noise in the gearbox, both manual and automatic, occurs when the oil level has become lower or the gear lubricant is no longer suitable for use. The nature of the sound resembles a metallic clang, which intensifies as the vehicle speed increases. So, noise in a gearbox with a low oil level occurs:
ATF level dipstick
- when the car is moving at speed (the higher the speed, the louder the clang);
- at engine idle speed;
- during acceleration (there is a gradual increase in the volume of the hum);
- in neutral gear;
- when the engine is running cold.
The reason for the hum from the gearbox when the engine is running cold may lie in the thickness of the transmission oil and its contamination.
The next common reason why a gearbox hums is partial failure of the bearings of the primary or secondary shafts. In this case, the sound will resemble a metallic hum. The input (drive) shaft bearings will hum in the following situations:
- immediately after starting the engine when cold;
- when the engine is running at low speeds (at first, second, then the hum decreases);
- when coasting in a car;
- when the engine is running at high speeds.
If the bearings of the secondary (driven) shaft fail, the hum of the box will be observed:
Bearing of the input shaft of the VAZ-2110 gearbox
- when driving the car in any modes;
- when driving, but when the clutch is depressed, the noise disappears;
- The hum in the box increases as the gear and speed increase (that is, in first gear the hum is minimal, and in fifth it is the loudest).
If there is significant wear on the gears or synchronizers, a situation may also arise when the gearbox howls. The sound is reminiscent of a metallic clang, which intensifies as the engine gains speed. As a rule, the hum occurs in one specific gear. This raises additional problems:
- gears are difficult to engage with a manual transmission;
- while driving, the selected speed may “fly out”, that is, the gear selector is set to the neutral position.
As for automatic transmissions, a hum can also occur due to bearing wear, low oil level, and gear wear. However, with an automatic transmission, a hum can also occur if it fails:
- friction pairs;
- individual parts of the torque converter.
Problems with reverse gear on automatic transmission
In practice, gearbox malfunctions associated with engaging reverse gear occur on both manual and automatic transmissions. "Automatic machines" have different designs. Robotic boxes are similar in design to “mechanics”. But the automatic transmission has its own list of breakdowns when it works hard or the reverse gear has disappeared.
- The fluid level is below normal, or it is contaminated and has lost its working qualities. The automatic transmission device is sensitive to the quality of the lubricant and its level. Therefore, it is better to start finding out the cause by checking the transmission fluid. An excessive oil level also contributes to improper operation of the unit. The service life of the fluid is limited to a mileage of 60 thousand km, but sometimes it is necessary to change it more often, as the lubricant becomes cloudy and contaminated.
- Wear of friction discs. The correct operation of reverse gear, as well as the “D” (drive) mode, depends on this. Worn clutches may prevent 3rd, 4th and reverse gears from engaging. In this case, eliminating the breakdown consists only of replacing the clutches.
- The splines on the drive drum are cut off. The car can move forward, but it will be impossible to go backward.
- Worn friction brake band. There is no reverse movement, but forward movement works.
- The brake band piston cuffs are torn or worn. This will only be noticeable when you engage reverse.
- Control solenoids or hydraulic units are jammed.
Sometimes the lack of communication between the torque converter and the oil pump gear also affects the reverse operation.
What kind of noise could there be in the gearbox?
The noise from the box can come from a different nature; depending on the damage, it not only operates with increased noise, but also howls or hums. Let us briefly describe the reasons why the above components lead to the gearbox howling and humming. So that you understand what to do about it and how to fix the problem.
Gearbox howls
The most common reason for noise in the gearbox resembling a howl is old, contaminated or incorrectly selected gear oil . If its level is insufficient, then as a result, the bearings and other moving parts of the box will run dry, producing significant noise. This is not only uncomfortable when driving, but also harmful to parts. Therefore, you should always monitor the oil level in the gearbox and its viscosity.
The second reason why a gearbox howls is because its bearings are worn out . They can howl due to natural wear, poor quality, a small amount of lubricant in them, or dirt that has gotten inside.
If the gearbox is noisy at idle when the clutch is released, in neutral gear and when the car is stationary, then most likely the bearing on the input shaft is noisy. If the box hums more in first or second gear, then a greater load is placed on the front bearings . Accordingly, it is necessary to diagnose the input shaft bearing.
Likewise, the input shaft bearing can make noise when the car is coasting or simply after starting the engine, and it doesn’t matter at what speed. Often the noise disappears in this case when the clutch is depressed. The reason for this is that when the clutch is depressed, the primary does not rotate, the bearing also does not rotate, and, accordingly, does not make noise.
Worn gearbox gear
If the box is noisy in 4th or 5th gear, then in this case a large load goes to the rear bearings , that is, the secondary shaft. These bearings can also make noise not only in high gears, but in any gear, including reverse. Moreover, the hum intensifies in this case with increasing gears (in the fifth gear the hum will be maximum).
Gear wear is the third reason why the gearbox howls. This noise occurs in two cases: teeth slipping and improper contact patch between them. This sound is different from noise, it is more like a metallic screeching sound. This squeal also occurs under load or during acceleration.
Often the cause of noise is the gear itself if the sound occurs in one specific gear. The gearbox makes noise when driving at speed due to banal wear of the corresponding gear on the secondary shaft. This is especially typical for gearboxes with high mileage (from 300 thousand kilometers or more) as a result of significant metal production and/or low oil level in the box.
Automatic transmission howls
In an automatic transmission, the “culprit” of the howl can be the torque converter . This knot is colloquially referred to as a "doughnut" because of its corresponding shape. The torque converter hums when changing gears and at low speeds. As driving speed increases, the noise disappears (after approximately 60 km/h). Additional signs that the donut is broken include:
- car slipping at start;
- vibration of the car when driving;
- jerking of the car during uniform movement;
- the appearance of a burnt smell from the automatic transmission;
- The speed does not rise above certain values (for example, above 2000 rpm).
In turn, torque converter malfunctions occur for the following reasons:
Torque converter with automatic transmission
- wear of individual friction discs, usually one or more pairs of them;
- wear or damage to blade blades;
- depressurization due to destruction of seals;
- wear of intermediate and support bearings (most often between the pump and the turbine);
- failure of the mechanical connection with the box shaft;
- overrunning clutch failure.
You can check the torque converter yourself, without even removing it from the automatic transmission. But it’s better not to carry out repairs yourself, but instead delegate the diagnosis and restoration of the “donut” to qualified craftsmen.
Gearbox hums
Wear of the synchronizer clutch is the main cause of gearbox hum at speed. In this case, it will be difficult to engage any gear, and often the box will hum in this particular gear. If the wear is significant, the transmission may “fly out” when the car is moving. During diagnostics, you need to pay attention to the condition of the splined connection of the couplings!
If the springs in the clutch weaken or break, this can also cause noise in the gearbox. Similarly, this happens in a certain gear, the springs of which have weakened or broken.
Gearbox is noisy
The transmission of front-wheel drive cars has a differential that distributes torque between the drive wheels. Its gears also wear out over time, and accordingly, they begin to make a metallic noise. It usually appears smoothly and drivers do not notice it. But it manifests itself most of all when the car is slipping. In this case, the drive wheels rotate unevenly, but with high torque. This puts significant stress on the differential, and it will fail faster.
You can indirectly check the wear of the differential by the sign when the car starts to twitch after moving off (rocking back and forth). If we rule out that the engine is to blame, then you need to check the condition of the differential in the gearbox.
It happens that over time the threaded fastening of the gearbox itself weakens. As a result, it begins to vibrate during operation. Vibration, which turns into continuous noise, occurs when the car is moving and intensifies as the engine speed and the speed of the car as a whole increase. For diagnostics, the car must be driven into an inspection hole to provide access to the gearbox. If the fasteners are really loose, they need to be tightened.
Replacing bearings
Most often, problems with the gearbox begin with the bearings breaking. Therefore, the bulk of all breakdowns lead to the driver needing to disassemble the gearbox and change the bearings.
Main shaft bearing
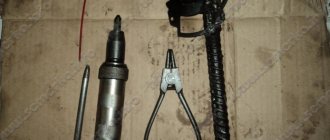
To change the input shaft bearing, you need to have the same tools as when disassembling the gearbox. The work is not difficult, but it can take a lot of time (depending on the physical fitness of the performer and his skill).
The operating procedure is as follows:
Clamp the input shaft with a vice
It is better to line the jaws of the vice with a soft cloth so that they do not deform the surface of the shaft. Use a puller to clamp the bearing and begin to slowly pull it off the shaft. Periodically you need to tap the bearing with a hammer and rotate the shaft between hits, otherwise misalignment may occur in the rollers and it will be very difficult to remove the bearing. Gradual knocking out will cause the bearing to jump off the shaft. Press a new bearing onto the shaft using the same method. It is important to only hit the inner ring of the bearing with a hammer and do so carefully. The job may take up to 30 minutes.
The job may take up to 30 minutes
Video: replacement instructions
Secondary shaft bearing
Replacing the secondary shaft bearing is carried out according to the same principle as the primary one. The only difference is that different types of bearings are used for different shafts.
Each type is strictly regulated for gearbox mechanisms
Noise additives in the box
Transmission noise reduction additives can temporarily reduce the noise during operation. However, the cause of the hum will not be eliminated. Therefore, it makes sense to use additives only for preventive purposes or during pre-sale preparation of a car in order to get rid of it as quickly as possible.
Different types of additives are suitable for different problems, so when choosing one it is important to determine exactly what is humming in the box. The most popular attachments for reducing noise in manual transmissions are:
- Liqui Moly Getriebeoil-Additiv . Forms a protective film on the surface of parts due to molybdenum disulfide, and also fills microcracks. It effectively reduces noise in manual transmissions and extends the service life of the transmission.
- RVS Master TR3 and TR5 are designed for optimal heat removal during constant overheating of the unit. Which also helps reduce noise in the box.
- XADO 1Stage . This additive can be used in any transmission - mechanical, automatic and robotic. Contains boron nitride. Removes noise and vibration in the gearbox. Allows you to get to the workshop in the event of a critical loss of oil in the gearbox.
There are similar additives in automatic transmissions. Examples for automatic transmissions include:
- Liqui Moly ATF Additive . Complex additive. Removes noise and vibrations, eliminates shocks when shifting gears, restores rubber and plastic transmission parts. Can be used with ATF Dexron II and ATF Dexron III fluids.
- Tribotechnical composition Suprotek . Can be used with both automatic transmissions and CVTs. The additive is restorative, including removing vibration and noise in automatic transmissions.
- XADO Revitalizant EX120 . This is a revitalizant for the restoration of automatic transmissions and transmission oil. Eliminates shocks when shifting gears, eliminates vibration and noise.
The additive market is constantly being replenished with new compounds to replace old ones. Therefore, the lists in this case are far from complete.
Conclusion
Most often, a manual transmission is noisy because the oil level in it is low, or the oil is of the wrong viscosity or is old. In second place is bearing wear. Less commonly, wear of gears and couplings. As for automatic transmissions, similarly, most often the cause of the hum is low oil level, wear of gears and bearings, and malfunctions of hydraulic system elements. Therefore, the first thing to do when a howling or noise of a different nature appears is to check the oil level, and then look at the situation, under what conditions it occurs, how big the noise is, and so on.
In any case, it is not recommended to operate any transmission that makes a hum or shows other signs of malfunction. In this case, the box will wear out even more and its repair will cost more. The exact cause can only be found out by disassembling and troubleshooting the unit.
Gearbox oil for VAZ 2107
A special transmission oil is poured into the VAZ gearbox. It is necessary to lubricate gears, as it extends their service life.
The choice of gear oil depends on many parameters: the driver’s finances, manufacturer’s recommendations and the preferences of the owner of a particular brand. You can undoubtedly fill the gearbox of the “seven” with gear oil from the following companies:
- UFALYUB UNITRANS 85W-90;
- LUKOIL TM-5 85W-90;
- SAMOIL 4404 80W-90 or 85W-90;
- FAIR SUPER E-80W-90 or T-85W-90;
- TNK TRANS GIPOID 85W-90 or 80W-90;
- AGIP ROTRA MP 80W-90 or 80W-95;
- NORSI TRANS 80W-90 or 85W-90;
- NOVOIL SUPER T 80W-90;
- SPECTROL FORWARD 80W-90;
- MP GEAR LUBE-LS 80W-90 or 85W-140 (GL-5).
The brand is always popular not only among VAZ drivers, but also among foreign car owners
How to check the oil level in the gearbox
If you suspect an oil leak, you need to check the level in the box. To do this, you will have to put the VAZ 2107 on the inspection hole and start working:
- Clean the drain plug and filler hole on the box body from dirt.
- Take a 17mm wrench and use it to unscrew the filler plug.
- Use any suitable object (you can even use a screwdriver) to check the oil level inside. The liquid should reach the bottom edge of the hole.
- If the level is lower, you can add the required amount of oil through a syringe.
You can check the level with a screwdriver, a narrow ruler, a bolt or a special probe purchased in a store.
How to change the oil in a VAZ 2107 gearbox
To change the oil in your car, you will need to prepare in advance:
- container for draining used liquid (at least 2 liters);
- key to 17;
- hexagon;
- screwdriver;
- rags.
VAZ 2107 needs to change transmission oil approximately every 3–4 years of operation
Operating procedure
To prevent the work from causing trouble, it is best to immediately cover the space around the box with rags. Next, follow the following diagram:
- Unscrew the oil fill plug on the box body.
- Place the drain container under the plug and open it with a hex key.
- Wait until the oil completely drains out of the box.
- Clean the drain plug from old oil and install it in place.
- Carefully pour 1.5 liters of fresh oil through the filler hole.
- After 10 minutes, check the level, if necessary, add more lubricant and close the plug.
The box on the VAZ-2107 began to howl - causes and troubleshooting methods
Like all other brands of cars, VAZs are equipped with gearboxes. This is one of the most unpretentious mechanisms that can serve for decades, but subject to careful treatment on the part of the driver. If this rule is not followed, then you can soon hear how the gearbox on a VAZ 2107 howls. You will learn from the material what precedes this result, and what methods are known to eliminate the unpleasant sound.
REPAIR
The VAZ 2107 has a 5-speed gearbox, which, despite the comparative simplicity of its design, can become unusable for reasons classic for manual transmissions:
- wear and tear due to natural reasons: high mileage, irregular operation and depletion of the service life of components, weather conditions not meeting the desired ones, and as a result - a decrease in service life, etc.;
- non-compliance of the working fluid with standards suitable for normal operation of the transmission;
- non-original spare parts included in the box;
- damage to the gearbox housing due to mechanical impact;
When it comes to the gearbox, even if it is a Zhiguli, the best option would be to entrust diagnostics and maintenance to specialists at a service station. Fortunately, repairing it will not cost too much, except in rare cases that require a complete replacement of the entire mechanism, when it would be more advisable to purchase the same new car.
What can cause a box to howl?
Initially, it is worth noting that VAZ 2107 cars are equipped with five-speed manual transmissions. Structurally, this is a separate unit that is connected to the car engine. The gearbox consists of two main parts - the drive and driven shafts. Gears of different diameters are placed on the shafts, with the help of which the shafts are connected. In addition, the box design contains bearings, gears, synchronizers, and a clutch. The failure of any part contributes to the appearance of characteristic noise, crackling, or hum, when it occurs it is extremely undesirable to operate the machine.
A specialist who has spent half his life in a garage will be able to determine by the sound why the box on a VAZ 2107 howls. It will be more difficult for a beginner to cope with this task, but it is quite possible. To do this, you need to find out what could be the reason that the gearbox is humming on the seven. The reasons for this phenomenon are as follows:
- If the box is noisy, then the reason may be a drop in the oil level in the unit structure. It is easy to identify this cause, since the noise will be heard in all operating modes of the unit, that is, when moving in all gears. You can verify this by checking the oil level. If the level is below the minimum, then you need to add special TAD-17 oil or other gear oil.
- When the box starts to howl, the bearings can contribute to this. Everyone knows that bearings tend to wear out, especially those made from low-quality materials. If the bearings are worn out, it is better to replace them immediately and not delay this moment. After all, the longer you operate a car with a faulty gearbox, the more expensive repairs will subsequently cost.
- Wear of gear teeth - this reason is rare and depends on the nature of driving. The more often you start from second or third gear, the faster the teeth will be licked. In addition, a clutch that is under-pressed or malfunctioning also causes gear teeth to wear out, causing costly repairs.
- Wear of synchronizers and blocking rings on the shaft.
As you can see, there are more than enough reasons, and detecting a breakdown by ear is only an attempt to estimate the cost of future repairs. However, there is no way to prevent it, and therefore if the gearbox on your car is howling, then it’s time to go for repairs. You can do this repair yourself if you have experience. If you have no experience, then there are instructions for this.
Determination of gearbox malfunction
Having dealt with the suspected causes, you can begin to identify the exact malfunctions of the gearbox on the VAZ 2107. First, it is worth doing a simple diagnostic procedure, on the basis of which the involvement of the gearbox in the malfunction will be revealed.
- On the car, you need to start the engine, then listen to the characteristic sound and try to determine where it comes from. After all, it is possible that the hum does not arise in the box, but in the bridge.
- Depress the clutch and listen - if the hum disappears, this means that the cause of the malfunction is in the mechanism in question. If the humming sound of the clutch pedal continues to irritate your ears, most likely the gearbox has nothing to do with it.
- If it is determined that the cause of the hum is in the mechanism, then we drive out onto the road, and sequentially engage the gears and listen to the sounds. By the nature of their changes and occurrence, it is possible to determine what the cause is.
- You should also check for a hum when you engage reverse.
If the mechanism makes a characteristic sound, then we can safely assume that the cause of the breakdown is the deterioration of the synchronizer or clutch. To establish the exact cause, you will need to remove the unit from the car and disassemble it. This is quite a labor-intensive process, so if you are going to renovate houses, you will need the help of a friend.
How to fix breakdowns
In most cases, the gearbox can be repaired, but the cost of such repairs can only be estimated after identifying specific parts that have failed. However, in any case, it is much cheaper than buying a new box for seven. If funds allow, you can buy a new or working box and install it on the car. After this, you can repair the old mechanism, providing yourself with a sufficient supply of time.
In any case, do not agree to replace the gearbox without 100% finding out the cause of the breakdown. Perhaps the mechanism needs to replace the bearings, which will cost nothing, except for the repair procedure. Even if the cause of the malfunction is a pair of gears, this type of failure can be eliminated without having to replace the entire assembly.
Many drivers, when they discover a mechanism malfunction, immediately begin to disassemble it and look at what’s inside. There is no need to rush, since the malfunction can be eliminated without the need for dismantling work, for example, by adding oil to the box. If the oil level is low, you can successfully eliminate the signs of transmission hum in a matter of minutes.
As a result, it is worth noting the following that any hum, noise and knocking in the gearbox does not bode well at all, so you should not wait until the gears stop shifting altogether. After all, the box is connected to the engine, and its malfunction indirectly disrupts the operation of the motor. If you are not sure that you have identified the cause of the box hum correctly, then you can always visit a service station, where the cost of diagnostics is not as high as repairing or replacing the box, which, based on the results of the examination, can be done at home yourself.
Gearbox device
In general, the concept of “remaking” the box is not entirely correct, since the design of the VAZ-2105 gearbox with 4 speeds was practically no different from the same gearbox 2101. The 2105 gearbox has a three-shaft layout, with constant gear meshing and manual control. Externally, the Kopeika and Pyaterki checkpoints can be distinguished almost only by the markings on the body of the box.
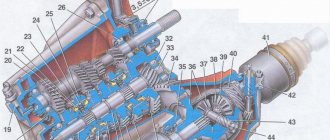
The VAZ-2105 gearbox diagram with 4 stages is presented below, and structurally it does not differ from modifications 2101 and 2106:
| 1 | Bottom cover; | 40 | Needle bearing of the front end of the secondary shaft; |
| 2 | Filler and inspection plug; | 41 | Synchronizer spring thrust washer; |
| 3 | Intermediate shaft second gear gear; | 42 | Fourth gear synchronizer ring gear; |
| 4 | Intermediate shaft third gear gear; | 43 | Sliding clutch for synchronizer of third and fourth gears; |
| 5 | Intermediate shaft; | 44 | Third and fourth gear synchronizer sliding clutch hub; |
| 6 | Front intermediate shaft bearing; | 45 | Synchronizer retaining ring; |
| 7 | Clamp washer bolt; | 46 | Synchronizer locking ring; |
| 8 | Intermediate shaft front bearing clamp washer; | 47 | Synchronizer spring; |
| 9 | Intermediate shaft constant mesh gear; | 48 | Third gear synchronizer gear and ring gear; |
| 10 | Constant mesh gear of the input shaft; | 49 | Second gear synchronizer gear and ring gear; |
| 11 | Spring washer; | 50 | Secondary shaft; |
| 12 | Retaining ring; | 51 | First gear synchronizer gear and ring gear; |
| 13 | Rear input shaft bearing; | 52 | First gear gear bushing; |
| 14 | Input shaft oil seal; | 53 | Secondary shaft intermediate bearing; |
| 15 | Transmission front cover; | 54 | Intermediate bearing lock plate; |
| 16 | Bearing mounting ring; | 55 | Secondary shaft reverse gear; |
| 17 | Clutch housing; | 56 | Elastic cushion for gear shift lever damper; |
| 18 | Gearbox input shaft; | 57 | Damper rubber bushing; |
| 19 | Reversing light switch; | 58 | Damper spacer; |
| 20 | Intermediate shaft reverse gear; | 59 | Damper locking sleeve; |
| 21 | Reverse intermediate gear; | 60 | Inner gear shift lever cover; |
| 22 | Reverse fork; | 61 | Secondary shaft rear bearing oil seal; |
| 23 | Gear shift lever release spring; | 62 | Flange of the elastic coupling of the propeller shaft; |
| 24 | Tension spring bolt; | 63 | Screw; |
| 25 | Gear shift lever guide cup; | 64 | Centering ring seal; |
| 26 | Ball joint of the lever; | 65 | Centering ring retaining ring; |
| 27 | Spherical washer; | 66 | Centering ring; |
| 28 | Spring; | 67 | Rear secondary shaft bearing; |
| 29 | Gear shift lever; | 68 | Drain plug; |
| 30 | First and second gear shift fork; | 69 | Mud deflector; |
| 31 | Third and fourth gear shift fork; | 70 | Speedometer drive gear; |
| 32 | Fork rod for first and second gears; | 71 | Speedometer drive; |
| 33 | 3rd and 4th gear fork rod; | 72 | Rear gearbox cover; |
| 34 | Locking blocks; | 73 | Reverse idler gear axis; |
| 35 | Reverse fork rod; | 74 | Rear intermediate shaft bearing; |
| 36 | Rod lock ball; | 75 | Intermediate shaft first gear; |
| 37 | Retainer spring; | 76 | Gearbox housing; |
| 38 | Retainer cover; | 77 | Sliding clutch for synchronizer of first and second gears. |
| 39 | Breather; |
Since the box from the VAZ-2105 is structurally similar to the 2101, the kinematic diagram of the gearbox is the same. But the gear ratios are different; on 2105 gearboxes they are:
- 1st – 3.67;
- 2nd – 2.10;
- 3rd – 1.36;
- 4th – 1.00;
- Rear – 3.53;
As for the differences in the design between gearboxes 2105 and 2101, they mainly come down to different numbers of teeth on different gears. So, on the intermediate shaft of the gearbox, a 1st speed gear with 14 teeth is used (15 for 2101), and their inclination angle is greater. The constant mesh gear of this shaft has 28 teeth (29 for 2101). The input shaft uses an 18-tooth gear (19 for 2101). Because of these features, the shafts with gear blocks of these two gearboxes are not interchangeable if you try to install them separately. But in the case of a complex replacement - the input shaft along with the intermediate shaft and all gear blocks, then installation is quite possible. As for the secondary shaft, modification 2105 differs from shaft 2101 in the first gear gear (its teeth have a different angle, although their number is the same, and its diameter is also slightly larger).
The gearbox howls on a VAZ 2107: causes and solutions
The transmission of the “Seven” is exceptionally reliable and unpretentious during operation. Natural wear of parts of units can cause the appearance of extraneous sounds during operation; the gearbox howls, usually due to an increase in gaps in the interfaces between parts. Diagnosing the cause of a breakdown of a complex mechanism is quite difficult; this requires knowledge about the device and the principle of its operation.
The VAZ 2107 is equipped with a five-speed manual gearbox, which consists of the following parts:
- Housing with oil sump.
- Drive and driven shafts, which are mounted on bearings.
- Main gear.
- Five pairs of gears with different gear ratios, constantly meshed.
- Reverse gears.
- Synchronizers and couplings.
- Gear shift mechanism
The occurrence of a malfunction is mainly due to wear of parts, while the box makes different noise depending on the nature of the breakdown.
- The main reasons for unit failure
- Determining gearbox malfunction
- Elimination of breakdowns in mechanisms
What is the gearbox ratio?
Gearbox ratios are quotients of the number of driven teeth divided by the number of drive gear teeth. Also, gears with high gear ratios are called “short”, and low gears are called “long”.
The physical meaning is as follows: since the engine (crankshaft and input shaft) always has the highest rotation speed,
and the rotational speed of the cardan is always lower (that’s why the gearbox is called a gearbox - a reduction gearbox), with the exception of 5th gear, where the gear ratio is less than 1, then the gear ratio is the number of revolutions of the driveshaft per one revolution of the crankshaft.
There is a general rule: the larger it is, the shorter the time it will take when pressing the gas pedal to gain the maximum number of revolutions. Accordingly, the transmission will be more powerful, the car will “jump” forward, but at the same time the driver must be prepared for a quick shift. And, as soon as the car has accelerated significantly, you need to prepare to switch. Therefore, a drop in speed is typical at high speeds.
In order to improve the dynamics of the car during acceleration, you can, of course, tune the carburetor. But if you decide to do something real, you need to change the main gear ratio, the main gearbox pair.
In a gearbox there is such a thing as a row - a set of shafts and gears.
A little history:
- Initially, the VAZ was equipped with a four-speed gearbox 2101;
- then, in 1976, the “Nivov” gearbox, or 2121, appeared. It was distinguished by a higher range, where the gear ratio was low (after all, an SUV)! In addition, it was equipped with “sixes” with a volume of 1.6 liters;
- a year before the Olympics - 80, checkpoint 2105 appeared;
- Currently, only 2107, 21074 and in some places you can find 2106 are on sale. All other boxes are discontinued;
- Gearbox 2107 exists for a five-speed gearbox, it is called 21074, the difference is that there is a place for mounting the reverse gear unit and fifth gear;
In order not to bore the reader, we present these gear ratios in the table for the 2101 gearbox, the ancestor of the gearboxes (in fact, of course, a Fiat design) and the VAZ 2107.
| VAZ 2101 | VAZ 2107 | |
| 1 | 17 | 18 |
| 2 | 29 | 28 |
| 3 | 15 | 14 |
| 4 | 33 | 33 |
| 5 | 3.753 | 3.667 |
| 6 | 20 | 20 |
| 7 | 27 | 27 |
| 8 | 2.303 | 2.1 |
| 9 | 24 | 24 |
| 10 | 21 | 21 |
| 11 | 1.493 | 1.361 |
| 12 | 1 | 1 |
| 13 | — | 38 |
| 14 | — | 20 |
| 15 | — | 0.819 |
- – number of teeth on the input shaft (main pair);
- – number of teeth on the intermediate shaft (main pair);
- – intermediate shaft 1;
- – secondary shaft 1;
- – gear ratio of 1st gear;
- — intermediate shaft 2;
- — secondary shaft 2;
- — gear ratio 2nd gear;
- — intermediate shaft 3;
- — secondary shaft 3;
- — gear ratio 3rd gear;
- — gear ratio 4th gear;
- — intermediate shaft 5;
- — secondary shaft 5;
- – gear ratio 5th gear. VAZ 2107 does not.
Even with a superficial analysis, these gear ratios say the following:
- all gear ratios of the VAZ 2107 are slightly lower than those of the VAZ 2101, this makes the box “softer”;
- in 4th gear we have 1, which means that the driveshaft and crankshaft are connected directly;
- There is a 5th gear, which causes the wheels to rotate faster than the input shaft, since the ratio is less than one.
The main reasons for unit failure
The crankcase of the transmission mechanism of the VAZ 2107 car contains a special oil of the TAD-17 brand, which lubricates the parts and reduces friction. Noise that appears during operation may indicate a drop in the level of technical fluid or a decrease in its anti-friction properties. If the transmission hums in all driving modes and at idle, check the oil level.
To answer the question why the gearbox makes strange sounds, it is necessary to carry out a simple diagnostic procedure:
- Start the engine and listen, then squeeze the clutch. If the extraneous sounds have disappeared, then the failure is not related to this unit.
- Consistently turning on the gears, while driving, pay attention to the character and changes in the sound.
- After stopping, we reverse. It should be remembered that the teeth of the reverse gears are straight and the mechanism produces a characteristic sound.
The observations obtained as a result of such a test need to be analyzed.
Replacing and adjusting the gearbox driveshaft
So, if only reverse does not work, and all other modes do not fail, then you will need to replace the universal joint and adjust it. To do this, prepare a new spare part, a gear selector shaft seal, a set of keys, a hammer and several screwdrivers of different sizes.
Carry out the work according to the instructions:
Place the machine on an overpass or over a pit. Find the gearbox from below and loosen the clamp bolts on its drive rod. Remove the actuator completely from the stem. Using a screwdriver, pull the boot towards the unit. Often the boot is completely damaged during this step, in which case it can be removed and then a new one installed
Unscrew the fixing screw on the universal joint. Carefully tap the driveshaft off the assist shaft with a hammer. Remove the boot if you haven't damaged it previously
Install a new oil seal on the speed shaft. Install a new boot, place the cardan on the shaft so that the position of the fixing screw coincides with the recess on the shaft. Tighten the retaining screw and place the rod on the rod, but do not tighten the clamp. To make the adjustment, ask an assistant to move the gearshift lever to the neutral position and a short distance to the right. He should hold it in this position while you tighten the clamp.
https://www.youtube.com/watch?v=sAUaUF67F0o
If the reason for the failure of the reverse gear was hidden in the cardan of the carriage, then you will no longer have problems after this repair.
Determining gearbox malfunction
While driving a VAZ 2107, it is quite possible to determine the nature of the gearbox failure. Constant noise during operation may have the following reasons:
- low oil level;
- bearing wear;
- greater output of the main gear.
If the unit hums when a certain pair of gears is turned on, then it is logical to assume that the synchronizer, clutch, or significant wear of the gears have worn out. Other possible malfunctions of the five-speed gearbox of the VAZ 2107 include breakdown of the switching mechanisms or leaking oil seals. In the latter case, the oil level drops, which immediately affects the performance of the mechanism. If there is extraneous noise when the gearbox is operating, you should check the presence of lubricant in the crankcase.
The process of dismantling and disassembling the transmission
Disassembly and reassembly of the gearbox if any malfunction is detected should be performed in the following sequence:
- de-energize the system by removing the negative contact from the battery;
- dismantle the radio panel;
- slightly move the locking sleeve down and remove it from the rod cavity;
- with a sharp movement we pull the rod out of the gear shift lever;
- remove the upper and lower bushings from the lever;
- dismantle the gearbox cover, which is fixed with four screws;
- remove the cover that protects the handbrake from dirt, and then unscrew all the fasteners located on the floor of the car;
- dismantle the hoses through which warm air is supplied to the air filter;
- move the starter forward a little, then unscrew the gearbox housing plug and drain the transmission oil;
- dismantle the muffler and disconnect the universal joint, the reverse switch and the speedometer cable, which connects the part to the gearbox;
- disassemble the clutch housing cover and the cardan drive;
- disconnect the last fastenings of the gearbox, move it back a little and remove it out.
Elimination of breakdowns in mechanisms
Based on the results of diagnosing the gearbox of a VAZ 2107 car, a decision is made to carry out routine repairs or replace the unit. Performing an operation to restore the functionality of the box is quite a costly operation, both in terms of time and finances. To identify the cause, it will be necessary to dismantle the mechanism, disassemble it and defect the parts. Performing this type of work requires experience and professionalism.
The answer to the question why the five-speed gearbox on a VAZ 2107 is constantly noisy will allow you to fix the breakdown at minimal cost. You should not immediately agree to replace the mechanism until all repair options have been exhausted. The gearbox has a significant service life and, with timely maintenance and repairs, can be used for almost the entire service life of the vehicle.
Rules for disassembling and assembling the gearbox
If the user has never encountered the repair of such a complex unit, the procedure should be carefully prepared.
- Disassembly of the mechanism is carried out only after it has been completely cleaned of dirt.
- All the tools required for disassembly are pre-prepared - keys, squeezes, pliers, lock ring pullers. It is also advisable to have a separate container for storing small bolts, nuts, and washers.
- It is necessary to dismantle the mechanism parts by first treating the bolts with an anti-boiling agent.
- When disassembling, the units are folded in the dismantling sequence.
- Human memory is extremely unreliable - a photograph of a disassembled mechanism before its reassembly is the best reminder.
- All gaskets without exception must be replaced. Recycling of seals is strictly prohibited.
- No one has canceled the abundance of the cleaner. When washing the structure, you should not skimp on the cleaning material; the better you wash it, the more fun it will be.
- Assembly of the unit is carried out exclusively in the reverse order.
- If after installation there are excess parts left (which is not uncommon), the entire gearbox is completely rebuilt.
It is also necessary to maintain maximum cleanliness during work. Dust, metal shavings, or foreign objects can cause serious damage to the gears.
Why does the VAZ 2107 gearbox hum?
Moderator: Rustem
Rumble in the box, what is it?
Unread message by Wolf » Wed Oct 15, 2008 06:55:04 PM
Unread message by VladiZlav » Wed Oct 15, 2008 19:56:13
Unread message by DonPedro » Wed Oct 15, 2008 07:56:56 PM
Unread message by Wolf » Tue Oct 21, 2008 15:01:36
Unread message by VladiZlav » Tue Oct 21, 2008 15:45:17
Unread message Wolf » Tue Nov 04, 2008 19:32:16
Unread message by VladiZlav » Tue Nov 04, 2008 19:46:47
Unread message by DonPedro » Tue Nov 04, 2008 20:19:52
Unread message Wolf » Wed Nov 05, 2008 19:04:42
Unread message by VladiZlav » Wed Nov 05, 2008 19:13:50
Unread message Wolf » Thu Nov 06, 2008 20:01:16
Unread message Vladimir S » Thu Nov 06, 2008 20:48:30
Unread message by VladiZlav » Thu Nov 06, 2008 21:18:35
Unread message Vladimir S » Fri Nov 07, 2008 10:38:14
Unread message by VladiZlav » Fri Nov 07, 2008 11:53:41
Unread message Vladimir S » Fri Nov 07, 2008 20:10:31
I’ll pump it soon and tell you, but now I’ve been climbing and adding oil to the gearbox, about 300 grams have been added
Added after 2 hours 8 minutes 45 seconds:
You start to grab it almost at the policeman, I also noticed that the rear one engages normally after any other, and if I immediately engage the rear one, then with a bang (
Unread message NikVE » Sat Nov 08, 2008 9:19:44 AM
Unread message by VladiZlav » Sat Nov 08, 2008 18:38:28
Unread message Vladimir S » Sun Nov 09, 2008 17:09:05
Unread message Wolf » Mon Nov 10, 2008 19:09:35
wrote: Wolf wrote: so what should I do? Should I change the input shaft and the bearings on it?
When you assembled the box, did you try the input shaft play? By the way, fill all bearings with grease, especially release grease, it is generally sold dry (it sucks to fill it, but it’s necessary!)
there are 2 nuts, large and small, the large one is the adjusting nut, the small one is the lock nut. release the locknut and unscrew the adjuster towards the trunk, then you will have enough in the middle or at the end of the pedal stroke. if you unscrew (or screw) towards the engine, it will grab right to the floor. In any case, you must have 3-5mm of free movement of the presser foot, otherwise the release will move. I have about 2-3cm from the floor. The trouble is that if the gap is completely removed, the gears will engage better, but the clutch will soon come in.
Added after 19 hours 34 minutes 26 seconds:
In general, they changed the input shaft - the hum disappeared. things like that, I didn’t even think of blaming him
Troubleshooting
If the VAZ 2109 gearbox howls, then the simplest repair is to check the level and change the oil in the crankcase. To eliminate all other defects, it is necessary to remove the box from the car and completely disassemble it. To do this, you need a closed room, a large number of various tools and experience in repairing such units.
Lack of oil
The oil level is measured using a dipstick installed in the upper part of the gearbox housing. A volume located at any distance between the minimum and maximum marks on the probe rod is considered normal. On the oldest gearboxes that do not have an overdrive fifth gear, the amount of fluid is measured through a hole in the side, closed with a plug. The level should be at the bottom edge of this hole.
Dipstick for checking the oil level on the VAZ 2109 box
To maintain the normal condition of the oil, it should be changed after 75 thousand kilometers. When filling, use API GL-4 standard lubricants with a viscosity of 75W-90, 80W-85 or 80W-90. Some owners specially fill in thick oil of the TM-5 type, which reduces the noise of the box. If replacing the lubricant does not correct the situation and the mechanism continues to make noise, then the problem lies in worn-out gearbox parts.
Replacing the drive shaft bearing
Before replacing the bearings, the gearbox must be removed from the vehicle.
To remove the gearbox you must:
- Wash the wheel arches and the underside of the car in a pressure washer and place the car on a lift. Then you need to remove the protective sheet of the crankcase and engine.
- Disconnect the battery from the on-board network and drain the oil from the gearbox housing.
- Unscrew the hub nuts of the front wheel drives and remove the wheels themselves.
- Disconnect the speed drive rod in the box and the ground wire going to the crankcase.
- Disconnect the plug from the reverse lamp switch.
- Remove the ball joints from the steering knuckle and remove the longitudinal brace from the vehicle.
- Unscrew the fastening of the lower cover on the clutch housing.
- Unscrew the fasteners and remove the wheel drive shafts.
- Unscrew the starter mounting bolts and remove it from the unit.
- Remove the gear shift link located on the top of the manual transmission.
- Unscrew the four nuts securing the gearbox housing to the flywheel housing.
- Remove the support with which the box is attached to the body side member. To do this, the power unit is slightly raised on a jack.
- Move the box away from the engine a few centimeters and remove the input shaft from the clutch basket. When removing the gearbox, you must make sure that the shaft does not rest on the clutch basket petals. Contact may damage the basket.
- Remove the gearbox from the engine compartment.
The procedure for removing the box from a VAZ 2109 is shown in the video from the author of AUTO REZ.
After completing the steps described above, you need to disassemble the gearbox and remove the input shaft.
To remove and replace worn bearings, follow the steps:
- Clamp the shaft in a vice with soft metal jaws or through wooden spacers.
- Remove the front and rear bearings from their seats using a screw bearing puller.
- Install the new parts into place by hammering them through a metal mandrel. This must be done carefully so as not to distort the bearing ring, as this will cause nicks in the seat.
Wear of gears in the box
To perform the repair, you will need to remove the gearbox from the car according to the instructions described above and completely rebuild the gearbox. In this case, the condition of all parts of the mechanism should be assessed, since not only gears, but also other mechanisms can be worn out.
The sequence for disassembling the gearbox is as follows:
- Remove the clutch bracket and unscrew the six nuts securing the rear cover.
- Using light blows of a hammer, push the cover off the gasket and remove it. Remove any remaining sealant. Reusing such parts is undesirable because it does not ensure the tightness of the joint.
- Engage third or fourth gear and unscrew the bolt securing the fifth-speed shift fork. The bolt is located under the removed cover.
- Sliding the synchronizer along with the fork down, switch the gearbox to fifth speed. Check the position of the coupling splines, which should come into contact with the gear.
- Remove the clamps of the primary and secondary shafts, and then unscrew the fastening bolts.
- Pry the fifth speed synchronizer with a flat tool (for example, a screwdriver) and remove it from the shaft along with the fork. When removing the part, you must hold it with your hand so as not to lose the balls and springs that fix the coupling.
- Remove the blocking ring and fifth gear from the secondary shaft by prying it off with a screwdriver.
- Remove the needle bearing cage along with the thrust ring. Then remove the fifth gear from the drive shaft.
- Remove the four slotted screws that secure the shaft bearing plate. The screws are tightened with a high torque, so they can only be unscrewed with an impact tool.
- Remove the driven shaft needle bearing plate and bushing along with the thrust ring. Remove the bearing retaining rings installed in the grooves on the shafts.
- Unscrew the three gear shift lock plugs. After this, remove the balls and springs from the holes.
- Remove the two bolts that secure the box support bracket to the crankcase. Separate the gearbox and clutch housings, which are secured with twelve nuts. For this purpose, there are special grooves at the junction into which the awl of a flat-head screwdriver is inserted. Trying to insert a screwdriver into another joint is prohibited, as the mating surfaces will be damaged.
- Place the box on the plane of the removed fifth gear cover and unscrew the bolts securing the shift forks of the first two speeds in the gearbox. Lift the forks up and out of their seats. Using a similar procedure, remove the third and fourth speed forks. To remove the overdrive fork rod, turn it to the side to disengage the rod heads.
- Remove the retaining ring and remove the reverse gear fork along with the gear. Then you need to carefully pick up the drive and driven shafts and remove them from the box housing.
- Unscrew the three bolts securing the gear selector mechanism. Through a mandrel, press the roller bearing of the driven shaft along with the oil seal out of the crankcase.
The procedure for disassembling the box is described in detail on the video of the AUTO RES channel.
The drive shaft of the VAZ 2109 box has several gears, one of which is made in the body of the shaft, and the second has a high interference fit. Therefore, the input shaft gears cannot be replaced and are replaced with a completely new shaft. Maintenance of this part consists of replacing the bearings, which are removed with mounting tools or a puller. Only the secondary shaft of the box can be disassembled, and the parts should be marked or laid out in the order of removal. This method makes it easier to reassemble the unit.
Shaft disassembly sequence:
- Place the shaft removed from the box vertically in a vice. The part should be clamped through spacers or using soft metal linings on the jaws of a vice.
- Using two mounts or a puller, pull off the rear bearing. Then remove the washer installed under the bearing and remove the fourth speed gear by hand.
- Remove the needle bearing cage and remove the spacer ring.
- Using pry bars installed under the end of the third gear gear, pull off the synchronizer assembly for shifting the third and fourth speeds from the splines.
- Remove the 4th gear bushing and insert it and the needle bearing cage into the inside of the 4th gear in the same position as they were on the gearbox. Secure the parts together with a plastic tie or wire.
- When removing the synchronizer, the fourth gear locking ring is removed. These parts are tied together with a tie in the same position as they were installed on the unit.
- Remove the third gear retaining ring. Then you should dismantle the gear and bearing and tie them together with a tie.
- Below there will be thrust half-rings secured with a retaining ring, which should be removed.
- Under the rings there is a second gear gear, secured against axial movement by a ball installed in a hole on the shaft. Pull out the ball with a screwdriver and remove the gear, and then the needle bearing. Secure the gear and bearing with a tie.
- Remove the retaining ring securing the first and second speed synchronizer.
- Place the shaft against the end of the first gear gear and use a hammer to hit the end of the shaft to tighten the synchronizer assembly. To remove, you need to use a mallet and a spacer so as not to deform the shaft surface.
- Remove the synchronizer assembly with the second speed locking ring from the shaft.
- Remove the first gear and the last locking ring. The gear bearing remaining on the shaft has a locking connector that must be unfastened. After this, the separator is removed.
- Turn the shaft over and pull off the remaining bearing with a puller or a puller.
- Wash the parts in kerosene, troubleshoot and replace the components, and then reassemble the shaft in the reverse order.
Replacing locking rings
The steps to replace parts are as follows:
- Remove the box from the car and disassemble it according to the diagram above.
- Find the synchronizer mechanisms on the secondary shaft.
- Check by visual inspection for nicks, cracks and deformations of the rings. If there are any, install new parts.
- Reassemble the box and install it on the car.
- Check the operation of the gearbox; if the fault was a defect in the rings, the noise level of the gearbox will decrease.
In parallel with checking the condition of the rings, it is necessary to assess the wear of the synchronizer couplings.
Changing the synchronizer clutch
Work on replacing couplings is carried out on a disassembled box in the same way as changing blocking rings. After removing the clutch and hub assembly, it is necessary to disassemble this unit.
Parsing order:
- Mark the relative positions of the parts with an indelible marker.
- Remove the coupling from the hub. At the same time, it is important not to lose the small parts of the crackers with the retainers.
- Visually inspect the disassembled unit. There should be no nicks or chips on the parts. All damaged elements must be replaced.
- Align the coupling and hub in a position where the large grooves on the coupling are opposite the grooves on the hub.
- Lubricate the spring with grease (for example, Litol) and insert it into the hole in the lower part of the hub groove.
- Apply lubricant to the cracker and insert a ball into the outer part of the part.
- Gently compress the spring using pliers and insert a cracker onto it. In this case, the ball should fit into the groove on the coupling splines.
- Insert the spring into the hole in the cracker. The assembled units must be installed on the box shafts and the mechanism must be reassembled.
The video, made by user Sem, shows how you can quickly assemble a synchronizer.
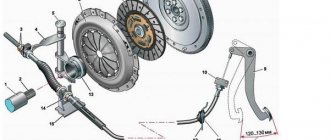
Clutch adjustment
To adjust the clutch, do the following:
- Measure the distance of the clutch pedal from the floor using a ruler. The distance is measured from the center of the pedal along the leading edge, resting the end of the ruler on the floor of the body.
- Press the pedal all the way down and measure the same distance. If the first measurement yielded a result within the range of 180-200 mm, and the second - 60-70 mm, then the pedal stroke will be 130-140 mm. This value is normal for the VAZ 2109 clutch. Otherwise, it needs to be adjusted.
- The adjustment is made by changing the length of the clutch cable and is performed under the hood of the car. To adjust, you need to tighten the adjusting nut and release the lock nut installed on the bracket.
- Rotating the adjuster nut clockwise increases the pedal stroke, tightening it counterclockwise decreases it.
- After setting the movement parameters of the mechanism within the limits recommended by the factory, you should tighten the lock nut and check the operation of the box and clutch while moving.
Measure the clutch pedal travel
Unscrew the nuts securing the cable
Perform cable adjustment
Replacing the release bearing
Work to replace the release bearing is carried out with the box removed.
The sequence of actions is as follows:
- Rotate the release bearing by hand to assess its condition. If it crunches and has play, then the part needs to be replaced.
- The bearing is secured to the shaft by a clamping locking element. It is necessary to remove the spring-loaded end of the clamp using a screwdriver and disengage it from the clutch that serves as the bearing housing.
- Remove the clutch with bearing.
- Pull back the pressure ring and remove the clutch from the release bearing.
- Install the new part in the reverse order. Before installation, you should check the softness of the bearing and the absence of play in it. During assembly, all parts are lubricated with engine oil, this makes the work process easier.
Why does the VAZ 2107 gearbox hum?
This noise has been going on for 4 years already, I’m sinning at the checkpoint, over the last year the noise has become much stronger. Help me determine what is howling like that. Tired of the noisy operation of the car already! Where to climb? What to repair? What should I change? Here is a link to a video of the car working: vk.com/video227569033_167156131. When the clutch pedal is pressed, everything is quiet, as soon as it is released, a noise appears (it starts approximately from the middle)
- Extraneous noise in the VAZ 2107 clutch – 4 answers
- VAZ 2107 fifth gear falls out - 3 answers
- Reverse gear does not engage in the 5-speed gearbox of the VAZ 2107 - 2 answers
- The transmission howls only in 5th gear VAZ 2107 – 2 answers
- How to assemble a five-speed gearbox on a VAZ 2107? – 2 answers
When the car is stationary, the engine is running and the clutch is not depressed, only the gearbox input shaft rotates. Accordingly, the operation of the rear bearing of the input shaft can be heard. Because The front bearing rotates with the engine and barely works, you can’t even hear it. But as soon as you squeeze the clutch, the shaft stops and the rear bearing of the input shaft is no longer heard.
Sometimes it is possible to change this bearing without completely disassembling the gearbox. When you unscrew the bell, the bearing is in front of you. But whether you can remove it or not depends on the amount of interference when pressed onto the shaft.
Like all other brands of cars, VAZs are equipped with gearboxes. This is one of the most unpretentious mechanisms that can serve for decades, but subject to careful treatment on the part of the driver. If this rule is not followed, then you can soon hear how the gearbox on a VAZ 2107 howls. You will learn from the material what precedes this result, and what methods are known to eliminate the unpleasant sound.
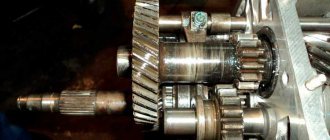
Intermediate shaft
Designed to transmit a certain amount of torque from primary to secondary. Rotates on bearings 2, 22 and 19. The gears are integral with the shaft. In the same block, gears of the fifth speed 18 and rear 20 are installed. The latter is installed on a separate shaft 21, connected to the secondary one on splines.
To fill the VAZ 2107 gearbox with oil, there is a special hole 11 on the left side of the housing, which is closed with a plug. The bottom of the case is closed with a steel lid, which is secured with ten nuts. All connections between the lids and the box body are sealed with special gaskets that prevent oil leakage. The bearings of the primary, secondary and intermediate shafts are sealed with seals that prevent oil from leaking out of the transmission pan.
The filling volume of oil for the VAZ 2107 gearbox is approximately 1.6 liters. Some car enthusiasts prefer to fill oil through the top, at the place where the handle is inserted into the gearbox. This method is much simpler than the standard one, since the handle is located in the interior and access to it is not difficult, which cannot be said about the filler hole.
Gear shifting is controlled by a set of forks that are driven by a handle. The structure and main details of the gear shift mechanism are clearly illustrated by the following diagram.
Here numbers 1, 2 and 16 indicate the gear shift forks: third and fourth, first and second, rear and fifth, respectively. Numbers 5, 7 and 9 indicate the rods of the corresponding forks, which are driven by handle 8, located in the interior of the VAZ 2107 car.
The operating diagram of the switching mechanism is as follows: when handle 8 changes its position, its hinge engages with a recess on one of the rods, the other end of which is rigidly coupled to the fork with a bolt 3. The fork, in turn, fits into a groove on the corresponding front gear (16 , 23, 24, 25) or intermediate (20) reverse. Thus, handle 8 ensures the movement of the fork and a certain gear of the secondary shaft is engaged with the corresponding intermediate gear. In this case, the torque transmission chain is closed, the secondary shaft begins to rotate at a speed corresponding to the gear ratio of the gears currently engaged. When the reverse gear is engaged, unlike the others, the handle is “recessed” down when moving.
As you can see, the design of the VAZ 2107 gearbox is quite complex, so it is not recommended to repair it without having the appropriate skills. It is better to entrust this matter to specialists.
The VAZ 2107 is equipped with two types of gearboxes, one of which is four-speed and the other five-speed. Sooner or later, these devices begin to malfunction, as a result of which it becomes almost impossible to drive a car. In this material, we will find out what the repair of both types of gearboxes on a VAZ 2107 is, what are the differences between these two mechanisms, and when repair work is required.
What can cause a box to howl?
Initially, it is worth noting that VAZ 2107 cars are equipped with five-speed manual transmissions. Structurally, this is a separate unit that is connected to the car engine. The gearbox consists of two main parts - the drive and driven shafts. Gears of different diameters are placed on the shafts, with the help of which the shafts are connected. In addition, the box design contains bearings, gears, synchronizers, and a clutch. The failure of any part contributes to the appearance of characteristic noise, crackling, or hum, when it occurs it is extremely undesirable to operate the machine.
A specialist who has spent half his life in a garage will be able to determine by the sound why the box on a VAZ 2107 howls. It will be more difficult for a beginner to cope with this task, but it is quite possible. To do this, you need to find out what could be the reason that the gearbox is humming on the seven. The reasons for this phenomenon are as follows:
- If the box is noisy, then the reason may be a drop in the oil level in the unit structure. It is easy to identify this cause, since the noise will be heard in all operating modes of the unit, that is, when moving in all gears. You can verify this by checking the oil level. If the level is below the minimum, then you need to add special TAD-17 oil or other gear oil.
- When the box starts to howl, the bearings can contribute to this. Everyone knows that bearings tend to wear out, especially those made from low-quality materials. If the bearings are worn out, it is better to replace them immediately and not delay this moment. After all, the longer you operate a car with a faulty gearbox, the more expensive repairs will subsequently cost.
- Wear of gear teeth - this reason is rare and depends on the nature of driving. The more often you start from second or third gear, the faster the teeth will be licked. In addition, a clutch that is under-pressed or malfunctioning also causes gear teeth to wear out, causing costly repairs.
- Wear of synchronizers and blocking rings on the shaft.
A short summary
General structure of manual gearboxes on VAZ
The device of a 5-speed manual transmission Lada Priora, Kalina. General diagram of the gearbox.
New cable transmissions installed on car models with 16-valve engines have become much quieter even when braking the engine. They have reinforced synchronizers (which, however, cannot be called problem-free). They are capable, according to the passport data, of withstanding a torque of 160 Nm. In practice, they work properly even under much higher loads when the car engine is boosted.
You should not think that we are deliberately praising VAZ manual gearboxes; we only noted their well-deserved positive qualities. But, of course, they encounter problems during operation. Let us note the most common malfunctions, their causes and solutions.
Table of the most common malfunctions of VAZ manual gearboxes, as well as their elimination and repair
The most successful manual transmission on Ladas is considered to be the one installed on the Lada Vesta
A new level in the design of VAZ manual gearboxes for front-wheel drive cars has become the VAZ 21807 gearbox, this is a five-speed manual transmission installed on the Lada Vesta. It is considered one of the most successful manual transmissions, as it is reinforced and capable of holding high torque. Problems such as gearbox noise, rapid wear of bearings and gears, oil leaks from seals are not typical for this box, but knocking at idle sometimes occurs, although not on all copies, which is an amazing phenomenon.
It should also be noted that the VAZ 21809 manual transmission is installed on the Lada X-ray. It is as durable as the VAZ 21807, but in the operational practice of owners, oil seal leaks and difficulty in engaging reverse gear are often encountered.
Lada X-ray with manual transmission, which is also quite successful
Gear shift diagram for a 4-speed manual transmission used on VAZ 2101, 2102, 2103, 2104, 2105, 2106, 2107, Niva 2121
Small Summary
So, what can we ultimately say about manual transmissions on VAZs and Ladas? Probably the fact that they started out in the 70s with phenomenally high quality, then the 5-speed manual transmissions suffered a little in quality, which, of course, slightly upset the owners. But it’s also impossible not to note how VAZ figured out (well, almost figured out) many of the problems of its manual transmissions. Just look at the box of the Lada Vesta and its Sport version, with a boosted 140 horsepower engine, how wonderfully the box works with a torque of as much as 180 Nm!
All VAZ boxes are incredibly repairable; they can be restored from any condition, and this can be done for relatively little money. Another big question is the quality of spare parts for gearboxes on our market. Now we are talking not only about cheap analogues, but, unfortunately, also about factory spare parts.
Thank you for your attention to this article, we tried to collect a lot of useful information about the operation and repair of VAZ manual transmissions, problems and ways to solve them, as well as other information about VAZ gearboxes. We hope you found it interesting and found something useful and necessary for yourself! Source
Source
Price issue
The cost of repairing each box is determined by the number of worn parts.
When performing work in the service, the average cost will be:
- gearbox overhaul - from 2500 rubles;
- removal and installation of the unit - about 4,000 rubles;
- changing the oil in the box - up to 1000 rubles;
- installation of new bearings on the input shaft - approximately 5,000 rubles.
Service costs are approximate and may differ depending on the city, workshop location and general condition of the box. In most cases, it is more profitable to purchase and install a less worn unit than to rebuild an old one.
Video “Consequences of bearing failure”
The consequences of the destruction of the secondary shaft bearing while driving are demonstrated in a video from user Sergey Tsapyuk.
Do you have any questions? Specialists and readers of the AUTODVIG website will help you ask a question
Was this article helpful?
Thank you for your opinion!
The article was useful. Please share the information with your friends.
Yes (80.00%)
No (20.00%)
X
Please write what is wrong and leave recommendations on the article
Cancel reply
Rate this article: ( 5 votes, average: 4.80 out of 5)
Discuss the article: