Every car owner is careful about his car. It is imperative to monitor the operation of many mechanisms, and in particular the transmission. The VAZ 2109 gearbox is very durable and unpretentious in its maintenance, but still, there are some subtleties that need to be taken into account when working with it. The VAZ 21099 gearbox is a mechanical system that performs its actions with the participation of the clutch pedal. Assembling and disassembling this mechanism can be done independently, but you need to have some skills in order not to cause damage.
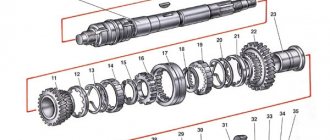
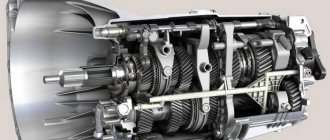
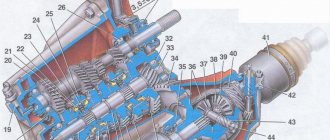
Checkpoint diagram
Designations
The VAZ 2108 gearbox is practically no different from the subsequent model. The repaired system does not make unnecessary noise, all switchings are smooth, the car drives without jerking, at the required speed.
The main thing that is needed is to constantly monitor its condition, control work processes and not subject it to strong stress. The VAZ 2108 gearbox is reliable, as well as low maintenance costs, since Russian parts are much more affordable than foreign ones.
Malfunctions and their elimination
Gearbox repair largely depends on the nature and type of fault. There are several options for the breakdown of this unit, in each of which appropriate actions should be taken to eliminate them.
| Malfunction | Possible reasons | What do we have to do |
| There is noise in the gearbox |
|
|
| Gears are difficult to shift |
|
|
| Spontaneous gear disengagement occurs |
|
|
| Gears are switched on with noise and crackling |
|
|
| There is an oil leak from the gearbox |
|
|
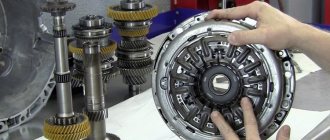
In most cases, problems with the gearbox are eliminated by dismantling and disassembling it. Do not take on this type of work without the proper skills and experience.
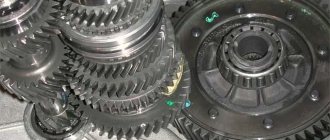
Disassembly
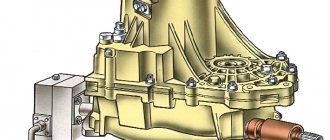
Having removed the gearbox, you can proceed directly to the main thing - disassembly. This will allow you to change damaged elements as you work, identify existing faults and solve problems on your own.
- Clean and thoroughly wash all external surfaces of the gearbox.
- Place the box in a vertical position and remove the back cover.
- Remove the clutch cable bracket, then use a rubber hammer to knock the rear cover off the gearbox.
- Remove the old gasket. She will be replaced.
- Engage any of the two gears - 3 or 4.
- Unscrew the bolt that holds 5th gear, then turn it on.
- Simultaneously turning on the indicated speeds will allow you to fix the shaft and prevent it from turning.
- Unscrew the nut on the secondary shaft, and then on the primary one.
- Remove the 5th speed synchronizer along with the fork.
- Remove the fork from the coupling. Remove the synchronizer as carefully as possible. If you allow the clutch to move away from the hub, the spring-loaded balls that secure the synchronizer will simply fall apart.
- Remove the 5th speed synchronizer locking ring.
- Remove the 5th speed driven gear from the output shaft.
- Remove the thrust ring located on the needle bearing.
- Remove the needle bearing itself from the 5th speed gear.
- Remove the drive gear from the drive shaft and remove the bearing plate.
- Now the needle bearing bushings should be removed from the secondary shaft, and the thrust washer should also be removed.
Jewelry work
- Take out the ring that secures the input shaft bearing, and then a similar ring for the secondary shaft.
- Unscrew the locking plug and remove the ball and locking spring. Next you can get a couple more clamps.
- Remove the rear engine mount.
- Unscrew the reverse gear lock plug, tilt the box and thus remove the lock ball and spring.
- Remove the clutch housing and gearbox housing mounting bolts.
- Acting as carefully as possible, separate the two units. To do this, there are grooves in the crankcases into which the ends of a screwdriver are inserted. By shaking, you can disconnect the elements without any problems.
- Remove the gearbox housing.
- Unscrew the bolt securing the 1st and 2nd speed shift fork.
- Remove the fork and stem.
- Unscrew the bolt securing the 3rd and 4th speed forks.
- Separate the rod head from engagement with the lever, remove it along with the fork from your gearbox.
When disassembling the box into parts, be sure to pay attention to the condition of the elements. If you detect faults in time and replace gearbox components, you can get by with inexpensive but very effective DIY repairs.
Disassembled gearbox
What to pay attention to
So, following the instructions, we disassemble the gearbox of your VAZ 2109. Along the way, pay attention to the following points:
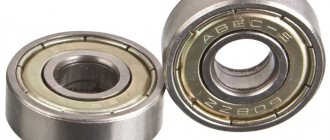
- Bearings. When they wear out, a noise from the box occurs. Plus, worn bearings negatively affect the condition of other gearbox elements;
- Synchronizers and sealing washers. If their condition leaves much to be desired, then the gears shifted poorly precisely because of them. Replace them;
- Clutch system, cotters, coupling hub clamps. All this must be replaced separately if there are signs of wear or defects;
- Blocking rings, synchronizers. If there are chips or nicks, don’t even think about alternative solutions, replace them immediately;
- Bearing tracks. Over time they wear out. If signs of wear are found, perform a complete replacement. In this state, they were only a short time away from breaking;
- Gap between gears and locking rings. Normally it is no less than 0.6 mm. In case of deviations, there is only one solution - replacing the rings;
- Retaining rings. If elasticity is lost, these elements must be changed, since they will no longer be able to perform their functions.
When assembling the gearbox, do not forget to lubricate the new gaskets with a layer of lithol. And when pressing the oil seals, do it with the working edge inward. The metal clip should be located on the outside.
During the process of reassembling the gearbox, all rubbing components should be treated with oil, and do not forget about the sealant for connecting the clutch housings and gearbox. Doing everything yourself is quite possible.
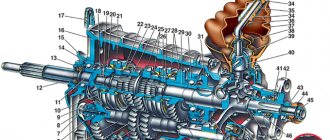
VAZ 2109 gearbox device
Gearbox VAZ 2109 - right view: 1 - clutch cable bracket, 2 - oil level indicator (dipstick), 3 - clutch housing, 4 - clutch release fork, 5 - input shaft of the VAZ 2109 gearbox, 6 - clutch release bearing, 7 — wheel drive shaft oil seal, 8 — protective cover of the gear shift mechanism rod, 9 — rear support of the power unit, 10 — speedometer drive.
Backstage
If the gearbox on a VAZ-2109 is ringing, don’t be upset. All owners of "nines" have this problem. Moreover, the rocker rings both on “killed” and on relatively fresh cars. The AvtoVAZ representative office itself is aware of this defect. And vibration occurs due to the incorrect location of the support points of the internal combustion engine and the gearbox. As a result, the nodes vibrate, and the ringing is transmitted to all other parts, including the slide. Some solve this problem by installing an o-ring in the rocker area, others get used to it and drive like that, with a ringing sound.
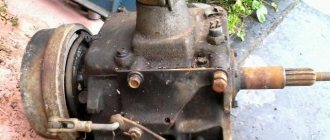
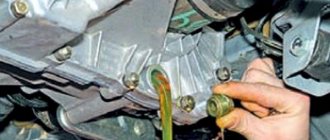
Removing the VAZ 2109 gearbox
First of all, you need to remove the mudguard and engine crankcase protection (if installed).
drain the oil from the box, remove the drive nuts and wheels. If removal takes place in a pit, it is necessary to jack up and hang the front part of the car on trestles or other reliable stands. Be sure to disconnect the battery terminals. The next order is:
– remove the clutch cable
Useful tips
It is extremely important to monitor the serviceability of the gearbox, and if signs of breakdown are detected, fix them immediately. Do it yourself or with the help of a car service - this is your personal decision.
When operating a car in city conditions, you have to change gears more often. Therefore, it is recommended to use motor oil here. This ensures that the synchronizers remain effective longer. Transmission oil is better suited for highways, increasing the life of bearings and gears, although the synchronizer lasts less.
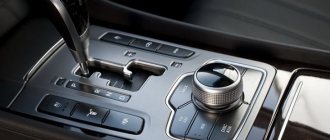
Gear shift technique
Gear shift technique
What I would like to share with you!
In non-professional circles, and often in professional ones, there are a lot of misconceptions about gear shifting. The purpose of this article is to tell you how to do it correctly. We do not set ourselves the task of covering all aspects and talking about all the intricacies of gear shifting, for example, how and in what cases you can shift without using the clutch. We want to explain the correct basic technique. This will answer almost all your questions and dispel any confusion, allowing you to confidently and correctly change gears both on the track and on the street.
The article is written taking into account a manual gearbox with synchronizers, i.e. an ordinary “handle”, which is installed on almost all cars from Nine to Zonda. The materials for this article were collected from many professional sources.
So, we hope that everyone reading this article understands why you need to change gears - to keep the car in the desired engine power range.
Working with the clutch and gas With the correct gear shifting technique, working with the clutch pedal always looks like this - pressed, released. Except when pulling away, the pedal is never released (and certainly not depressed) slowly. It is quickly squeezed out (preferably to the floor, especially when shifting down) and quickly released. There is no need to hit the pedal or throw it. Everything is done smoothly, but quickly, as, indeed, with all other elements of car control. The gas pedal is released when changing gears to relieve the load on the gearbox.
Switching to a lower gear For “advanced” drivers, let us immediately clarify that switching to a lower gear occurs only in order to maintain power. The brakes are used to stop, not the engine. The pads cost pennies and are cheaper than gasoline and a clutch. It is especially important not to engage in nonsense on a slippery/icy road - unfulfilled (or incorrectly performed) throttle adjustment can lead to a skid (drift on front-wheel drive cars) and subsequent ditch, and no abs will save you.
First, we will explain what a gas booster is and why it is needed. Imagine that you are driving 60 km/h... Suddenly a fancy Sky with neon lighting “flies up” to you from the left and starts honking and accelerating. Of course, your action is to move on and I’m not in a hurry. But suppose you decide to answer the “challenge”. You need to shift from 5th gear to 2nd. If you simply depress the clutch, engage 2nd gear and release the clutch, the car will jerk very strongly, and the clutch with the gearbox will have a hard time. Why is this happening?
Release the gas, press the clutch pedal and change gear. The engine speed drops to idle, and the clutch rotation speed increases, because the wheel speed remained the same, but the gear ratio increased.
Now the difference between the speed of the engine and the gearbox is 4000 rpm. If you release the clutch, the engine and wheels will have to match speeds very quickly. The engine will spin up sharply to 5000 rpm and will transfer a lot of stress to the wheels (equivalent to a sharp, brief application of the brakes), which in this case may lose traction if they are subject to strong lateral forces or if the road is simply slippery. If you release the clutch slowly, the stress will be much less, but then the clutch will burn.
To avoid this, it is necessary to add gas, i.e. press the gas a little before releasing the clutch. This is done very quickly: the foot hits the gas pedal, in our case quite deeply, almost to the floor, and instantly releases it. Immediately the clutch is released, and the right foot presses on the gas again, but this time to accelerate. The purpose of accelerating in this case is to raise engine speed to 5000 rpm or a little higher. If you do everything correctly and then quickly release the clutch, you will not feel anything at all, and the car will begin to smoothly accelerate when you press the gas again.
Simply and easily. Not so. You almost always need to downshift before turning, i.e. when you slow down. And when you brake, your foot is not on the gas, but on the brake...
Of course, we can assume that in this case you need to slow down in advance, then right before the turn, change gears with a full throttle and into the turn... We think there is no need to explain that in this case there is no talk of any competition at all. To go really fast, you need to brake hard before the turn and at the beginning of the turn. And then the desired gear must be engaged in order to begin accelerating before the apex.