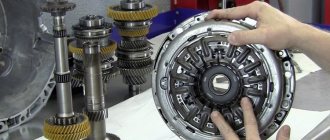
Inspection and repair
After dismantling, parts and assemblies are cleaned and their condition is checked.
The crankcase and clutch should be free of chips and cracks. The sliding surfaces are inspected for signs of wear or damage. The bearing clearance should not be more than 0.05 mm. The wear of the seals should not exceed 1 mm. The teeth and landing shafts must be free of chips, cracks and nicks. The shafts must not have any dents. If defects are found, the parts should be replaced with new ones. If you need to replace the VAZ 2114 gearbox, you can save money and install a rebuilt unit. It will cost 30-70% less than new. If you decide to make such a purchase, choose only proven companies that have been operating on the market for more than one year.
Prevention and care
The most important factor influencing the condition of the gearbox is monitoring the level and condition of the oil.
It is advisable to check the oil level once every three weeks. Use a dipstick to check.
It is recommended to change the oil to mineral grade GL4 or 75W90. If you fill in high-quality oil and follow the switching rules, then repair of the gearbox, as a rule, is not required. If the oil level is low, the upper fifth gear will experience increased stress and may fail.
Change of oil
If an oil change is required, after installation on the overpass (above the inspection hole), the following work is carried out:
- The cap is removed and cleaned.
- The breather and outlet openings are cleaned with a brush.
- Place a container for used oil and unscrew the dipstick.
- The old oil is drained. The box is washed to remove any remaining old oil.
- The plug at the bottom is screwed on. New oil is poured through the dipstick hole.
- The dipstick is returned to its place and the cap is screwed on.
Changing the oil in the VAZ 2114 gearbox
How does a differential work?
VAZ 2114 starter connection diagram, its structure and symptoms of malfunction.
The main purpose of this unit is to give the wheels different rotation speeds at the right time, for example, when turning the car. Let's look at a specific example:
When a vehicle moves on a straight road, each wheel has the same rotation speed. However, when the car makes a turn, the inner pair of wheels will travel slightly less distance than the outer pair. As a result, if the car did not have a differential, the inner pair of tires would begin to slip. This will lead to 2 problems:
— Rapid wear of the tires on each of the drive wheels,
— Poor road handling when turning the car (the absence of this unit will especially affect speeds greater than 70 km/h).
It is precisely due to the bevel differential on the VAZ 2110 and 2112 that it is possible to give a pair of drive wheels different rotation speeds. When they work together with the main gear, it is possible to reduce the speed, after which information from the gearbox is sent to the drive wheels.
ALL ABOUT CAT
Diagram, device of the VAZ 2110 gearbox. Replacing the airbag, signs of malfunction
Models VAZ 2113, 2114, 2115 are equipped with a five-speed manual transmission.
"COMPOSITION" of the checkpoint
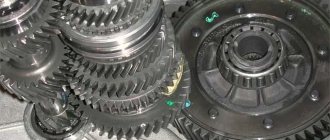
In general, the gearbox on a VAZ consists of two blocks: the housing (it includes the clutch housing and gearbox, as well as the rear cover), and the internal part (gear ratios, differential and main pair).
Let's look at the internal structure of the gearbox. The main pair is the main gear (also called the main shaft of the box). It serves to reduce the speed transmitted by the power unit. The average “performance” of the shaft is a fourfold reduction in the number of revolutions. For example, with a torque of the power unit of four thousand revolutions per minute, the main pair “produces” only one thousand revolutions, respectively.
Another important component of the internal structure of a transmission is the gear ratios. Gear ratios are gears, each of which is responsible for its “own” gear. Cars produced in Tolyatti usually have the following gear ratio parameters:
- 1st: 3.636
- 2nd: 1.95
- 3rd: 1.357
- 4th: 0.941
- 5th: 0.784
- Reverse: 3.53
The main part of the VAZ 2114 gearbox is the rocker (the part is used when changing gears).
Backstage
Developed in the 80s of the last century, the rocker has many drawbacks, including poor “interactivity” when changing gears (gears may not engage the first time, constantly jam, or engage poorly). The speed of gear shifting depends on the length of the link. Typically, sports cars are equipped with a shortened version of the rocker, this allows you to solve many problems with gear shifting and add dynamics to the car. Well, to improve the “controllability” of gears, another part of a similar purpose has long been used: a cable. Thanks to it, you can clearly and quite easily switch to the desired gear.
DISADVANTAGES OF GEARBOX VAZ 2114,2113,2115
In VAZ 2114 cars, there is a loss of dynamics when switching from 1st to 2nd gear. This is due to the fact that the 1st is quite long, but the 2nd, exactly the opposite, is too short. In addition, with frequent sharp gear changes, the 2nd gear synchronizer may fail. Tuned and sports cars VAZ “13,14,15th” series can boast of excellent dynamics. This is due to the fact that the “gap” between “1st” and “2nd” gears is reduced to a minimum.
The drawstring is too long. Because of this, gear shift speed suffers. In addition, the imperfection of the rocker design makes the process of switching gears quite complex and ineffective.
[question] Box tuning. What should we do with it? — Lada 2114, 1.5 l., 2004 on DRIVE2
I found an article on the Internet. I would really like to hear the opinion of experienced tuners, what should I do? The engine is currently 1.5L horses according to the passport 76.7.
Replacement of the secondary shaft and differential gear of VAZ 2108, VAZ 2109, VAZ 21099, Lada Samara
The usual replacement of the main pair (secondary shaft and differential main gear) in a five-speed gearbox of cars of the VAZ 2108-2112 family, with a gear ratio of 3.7 or 3.94 (standard) to 4.13 for the once produced “chisels” with 1100 engines and a 5-speed gearbox The gearbox opens up the opportunity to improve the dynamics of your car without resorting to boosting the engine. In the city, fuel consumption will not change, on the highway there may be an increase of 3% when driving at maximum speed, which is not significant, but the dynamics will noticeably improve, it will be easier for the engine to reach high speeds, 5th gear will become more efficient, it will seem like smooth pickup at all gears, it will become easier to start from a standstill, overcome steep hills, you will have to change gears less often when driving steadily or when driving in city traffic.
It is fundamentally!
VAZ dealers have received a circular that practically reports the beginning of a recall of all VAZ cars equipped with the 2110 gearbox and manufactured before May 2000. The reason is a design flaw of the box, or rather a hollow secondary shaft inside of which there is a through channel. A flat snap ring on the output shaft can cut the shaft in half. The disadvantage is unsafe: fragments get caught in the gears and the gearbox jams. There have been cases when fragments of the secondary shaft pierced the gearbox housing (the so-called “hand of friendship”). After additional tests, VAZ changed the shape of the retaining ring, which, according to plant representatives, resolved the problem. In fact, the problem was not solved in principle, because... only replacing the hollow 2110 gearbox secondary shaft with a solid 21083 can give a 100% guarantee. As annoying as it may sound, the secondary shafts continue to break. That’s why I recommend switching to a 4.13 GP with a solid output shaft, I emphasize again - specifically with a solid one, maybe. there are cheaper versions of the 4.13 GP with a hollow secondary shaft 2110 on the market. Please do not try to save money; in the end, replacing the gearbox housing with its entire interior will be much more expensive.
PS Why 4.13?
1. does not require the installation of a rather expensive and loaded 6th row. 2. acceleration dynamics are really improved, without an increase in fuel consumption 3. speed at the highest speed will increase by only 500 rpm 4. the highest speed is achieved specifically from 4.13 to 5th and it will in no case be less than standard gearbox, on the contrary, steam will allow you to turn the engine to the highest speed and accordingly increase the highest speed. If you repeat the mistakes of “smart mechanics” who recommend installing a pair of 4.3 on a standard row, then you will really lose maximum speed, due to the fact that the engine speed at maximum speed will increase by approximately 1000 rpm and the engine will simply “spin.” The gears will be shortened so that you can start in 2nd, and 1st will turn into a super-low gear, like on a good jeep. This option is especially recommended for those wishing to use the machine as a tractor for the development of virgin lands.
An option that seems to suit me. However, I would like to know the opinion of, as I already said, experienced tuners
For the greatest acceleration dynamics on 1.5 liter engines. VAZ 2108 and higher, it is recommended to install an 18-row gearbox with a 3.9 main pair. Thanks to this, you will get the 1st long one (you can accelerate to 60 km/h on it, which is very comfortable in the city, traffic light races and street racing - this significantly saves time on switching and allows you to significantly overtake your competitor) and 2,3,4,5 close ones shortened gears. This will allow you to keep the engine in a rational operating range (not lower than the maximum torque speed) and, when switching, lose a minimum number of revolutions due to the close proximity
www.drive2.ru
VAZ 2114 gearbox malfunctions
Gearbox VAZ 2110 5 mortar device diagram
First, it is worth considering faults that can be removed without dismantling. If the reverse gear does not press, it is worth checking the clamp and the mechanism itself for blocking. Another common problem is a rattling gearshift lever. The sound comes from a bushing that hits the surface of the wings. You can solve a manufacturing defect using a file - the error is determined and excess metal is removed.
Repair and, accordingly, removal of the gearbox is required when, when changing gears, a grinding or crunching sound appears in the gearbox, a hum is heard, and the lever moves with difficulty. Also, dismantling is indispensable when some gears are switched off randomly (the problem is caused by a drive adjustment failure or a synchronizer failure).
Pros and cons of a short-throw rocker
The motorist should understand that replacing the VAZ 2114 backstage will bring not only positive aspects to his life, but also some difficulties, which is worth knowing in advance.
So, the clear advantages of such modernization include:
- reducing the travel of the gearshift lever by two or more times;
- eradication of backlashes present in the standard scenes of cars;
- high switching accuracy;
- minimal use of the driver's shoulder to change gears (the load is transferred to the hand).
Short-stroke kit
There is only one downside: reducing the force lever leads to an increase in the load on the synchronizers, which increases the rate of their depreciation by two or more times.
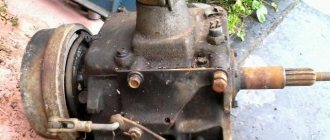
Removing and installing the gearbox of a VAZ 2115 - 14
Removal
Place the VAZ 2115 - 14 car on a lift or inspection ditch. Raise the engine hood and lock it in this position. Next, follow these steps:
-disconnect the wires from the battery, from the starter traction relay
-disconnect the ground wire from the clutch housing
- disconnect the lower part of the clutch cable
- unscrew the two upper bolts securing the clutch housing to the engine block and the two upper nuts securing the starter, attach a bracket for lifting the power unit to the left stud of the engine exhaust manifold
Fig. 1 Installing a cross member to support the power unit
-install a cross member on the gutters to support the engine and hook it to the bracket installed on the exhaust manifold stud. If there is no cross member, hang the power unit with a hoist.
Next, perform work on the bottom of the car:
-remove the engine splash guard and the lower clutch housing cover
- drain the oil from the gearbox
-disconnect the wires from the reverse light switch
Fig.2 Mounting the gearbox on the car
1-engine, 2-power unit mounting bracket, 3-extension arm suspension bracket, 4-extension arm, 5-gearbox, 6-wheel drive shaft, 7-suspension arm, 8-anti-roll bar, 9-rear power unit support , 10-clamp, 11-rod gear lever drive, 12-inner joint housing
- loosen clamp 10 (Fig. 2) and disconnect rod 11 from the gear selection rod hinge
- unscrew the nut of the stud securing the gearbox to the engine
- disconnect the ball joints of the suspension arms from the steering knuckles
- using a puller or sharply hitting the body 12 of the internal joint with a hammer through a drift, knock out one hinge from the side gear, then fix the side gear with a technological mandrel or plug used when transporting the differential (otherwise the unfixed side gear may fall into the gearbox housing), after which knock out the second hinge
- move the wheel drive shafts to the sides
- unscrew on the left side the three nuts of the studs securing the gearbox to bracket 2 (Fig. 2) of the power unit suspension, and then the nut from the bolt securing the bracket itself. Having removed the bracket from the gearbox studs, remove the suspension bracket 2 from the eyelets of the body side member
- unscrew the bolts securing the rear support 9 of the power unit suspension
-unscrew the lower nut securing the starter and remove it
-install a special stand with a hydraulic lift under the gearbox
-lower the engine slightly by extending the support rod of the cross member or lowering the hoist, unscrew the lower bolt securing the crankcase to the engine block and move the gearbox assembly with the clutch housing away from the engine to separate the gearbox shaft and the driven clutch disc
-remove the gearbox
Installation
Install the gearbox in reverse order, taking into account the following:
- before connecting the wheel drive shafts with the side gears, replace the retaining rings on the internal joints with new ones, since when installing old rings, spontaneous separation of the wheel drives and side gears is possible when the car is moving.
- before installing the gearbox, apply a thin layer of CV joint-4 grease to the outer surface of the guide sleeve 2 (see Fig. 1 chapter “VAZ 2115-14 car gearbox”) of the clutch release bearing clutch. If necessary, center the driven disk with a mandrel
Fig.3 Centering the driven disk
1-flywheel, 2-clutch assembly, 3-mandrel
After installing the gearbox, adjust the full travel of the clutch pedal (see the chapter “Clutch of a VAZ 2115-14 car”) and the gear shift control drive in the following order:
- working from below the car, with the clamp bolt 13 loosened (see Fig. 2, chapter “Gearbox of the VAZ 2115-14”) of the rod 8, set the rod 6 to the neutral position
- set lever 10 to the required position
- working from the bottom of the car, select the axial play in the rearward direction, acting on the hinge 7 and the angular play in the counterclockwise direction, tighten the nut of the coupling clamp 13, having previously installed it at a distance of X = 1-3mm. Select the backlashes with a light movement so as not to cause movement of the selector levers inside the gearbox. Then fill the gearbox with oil.
When connecting the gearshift drive to the gearbox, make sure that there is no twisting or deformation of the corrugations of the protective cover of the hinge 7.
Dismantling
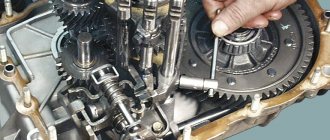
All gearbox repair work involves its removal. They pass on an overpass (you can park the car over the pit). For dismantling you will need a set of keys and screwdrivers. If possible, it is better to carry out dismantling together. This speeds up the process significantly.
- The power is turned off and the battery is removed. The oil is drained from the box and the starter is removed. The wires and protection are removed from the unit and 2 nuts from the bottom and one nut from the surface of the starter are unscrewed.
- The connecting cable between the clutch release fork and the gearbox is removed.
- The wires on the speed sensor are disconnected.
- The reverse sensor wires are disconnected.
- Remove the torque rod bracket bolts.
- Jet thrust is removed.
- The wheel drives are dismantled. The left wheel drive is completely removed. The right wheel drive is disconnected and placed next to the gearbox on the housing.
- Remove the bolts securing the steering knuckle from the left ball joint.
- The gearbox mount to the engine is dismantled. On the lower right side, the brackets are removed from the studs.
- Remove 3 bolts of the housing cover from the clutch housing.
- The bolt is unscrewed from the lower left gearbox mount.
- Unscrew the engine fixing nuts from the left and rear supports.
- The bolts securing the gearbox to the rear engine mount are unscrewed.
- The rear engine mount is removed.
- The box moves backwards from the guides. To do this, place a screwdriver in the hole between the cylinder block and the clutch housing and, pressing, move the gearbox. The rear part of the gearbox should go above the suspension extension, the input shaft should be disconnected from the clutch.
- The box of the VAZ 2114 is carefully removed from the car.
VAZ 2114 gearbox repair
Disassembling the VAZ 2115 gearbox
Wash the gearbox, preventing water from entering the crankcase, and place it on a disassembly stand. Remove the power unit suspension bracket and the clutch release cable mounting bracket.
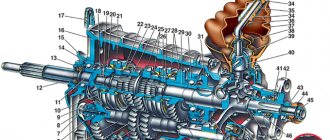
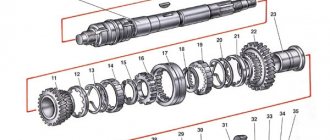
| Rice. 3.7. Gearbox: 1 – clutch release bearing; 2 – guide sleeve; 3 – input shaft; 4 – roller bearing of the secondary shaft; 5 – secondary shaft; 6 – retaining ring; 7 – satellite axis; 8 – speedometer drive drive gear; 9 – transport plug; 10 – wheel drive oil seal; 11 – tapered roller bearing of the differential; 12 – axle gear; 13 – satellite; 14 – differential box; 15 – clutch housing; 16 – driven gear of the main gear; 17 – drain plug; 18 – adjusting ring; 19 – driven gear of the 1st gear of the secondary shaft; 20 – synchronizer for 1st and 2nd gears; 21 – driven gear of the second gear of the secondary shaft; 22 – retaining ring; 23 – persistent half ring; 24 – driven gear of the third gear of the secondary shaft; 25 – synchronizer for 3rd and 4th gears; 26 – driven gear of the fourth gear of the secondary shaft; 27 – needle bearing of the secondary shaft gears; 28 – ball bearing of the secondary shaft; 29 – thrust plate; 30 – driven gear V of the secondary shaft transmission; 31 – 5th gear synchronizer assembly; 32 – nut; 33 – thrust washer; 34 – drive gear V of the input shaft; 35 – rear cover of the gearbox housing; 36 – ball bearing of the input shaft; 37 – gearbox housing; 38 – roller bearing of the input shaft; 39 – breather; 40 – input shaft oil seal |
After unscrewing the nuts, remove the back cover 35 (see.
| Rice. 3.12. Removing the primary and secondary shafts |
Remove the primary and secondary shafts at the same time (
| Rice. 3.13. Removing the gear selector mechanism |
Unscrew the gear selector mounting bolts (
| Rice. 3.14. Secondary shaft parts: 1 – nut; 2 – thrust plate; 3 – sliding clutch of the 5th gear synchronizer; 4 – sliding coupling hub; 5 – synchronizer blocking ring; 6 – 5th gear gear; 7 – distance ring of the needle bearing; 8 – needle bearing; 9 – 5th gear gear bushing; 10 – thrust washer; 11 – ball bearing; 12 – thrust washer; 13 – 4th gear gear bushing; 14 – 4th gear gear; 15 – sliding clutch for synchronizer of 3rd and 4th gears; 16 – sliding clutch hub; 17 – third gear gear; 18 – retaining ring; 19 – thrust half-rings of the secondary shaft; 20 – 2nd gear gear; 21 – sliding clutch for synchronizer of 1st and 2nd gears with reverse gear; 22 – retaining ring of the synchronizer hub; 23 – hub of the sliding clutch for the synchronizer of 1st and 2nd gears; 24 – synchronizer spring; 25 – cracker; 26 – retainer; 27 – 1st gear gear; 28 – roller bearing |
If it is necessary to disassemble the secondary shaft, clamp it in a vice with soft pads and use a universal puller to press the ball bearing from the shaft. The bearing is pressed off the input shaft in the same way. Then remove the driven gears of IV, III, II and I gears and synchronizers assemblies from the secondary shaft in the order indicated on
| Rice. 3.15. Differential assembly: 1 – satellite axis; 2 – retaining ring; 3 – semi-axial gears; 4 – speedometer drive drive gear; 5 – differential box; 6 – satellite; 7 – driven gear of the main drive |
– if it is necessary to replace the driven gear, unscrew the bolts securing it and compress gear 7 (
| Rice. 3.16. Details of the gear selection mechanism: 1 – gear selection rod; 2 – gear selection rod lever; 3 – housing of the gear selection mechanism; 4 – three-arm gear selection lever; 5 – blocking brackets; 6 – axis of the gear selection lever; 7 – guide axis of locking brackets; 8 – reverse fork; 9 – clamp; 10 – thrust washer; 11 – spring |
If necessary, disassemble the gear selection mechanism by unscrewing the nut securing axle 6 (Fig. 3.16) of the gear selection lever and remove the retaining rings from the reverse fork axle and from the axle 7 of the locking brackets, remove the reverse fork 8, gear selection lever 4 assembly with a locking bracket 5, a lever axis 6 and a spring 11 with a thrust washer 10.
If necessary, remove the speedometer drive by unscrewing the nut securing it and, supporting the driven gear shaft, remove the speedometer drive.
Video about “Disassembling the gearbox” for VAZ 2115
repair and disassembly of the VAZ 2114 box
Repair of VAZ 2115 (2110,2111,2112) gearbox. Disassembly of gearbox
disassembly of the VAZ 2108-2114 gearbox
Algorithm for replacing the secondary shaft and driven gear
Changing the final drive gear ratio is accompanied by replacing the driven gear fixed on the differential box and the secondary shaft, made together with the drive gear, with tuned elements. In this case, the gears of the standard secondary shaft must be replaced with a new one.
To replace the secondary shaft and driven gear yourself, follow these steps sequentially.
Self-loosening of these screws is prevented thanks to lock washers.
This is recommended for ease of disassembling the secondary shaft;
The jaws of this device must contain soft metal pads;
In case of difficulties, it is recommended to use a three-jaw puller;
It is worth noting that after installing the differential into the clutch drive housing, one of the gears will need to be fixed with a mandrel. The correctness of further assembly will depend on this. And one more thing: before you begin assembling the gearbox and clutch housings, it is advisable to apply sealant along the entire perimeter of the mating surfaces.
Source
Removing the gearbox from a VAZ 2113, VAZ 2114, VAZ 2115
How to remove the gearbox from a VAZ 2113, VAZ 2114, VAZ 2115? This question may arise in a number of cases, whether it is replacing a clutch disc, clutch basket, release bearing, or replacing a flywheel ring. And there are many other reasons for the need to remove the gearbox. In this regard, this procedure is included in a separate article. Removing the gearbox is a thorough process and you need to prepare for it properly. You will need: a lift or pit, a set of socket wrenches (sizes: 30, 19, 17, 13, 10), a flat-head screwdriver, a mount………….. After preparing all of the above, you can proceed directly to removing the gearbox. First of all, remove the terminal from the battery. The air filter will interfere with us, so use a 10mm wrench to unscrew the air filter mount. We disconnect the mass air flow sensor and move the filter to the side, along with the pipe.
It would be enough. Using keys 13 and 17, disconnect the power supply to the starter and unscrew one bolt (indicated by the upper right arrow (the rest will be more convenient to turn from below) securing the starter itself.
Unscrew the two nuts securing the gearbox to the engine. Use a 17 key to disconnect the clutch cable.
Next, we hang up the car and take off the front wheels. Use a 30mm wrench to unscrew the hub nut, having previously loosened it.
At the same time, it is necessary to keep the brake pedal depressed. And not weakly, because as a rule the hub nuts are tightly tightened. Further actions will take place under the car. The next step is to remove all the protection available under the engine compartment.
If you need to remove the drive, in order to protect against possible leaks, you need to drain the oil, for which you unscrew the bolt-plug with a 17mm wrench. Here we will consider the option without removing the drives from the gearbox. After the engine protection is removed, you need to use a 17mm wrench to unscrew the three bolts securing the crabs.
Using the key again at 17, unscrew the stabilizer mounts.
Using the same key, unscrew the two bolts securing the ball joints.
After carrying out these procedures, you can pull out the drive. To do this, it is necessary to remove the drive from the hubs on each side by simply moving the hub to the side.
Disconnect the reverse switch. Disconnect the speedometer terminal.
Now we remove the starter by unscrewing the remaining two bolts (let me remind you that one bolt on top has already been unscrewed) securing it.
From the rear, on the interior side, a rod approaches the gearbox (the rod comes from the gear shift lever). This rod will be connected to the gearbox rod through a clamp tightened with a bolt and nut size 13. We loosen this clamp and pull the rod off the splines of the rod.
So, using a 10mm wrench, unscrew the three bolts securing the flywheel protection, the so-called crescent.
Unscrew the side airbag fastening. And the rear cushion is attached to two studs. And finally, we unscrew the remaining two bolts (the first bolts, let me remind you, we unscrewed them from the top) securing the gearbox to the engine. After the work has been done, the gearbox can be removed, first by hooking it with a pry bar.
The box must be removed carefully, especially without damaging the petals on the clutch basket with the input shaft. Box removed
Its installation is carried out in the reverse order of removal. When the process as a whole is clear, the sequence of some steps can be changed, depending on what is convenient for you. In addition, it should be noted that after installing the box in place, it will be necessary to adjust the travel of the clutch pedal by moving the clutch cable to a certain position using the corresponding nuts.
Types of gearboxes (speeds)
Currently, there are 3 types of gearboxes in cars:
- mechanical, speeds are switched manually using a special lever;
- automatic, in which the gear change occurs without external influence, but only when the gas or brake pedals are pressed. Reverse gear in such cars is activated manually.
- mixed (variable). In this type, the gearbox operates in automatic mode, but under certain conditions it can be briefly switched to manual control.
The most popular because of maintenance, ease of replacing parts and inexpensive repairs is the manual gearbox. It is divided into 3 subtypes: 4-speed, 5-speed and 6-speed. Five speeds for the gearbox are familiar and are the most common.
Backstage adjustment
There is nothing complicated in the procedure; you can do it yourself, but you will have to run from the pit to the salon.
Yes, it is advisable to do this work in a pit or overpass. You need to act approximately according to this principle:
- Loosen the nut on the clamp.
- Set the gearshift lever to the reverse gear position.
- Set the box rod to the reverse speed position. This is difficult to achieve, so adjustments will have to be made.
- Check how the gears shift. If the rear one is too far to the left, loosen the clamp and turn the cardan counterclockwise. If the fifth speed (including reverse) has gone too far to the right, then the cardan rotates clockwise.
By adjusting the position of the gearshift rocker, you will notice that when the lever is installed in the middle, neutral speed will be engaged. When turning on the fifth gear, the lever should not catch the passenger seat, and when moving in reverse, the driver's seat should not interfere with the movement of the lever.
Gear Features
The highest torque of the car is at first speed. It is not difficult for the engine to rotate the wheels, but the speed of the car will not exceed 40 kilometers per hour. When such a speed is reached, the tachometer needle is usually in the red scale. Therefore, for further movement it is necessary to switch to a weaker but faster gear. Then to the third, quadruple and so on. All switching must be done sequentially. The engine power is not enough to confidently accelerate the car at 20 kilometers in 3rd gear. Unless, of course, it's a 5.0-liter V-8.
In our case, this is a VAZ 14th model, and for normal acceleration dynamics you need to sequentially switch speeds, reducing the gear ratio. The fastest is “fifth”. The load on the engine is minimal here, hence the low fuel consumption. If a car spends 11-13 liters in the city, then on the highway this figure will not exceed seven. But this transmission has one drawback. It has virtually no torque. It will take a long time for the engine to gain speed further. Therefore, when overtaking, it is better to use a “reduced” speed, in our case it is “straight”, fourth speed.
Transmission VAZ 2114
The transmission diagram of VAZ cars is quite simple. It includes clutch, gearbox and front-wheel drive. The device that is the first in the transmission chain between the internal combustion engine and the wheels and receives torque from the engine is the clutch. On this machine it is single-disk, dry, closed, with a pressure spring and a damper on the driven disk. The drive is a cable drive, with no gap between the bearing and the pressure spring. It is controlled by a pedal mounted on the same axis as the brake pedal.
The normal pedal travel from the top position to the stop on the floor mat is 135 millimeters. During operation and as the driven disk linings wear out, this stroke can increase and reach 160 mm. This is considered acceptable, but it is not recommended to exceed this distance; a situation is possible when the clutch begins to “drive” due to poor contact between the drive and driven discs.
In this case, it is recommended to adjust the clutch, which you can do yourself. To do this, it is necessary, in the engine compartment of the car, on the tip of the clutch drive, to rotate the nut, controlling the pedal stroke; when the desired result is achieved, you need to tighten the lock nut, thereby fixing the desired position of the pedal.
The final part of the VAZ 2114 transmission is the front wheel drive. For each wheel there are two angular velocity joints, external and internal. They are driven through the wheel drive shaft. On the right wheel it is made of a pipe, and on the left - from a rod. If they fail, the angular velocity joints cannot be repaired; they must be completely replaced.
VAZ 2114 gearbox device
The main working unit of the transmission is the gearbox, in which all the main parts are rotating shafts, gears and transmission links that experience constant friction and require effective lubrication. This oil is special and is called transmission oil according to the place of application. To understand which gear oil is best for the VAZ 2114, you need to understand the structure of the VAZ 2114 gearbox.
VAZ 2114 gearbox device
The following requirements apply to the gearbox, as well as to the entire vehicle transmission:
- all transmission units must provide high speed and good traction when driving both in a straight line and when turning;
- they must provide simple and easy control while driving in order to minimize driver fatigue;
- small size and weight are one of the main requirements, because designers are fighting for every gram of weight and millimeter of volume, to lighten the overall design while increasing power and efficiency of its use;
- high reliability during operation, no one needs a unit that will have to be constantly maintained;
- each unit individually and the transmission as a whole must have a high efficiency;
- simplicity in design must be accompanied by simplicity and high manufacturability in production so that the product is economically profitable;
- after installation on the vehicle, all transmission units must be easily accessible and convenient to maintain throughout the entire period of operation;
- An important requirement is to ensure silent operation of the system.
The VAZ 2114 gearbox device meets all these requirements. This mechanism is designed to change the drive torque and wheel speed within wide limits necessary to ensure vehicle movement over the entire speed range determined by its technical characteristics. In addition, it ensures that the machine moves backward and idles for a long time.
The VAZ 2114 gearbox has five stages, synchronized. The box is connected to the differential, as well as to the main gear. The input shaft is made of a block of gears of the first, second, third and fourth gears with a mounted fifth gear drive gear. The secondary shaft collects all the driven gears and is itself connected to the drive gear of the main transmission. The gearbox control drive includes:
- gear lever;
- rod and ball joint;
- gear selector rod;
- gear selection and shift mechanism.
Diagnostics and minor repairs of the device
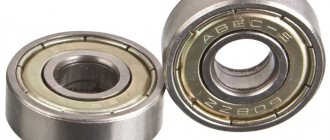
The gearbox, like many car components, sometimes malfunctions and requires maintenance. There are several main reasons that lead to problems. If you hear extraneous noise in a VAZ gearbox, it may be due to wear on the gear teeth or bearings. The box may make noise if the oil level is low. To solve the problem, it is necessary to replace worn mechanisms, oil seals and bring the oil level to normal.
Problems when shifting gears. In this case, it is necessary to inspect the control drive rods for wear. You should check the reliability of the hinge mounting and the gearbox lever rod. Incorrect debugging of the switching drive or breakdown of plastic parts of the assembly can also cause a similar problem. To troubleshoot problems, you need to adjust or replace the rod, tighten the screws and adjust the drive, and replace faulty parts.
Spontaneous gear reset is possible when the end teeth on the clutch itself or gears wear out or fail. This is also possible if the drive is adjusted incorrectly or the protective cover of the thrust is installed inaccurately. The problem can be corrected by replacing unusable parts, debugging the drive, and mounting the cover in the desired position. If there is an oil leak, secure the crankcase and replace worn gaskets. For future repairs to the box itself, it must be removed. The process must be carried out in this sequence.
- Unplug the box.
- Drain the oil and disconnect the starter.
- Remove the crankcase protection.
- Disconnect the fastening cable and remove it from the bracket.
- Remove the wires by pressing the spring.
- Remove the reverse control wires.
- Unhook the rod from the hinges, moving it back a little.
- Remove the clutch cover.
- Hold the box and unscrew the remaining nuts.
Shocks in the automatic transmission but no errors - why?
Most car enthusiasts, turning to specialists with a request to conduct an auto technical examination, voice the presence of problems with the automatic transmission. At the same time, they do not have fault codes that should be displayed in the automatic transmission control unit. In such cases, dealers are not in a hurry to look for a ghostly malfunction, but make the logical conclusion that since the system shows no errors, then there are no problems with the automatic transmission.
This happens for the following reasons. The presence of a knocking sound when switching is evidence of the presence of obvious problems in the system, respectively, switching. That is, a problem in fact, which manifests itself as a knock in the body, exists, but during scanner diagnostics it is not confirmed by fault codes. Unfortunately, manufacturers of automatic transmissions have not yet implemented the ability to control the processes occurring in automatic transmissions, which would include a device that measures acceleration. Such a sensor could monitor knocks and analyze the causes of their occurrence. But for now, car enthusiasts have to do without it.
How does a force appear that acts on the body in such a way that the driver, due to the appearance of incomprehensible knocking, begins to experience unpleasant sensations? It is clear that when switching, the shock comes from the power unit. This unit, moving on supports, creates conditions under which accumulated energy is transferred to the body. Subsequently, damped oscillations occur. What exactly is to blame for the displacement of the unit? There can be many answers here; some of the possible options are given in the list a little higher in the text.
Vibration and knocking in the automatic transmission when engaging reverse gear
So, such a force can only appear in the presence of accumulated energy, which, due to the automatic transmission switching, is redistributed, moving the unit. A considerable amount of energy accumulates in the gear that precedes the switching process. This is essentially the inertia of the turbine wheel. Everyone had a spinning top or a spinning top in childhood? Remember, was it easy to change the axis of its rotation, or just stop the movement of this toy? So it is here. It is precisely because of the change in the angular velocity of the turbine wheel (when changing gears) that the knocking (or impact) occurs. Interestingly, if you change the time interval of gear shifting, the quality of their shifting will also change.
Preparing for removal
Preparatory work includes the removal of all parts that block access to the gearbox. You can begin removal when you have a board or other hanging equipment, a set of wrenches and sockets, different types of screwdrivers, and WD-40 lubricant at hand. It is also recommended to carry out work in a garage where there is a car pit. Now you can proceed to the analysis:
- It is necessary to remove the terminals from the battery and then remove it. The next step is to completely remove the working fluid from the gearbox and remove the starter. Some bolts may not budge, in which case WD-40 must be used;
- Now the VAZ 2114 needs to be placed on the pit and the crankcase protection, which is attached to the bottom with three fasteners, removed;
- There is a cable coming from the clutch fork - it should be disconnected from the fork and then removed from the gearbox bracket;
- Next, you need to hang the motor to gain access to the lower parts. After this, all wires must be disconnected from the speed sensor. A spring is used as fastening here.