How to assemble the gearbox of a MTZ walk-behind tractor
Unlike a tractor, the gearbox of a wheeled walk-behind tractor has a less complex device. The main differences between the walk-behind tractor transmission:
- fewer drive stages than a tractor (the MTZ-05 walk-behind tractor has 6 stages);
- constant meshing of gears in the box, no moving gears;
- lack of a separate shaft for first and reverse gears.
To independently assemble a walk-behind tractor gearbox, you will need a diagram and instructions. The sequence should be the reverse of the steps taken when dismantling the unit.
Possible malfunctions of the MTZ gearbox
Problems when starting off and with steering in motion associated with gearbox failure can be divided into two groups:
- Difficulties in fixing the selected speed (poor retention, “knocking out” the gear, etc.).
- Extraneous sounds made by the gearbox when shifting gears or while the tractor is moving.
The first stage of the gearbox, which doubles the available speeds, complicates the design of the box. Externally similar symptoms can be caused by the breakdown of various parts inside the unit; an accurate diagnosis can be made after partial or complete dismantling of the gearbox. Problems with the gearbox are the same for MTZ-80 with one drive axle and MTZ-82 with two axles.
Bearings.
Knocking out the speed
A shift out of gear while driving can be caused by problems with the shift forks, retainer springs, shafts, or bearings. If the gears are not properly engaged, the lever may return to the neutral position.
Impossibility or poor gear engagement
The problem with turning on speeds can be caused by the same reasons as their spontaneous switching off or switching, i.e. with defects in forks or retaining springs. The distance between the gear shift bars should not be more than 1.6 mm. The second source of problems with gear shifting is a malfunction of the clutch mechanism. The tractor may stall when starting due to defects in the fuel supply control system.
Rumble and grinding noise when the gearbox operates
Extraneous sounds when the gearbox is running can be of 2 types:
- constant (hum or noise);
- discrete (knock).
The presence of constant noise indicates wear of the shaft mounts. If the problem is not corrected, the shaft may break off the mounting and jam the transmission. Another source of persistent noise can be bearing wear. The reason for the simultaneous occurrence of noise and free play of the reduction gear control lever may be wear of the fork. Uncharacteristic sounds in the final drive gearbox may indicate a malfunction of the front axle.
Breakdown of the gearbox shift mechanism
A malfunction of the gear shift unit can result in play, which makes it impossible to set the lever to the desired position. The reasons may be:
- deformation of the springs during operation, as a result of which, in a compressed state, their length exceeds the maximum permissible;
- wear of shift forks;
- broken grooves of sliding carriages.
If there are signs of wear on the tip of the MTZ gearbox shift lever, it must be replaced.
Tension and compression deformation of a spring.
DIY gearbox repair
When a manual transmission begins to act up, and the gears do not shift or are knocked out while driving, you should urgently repair it. Driving a faulty car that has a breakdown is not only unpleasant, but also unsafe. You can entrust transmission repairs to professionals at a service station, but not all service stations do this kind of work. In addition, the owner is often not allowed into the repair area, and unscrupulous mechanics can replace only one worn-out gear, saying that they have carried out a major overhaul of the entire gearbox.
For those who know the car well and have a garage with a set of tools, it makes sense to repair the manual transmission themselves. This will save you a lot of money and help eliminate the jerky riding style. For this procedure you will need an assistant, since the weight of the gearbox is quite impressive.
How to disassemble the MTZ-80 box
Depending on the external signs of a malfunction, the gearbox must be partially disassembled or completely dismantled. The sequence of actions for complete dismantling of the MTZ gearbox in the repair scheme described in the instructions for the tractor provides the following steps:
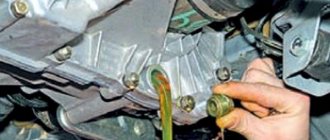
- transmission oil drain;
- disconnecting the box assembly from the tractor body;
- disassembling the gearbox.
If a number of transmission , you can disassemble without complete dismantling; this method is provided for unclear gear shifting, when at the first stage it is enough to dismantle the transmission control knob and check the condition of the unit.
Disassembling the MTZ-80 gearbox lever
You can check the suitability of the shift knob for further use without dismantling the gearbox, for which you need to perform the following steps:
- remove the lever by first removing the floor and disassembling the hinge socket;
- remove the plate with forks, visually determine which of them require replacement;
- inspect the suitability of the gear shift knob for further use;
- if the forks are bent and loose, and their working sides are not parallel, it is necessary to disassemble this unit and replace the worn parts.
Such repairs can eliminate only part of the possible problems associated with poor engagement and gear shifting. A complete inspection of the unit requires complete disassembly of the gearbox.
Disassembly procedure
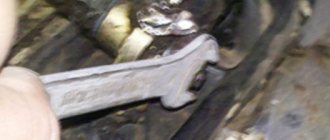
In addition to keys and screwdrivers, the following fittings are required to remove the tractor gear shift mechanism:
- puller;
- hammer;
- metalworker's beard (beater);
- bronze knockout.
After disconnecting the assembly from the body and dismantling the plug block, you should:
- remove the retaining ring and gear from the input shaft, then remove the second ring and dismantle the bushing and gear No. 4;
- Having previously knocked out the pin, remove the internal PTO drive shaft (power take-off shaft);
- Having unscrewed the bolts and removed the socket, remove the second range drive gear complete with the cup and bearings from the housing;
- remove the input shaft to facilitate disassembly of a manual transmission operating according to the scheme (9F+2R);
- remove the intermediate shaft;
- remove the secondary shaft;
- prepare to remove the reverse and low gear shaft by removing the retaining ring and bearings;
- remove the reverse and low gear shaft from the housing;
- press out the bearing cup.
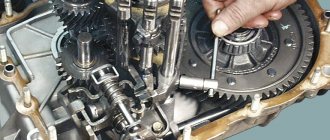
After removing the shafts from the gearbox, remove the gears from them and disassemble the remaining parts, removed entirely.
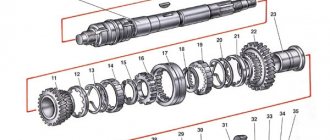
Defects of gearbox parts
After complete disassembly of the transmission, it is necessary to visually inspect all components and make a decision on their suitability for further use. In order not to miss metal defects, it is recommended to wash the components in kerosene or diesel fuel and dry them before inspection.
Recommendations for rejecting box elements:
- The housing must be replaced if cracks are detected.
- It is necessary to replace with new broken glasses in the body of the box.
- Instead of bent forks, as well as with non-parallel cheeks, new ones should be installed.
- Bearings should be checked by rotating the outer race relative to the inner race.
- You cannot install a gearshift lever with a worn tip.
You can begin installing the gearbox only after checking all the parts and obtaining new ones to replace those unsuitable for use.
When is manual transmission repair needed?
Our specialists have extensive experience. Over 16 years of overhauling mechanics, transmissions and clutches in North-East Administrative Okrug, they have thoroughly studied all possible causes of malfunctions and effective methods for eliminating them. Below are the most common defects:
| How it manifests itself | Cause of malfunction | How to get rid | Node diagram |
| In neutral, the manual transmission makes uncharacteristic noises | The bearing in the input shaft has become unusable | Replace the worn part | |
| The movement of the car is accompanied by knocks or metallic clanging in the box | Presence of mechanical damage or natural wear of the transmission gear | The gear needs to be replaced with a new one. Or change the entire assembly. | |
| Difficulty changing gears, sometimes instead of going up to third you end up in first | Failure of the link or clutch responsible for changing gears in the gearbox | Will require professional repair or replacement of the unit |
*Notations for the “Manual Transmission Repair” diagram:
- Gearbox input shaft;
- Driven bevel gear of differential mechanism;
- Manual transmission drive shaft;
- Bevel wheel of differential mechanism;
- Main shaft.
If a breakdown is detected, we recommend contacting a specialized car service immediately; independent repairs can result in even higher costs.
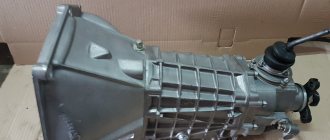
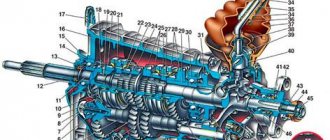
Box MTZ-80 assembly diagram
To eliminate problems when assembling the box of tractors of the MTZ-80/82 family, it is disassembled in a sequence that, when done in the reverse order, will allow you to obtain a technically complex unit without any problems. After discarding unsuitable parts and obtaining new ones, you should check that all bushings, gears and other parts comply with the standard dimensions specified by the manufacturer.
Box MTZ-80.
Gearbox bearings: type, dimensions, bearing numbers
The transmission of MTZ tractors uses several dozen standard sizes of these components. Most of them are single-row ball or needle type. The most popular sizes are also used in other components of agricultural and road machinery.
The table shows the range of common bearings used in gearbox assembly.
| Size | Manufacturer's code | Purpose in gearbox |
| 40x80x18 | 208 | power take-off shaft supports, 1st gear shaft, input shaft |
| 45x85x19 | 209 | rear power take-off shaft |
| 50x90x20 | 210 | PTO, input shaft |
| 30x72x19 | 306 | included in transfer case |
| 40x90x23 | 50308 | 1st gear and reverse shaft |
For most components used in Russia and Belarus, you can select imported, most often Chinese, analogues of similar sizes.
Assembly procedure step by step
When assembling, the following rules must be observed:
- lubricate all mounting sockets with machine oil;
- install bearings to the bottom of the seats;
- All adjusting shims removed during dismantling must be installed in their places or replaced with new ones.
Manufacturer's recommendations for tightening torque must be followed.
Step-by-step installation procedure:
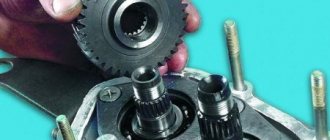
- Installation of the secondary shaft, connection with the driven gear of the first gear of the gearbox. It is necessary to strengthen the bearings and check the turning torque. The main gear gear is put on the same shaft.
- Assemble the middle shaft by installing the intermediate gear on it. Check the gaps (the norm is 0.03-0.05 mm).
- Having placed all the elements of the box in their places, assemble the housing, check the joining of the planes, glue new gaskets and connect them to the rear axle and clutch housings.