Today, the domestic “ten” continues to confidently remain in a leading position among the most popular cars in the country. They have already stopped producing them, but this does not stop many people from driving a VAZ 2110.
The car is far from ideal, but it has a lot of positive qualities. One of them is the simplicity of the design, which allows you to perform a whole range of repair work with your own hands.
An example of a successful design that combines good reliability and the possibility of self-repair is window regulators.
Kinds
Window lifters are devices that serve to move glass on windows and hold it in a given position. Today, the VAZ 2110 is available with quite a variety of window lifts, which differ not only in manufacturer, but also in purpose.
If we take into account the purpose, then devices can be divided into four types:
- For front doors;
- For rear doors;
- For left doors;
- For the right.
It is noteworthy that their design may be different, but they have quite a lot of common nuances.
Any of the listed window regulators includes several main components.
| Component | Functions |
| Gutters | They are installed on the inside of the door frame. Their function is to hold the glass sheet in a given position |
| Rails | They are mounted inside the door frame in a static position. Act as guides for moving glass up and down |
| Seal and damper | Products made of soft rubber. They ensure that glass movements are limited downwards and upwards. |
The design of any window regulator includes two main components - the drive and the lifting mechanism.
Drives
As in many other cars, in the case of the VAZ 2110 there are two types of drives.
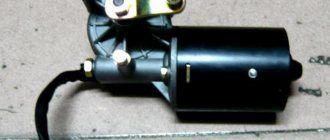
- Electric. A rather complex set of elements, which consists of a drive drum or gear, as well as an electric motor with a worm gearbox built into it. This design allows you to raise and lower the glass at the touch of a button.
- Mechanical. The most simplified design, which includes several parts, gears and handles. To raise the glass in a VAZ 2110 using a power window lifter, you need to turn the handle clockwise. The drive roller takes on the required physical effort, so lifting is not difficult.
Lifting mechanisms
As for lifting mechanisms, there are several of them. For the VAZ 2110, various options are available.
Rack and pinion mechanisms
| Mechanism type | Peculiarities |
| Rack and pinion lift mechanism | It was installed on the VAZ 2107, then switched to the VAZ 2110. The advantages of such a mechanism are its simple repair and operation. But the design is not particularly reliable; for effective operation, the rack and pinion device must be lubricated. Design flaws forced the developers to abandon it |
| Cable mechanism | A more advanced system that eliminates the possibility of glass distortions. But the reliability is not the highest. The most attractive option for a cable mechanism is a structure made of galvanized metal. Their cost is 400 rubles. It is also worth paying attention to Metprom devices. Their current price is 300 rubles. Standard VAZ cable lifts will cost 250 rubles |
| Lifting lever mechanism | These are the most advanced mechanisms available for the VAZ 2110. Their operation is based on the use of hinges. The design ensures silent operation. However, the mechanism is only available on electric windows |
Electric glass lift
Rack and cable mechanisms are offered complete with electric and mechanical drives, while lever mechanisms are available only with an electric motor.
Installation process of electric windows
In addition, it is necessary to install the power windows themselves. The procedure is performed in the following sequence:
- temporarily remove the glass seal located on the inside of the door;
- remove the glass, and then dismantle the window regulator fastening mechanism;
- we install devices that will operate from an electric drive;
- connect the negative terminal to the battery and check the operation of the new window regulator;
- We install the glass in place and trim the door.
Our instructions in pictures will help you understand the installation procedure in more detail.
Replacement
The need to replace or repair window regulators may arise for two main reasons. Namely:
- The old gears of the lifting mechanism are worn out, due to which the device ceases to perform its functions;
- The cable broke, which caused the entire system to fail.
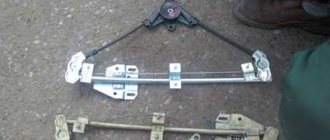
Disassembled structure
To solve the problems that arise, you will need to go through three or four steps:
- Preparatory activities;
- Dismantling;
- Installation;
- Repair.
If you plan to simply replace the mechanisms with new ones, then you can skip the repair stage.
Although versions with mechanical and electric windows are available for the VAZ 2110, the nuances of the replacement procedure will be identical. Therefore, the instructions below are relevant for both cases.
Preparation
To begin with, we will talk about the preparatory activities that will allow you to get to the desired mechanism. There is nothing complicated here if you follow the instructions.
Although the front, rear, left and right window lifters are structurally different, the principle of working with them when repairing or replacing is similar.
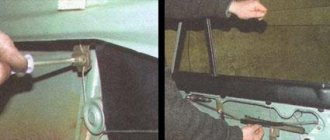
- First, remove the glass lift handle. To do this, remove the stopper, which you will find under the lever washer of the handle. Using a screwdriver, the latch is moved to the side, and the stopper is removed from the plate. After this, the handle can be easily removed. Sometimes it can get tight, so take a second screwdriver and pry the device up onto the base.
- Next in line for dismantling is the armrest handle. You will need a flathead screwdriver to unscrew the plugs covering the pair of mounting screws. They are the ones that hold the armrest handle. Armed with a Phillips screwdriver, the screws are unscrewed and the handle is removed.
- Now we move on to the handle of the exterior rear view mirror, plus the handle trim is dismantled.
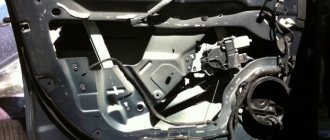
- At the last stage of preparatory activities, you need to remove the door trim. It is held on by plastic pistons. If they are damaged, you can always buy new ones. Don't forget to also remove the storage compartment.
Dismantling
The preparation is complete, so you can begin to directly dismantle our failed window regulators.
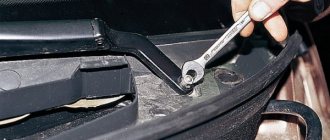
- Lower the window completely. This will allow you to get to the fasteners that connect the glass panel to the window regulator device. The device is held in place with a pair of bolts. To unscrew them you will need a 10 mm wrench;
- Next, decide for yourself what is more convenient for you to do. You can fix the glass with tape and continue the repair. Or you can remove the glass completely. The second option is not the most successful, since it will require more effort and time;
- Remove the socket from the slot;
- Using an 8 mm socket, the fastening nuts are unscrewed, which gives you the opportunity to remove the damaged window regulator.
Dismantling works
Installation
The device has been dismantled, so we can talk about several of the most important nuances of reinstalling the power windows.
- Replace the damaged element with a new one, after which assembly is performed strictly in the reverse order.
- If at the previous stage you decided to completely remove the glass rather than secure it with tape, then be sure to adjust its position during installation. This is done by displacing the bolts in the mounting holes.
- During dismantling work, the holders - pistons - often break or suffer. Therefore, before starting repairs, we advise you to purchase a set of new holders so that you don’t have to run to the stores in the middle of the work process.
- When installing your window regulator handle, make sure it fits snugly in its rightful place. If you cannot fit the handle tightly, use several rolls of electrical tape. This should help.
Installation instructions
Before installing a new set, you need to deal with dismantling the old window regulator. Having understood how the entire structure works, it will be easier for you to install the automation and configure it correctly if necessary.
Tools
To work you need to prepare:
- a set of keys;
- flat and Phillips screwdrivers;
- pliers;
- tape for fixing the glass in the desired position.
How to install (step by step with photo)
The factory mechanism must be removed in the following order:
Tip: Attach wire to the ends of the cable - this will reduce the time required to reassemble the entire mechanism.
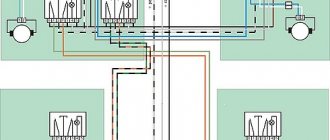
Connection diagram and installation
Video: how to install electric windows on the “seven”
Installing automatic window lifts does not require any special skills. Even novice car enthusiasts can install and connect the new kit according to the instructions. Modern devices are highly reliable and eliminate the main disadvantages of mechanical lifts.
Repair
It is not possible to repair window regulators in all cases. Mostly, these glass lifting devices can be repaired in case of obvious mechanical fractures of the elements.
But we can still give some useful tips regarding restoring the functionality of the window regulator without replacing it.
- If the electric window motor fails to work, then the brushes or winding are most likely to blame. To verify this and fix the damage, you need to remove the motor, disassemble it and clean the outer and inner surfaces.
- For cleaning, it is recommended to use a lint-free cloth. The cloth is soaked in gasoline, alcohol or a special cleaning agent. When you buy the latter, you can use it for a long time, the efficiency is higher compared to gasoline.
- After cleaning and drying the parts, it is recommended to treat the moving elements with lubricant so that the mechanisms function longer.
- If the cable comes off the lifting mechanism, you will have to dismantle it, remove the electric motor, or unwind the cable if it is mechanical. Then the cable is pulled back onto the grooves and the assembly is reassembled.
- If a malfunction occurs in the mechanism or the electrical circuit of the device, it is necessary to study this circuit, determine the direction of the wires, and then ring them. This is the most effective way to check for electrical failure.
Lifting device diagram
Repairs in most cases only give temporary results, so soon you will still have to make a full replacement. This is due to the fact that each part has its own service life and degree of wear. When they are reached, the window regulator stops working.
Replacing or repairing mechanical or electrical window regulators cannot be called complex undertakings. It is quite possible to cope with such tasks with your own hands.
Window lifter malfunctions and ways to eliminate them
The operation of the window lifter is configured and adjusted by the manufacturer, so you should interfere with it extremely carefully and carefully, otherwise the mechanism may jam, crackle and crackle.
From personal experience, I advise you to carefully study the device and read the detailed troubleshooting instructions before starting to independently repair the window lifter mechanism. Even though many of them seem quite possible to fix with a screwdriver and a wrench, in some cases it may be necessary to completely replace the window regulator.
Before you begin self-repair, you need to study the structure of the window lifter and the principle of its operation.
Window lift creaking
At first glance, the creaking of the window regulator does not seem to be a serious malfunction, but you should pay attention to this signal, since this is the first sign that the mechanism is wearing out and may soon break. Methods to combat this symptom are extremely simple, accessible to everyone and do not take much time:
- lubricate the window lifter - lubricants from any manufacturer, widely available in car dealerships, are suitable for these purposes;
At the first sign of squeaking, the window regulator must be lubricated.
- Replace the rubber bands in contact with the glass. When the window is open, dust and sand inevitably enter the car interior, which scratches the glass and rubber bands, resulting in a squeaking sound. The entry of dust and moisture through the gap between the glass and the seal can subsequently lead to jamming of the mechanism, so it is necessary to regularly monitor its cleanliness.
Window lifter jammed
The main reasons that the VAZ 2107 window lifter is jammed are as follows:
- failure of the welded joint connecting the cable bracket and the glass strip to which it is attached. In this case, you need to disconnect the window lift cable and weld the bracket;
- The cable is tangled or twisted inside the window lift mechanism. You can try simply removing and reinstalling the cable. In case of failure, the entire mechanism will have to be replaced;
- wear of the window lifter gears indicates a clear need to replace them.
Worn gear needs to be replaced
Glass falls
It happens that the glass falls and does not stay up. The reason for this may lie in the weakening of the tension roller, which creates the proper tension in the cable. To fix the damage, it is necessary to restore this mount. Another cause of the malfunction may be that the end of the cable has come out of the fastener. Then you need to remove the window regulator and try to wind the cable again.
It’s easy to check whether you carried out the repairs properly: in good condition, the window lifter handle rotates freely and effortlessly, the glass rises easily, without getting stuck and without any extraneous sounds.
Replacing the window regulator on the front doors of a VAZ 2110
An article with step-by-step photos and video instructions on how to independently replace the window regulator on the front doors of VAZ 2110, 2111, 2112 cars.
Each window regulator is stamped with the vehicle model number and part number. The last two digits indicate: 10 – right door; 11 – left door.
Brief summary of the work done
Replacing a VAZ-2110 window regulator is completed in half an hour, and is classified as simple car mechanic work, which can be done independently.
Therefore, it is better to spend some time in the garage than to spend a considerable amount of money at a car repair shop. Moreover, every time you overcome difficulties and do new work, you feel like a real man. And it's worth a little effort.
When replacing a window regulator, please note that the model number 2110 and the seven-digit part number must be stamped on the window regulator. The last two digits of the part number indicate: 10 – right, 11 – left.
Withdrawal procedure
- To access the window regulator, remove the door trim.
- Special bolts are used to secure the glass frame. Lower the glass so that the mounting bolts are accessible through the top hole of the door. You need to unscrew the 2 bolts securing the glass frame to the window lifter slider.
- Using your hands, lift the glass all the way up and jam it in the upper position.
At the same time, lower the window lifter slider down until it stops.
5. On the front door, you need to unscrew the 4 nuts securing the guide and the 3 nuts securing the window lift mechanism itself.
6. On the rear door, you need to unscrew the 2 nuts securing the guide and 3 nuts securing the window lift mechanism.
7. The window regulator is removed through the technological hole in the door.