Types, design and characteristics of rear window heating switches
All rear window heating switches are divided into two types according to design and operating principle:
- Key switches;
- Push-button switches.
Key switches are toggle switches in which the movable contact plate is moved using a key of one shape or another. To close the circuit, press one part of the key, and to open it, press the opposite part. Typically, two-position switches with an “On” position are used to control the defroster. and “Off,” but there are also three-position switches with a middle position and the ability to turn on various heater modes.
Push-button switches are switching devices with a button that is locked in a pressed (recessed) position. To close the circuit, press the button - it will sink into the body and lock in this position, providing current to the heater. To turn off the heating, press the button again - it will release and break the circuit. The buttons are only two-position - with the “On” positions. and "Off."
Keys and switch buttons can have a standard neutral design or be made for specific car models. Most often they are black, so they can be installed on various vehicles without disturbing the overall design of the dashboard. Therefore, today a standardized range of switches is used on both domestic and many foreign cars.
How to replace the windshield on a VAZ 2101-VAZ 2107?
Note! When you purchase new glass, make sure that the markings match on the old and new windshields, otherwise you might even buy the wrong glass and you simply won’t be able to install it on your car, and by the way, if the glass is branded, then the markings on it will it is applied very well and will not be erased by anything, unlike a fake, for this test, take a solvent and try to wipe off the markings on the new glass, if it is easily erased, then the windshield is fake, but on the branded glass this marking is, as we said earlier, It is applied very well and usually does not wear off for years!
Removal: 1) First, lift the wipers and then remove the chrome trim from the groove (Indicated by a red arrow in the large photo) which is located around the glass seal and remove it completely, but to do this, move the trim as shown in the small photo, which is this joint and closes so that the edges of the chrome trim are accessible.
2) Now, with your hand or a screwdriver or something similar, remove the upper corner (On either side) of the rubber seal from the opening (That is, move this rubber past the opening of the body), while pressing on the glass, trying to bring it out like this in the small photo It is shown that after the operation, the glass will already move away from the opening and it can be easily removed from the car.
Note! When the glass is removed from the car, if you no longer need it, you can throw it on the grass or anywhere else, if it is still useful, then place a blanket or something else soft and clean, then remove the rubber from it seal and transfer it to the new glass (Start the seal from the lower middle of the glass)!
Installation: 1
Before installing the glass, clean the opening in which it stands from dirt and rust and install the seal on the glass, to do this, clear the grooves of the seal from dirt and clean its two drainage holes (One is indicated by an arrow in the photo below for clarity), water flows through them leaks out and thus the body does not rot, so pay special attention to them and by the way, if suddenly the seal becomes very cracked or the rubber feels aging, then replace it immediately with a new one
2. Next, put the seal on the new glass, you will need to start from the bottom corners and also install the chrome edging of the glass that was previously removed in its place, now insert a small thickness cord into the groove of the seal (to make it easier to insert it, use soap) yes so that it comes together in the middle, at the bottom of the glass, and you put it there crosswise and after that you can install the glass in its place and take into account the fact that it is best to put the glass in its place with an assistant and not alone, so, bring the new glass to the opening and insert the ends of the cord into the interior and select one end of the cord and begin to pull it out (Pull towards yourself), while the assistant, using great force, will have to press on the glass from the outside (From the street), including Where you pull out the cord, continue the operation until the glass is in place and be sure to ensure that its edge is tucked in and the windshield is clearly in its original place.
Note! Both ends of the seal will need to be pulled out not completely, but only to the middle at the top of the glass, that is, first pull one end up to the middle, then grab the other and pull it in the same way; in no case should you pull out the rope completely for the seal only on one side, otherwise the glass will have to be reinstalled!
Additional video: You can see in more detail the process of replacing glass with a new one by watching the video below:
Sequence of work
How to tint a car window so that the work goes smoothly and the result pleases you? Proceed according to the following instructions.
- Remove the rear window, this will provide you with convenience and quality work.
- Clean the work surface from dust and dirt by washing it with a special solution and wiping it dry with a lint-free cloth.
- Make sure that there is not a single speck of dust left on the surface of the glass.
- Cut the tint film according to your pre-measurements.
- Separate the layers of film using two pieces of tape glued at different levels.
- Apply the film to the canvas and adjust its position. To achieve ideal placement of the film sheet, you can use a soap solution.
- Now it's the turn of the rubber spatula. Tinting the rear window of a VAZ 2107 on your own will work perfectly if you move the spatula in one direction. Use a spatula until all air bubbles are out of the contact area between the glass and the film.
- Use a hair dryer to shape the film at the curves.
Percentage of light passing through film
Remember: the film is glued from top to bottom. It dries in about three days. During this entire time, the material must not be touched with hands, so place the car where no one can touch the glass, even by accident.
Tinting the rear window of a VAZ 2107 with your own hands will be much easier if you use a removable film instead of a regular film. This film adheres to the glass using static energy, does not impede the movement of the side windows, and can be removed and reapplied if necessary. It has significant advantages, because condensation does not accumulate under it. Removable tinting is also performed in conditions of perfect cleanliness.
Tinting the rear window of a VAZ 2107 on your own is not an easy procedure, but not extremely difficult either. With a minimum amount of knowledge and skills, and a good amount of patience, every car enthusiast can perform tinting without problems. Skillful hands, a bright mind and a good mood are the main components of high-quality work with any car!
Front door side glass
Work on replacing the side glass is complicated by the fact that it is secured in a different way and is movable. In order to carry out any repair work, you will need to disassemble the door card.
How to remove glass
In order to remove the side auto glass, you must complete the following steps:
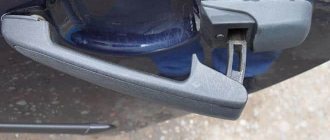
- We remove the plastic plugs from the armrest, prying them off with a screwdriver for convenience;
- Remove the armrest by unscrewing the fasteners;
- We move the socket and then move the trim, pressing it against the door. Remove the socket;
- Use a flat-head screwdriver to pry up the handle trim so that you can carefully remove it.
- We insert a screwdriver into the gap between the door and its lining, carefully snapping off the clips.
- We remove the seals.
- Use a wrench to unscrew the fastening screw in the front gutter;
- We take out the guide;
- We unscrew the cable fasteners, simultaneously lowering the glass down to the end;
- Using a screwdriver, we remove the cladding elements;
- Carefully remove the glass.
Door glass seal
Velvets act as a sealant. However, over time, when they become deformed and the velvet layer wears off, they perform their function very poorly. Cracks appear into which grains of sand, fine dirt and moisture get clogged. When moving, the glass gets scratched and quite unpleasant marks appear on them. In this case, the seal must be changed before installing a new body element.
Front door glass installation
The installation process is not complicated: all steps must be carried out in the reverse order. However, the glass itself must be carefully and carefully put in place so that it does not stand crookedly.
Installation
Installation of the rear door glass is performed in the reverse order, following the previously marked mark on the cable.
GOOD EVENING EVERYONE!
Well, here’s my next entry about my old cop) today I’ll tell you how I changed the windshield (and the rear one as well) into one =) sit back more comfortably and take a look. I’ll start with the fact that even when I bought the car, there were about 3-4 cracks on the glass along the entire height (((I didn’t care much, but after the inspection they told me that it needed to be changed! Otherwise there’s no way (((( I I went to the service center, where they told me the price was 1000 rubles. This is the installation and the glass itself together. Well, I calculated all the maintenance costs and decided that it would be better for me to pay 500 rubles on top like everyone else and forget about it...
But after driving for a year, my very good friend gave me an almost new windshield, the glass was in good condition and there was not a single chip or crack on it))) and its year of manufacture seems to be 2006. Well, then I decided that I got the glass for free, then and I’ll change it myself too) for almost no charge)) I had to surf the Internet and ask my friends what and how to do it) now I’ll share my experience with you, dear friends =) For this work we will need
- 2 strips of screwdrivers - 1 Phillips screwdriver - silicone grease (you can just use any oil or WD - 40) - gasoline galoshes (you can also use kerosene or simple gasoline) - rope (about 3-4 meters) - compressed leader and a clean rag (maybe and without it, depending on who has the condition of the car)
Actually, let's get started.
The first thing I did was this. I wiped the entire working surface from dirt and dust (well, for more comfortable work) the next moment I removed the sealing rubber lock, it can be removed in 2 steps by simply taking a flat-head screwdriver and prying it out from one end, just pull it out of the seal.
Then I unscrewed the plastic covers on the front pillars, they are held on by three small poles =) and for convenience, we also unscrew the rear view mirror (held on by 2 bolts)
Welcome! The rear side window of a car - it can break in different situations, for example, it can break if you hit it with a ball or if you just slam the door hard, besides, there are a lot of thieves and different people walking along the streets of our cities, trying to take possession of anything strangers stealing it from the first car they come across, but in order to get into the car they basically break its windows, or if a more experienced person, then use a special hook and sleight of hand to open the car.
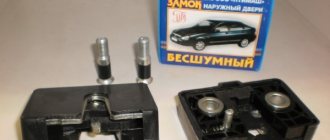
Note! In order to change the side window of a car door, you will need tools with which you will remove parts to get to it, these tools include: A set of wrenches and two different types of screwdrivers!
When should you replace your rear side window? Each car owner decides for himself when he needs to change the glass to a new one, but there are some people who change the glass only because of strong dirt that has appeared on it and has dried out over a long time, in this case it is not necessary to go to the car store and buy new glass, first try to wipe off all the dirt with a rag and water, in extreme cases, if this does not help, then using a special glass cleaner that is sold in household chemical stores, you can try to wipe the glass again, maybe this will help.
Note! We will give you advice for the future so that you then know what to do in that situation when a crack appears in the glass, namely, have you ever noticed that after a crack appears on the glass, over time it goes a little further until it reaches the end of the glass, so So that this doesn’t happen and you don’t have to immediately go to a service center or garage and replace the glass with a new one, you can extend the life of the old glass, to do this, using a cutter used to cut glass, make a strip across which the previously formed crack will rest against, and thereby She won’t go any further all over the glass!
Rear window replacement
The rear window of the VAZ 2107 can be heated or without it. Structurally, the parts are the same, with the exception of contacts that are disconnected before removal. The sizes and shape are the same.
- Using a screwdriver, remove the locks that are installed in the lower corners.
- Remove the wedge cover.
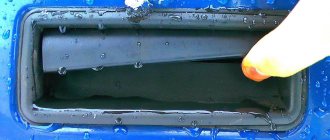
- Press out the glass from the inside.
- Remove the old shield from the posts.
If the shield is firmly in place and is not squeezed out from the inside, you should use a screwdriver to knead the molding along the contour and repeat the dismantling again. Removal is done with an elastic band, this will protect your hands from damage.
Rear part installation:
- Clean and degrease the surface of the frames.
- Install new locks and seals on the glass.
- The rope is inserted along the contour of the elastic band and overlaps at the bottom.
- The glass is applied to the frame and pressed down.
- Carefully pull out the rope, which must be inserted into the rubber edging.
Tuesday, February 19, 2022
How to remove and insert the windshield of a VAZ-2107
The windshield is removed when it is replaced, to clean or replace the seal, or to treat the body if corrosion occurs. We will need:
- Screwdriver flat and Phillips
- Blanket or similar
- Linen cord 5-6 m long, 3.5-4.0 mm in diameter
We move the windshield wiper arms with the brushes away from the glass. To facilitate dismantling, we remove the decorative edging and, if necessary, replace it with a new one after all the work.
We remove the decorative trims of the front pillars; it is not necessary to remove the remaining elements of the interior
Carefully use a screwdriver to pry up the seal in the upper corner of the glass from inside the passenger compartment and move it behind the body flange.
!If the glass has chips, cracks or other damage, you should work very carefully! By squeezing the seal with your fingers and simultaneously pressing on the glass, we remove its upper corner from the body opening, moving towards the opposite corner. We remove the top and side parts of the glass and remove it along with the seal, place it on a blanket
We remove the seal, clean all grooves from dirt and rust, and wash them in soapy water. We clean and wipe the edge of the glass.
We clean the two drainage holes in the lower corners of the seal.
If mechanical damage or loss of elasticity is detected, the seal must be replaced. We clean the body opening from dirt, and if there is corrosion, we carry out paint and varnish work.
We put the seal back on the glass.
We insert the edging into the seal (it can be installed after installing the glass).
We insert the cord into the groove of the seal, with which it fits onto the flange of the body opening so that in the lower part of the glass the cord overlaps by about 20 cm and there are still free ends of 30-50 cm.
We attach the ends of the cord with tape to the inside of the glass.
To make work easier, you can lubricate the edge of the seal and the cord with soapy water. We insert the glass into the opening so that the groove of the seal where the cord exits fits onto the lower flange of the opening, and the ends of the cord are inside the body.
Slowly and carefully pulling out one end of the cord, and pressing the glass against the opening on the other side, we move the edge of the seal through the flange of the opening. If necessary, adjust the seal with a screwdriver.
We perform a similar operation alternately with the other end of the cord until it completely comes out of the groove in the middle of the upper side of the glass. We make sure that the edge of the seal has completely passed the flange and has no curls.
Align the seal from the outside along the perimeter of the glass, lightly tapping it with the edge of your palm. We make sure that the drainage holes in the seal coincide with similar recesses on the body.
We install the edging lock-plate.
We put the removed trim parts back in place.
Front door side glass
Dismantling the side glass of the front door on a VAZ 2107 may be required during repair work. The front sliding glass has dimensions of 729**421*5 mm.
How to remove glass
To dismantle the glass you will need to prepare:
- flat and Phillips screwdrivers;
- set of open-end wrenches.
We carry out removal in the following order:
- Use a flathead screwdriver to pry the plastic plugs out of the armrest.
- Unscrew the fasteners and remove the armrest itself.
- We move the rosette away from the facing, and then move the facing itself along the handle and remove the rosette.
- Use a flat-head screwdriver to pry up the door handle trim and remove it.
- We insert a screwdriver between the door trim and the door itself, snapping off the plastic clips.
- Remove the sealing element from the front and top of the door frame.
- Unscrew the front gutter fasteners.
- We remove the guide element from the door along with the seal.
- We unscrew the cable fastening to the glass frame, lowering the glass itself down until it stops.
- Use a screwdriver to pry up and remove the facing elements from the inside and outside.
- We remove the glass from the door.
- If further disassembly of the door is required, remove the seal from the rear part.
- Unscrew the fastening of the rear guide element and remove it.
- We perform assembly in reverse order.
Door glass seal
To prevent scratches on the sliding glass, the doors are equipped with a special element - velvet covers, which also serve as a seal. Over time, the velvet layer wears off and the seal is broken, causing water to get inside the door and the glass to become loose and scratched. In this case, the seal needs to be replaced.
If the velvets are damaged, they should be replaced
To do this, just pry with a screwdriver and remove the worn elements, and install new ones in their place.
To replace glass seals, simply pry out the old elements with a screwdriver and then install new ones
Removal
1. Prepare the car for operations (see “Preparing the car for maintenance and repair”).
2. Set the glass to the lower position.
3. Remove the rear door trim in the same way as removing the front door (see “Front door trim - removal and installation”).
4. Remove the protective film of the door.
5. Using a Phillips screwdriver, unscrew the self-tapping screw securing the rear upper guide of the sliding window.
6. Remove the seal from the top of the door frame.
7. Using a 10 mm socket or socket wrench, unscrew bolt A and nut B securing the rear guide.
8. Remove the upper part of the guide from the fixed glass seal.
9. Tilting the upper part of the fixed glass forward, remove it.
10. Remove the seal from the fixed glass.
Attention! Before performing the following operation, it is recommended to note the position of the cable relative to the pressure plate.
11. Using a Phillips screwdriver, unscrew the two screws securing the cable pressure plate to the glass bracket.
12. Remove the plate and lower the glass all the way.
13. Remove the door trim and two chrome trims (see “Front door glass - removal and installation”).
14. Lifting the sliding glass with its bracket and tilting it inward, remove it from the door.
Rear window replacement
The rear window of the VAZ 2107 can be heated or without it. Structurally, the parts are the same, with the exception of contacts that are disconnected before removal. The sizes and shape are the same.
- Using a screwdriver, remove the locks that are installed in the lower corners.
- Remove the wedge cover.
- Press out the glass from the inside.
- Remove the old shield from the posts.
If the shield is firmly in place and is not squeezed out from the inside, you should use a screwdriver to knead the molding along the contour and repeat the dismantling again. Removal is done with an elastic band, this will protect your hands from damage.
Rear part installation:
- Clean and degrease the surface of the frames.
- Install new locks and seals on the glass.
- The rope is inserted along the contour of the elastic band and overlaps at the bottom.
- The glass is applied to the frame and pressed down.
- Carefully pull out the rope, which must be inserted into the rubber edging.
How to replace the rear side glass on a VAZ 2101-VAZ 2107?
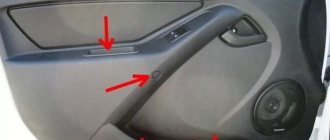
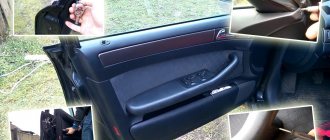
Removal: 1) At the beginning of the operation itself, you will need to get to the window lift mechanism, because in order to remove the glass itself from the car, you must first loosen the window lift cable and remove the glass groove, but in order to loosen the cable and remove the groove, you first need to get to them by removing To do this, cover the trim from the car door on which you are replacing the glass. (For information on how to remove the trim from the door, see the article using the example of removing the trim from the front door, you can see this example in the article called: “” see points 1-4)
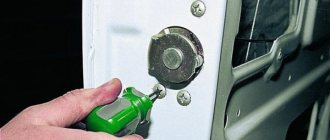
Note! Before you start removing the trim, unscrew the button that locks the car door by hand or using a screwdriver (see photo 1), and when the button is unscrewed and removed, unscrew the screw that secures the window sill trim in the front part (see photo 2 ) if you have it of course!
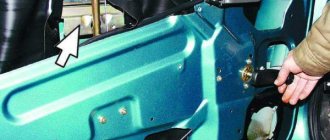
2) Then, when the trim is removed from the door, you will need to remove the protective film, which you may or may not have at all, this film covers the entire window lifter mechanism from dirt getting on it, and this protective film is attached to the adhesive tape by peeling it off , you can easily remove the film from the car door.
3) Now proceed to removing the window sill, there are only four plastic holders that secure it, disconnect all these holders from the door using a screwdriver and then you can remove the window sill from the car door.
4) Next you will need to remove the rear glass groove, to do this, first disconnect the plastic clamp from it (It fits into the hole) that attaches the rod to the groove and after the clamp is disconnected (see photo 1), pick up a wrench and use it to completely unscrew the nut and bolt that secure the rear channel to the car door and then remove it (see photo 2).
5) After removing the groove, insert a handle with which you can lower and raise the window of the car, but only the trim and rosette of this handle do not need to be installed, just put one handle in its place and, holding the glass with your hand, lower it to the very bottom until it stops .
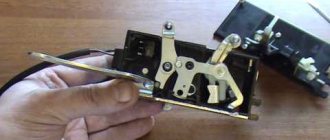
6) Next, unscrew the two screws that secure the pressure plate (Indicated by the red arrow), which in turn firmly fixes the cable and does not allow it to go anywhere.
7) When the screws securing the plate are unscrewed and the plate itself is removed, use a wrench to slightly loosen the nut that secures the tension roller (see photo 1), and after loosening the roller will move and thereby the cable itself will weaken a little; after the cable has loosened, you will need to remove it from the tension roller and from the lower roller which is indicated by the red arrow.
Now use a screwdriver to pry up the chrome inner glass trim and then remove it so that it does not interfere with the removal of the glass; you need to remove it through the top of the car door.
9) And to finish removing the glass, first unscrew the screw that secures the fixed glass to the car door (see photo 1), then completely or just a little (at your discretion) remove the upper seal of the sliding window as shown in photo 2, then tilt the fixed glass forward and remove it and finally lift the sliding glass to the top and tilt it inward, also remove it from the car door (see photo 4).
Window lifter malfunctions and ways to eliminate them
The operation of the window lifter is configured and adjusted by the manufacturer, so you should interfere with it extremely carefully and carefully, otherwise the mechanism may jam, crackle and crackle.
From personal experience, I advise you to carefully study the device and read the detailed troubleshooting instructions before starting to independently repair the window lifter mechanism. Even though many of them seem quite possible to fix with a screwdriver and a wrench, in some cases it may be necessary to completely replace the window regulator.
Window lift creaking
At first glance, the creaking of the window regulator does not seem to be a serious malfunction, but you should pay attention to this signal, since this is the first sign that the mechanism is wearing out and may soon break. Methods to combat this symptom are extremely simple, accessible to everyone and do not take much time:
- lubricate the window lifter - lubricants from any manufacturer, widely available in car dealerships, are suitable for these purposes;
Window lifter jammed
The main reasons that the VAZ 2107 window lifter is jammed are as follows:
- failure of the welded joint connecting the cable bracket and the glass strip to which it is attached. In this case, you need to disconnect the window lift cable and weld the bracket;
- The cable is tangled or twisted inside the window lift mechanism. You can try simply removing and reinstalling the cable. In case of failure, the entire mechanism will have to be replaced;
- wear of the window lifter gears indicates a clear need to replace them.
Glass falls
It happens that the glass falls and does not stay up. The reason for this may lie in the weakening of the tension roller, which creates the proper tension in the cable. To fix the damage, it is necessary to restore this mount. Another cause of the malfunction may be that the end of the cable has come out of the fastener. Then you need to remove the window regulator and try to wind the cable again.
It’s easy to check whether you carried out the repairs properly: in good condition, the window lifter handle rotates freely and effortlessly, the glass rises easily, without getting stuck and without any extraneous sounds.
Rear door side glass
The glazing of the rear door of the VAZ 2107 consists of two parts - a sliding glass and a fixed one. The first has dimensions of 543429 mm, the second - 372258 mm. Removal of these door elements may also be necessary to repair the door.
How to remove glass
To dismantle the glass you will need to prepare:
- flat and Phillips screwdrivers;
- set of open-end wrenches.
Use a flathead screwdriver to pry the plastic plugs out of the armrest.
Door glass seal
To prevent scratches on the sliding glass, the doors are equipped with a special element - velvet covers, which also serve as a seal. Over time, the velvet layer wears off and the seal is broken, causing water to get inside the door and the glass to become loose and scratched. In this case, the seal needs to be replaced.
To do this, just pry with a screwdriver and remove the worn elements, and install new ones in their place.
Heated rear window
The VAZ “Seven” was equipped from the factory with a heated rear window. This function is quite convenient and indispensable in damp and frosty weather, when the glass fogs up or freezes.
Sometimes a malfunction occurs when the heating does not work, and the glass fogs up. However, the problem is not always caused by a breakdown, but by high humidity, and nothing needs to be repaired.
If the heating really does not work, for example, due to damage to the wiring, then in this case it is necessary to familiarize yourself with the connection diagram and perform the following sequence of troubleshooting steps:
- We check the fuse that is responsible for heating the rear glass. It is located in the mounting block and is named F5.
If all of the above points do not give any result, there may be problems with the ignition switch or the circuit board in the fuse box.
Self-installation
Installing a windshield is not a difficult, but responsible process. Before starting work you need to do the following:
- Wash the surface of the frames and inspect for chips, rust, and abrasions.
- Degrease the surface.
- Place the cord in a new elastic band. The ends of the rope are located along the bottom edge in the place where the lock is located.
- Prepare a new part.
If pockets of corrosion are detected, clean the area with sandpaper, apply a primer and paint over it with enamel. The presence of rust in the contact area is unacceptable: this reduces the strength of the fastener, which is why water may enter the VAZ interior.
Before starting installation work, remove the side trims from the frames and the rear view mirror. This will make it easier to pull out the rope.
How to install:
- Put on the rubber seal.
- Lay down the rope.
- Carefully attach the part to the frame.
- One person adjusts the position from the outside of the VAZ, and the second carefully pulls the rope into the interior. It's better to start from the bottom edge.
- When pulling out the rope, an assistant adjusts the part and presses slightly towards the seal.
After the seal is in place, the shield will take its position. The windshield frame on the VAZ 2107 is installed in the reverse order. This is where a flathead screwdriver with a large handle comes in handy.
When going around the bottom corners, be careful not to scratch the panel with the cord. After installing the seal on the glass, you can return the rear view glass and decorative trims of the pillars to their place
Dismantling the lobovukha
Replacing the windshield on a VAZ 2107 will require dismantling the interior decorative trims, as well as the rear-view mirror.
To dismantle a part from a VAZ:
Wash the car at the car wash and drive it into a warm garage. Bend the wiper blades. Use a screwdriver to pry up the windshield lock, which is located in the lower frame. Remove the wedge molding around the entire perimeter of the glass. Gently press on the corners from the interior side to push out the shield, holding it from the outside. When dismantling, you need to press the seal with a screwdriver, squeezing it out
When removing, it is important to be careful and not to fumble when pulling the part out of the groove. Do not press on the shield as this may cause the part to crack and cause injury to your hands.
Search
Rear side glass
for VAZ 2101-VAZ
2107
Welcome! The rear side window of a car - it can break in various situations, for example, it can break if you hit it with a ball or if you simply slam the door very hard, besides, there are a lot of thieves and various people walking along the streets of our cities, trying to take possession of anything strangers stealing it from the first car they come across, but in order to get into the car, they mainly break the windows
or if the person is more experienced, then with the help of a special hook and sleight of hand they open the car.
Note! In order to change the side window of a car door, you will need tools with which you will remove parts to get to it, these tools include: A set of wrenches and two different types of screwdrivers!
When should you replace your rear side window? Each car enthusiast decides for himself when he needs to change the glass for a new one, but there are some people who change the glass only because of the strong dirt that has appeared on it and has dried out over a long time, in this case it is not necessary to go to a car store and get a new glass first try to wipe off all the dirt with a rag and water, in the latter case, if this does not help, then using a special glass cleaner that is sold in household chemical stores, you can try to wipe the glass again, maybe it will help.
Note! We will give you advice for the future so that you know later what to do in that situation when a crack appears on the glass, and specifically, have you ever noticed that after a crack appears on the glass, over time it goes little further until it reaches the end of the glass
, so so that this doesn’t happen and you don’t have to immediately go to a service center or to the garage and replace the glass with a new one, you can extend the life of the old glass, to do this, using a cutter used to cut glass, make a strip across which the previously formed crack will rest and so it won’t go any further all over the glass!
Types of glass
The following types are available for sale:
- classic, without darkening;
- with silk-screen printing;
- with spraying.
Factory spraying allows you not to glue the tint film on the rear and side windows, while protecting the interior from sunlight and improving the appearance of the car.
Silk-screen printing along the contour of the shield or in its upper part improves not only the appearance, but is also used as a visor from the bright sun. There are options on sale with images or inscriptions that are applied to the part using spraying.
The grille for the rear window is made of plastic and is attached to the rack using clamps or double-sided tape. The part transforms the car, but reduces visibility in the rear view mirror.
Transparent glass without chips or defects not only ensures an excellent appearance of the VAZ, but also affects the quality of viewing in bad weather conditions. Ease of replacement allows drivers to carry out the work themselves without visiting car repair shops.
Let's start with dismantling
Removing the sun visor
So:
Pull the visor axle out of the holder by pulling it in your direction.
Stage 1
Three self-tapping screws are unscrewed with a Phillips screwdriver.
Stage 2
We remove the visor.
Stage 3
Removing the interior rear view mirror
Stage 1.
Using a screwdriver, remove the decorative trim of the mirror bracket
Stage 2.
Unscrew the two screws with a Phillips screwdriver
Stage 3.
Removing the mirror
With a mirror, the issue is easily resolved - I bought a larger one and secured it on a standard mount, but the visors force me to make a choice - either re-tighten it with a carpet or buy tuning ones. For most, the second option is preferable; they both look and cope with their duties better than standard ones.
Removing a hard ceiling
Many car owners have a question: how to remove the hard ceiling on a VAZ 2107? Most of the advice boils down to the need to dismantle the windshield, but I suggest trying a more gentle, although also labor-intensive, method. I wanted to post a video, but I think we’ll make do with instructions and photos. In a VAZ 2107, replacing the ceiling begins with dismantling the rear seats, removing the side plastics on the rear and front pillars, as well as dismantling the front passenger door. After unscrewing all the fasteners on the ceiling, it easily fits into the opening of the removed passenger door. And although this method seems very difficult, believe me, the new ceiling upholstery of the VAZ 2107 is worth the effort!
Removing the rear seats
Unscrew all fasteners
We take you out of the salon
We pull out
Removing a soft ceiling
The soft ceiling lining of the VAZ 2107 can also be removed in two ways - both with removing the windshield and without dismantling it. In the second case, you will have to be a little nervous, since picking out the brackets holding the ceiling from under the windshield sealing rubber is not a pleasant task (it can be solved by using a screwdriver and some kind of mother).
In order to remove the ceiling of a VAZ 2107 with soft upholstery, you need to dismantle:
- Door seals;
- Handles above doors;
- Sun visors.
We begin to remove the upholstery from the windshield. And then step by step:
- We feel for the first arc (the first seam from the windshield);
- We push it by the middle, towards the trunk;
- The arc rotates around its axis, thereby weakening the upholstery;
- We remove the arc from the side niche of the roof profile, slightly squeezing it in the center.
- Further, with other arcs, in a similar order.
Now we are faced with the question of whether to stitch the leatherette so that we get hinges (a high-quality, but labor-intensive option with a big disadvantage - the seams are visible) or glue a new one directly onto the new skin.
In any case, having removed the ceiling from the VAZ 2107, you first need to wash it...
Old ceiling
...and cover it with material...
Sheathing Result
...or cover it with vinyl.
Vinyl
Dismantling the lobovukha
Replacing the windshield on a VAZ 2107 will require dismantling the interior decorative trims, as well as the rear-view mirror.
To dismantle a part from a VAZ:
Wash the car at the car wash and drive it into a warm garage. Bend the wiper blades. Use a screwdriver to pry up the windshield lock, which is located in the lower frame. Remove the wedge molding around the entire perimeter of the glass. Gently press on the corners from the interior side to press out the shield, holding it from the outside. When dismantling, you need to press the seal with a screwdriver, squeezing it out. When removing, it is important to be careful and not to fumble when pulling the part out of the groove. Do not press on the shield as this may cause the part to crack and cause injury to your hands.
Unusable VAZ consumables should be placed on a soft cloth or rubber mat. This will prevent chips in the corners and the appearance of potholes that can cut your palms during subsequent transportation.
Unusable VAZ consumables should be placed on a soft cloth or rubber mat. This will prevent chips in the corners and the appearance of potholes that can cut your palms during subsequent transportation.
Unusable VAZ consumables should be placed on a soft cloth or rubber mat. This will prevent chips in the corners and the appearance of potholes that could cut your palms during subsequent transportation.
What is required for the work
To replace a defective element on a VAZ 2022 with your own hands, you need to prepare the following tools:
- degreasing and cleaning agent;
- clean cloth;
- a cord with a cross-section of 4-5 millimeters and a length of at least 5 meters;
- assistant, since some operations are performed only by two people;
- new sealing rubber;
- molding.
You need to thoroughly wash and degrease the new product before starting work. This will prevent it from accidentally slipping out of your hands, and will also ensure a tight grip in the rubber groove.
All work should be carried out in a warm, windless place, observing safety precautions when using degreasing chemicals.
Roof noise insulation on a classic
In the process of soundproofing a car, the roof is often forgotten, but in vain. This huge surface contributes significantly to the overall noise that needs to be eliminated. If we talk about classic AvtoVAZ models, there are two types of ceilings - soft and hard. The labor intensity of soundproofing the roof of these cars directly depends on this, because the ceiling will have to be completely or partially removed. It’s easier with a soft ceiling - you just need to bend it at the edges, but a hard one may not bend that way. Then you will have to pull it out of the cabin, and for this you need to remove the front or rear window... The prospect is not pleasant, but the soundproofing of the roof on a classic is worth it!
Sound insulation of a roof with a soft ceiling
Everything is quite simple here. The soft ceiling is a piece of dermantine, which is stretched around the perimeter of the ceiling and is held on by metal hooks and brackets. The hooks are located under the seals of the front and rear windows, so in order to completely remove the ceiling, you need to remove these windows. However, the soft ceiling does not need to be removed - to soundproof the roof, it is enough to bend it at the edges.
see also
Comments 6
Under the driver's side, 2 pieces of felt 4-5mm (what I found at home, I tried the wrong plywood, it was very hard) under the passenger side in one layer. and additionally tightened the springs with wire. I placed 2 washers under the steering column and sawed off the gearshift lever several times (in total -5cm) and only with this was I able to achieve a more or less correct fit for myself.
What did you do with them? He even slipped in some plywood. It's just like being in a hammock. Directed by Lifan Solano. with active lumbar support. I couldn't be happier.
Yes, we should also replace it somehow
Whatever you say, the seats on the classics suck, I also struggled with them until I replaced them
Source: www.drive2.ru
Rear window
In Zhiguli cars, the rear glass also has a concave shape. It protects the interior from dirt and moisture. The tightness of the internal space is maintained until the seals deteriorate or the body element itself breaks.
Rear window dimensions
The rear window of the Zhiguli is also quite massive. Its dimensions are 136 cm in length and 51.2 cm in height. The dimensions indicate that dismantling and installation should also be performed with an assistant.
Replacing the rear window, algorithm of actions
In order to replace the rear auto glass of a VAZ 2107, you will have to repeat the steps that are required to replace the wind body element, with the exception of some nuances:
- Pry up the edging at the bottom using a flat-head screwdriver;
- Remove the metal corner element and take out the edging;
- Carefully pushing out the glass, we take it out. You should start from the bottom side. You can replace old auto glass with new one using the same instructions.
Heated rear window
The VAZ 2107 was equipped with heating from the factory - this option is very useful in cases where in winter everything can become foggy and the driver’s all-round visibility will be limited. When installing new glass, you need to make sure that the heating is connected and working properly.
Rear window grille
Often a grille is installed on the rear window as an addition. It beautifies the appearance of the car and helps darken the interior, protecting it from the penetration of sunlight. On hot days, it helps maintain a normal temperature in the cabin.
Frequent breakdowns
In winter, it may happen that the heating will work, but fogging will not go away. This phenomenon cannot be called a breakdown, because it occurs only with high humidity. If you notice a similar effect, there is no need to worry about repairs.
But if the humidity is moderate and the heating is not working, you will really have to start repairing. To do this, you will have to check the entire chain step by step:
- Fuse F5;
- Heater terminals and ground;
- Check the filament with a multimeter.
Basic data for adjustments and control
| Gaps in the valve drive mechanism between the cams and levers on a cold engine, mm | 0,15 |
| Minimum crankshaft rotation speed at idle speed, min" 1 | 820-900 (750-800*) |
| Oil pressure in the engine lubrication system at oil temperature +85 °C, MPa (kgf/cm2) | 0,35-0,45 (3,5-4,5) |
| Fluid temperature in the cooling system of a warm engine, "C | 95 |
| Coolant level in the expansion tank on a cold engine | 3-4 cm higher risks "MIN" |
| Deflection of the fan belt at a force of 100 N (10 kgf), mm | 10—15 |
| Gap between spark plug electrodes, mm | 0,5-0,6 |
| Initial ignition timing to TDC, degrees | 5-7 |
| Gap between breaker contacts in the ignition distributor, mm | 0,4+0,05 |
| Brake fluid level in brake and clutch reservoirs | to the bottom edges of the filler necks |
| Clutch pedal free play, mm | 25—35 |
| Free travel of brake pedal, mm | 3-5 |
| Free play of the steering wheel, degrees (mm) | 5(18-20) |
| Toe-in of the front wheels of a run-in car under load when measured between the wheel rims, mm | 2—4 |
| Camber of the front wheels of a run-in car under load, degrees | 0°30’±20′ |
| Longitudinal angle of inclination of the steering axis of the front wheels of a run-in car, degrees | 4°+30′ |
| Axial clearance in front wheel hub bearings, mm | 0,02-0,08 |
| Tire pressure 175/70 R 13, MPa (kgf/cm2): | |
| 0,17 (1,7) | |
| 0,16 (1,6) | |
| 0,20-(2,0) | |
| 0,22 (2,2) | |
| 0,23 (2,3) | |
| Tire pressure 165/80 R 13 (165 SR 13), MPa (kgf/cm 2): | |
| 0,16 (1,6) | |
| 0,19(1,9) | |
| 0,21(2,1) | |
| 0,22 (2,2) | |
| Maximum slope on dry hard ground, on which a vehicle with full weight is held for an unlimited time by the parking brake when moving the lever by 4-5 teeth of the sector, % | 30 |