Why change the backlighting of individual buttons on the VAZ 2114 dashboard
On the VAZ 2114, the illumination of the buttons for controlling the dimensions, low beam, front and rear fog lights, as well as the rear window heating is green from the factory. Over time, many owners get tired of this glow and there is a desire to replace it, make it non-standard. After making a decision about such modifications, you need to decide: do this work yourself or contact the service. Since the process of replacing button backlighting is not a complicated procedure, in most cases, car owners carry out such an upgrade with their own hands.
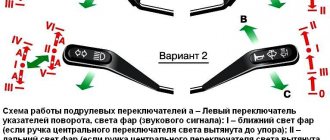
Electrical diagram of VAZ-2115-01
Years of production 2115: 1997—2012. This is a circuit with a regular button for rear fog lights (with locking), a fluorescent interior light, a connector for the clock and an 8-pin connector for the injector wiring.
1 — block headlights; 2 — fog lights; 3 — air temperature sensor; 4 - generator; 5 — electric motor of the engine cooling system fan; 6 — fan motor activation sensor; 7 — engine compartment lamp switch; 8 — block for connection to a single-wire type audio signal; 9 — sound signal; 10 — oil level sensor; 11 — front brake pad wear sensors; 12 — washer fluid level sensor; 13 — spark plugs; 14 — ignition distributor sensor; 15 - switch; 16 — carburetor solenoid valve control unit; 17 — carburetor solenoid valve; 18 — carburetor limit switch; 19 — speed sensor; 20 - starter; 21 - battery; 22 — relay for turning on fog lights; 23 — coolant level sensor; 24 — brake fluid level sensor; 25 — reverse light switch; 26 — coolant temperature indicator sensor; 27 — engine compartment lamp; 28 — windshield wiper gearmotor; 29 — oil pressure warning lamp sensor; 30 — block for connecting to the rear window washer electric motor; 31 — electric motor for windshield washer; 32 — ignition coil; 33 — instrument cluster; 34 — mounting block; 35 — brake light switch; 36 — blocks connected to the injection system wiring harness; 37 — ignition switch unloading relay; 38 — ignition switch; 39 — glove box lighting lamp; 40 — switch for the glove compartment lighting lamp; 41 — rear window heating switch; 42 — fog light switch; 43 — fog light switch; 44 — external lighting switch; 45 — alarm switch; 46 — steering column switch; 47 — instrument lighting regulator; 48 — hydraulic corrector scale illumination lamp; 49 — socket for a portable lamp; 50 — side direction indicators; 51 — switches in the front door pillars; 52 — lamp for individual interior lighting; 53 — electric heater fan; 54 — additional resistor of the electric heater fan; 55 — heater electric fan switch; 56 — backlight lamp for the electric heater fan switch; 57 — backlight lamp for heater control levers; 58 — display unit of the on-board control system; 59 — trip computer; 60 — switches in the rear door pillars; 61 — block for connection to the clock; 62 — electric fuel pump with fuel level sensor; 63 — ashtray lighting lamp; 64 — cigarette lighter; 65 — trunk lighting; 66 — trunk light switch; 67 — interior lamp; 68 — parking brake warning lamp switch; 69 — external rear lights; 70 — internal rear lights; 71 — plugs for connecting to the rear window heating element; 72 — license plate lights; 73 - additional brake signal.
Do-it-yourself overexposure of buttons on a VAZ 2114
Replacing the standard button backlighting on a VAZ 2114 will require the preparation of certain tools, materials, as well as some time. To work you will need the following list of necessary things:
- soldering iron with a thin tip;
- solder;
- tweezers;
- small knife or flat screwdriver;
- LED elements of the desired color.
Which LEDs and in what quantities should I buy?
The buttons installed on the dashboard of the model in question come in old and new styles. In the first case, small light bulbs or LEDs are used as a backlight element, and in the second, boards with sealed SMD LEDs are used.
Each button is equipped with two LED elements: one is responsible for illuminating the button itself, and the second indicates the activation of a particular function. The exception is the low beam headlight button - it does not have a power indicator LED. Therefore, if you plan to replace the LEDs on all five buttons, you will need to purchase 9 backlight elements. The type of the latter can be determined only after disassembling the button. The old model requires 12 V LEDs with a diameter of 3 mm. The new sample uses elements marked 0805. When using standard LEDs, it is recommended to additionally install a resistor with a resistance of 500 Ohms to 1 kOhm along the power circuit (directly in the button), which will prevent the element from burning out.
It is better to purchase LEDs with a small margin, since there is a possibility of damage to the element during installation.
How to remove buttons
To remove the buttons on the front console, do the following:
- Remove the negative terminal from the battery.
- We take out the plug of the on-board computer or the BC itself, if it is installed. To do this, just hook it with your finger and pull it towards you.
Replacing the backlight of the front panel buttons
Since replacing LEDs on old and new button versions is somewhat different, each process should be considered separately.
Overexposure of old-style buttons
After removing the buttons from the instrument panel, perform the following sequence of actions:
- Pull the top of the button and remove the lid that is pressed.
The LEDs on all instrument panel buttons change in the same way.
Overexposure of new buttons
On modern buttons we change the LEDs this way:
- We disassemble the button, as in the previous paragraph.
- After opening we find a board with installed LEDs. We determine the polarity of the elements and solder them with a soldering iron with a thin tip.
To make it easier to replace LEDs, the board can be removed from the button. Depending on the button itself, the board can be inserted or soldered onto the legs.
Video: overexposure of VAZ 2114 buttons
Modernization of the buttons for turning on the headlights and low beam
The buttons for turning on the headlights and low beam headlights are made as a single element. The absence of an LED indicating that the headlights are on low beam causes inconvenience to many motorists. This is due to the fact that it is often unclear whether the headlights work or not. To solve this problem, they resort to modernizing the button. In addition to the tools listed above, you will need a similar button from which the necessary parts will be removed. The finalization process itself consists of the following steps:
- Remove the button from the panel.
Video: refining the low beam switch button
Wiring diagram for VAZ-2110 power windows with instructions
Electric windows are very convenient devices that are controlled by a special button and make it possible to lower or raise the side windows without rotating the previously used handles. Unfortunately, this option is provided only in some modifications of the VAZ-2110 car. Therefore, in this article we will tell you how to install it yourself and ensure maximum comfort in controlling the side windows.
Selecting window regulators for installation on a VAZ-2110
If you want to install electric windows on your car, you will first need to choose the most reliable device that will serve for many years without causing any problems. On the modern market you can find the following options:
- traditional cable structures, which are relatively easy to install, but differ from others by not having a very long service life, wear out quickly;
- strip devices that are not very convenient to use;
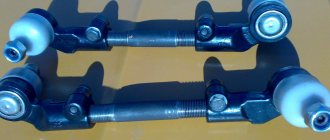
- rack and pinion window lifters, which are deservedly recognized as the most suitable and reliable in operation.
When choosing devices suitable for your car, pay attention to factors such as:
- the speed of raising and lowering the glass, which largely depends on the gear motor installed on the car;
- the ability to use the device in the cold season;
- noise level during product operation.
Taking into account all these factors, you will be able to choose window lifters that will not only work flawlessly, but also will not create any problems in specific operating conditions.
How to install and connect power windows on a VAZ-2110
The most preferred devices are rack type, so we will describe the installation process as an example. The connection diagram for the window regulator on a VAZ-2110 car is as follows:
- remove the negative terminal from the car battery to stop the supply of voltage to the on-board power supply network;
- we take the wires that come standard with rack-and-pinion window lifts and make a kind of harness out of them that makes connection easy;
- remove the car mounting block, which will require unscrewing the self-tapping screw that secures the special latch;
- turn the block over and carefully install block Ш1 of the pre-prepared wiring harness into the corresponding connector;
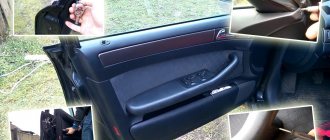
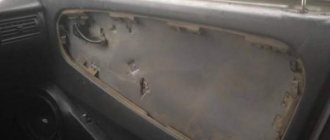
- dismantle the door trim;
- we pull the wires to the electric window drive. To do this, you will need to carefully pass them through the holes in the door itself and the body pillar on the desired side.
After this, buttons or keys are installed that will be used to control the power windows. Depending on your desire, they can be attached either to the door trim of a VAZ-2110 car, or to an existing control panel. In the first case, you will need to use an additional wire, which will allow you to equip the key backlight.
Installation process of electric windows
In addition, it is necessary to install the power windows themselves. The procedure is performed in the following sequence:
- temporarily remove the glass seal located on the inside of the door;
- remove the glass, and then dismantle the window regulator fastening mechanism;
- we install devices that will operate from an electric drive;
- connect the negative terminal to the battery and check the operation of the new window regulator;
- We install the glass in place and trim the door.
Our instructions in pictures will help you understand the installation procedure in more detail.
Features of connecting power windows
Unlike conventional mechanical devices, power windows are not equipped with traditional gear reducers, but with a special drum. The shaft of a DC electric motor is inserted into its hole located in the center. In this case, the motor is only a component of the gearmotor, on which, as we found out earlier, the speed and quality of raising and lowering the windows depends.
Before installing a new power window, you must select the correct device based on its technical characteristics, and also make sure that the product is in a fully folded state. Otherwise, you are unlikely to be able to install the product efficiently and ensure its flawless operation after connecting it to the vehicle’s on-board network.
Experience of car enthusiasts
There are buttons with both lamps and diodes, there is a choice. Resistors are soldered directly into the diode, this is AvtoVAZ know-how