Consider the device
The stable availability of spare parts for any domestic cars in stores, and their quite affordable price, makes the repair (replacement) of a CV joint not costly, both financially and in terms of time. However:
- You should take into account that replacing a boot in terms of the volume of work performed is no less than replacing a grenade on a VAZ 2115
- That is why in practice, due to the labor intensity, replacing the boot cannot be called easy, in addition, you will need skills in using metalwork tools and following the rules in accordance with safety requirements when starting to perform such work
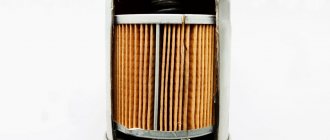
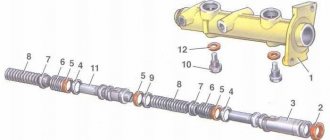
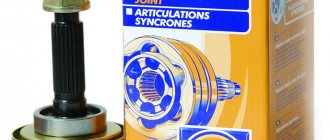
- CV joint, also called a “grenade” for its peculiar shape, its task is to transmit torque from the box to the wheels of the car, the design of the CV joint is not complicated, it consists of the main seven elements, photo below
The main elements of the CV joint and the CV boot (boot)
- However, although its service life is designed for a long time, replacing the VAZ 2115 CV joint is a procedure that has to be performed quite often and this largely depends on the intensity and operating conditions of the machine
- The need for replacement arises when play appears in any connections of the device, or when there is a characteristic crunch and crackling sound when turning the wheels.
- Replacement is usually carried out after checking and confirming the version of the CV joint malfunction, and you need to diagnose it to make sure that the whole problem really lies in it
VAZ 2115: replacing the CV joint will cost less if you do it yourself
Replacing CV joints on a VAZ 2115
Replacing the CV joint on a VAZ 2115 is carried out when a strong crunching sound appears when turning at speed; if you find such a sign of a malfunction, you simply need to carry out repairs immediately. The reason for the appearance of crunching (destruction) of a “grenade” (as motorists have long nicknamed CV joints due to some external similarity) is usually the ingress of sand, dust, and dirt through a torn (damaged) boot (aka cover). In the VAZ 2115, replacing the grenade can be prevented by timely changing the boot, but such a malfunction does not reveal itself until the unit completely breaks down and a crunching sound appears.
Diagnostics
Before we start replacing the CV joint with our own hands, we usually carry out simple diagnostics by first checking for play in the shaft of our drive, and all we need are our hands, as well as an understanding of what play is. There are several ways to check:
- Method one - grab your drive shaft with your hand and swing it, when you feel a lot of free play or play - this means you need to replace the CV joint
- Method two - we go to the inspection hole and turn the steering wheel to the right as much as possible or to the left (as necessary), then we carefully look at the condition of the “grenade”, if there are cracks or visible breaks on its boot, traces of grease protruding, this means that the boot needs to be replaced, otherwise the entire CV joint will soon need to be replaced
- We buy a new “grenade”, the price is affordable
What brand of grenade should I choose and what boots should I install?
Almost all motorists who are faced with a breakdown of this element are wondering - which CV joint is better for a VAZ 2114 - domestic or imported? The answer to this question can be completely unambiguous - the best CV joints are the original ones, produced by AvtoVAZ itself.
The only difficulty that exists here is that such grenades have not been and are not on sale, so it is very difficult to get them.
You can either try to look for them at auto repair shops (however, here you can unknowingly buy used ones, which is not very good - after all, the part may already be damaged) or go to an official AvtoVAZ service center (but the price will be very high)
For these reasons, it would be best to pay attention to products from other manufacturers.
CV joint for VAZ 2114
So, the answer to the question which outer CV joint for the VAZ 2114 is better can be any of the following companies:
- Lobro;
- Hola;
- Kraft;
- GKN;
- GLO;
- FINWHALE;
- LPR;
- Mettelli.
GKN grenade for VAZ 2114
The first three companies on this list are especially popular among domestic car enthusiasts, so if there is a choice in a car store, it would be better to give preference to them. Also, when buying new grenades, you should not forget about buying new boots (mounting new CV joints with old, albeit “working” boots, would be a very big mistake).
It’s not worth talking in detail about which CV joint boots are best for the VAZ 2114. All anthers can currently be divided into two types - ordinary, almost no different from the anthers installed at the factory, and the so-called “reinforced”.
When buying the latter, it is worth remembering that along with them you should also buy mounting clamps of an increased size, since clamps from ordinary boots will not fit. All of these anthers have approximately the same quality, regardless of the manufacturer (some believe that silicone anthers last a little longer, but, as practice and reviews from many motorists show, the difference between silicone anthers and conventional ones in terms of service life is minimal).
The most important thing to do when buying anther is to check its quality. It must not have cracks, tears or other damage
The CV joint boots should be replaced with new ones at the first signs of wear.
Symptoms of a problem
- crunching under the wheels;
- jerking when changing speed or starting to move.
It is the crunch that is easiest to notice, and it is this sign that you should focus on first when making a diagnosis. But how can you distinguish the sound emanating from the outer element from the sound made by the inner CV joint? You can check the condition of the external one by turning the steering wheel all the way and starting to drive. A crunching sound while driving in a straight line indicates a malfunction of the inner CV joint. You can also check the condition of this part by lifting the car and spinning the wheels idle. The sound that appears is a 100% guarantee. One of the CV joints is faulty.
If crunching or jerking occurs, you should also inspect the mechanism. The boot may have cracked. A visual inspection will allow you to find cracks, chips, deformation and it will become clear what is wrong and what to do.
CV joint needs to be replaced
VAZ-2115 is a beautiful economy class car. Of course, many people dream of a luxurious and spectacular foreign car. The VAZ-2115 car may lack gloss and shine, but it is characterized by lightness and elegance. Good build is another feature. But not everything is so smooth. Nothing lasts forever, and this means of transportation begins to bother you over time.
A CV joint is a part whose load is high. This is a constant velocity joint, an element that is fragile and strong at the same time.
Sometimes it breaks and needs repairs. But how can you determine that it is he who is causing trouble? Millions of reasons sometimes provoke the same failure. Should a driver take on the job or is it better to go to a service station? In order to make the right decision, you need to carefully weigh the pros and cons.
How to replace the inner CV joint on a VAZ 2114
Replaced the inner left CV joint. There was a problem when accelerating, namely clicks during sharp acceleration “underfoot” and when turning slightly to the left. Since the left inner CV joint operates at a larger angle, I replaced it. By the way, it was mentioned on the forum that the 2008 cars had defects in the left inner CV joint. All the anthers were also replaced. Almost all of them had cracks and a small amount of lubricant, which had also dried out. There were some difficulties during the replacement. The nuts were tightened from the heart. So I helped tear them off with a chisel. Broke one knob. I also purchased a CV joint puller from the drive and steering ends. Their work pleased me with the time savings, the unnecessary need for an assistant and cutters, and unnecessary work with a sledgehammer.
Replacing the Inner CV joint of a VAZ 2115
CV joint replacement of VAZ and its sawmill
In order to change the articulated joint (grenade) of a VAZ without outside help, it is best to use an overpass or a pit, as this is inconvenient to do on uncomfortable asphalt. This is especially true for replacing the internal CV connection
, which is located on the side of the gearbox, because such work is fundamentally different from replacing an external one.
In fact, a new lemon is always equipped with a saw, so it is better to change it. The exception is when the bootloader has changed recently. then it is better to throw the new one into storage. practice shows that the download serves the connection at a constant speed less.
External CV joint replacement
First replace the external CV connection
VAZ needs to lift the car with a jack and raise the wheel. then unscrew the hub nut. If the crankcase is installed, remove it. Then you need to unscrew the ball bearing from the lower suspension arm. If the support is pressed, you need to unscrew it using the lever.
Then move the stand to the side so that the CV joint is in a bent position. The pulley that drops into the hub bearing must be at an angle relative to the drive shaft that connects the inner and outer grenades. Replacing the pump on a VAZ 2115 2114 2113, video »Repair. You can now knock the CV pulley connection away from the bearing. To do this, use a metal spacer and tap it on the outside of the wheel.
RELEVANT REPAIRS CV Joint Replacement
at VAZ
2108, 2109, 2110, 2112.
replacement of internal grenade (internal joint) of VAZ 2114
I'll show you how to substitute
internal grenade for a VAZ
2108-
2115
. My videos. it is useless as a repair.
Now you need to remove the trunk and remove the grenade from the drive shaft. All old oil must be removed. All of the above manipulations are best performed with WD-40 or a similar aerosol.
Before putting on the new CV joint, it is necessary to replace the retaining and traction rings (the latter are installed inside the grenade) and lubricate the entire mechanism with grease. Sometimes the kit does not contain enough lubricant, so it is better to have a supply on hand. Once the CV joint is “bitten” to the drive shaft, we center it so that the fork runs smoothly and drives it into the saddle. Then everything is simple. we compress the shoes with clips and assemble them in reverse order.
replacement
inner CV joint
Replace the old grenade before removing the old CV connection
VAZ, you need to completely drain the oil from the gearbox. At the same time, it's worth watching. Is it worth replacing it so as not to lift the car twice? Once the oil is drained, remove the wheel, unscrew the ball, freeing the strut from the lower control arm, and unscrew the wheel outward. The CV connection was a free ride. We knock the outer grenade out of the wheel as described above and remove both grenades from the gearbox. It is better to cover the hole in the box with something to prevent dirt and dust from getting inside. Next you need to clamp the disc in a vise and remove the trunk lid and then knock down the old CV connection.
Then put on new dust, whole interior new CV connection
Loosely lubricate, adjust the direction of the drive and seat, and prime on the drive shaft. Replacing the pump (water pump) from VAZ 2114, 2115 8. Next, install in the reverse order, not forgetting to put on the retaining ring and rod.
When replacing the CV joint, it is necessary to take into account the fact that different car models may have different designs for attaching ball joints; CV joints may have adjusting nuts or additional rings. Therefore, when removing an old spare part and installing a new one, make sure that there are no “unnecessary” spare parts.
Post Views: 4
Removing the drive shaft
Next they move to the wheel arch and from there they take out the drive shaft, which already has an internal and external hinge. Using pliers, remove the clamps holding the boot from the parts. If the latter is destroyed, then it is torn apart. Otherwise, you can just move it to the center. If the boot is torn, the inner CV joint boot will need to be replaced. These parts are sold separately and are included with the spare part. To remove the joint from the drive shaft, you need to hit the inside with a hammer. After a few blows, the part will fly off the shaft. The same operation must be done on the other side.
CV joint replacement
- We remove the crankcase protection; to do this, unscrew two bolts at the front to 17 and 2 nuts at the back to 19.
- Drain the lubricating fluid from the box (about 1/3 of the total volume).
- We use a wheel wrench to remove the wheel bolts of the side of interest.
- Take the 30mm head and unscrew the outer CV joint nut.
- Raise the car using a jack.
- We take a 13mm wrench and unscrew the two bolts (you can knock out one of the pins) from the hub that hold the ball joint.
- Using a mounting blade (mount), we move the hub away from the reaction rods.
- Pull the strut towards you and pull the CV joint pin out of the hub.
- Move the shaft drive to the side.
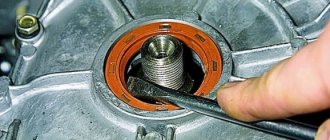
- Open the hood and use a pry bar to remove the inner CV joint from the box. To do this, you need to insert a mounting blade between the parts and pull it sharply towards the box.
- After the CV joint has moved a little, we move to the wheel arch and pull out the shaft drive with two “grenades”.
- We take pliers and remove the large and small clamps of the protective cover from the grenades.
- If the boot is damaged, we tear it off, and if not, then we move it to the center.
- We hit the inner race of the inner CV joint as hard as possible with a hammer until it falls off. We do the same thing, on the other side.
- Remove the rings from the shaft drive.
- We put rings from the new CV joint kit on the shaft and a new boot.
- We hammer in a new “grenade” with a hammer.
- Lubricate the CV joint with grease, and squeeze the remainder into the boot.
- Using clamps, we fix the boot on the “grenade” and the shaft.
- We do the same with the other CV joint.
- We take the shaft drive, screw the nut onto the outer CV joint and use a hammer to hammer it into the box.
- We assemble the parts in reverse order.
Let's start replacing
Before starting any replacement work, we will need to prepare everything, not forgetting what the safety instructions say:
- You need to secure the car, to do this, engage fourth gear and tighten the handbrake
- Then you need to install wheel chocks (shoes) under the rear wheels; if you do not have them, use wooden blocks of a similar shape
- We remove the protective cap from the wheel disk, then unscrew the hub nut, for this it is better to use an extension in the form of a tube or a pry bar to make it easier to unscrew
- After moving the hub nut from a dead center, we proceed to unscrew the bolts that secure the wheel
- Using a jack, we hang up the wheel on which we are going to change the CV joint.
We tear off the hub nut, then the wheel bolts and you can hang the wheel on a jack
- Raise the car, place wooden blocks and remove the wheel
- Then we unscrew the two bolts that secure our lower ball joint for the steering knuckle
Unscrew the bolts securing the lower ball joint
- Now turn the steering wheel as much as possible in the direction opposite to the CV joint being replaced
- We need to pull our steering knuckle together with the strut, and then remove the splined end of the CV joint from the hub
- Then remove the inner CV joint connected to the gearbox using a pry bar for this purpose
- We clamp the shaft in a vice, then remove the clamps from the inner, then from the outer hinge
- We turn the anthers inside out, if we find any breaks or cracks, we simply cut them off with a knife so as not to waste time on removal
- Now we knock the CV joint off the shaft; a hammer and a wooden or bronze adapter are suitable for such a procedure
- We assemble the hinge in the reverse order; during the assembly process we recommend replacing the old hub nut, and after tightening it, do not forget to lock its edge to avoid unscrewing
- When installing the inner CV joint, remember the plastic plug, it is installed at the end of the shaft
- And before installing the CV joint, you need to take care of the need to fill the “grenades” with lubricant
- We install the retaining ring (certainly new) on the inner CV joint before installing the assembled mechanism on the car
- And after installing the drive in the box, it must be inserted into the floor of the axial gear until it is completely fixed
- To do this, use light taps with a hammer through a wooden adapter, along the perimeter of the axis of our shaft
That's it, you can wash your hands and be sure that replacing a VAZ 2115 grenade yourself is a completely doable task, it is only important to follow the instructions and then the repair will be successful. All that remains is to avoid surprises and to clarify unclear points, watch the video on this topic
Replacement
It is better to change a grenade yourself with an assistant.
- remove the wheel, remove the wheel bolts and the hub nut washer;
- unscrew the ball from the steering knuckle;
- pull out the splined end of the outer CV joint;
- pull out the drive with the internal CV joint from the gearbox;
- if you plan to remove both drives, remove the internal grenade from the drive and insert it into the gearbox so that the differential does not move after removing the second drive;
- remove or cut off the anthers, thoroughly clean all hinges with a special liquid or just gasoline;
- when filling the CV joint, use a special lubricant suitable for these purposes; ordinary lithol does not have the required temperature characteristics;
- the retaining rings of each CV joint and the hub nut must be replaced;
- The inner CV joints are inserted into the gearbox until they are completely fixed; when adjusting, you can use a hammer with a wooden spacer.
It is quite possible to diagnose and replace a CV joint with your own hands. This does not require sophisticated car mechanic skills and engineering knowledge, but it allows you to get in touch with the car, see and feel how it works. Whatever the reason for the crunching sound, you need to check the condition of the grenade as quickly as possible. Delaying this will almost certainly mean bringing the part to the point of complete wear, and timely repairs will allow you to get by with “little loss.”
How to install a new CV joint on a VAZ.
Be sure to follow this sequence for installing new parts:
- Small clamp.
- Grenade boot.
- Large clamp.
- Retaining ring.
- The CV joint itself.
First, we clean the drive shaft from dust, dirt and old grease. Most CV joints come with lubricant, a boot, two clamps and sometimes a new hub nut. If suddenly there is no lubricant in the kit, it is better to use graphite lubricant, and if it is not available, then simple lithol. First of all, we put on a small collar. Then the boot (it should go behind the limiting washer) and a large clamp. Then we put a retaining ring on the drive shaft. Now open the tube of lubricant and completely squeeze it into the grenade. Now it's time to put the CV joint on the drive. Because of the locking ring, it will be difficult to insert the drive into the grenade, so we take a hammer and lightly, trying not to damage the thread, press the grenade into place. Now you need to put the boot on the CV joint and tighten the clamps. Assembly occurs in reverse disassembly sequence, but there is one nuance! Do not overtighten the hub nut! This may cause the bearing to hum. The hub nut must be tightened with a force of 225.0–250.0 N*m. Of course, few people have a torque wrench. So, tighten the nut tightly, but not with all your might. In theory, a force of a maximum of 25 kg will need to be applied to a meter-long knob. But, the extension pipe will spring back under such force, so how can you describe it exactly? But obviously there is no need to jump with weight.
How to replace a VAZ-2115 CV joint
Interruptions in work are a signal for comprehensive diagnostics, but somehow everything is not on the way to the car service, and it would be nice not to forget, but it is forgotten. You have to take a risk, postponing a trip to a car service center until later, although it is known that a car in a faulty condition is dangerous to the life and health of the driver himself and the people around him.
Driving carefully is perhaps the most important thing if any problem makes itself felt. Not everyone has the useful skill of self-diagnosis.
Negative emotions in connection with a car breakdown are a natural reaction. It’s still not worth following their lead. Wear and tear is inevitable
Constant care, attention, and careful attitude will allow you to delay this moment and drive more kilometers. A well-maintained car is a source of positive emotions, regardless of the brand.
Replacing the inner and outer CV joints on a VAZ 2114
Knocks in the chassis are a frequent companion in life for VAZ 2114 owners. Many elements that can cause knocking, bad roads, and low-quality parts can cause extraneous noise in the suspension. A common source of the problem is the angular velocity distributor, or CV joint (grenade). The process of replacing a part is simple, so you can change it yourself. The question is often asked which CV joint for the VAZ 2114 is better: regular or tripoid. Among the most common arguments: tripoid is more reliable, but it hums and vibrates at high speeds. The regular one is less reliable, but the car handles better at high speed. However, you can find opposing opinions and arguments on this matter.
There is no clear answer which type is better. Operation in harsh conditions showed that there is no fundamental difference in driving sensations and reliability. The main thing is to buy a high-quality grenade made of well-hardened metal, install it correctly and monitor the safety of the anthers.
Scheme for disassembling the VAZ 2114 CV joint
Causes of malfunction
Among the main causes of CV joint failure:
- low quality metal and lubricant;
- insufficient amount of lubricant;
- rupture of the boot, entry of dirt.
The CV joint is a moving element, so it heats up when moving. A lack of lubricant or its lack of the necessary properties leads to wear of the hinges and the appearance of extraneous sounds. Due to the rupture of the boot, dirt gets into the grenade, solid particles harm the moving elements.
Fault diagnosis
The VAZ 2114 has 2 external and 2 internal CV joints. First you need to determine which one is knocking. The optimal test would be on a suspension diagnostic stand. If this is not possible, diagnosis by ear is possible.
Two signs indicate a grenade malfunction in a VAZ 2114:
- the sound resembles a crunch;
- It usually appears when turning.
The simplest and most accurate way to do a garage check is as follows:
- Place the car on a flat surface;
- Turn the wheels to one side (to the middle position or a little further);
- Drive off with medium speed. It is worth remembering that starting too smoothly may not reveal a crunch due to insufficient load on the CV joint, and starting too abruptly may lead to the drive flying out of the wheel.
- Repeat the operation by turning the steering wheel in the other direction. The appearance of a crunch indicates a malfunction of the outer CV joint on the side in which the steering wheel is turned.
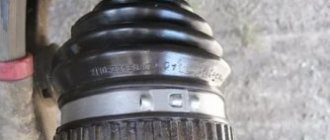
Visual detection of ruptured anthers will also be a sign of a CV joint failure. If you discover a damaged protection for any grenade, it must be immediately removed, disassembled and cleaned. If there is enough grease and there is no significant wear on the hinges yet, it is enough to replace the boot and fill it with new grease. If the wear of the balls is obvious, it is better to change the grenade.
CV joint boot VAZ 2114 with a defect
It is more difficult to diagnose a malfunction of the internal grenade on a VAZ 2114. If it malfunctions, it crunches when starting off in a straight direction, and not when turning. But the same symptoms, for example, include play in the steering rack or wear on the engine mounts.
Sometimes the problem can be diagnosed from the pit by tugging on the drive from the gearbox side: strong play or the appearance of extraneous sounds indicate that the internal CV joint should be replaced.
Replacement
It is better to change a grenade yourself with an assistant.
Algorithm:
- remove the wheel, remove the wheel bolts and the hub nut washer;
- unscrew the ball from the steering knuckle;
- pull out the splined end of the outer CV joint;
- pull out the drive with the internal CV joint from the gearbox;
- if you plan to remove both drives, remove the internal grenade from the drive and insert it into the gearbox so that the differential does not move after removing the second drive;
- remove or cut off the anthers, thoroughly clean all hinges with a special liquid or just gasoline;
- when filling the CV joint, use a special lubricant suitable for these purposes; ordinary lithol does not have the required temperature characteristics;
- the retaining rings of each CV joint and the hub nut must be replaced;
- The inner CV joints are inserted into the gearbox until they are completely fixed; when adjusting, you can use a hammer with a wooden spacer.
It is quite possible to diagnose and replace a CV joint with your own hands. This does not require sophisticated car mechanic skills and engineering knowledge, but it allows you to get in touch with the car, see and feel how it works. Whatever the reason for the crunching sound, you need to check the condition of the grenade as quickly as possible. Delaying this will almost certainly mean bringing the part to the point of complete wear, and timely repairs will allow you to get by with “little loss.”
Replacing the CV joint boot - repair features
Now let's look at how to change the CV joint boot and forget about the problem for a long time. The algorithm of actions is as follows:
1. Put the car on the handbrake, engage first gear and additionally secure the wheels using special “shoes” (stops).
2. Loosen the nuts on the front wheel a little, remove the hub cap in the center of the wheel and make a few turns of the hub fastening nut.
3. Raise the car with a jack and place it on a wooden or some other stand (this will be more reliable).
Attention! When lifting your car on a jack, do not forget about safety precautions.
4. Tighten the mounting bolts on the wheel and remove it.
5. Unscrew the hub nut and remove it with the washer.
6. Remove the pair of bolts that secure the ball joint to the steering cam.
7. Grasp the counter with both hands and pull it toward you. This will allow you to remove the drive from the spline joint.
8. Pull out the internal element of the gearbox drive. Be very careful here. To prevent transmission oil from leaking from the “box,” it is advisable to immediately close the hole.
In addition, the drives must be removed one by one. If you do this work at the same time, then there is a high probability of mixing the differential gears. In this case, it will be very difficult to put everything back in place.
9. Remove the clamps that are installed on the boot. This can be done using a regular screwdriver.
10. Take a hammer and use it to carefully tap the CV joint race. In this way you can gradually displace it from the shaft.
11. Pull off the old boot.
12. Remove old grease from the hinge. This can be done using regular diesel fuel, gasoline or any other special composition.
13. Put on a new boot. Be sure to put new grease in it before installation.
14. Place the joint on the shaft and use a hammer to push it into place.
15. Pull the dust cover and secure it with special clamps.
16. Place the CV joint in the box until it clicks. If you can’t do this manually, then you can work a little with a hammer through the spacer (just without fanaticism, so as not to damage the expensive unit).
17. Install the ball joint and put the washer in place.
18. Screw on the hub nut and tighten it well. To do this, ask an assistant to press the brake pedal in the car.
19. Return the hubcap to the center of the wheel in place.
20. Put on and tighten the wheel, tightening the bolts.
21. Lower the machine to the ground and finally tighten the bolts.
If replacing the CV joint boot is necessary on the other side, then the sequence of actions remains unchanged.
Remember that timely replacement of dust covers is a guarantee of the long life of the car’s expensive and more important CV joints, on the integrity of which your safety directly depends. Good luck on the roads and of course no breakdowns.
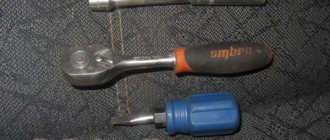
List of tools that may be needed when replacing CV joints
To carry out repair and replacement of CV joints, you will need the following tools and materials:
- hammer,
- punch,
- mount,
- screwdrivers,
- powerful car lock,
- vice,
- wooden spacer,
- gasoline for washing removed components, CV joint-4 lubricant.
Replacing a CV joint on a VAZ 2109 - operating procedure
First, you should remove the handbrake handle and secure the front wheels with a stop. Then you need to unscrew the hub nut while the car is on the ground. Next, you should raise the car and support its front part. The next step is to remove the wheel and wheel hub thrust nut. Next, the tie rod end must be disassembled. Using a special puller, press the finger out of this assembly. Subsequently, you need to unscrew the ball joint mounting bolts. After the steering knuckle with the stand is moved to the side, it is necessary to remove the splined end of the outer CV joint from the wheel hub. Then, in order to squeeze out the CV joint, you need to use a pry bar.
It should be noted that if the repair work affects all CV joints on both sides of the car, then the old part should be installed instead of the removed part, otherwise during assembly you will encounter the fact that the CV joints will not be installed in their designated place.
It should also be noted that if during the operation of your vehicle you could observe oil leaks near the gearbox, then most likely you will have to replace the CV joint seal. The old part should be pulled out with a screwdriver, and the new one should be pressed into this place until it stops.
It should be understood that the entire repair process in this case is not very labor-intensive, just like repairing a steering rack, however, in this case it is necessary to take into account the recommendations of experienced motorists, which state that replacing the inner CV joint, as well as replacing the outer CV joint, should only be done with similar spare parts assembled. In this case, replacing individual elements is not recommended, unless it is possible to replace the inner CV joint boot or other similar components.
After the shaft with CV joints is removed, the following manipulations must be done: the shaft is installed in a vice, after which the cover clamps are removed. Using a drift, the inner CV joint is knocked out. A similar sequence of actions applies to the outer CV joint. But installation on the shaft is done in reverse order.
Here it should be taken into account that the right shaft is longer than the left one
Before final installation, it is necessary to check the presence of the proper amount of lubricant in the CV joints. During assembly, new clamps must be installed, and during the installation process, care should be taken to ensure that no contamination gets inside the CV joint.
Installation of the CV joint in its designated place is carried out using a hammer and a wooden spacer, and the movements should not be sharp or strong. After the CV joint is placed, the CV joint boot should be installed
During the installation process, it is very important to bend the edge of the boot with a screwdriver, thereby equalizing the pressure inside and outside this element
It should also be noted that if the described process seems too labor-intensive to you, you can always contact a car service. Since such a replacement is quite common, it will take very little time for a professional. Another operation that you can do yourself is pressing in the silent block.
Fix the breakdown without the help of a specialist
In order to determine whether it is worth going to a service station or doing it yourself, it would be good to know how to replace a CV joint on a VAZ-2115. What is better - to overestimate your strength or underestimate? Some people like to repair their cars; in the old fashioned way, they don’t trust this activity to anyone; others consider it a relic of past years. Many people used to understand mechanical engineering. Both adults and children wanted to create a robot. Having bought a car, we traditionally explored it with pleasure.
The CV joint is completely changed. So there’s not much to tinker with: you don’t need to take it apart, examine the device, or look for any element. Buying a CV joint, both external and internal, is not a problem. The boot is also easy to find, but that’s not what we’re talking about now.
The algorithm of actions is as follows:
- Secure the vehicle using the parking brake.
- Place locking bars under the rear wheels.
- Remove the protective cap and unscrew the hub nut.
- Loosen the wheel mounting bolts.
- Now the car should be raised with a jack.
- It is necessary to remove the bolts that secure the ball and steering knuckle.
- The drive must be pulled out of the hub; the steering wheel must first be turned to the left.
- Cut off the old boot and remove the CV joint.
- Put on a new CV joint, carefully treating it with lubricant, which will help extend the life of the part.
- Put all the parts back in the reverse order.
The procedure is not complicated. But physical strength is needed here. You will also need ingenuity - only a car mechanic, to whom experienced craftsmen and teachers have revealed their secrets, knows how best to do all this. But if you repair a car for your own pleasure, without knowing absolutely anything about the CV joints and the nuts that hold them together, fantasy and imagination will come in handy, as well as confidence, clarity of movements, good emphasis, and reliable fixation of the car.
Damaging adjacent parts and aggravating the situation is difficult and yet real - we must remember the risks and potential threats. There is a possibility of injury
Caution comes in handy when repairing your car yourself, no matter how simple or complex the procedure. When replacing a CV joint, it is better not to rush, prepare for the fact that the process will take several hours, have time
The replaced CV joint will work properly for a long time if you monitor the road and the condition of the boot.