What you will need to remove the device
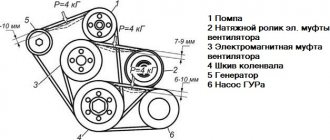
Since the generator is bolted on all sides, it is advisable to carry out all work in a garage with a pit. If there is no hole, then for convenience you can use a jack. The VAZ-2114 generator must be disconnected from all wires. To remove the part itself you will need:
- mount;
- keys at 10, 13, 15, 17, 19;
- knob with cap heads;
- rags.
It’s easier to unscrew hard-to-reach nuts with a wrench, but if you don’t have one, you can get by with wrenches. A rag will be needed to wipe the parts. Moisture often accumulates on the belt, and if you do not plan to replace it, it is better to immediately wipe the part with a rag.
What to choose?
When choosing new protection, it is important to pay attention to the individual characteristics and features of your particular car.
The design of the selected element directly depends on the type of body, the gearbox used, the engine and other parameters. Therefore, when going to an auto parts store, collect all the necessary information.
Sheriff
Based on the experience of VAZ 2114 owners, devices from two brands are excellent for this model.
- Sheriff. Despite the foreign name, it is actually a company from the Russian city of St. Petersburg. To make the protection, the manufacturer uses high-strength steel 2 millimeters thick. The design of the element completely replicates the parameters of the factory device, but has higher reliability and durability. Plus, the Sheriff device is offered with auxiliary wings made of plastic or metal. They allow you to additionally cover the engine space from dirt, dust and other “pests”. Another important advantage of Sheriff devices is two hatches. One is for replacing the filter, and the second is for draining the oil. This will allow you to change the oil or oil filter without removing the protection.
- Titanium. Also a Russian manufacturer that uses hot-rolled steel to produce protection for the VAZ 2114. The thickness of the element can be up to 2.5 millimeters. The popularity of the company is largely due to the fact that for production they use hot rather than cold rolled products. This has a positive effect on the performance characteristics of the part, which are superior to analogues made from cold-rolled steel. Titanium uses stamping, that is, the protection structure is monolithic and not welded. Consequently, we get a durable, reliable design.
We diagnose the timing belt ourselves
If you decide to carry out diagnostics yourself, when disassembling the system you should pay attention to indicators indicating that the timing belt has failed
Check the condition of the teeth on the belt. After removing chemical contaminants such as oil or gasoline particles, inspect the cleaned section and check its tension properties. Pay attention to the presence of antifreeze on the belt. This chemical must not leak
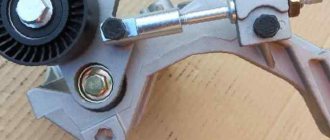
Its presence can cause irreparable damage to the surface of the belt and render it unusable in a short period of time. If a leak is detected, it is recommended to immediately eliminate its cause. Inspect the belt for various chips, cracks, or areas of change in surface structure. Check the stretch value along the entire length. Determine wear and, if possible, replace the tensioner and rollers. Experts recommend that when changing the timing belt, you also replace components in order to ensure stable operation of the system.
If any of the described signs of timing belt failure are detected, the part must be replaced, this will extend the life of the remaining components of the mechanism. It is easy to calculate that the cost of a new battery, which may break, is several times higher than the price of a belt.
Soon, owners who purchased the domestic Lada Kalina model are faced with the question of replacing the belt that drives the on-board power generator. This is equally interesting to owners of both eight and 16-valve versions of the practical “Russian”. Due to the fact that Kalina motors are endowed with different design features, there are differences in replacing the specified consumable component. The service life of a belt is primarily influenced by factors such as the quality of the product itself and the intensity of use of the vehicle. And only after learning many details can you judge when the alternator belt needs to be replaced.
There are quite a lot of handwritten works on the network about replacing the generator assembly belt, but in our material we will try to explain as clearly as possible all the points that interest the owners. This will be clear even to inexperienced owners of their Lada Kalina, since the work will not require special equipment, expensive tools and “gigabytes” of experimental information. All actions can be carried out, as they say, “on your knees in the yard.”
Useful video
You can get additional useful information on this issue from the video below:
Sources:
https://vaz-russia.com/remont-vaz-2113/zamena-remnya-generatora-na-vaz-2113-vaz-2114-vaz-2115.html https://remontvazov.com/remen-generatora-vaz -2114-8-valve
Diagnosis and elimination of alternator belt whistling
Is the alternator belt whistling in your car? - Don't panic. The first thing you need to do is do a little diagnostics. Inspect the belt for obvious damage.
Check if it is well tensioned and if there is any obvious displacement of the pulley line
Pay special attention to the surface of the belt - there should be no liquids on it
After the inspection, you will be able to draw preliminary conclusions and make a decision on further repairs:
If the belt is visually damaged, there are serious cracks on the surface, and the edges are frayed, then you cannot do without replacing the belt. At the same time, buy only original parts for your VAZ model.
Otherwise, after a couple of thousand kilometers you will encounter this problem again. By the way, low-quality Chinese fakes often “whistle” immediately after installation.
Is there obvious contamination on the belt (oil, antifreeze)? – Carefully clean the belt of excess dirt (if possible). If dirt has become embedded in the product and cleaning does not produce visible results, then it is better to replace the alternator belt.
If no external problems are found, move on to the mechanical part. Check tension. To do this, press the belt at the midpoint between the crankshaft and generator pulleys.
The optimal level of deflection is about 6-8 mm. If this parameter turns out to be larger or smaller, adjustment is necessary.
Let us immediately note that for each VAZ model the setup process may be slightly different. We will consider the general case.
Prepare a ratchet handle, a spanner set to “19”, a deep socket set to “17”, and also reserve 15-20 minutes of personal time.
Additional protection
But there are several important recommendations in this regard.
- Do not use low protection, after installation of which the distance from the element to the power unit is less than 3 centimeters. This is due to the fact that the element can sag. Consequently, when hitting a hard object, it will bend and damage the crankcase.
- Additional protection effectively copes with impacts under the floor, but poses a potential danger in frontal collisions. If during such an impact the usual protection falls from its mounts and the engine also ends up on the ground, then the additional one helps ensure that the engine remains on it and is directed into the cabin. This could result in serious injury to all people sitting in front.
- If there are good roads in your city and if you live there regularly, there is no point in additional protection. It is designed for difficult road conditions.
- Additional protection for the engine crankcase is relevant for a city with more or less good roads if you lower the car. Being close to the ground, a simple collision with a stone can lead first to damage to the sump, and then to breakdown of the engine itself.
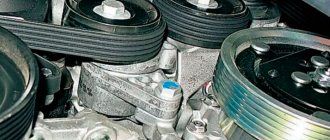
LOCATION
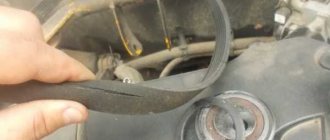
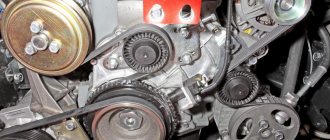
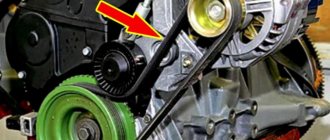
Finding the Alternator belt in a VAZ 2114 is not difficult; when you open the hood, it is immediately visible. There are 2 criteria by which you can easily see it - firstly, it differs from all other belts in that one of its sides is toothed, and secondly, it connects not only the crankshaft and camshaft, but also passes through several small auxiliary parts . If you still don’t understand where it is, let’s first find the generator itself, it is located to the left of the car engine, not far from the right headlight, on the right side of the passenger compartment - accordingly, the belt is located on the generator itself (logically).
Also, before talking about changing, it is necessary to mention that in any case, no matter how carefully the car is operated, and no matter how often you drive it, the alternator belt will begin to deteriorate
Perhaps it will slide, or maybe it will be eaten away, it doesn’t matter, the main thing is that in any case it will become unusable. Therefore, its condition must be monitored very carefully, because no one wants it to break on a long journey
Removal and installation
First of all, you need to remove all unnecessary things, make room for work: it’s good to remove the wheel on the left, the fender and crankcase protection, although many people remove the belt without such unnecessary movements. VAZ is spacious, there is room to turn around under the hood.
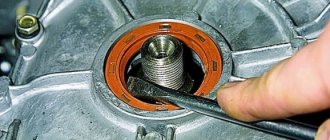
- We start by relieving the belt tension on the generator (to do this, loosen the nut that secures the belt tensioner to the generator).
- It is important to remember (draw, photograph) how the belt is located on the generator, what it is attached to, and how it lies. We will install a new one in the image and likeness.
Installing the alternator belt:
- We remember that we go to the store with the old one and buy the same new one. Also, we take out our sketches and remember how the previous non-working belt lay, what it clung to. The new one must stand in strict identity.
- There is no special installation scheme, everything is already transparent: just install the new one in the same way as the old one, observing all its hooks to the elements of the unit.
- When installed, check how the belt hangs: one or one and a half centimeters is considered the norm.
- Next, there is the process of tensioning the belt on the generator, which is, in principle, similar in complexity to the replacement process (but that’s a different story).
Is it possible to continue driving if it is torn?
In principle, the car will continue to move without the alternator belt. But you won’t be able to go far in such a car. Indeed, in this case, all electrical equipment is powered by a battery, and its reserves, even if it is super-powerful, will not last long.
However, there are engines in which this part drives not only the generator rotor, but also the pump. The operation of such motors in the event of a break is strictly prohibited, since stopping the pump stops the water circulation in the engine cooling system, and this will lead to its overheating and failure.
An overheated engine can seize, have bent valve pins and even damaged pistons. In any case, it will have to be overhauled.
Originals, analogues, prices, articles
| Catalog item | Serial number | Price | |
| KATEK ELD-A-2114-90A (original) | BOSCH (9402.3701) (original) | From 3500 – 4000 | |
| 9402.3701 | FINWHALE 6РК-698-05 | 6202 2RS / 180202 | From 3500 – 4000 |
| KZATE 9427.3749 | Electromash 977.3701 | SKL 2114-6202 2RS | From 3500 – 4000 |
| 2114-3701010 (HORT) | KATEK 2114-3701010 | Contitech 6PK-1115 | From 3500 – 4000 |
| PRAMO-Electro 2114-3701984 | PRAMO- 3701953 | PRAMO-Electro 2114-3701747 | From 3500 – 4000 |
| *prices are as of July 2022 |
Operating principle of the electrical energy source
There are 8 coils installed in the GU housing. The material is copper, the connection method is “star”. The rotor is a steel shaft, on the back surface of which magnetic circuits are pressed, between which a winding is installed.
How to Tension the Alternator Belt of a VAZ 2107 Injector
How to replace an alternator
? VAZ- 2107 injector
The belt is necessary to connect the alternator and crankshaft pulleys, as well as on classic models with front wheel drive; the kit also includes a water pump pulley.
Replacing a broken or strained alternator belt in a VAZ-2107
not so difficult for an injection engine that has an additional carburetor.
To do this you will need:
- a mounting knife, which can be replaced with a crowbar or a strong flat stick;
- Keys for 17 and 19 year olds.
This is enough for repair work. Of course, if you have at least an idea of where this belt is.
If the VAZ-2107 has an alternator belt
In front of the car, under the battery, which must be removed when replacing a torn element.
The belt pulleys are quite difficult to access but must be removed.
In what situations is replacement required?
Element wear is characterized by signs such as cracks or tearing blades, washed out teeth, and jagged edges.
If you ignore such a poor condition of a very important element, it will overheat you when the engine overheats and boils, when the battery is running autonomously, which will lead to its rapid failure
If there is heavy wear, the strap will also show signs of wear. starts to whistle, especially at low speeds. Another reason for a whistling tape may be moisture getting into its fabric, which is associated with wear and tear on the cooling system connections. antifreeze begins to leak.
Some belts. oak. Hisses when the car starts in frosty weather and after warming up the sound disappears. The slight stretch is a whoosh, but in this case it's easy to draw.
to tighten the alternator belt
car Vas
classic model.
Replacing the VAZ 2107 alternator belt
We have been added to the subscription group, leave comments.
To remove the belt
, you will need access to not only the top of the car, but also the bottom. Therefore, if the crankcase is installed, it will need to be removed. Some technicians make it easier to access the belt and remove the battery.
Once you have access to the product you want, check it out. If there is no visible damage to the canvas, just check the tension, it may be loose. This is easy to do, just press the belt with your fingers, simulating about 10kg of pressure, and from the deflection distance you can determine whether the item is in an acceptable tone. The maximum norms in a narrow space are 10-15 mm, and in those where the space between the pulleys is wider. 12-17 mm.
To remove a belt from a pulley, you only need to completely replace it, but tensioning does not require this. At the bottom of the machine, unscrew the nut that holds the generator
from the bottom turn. Unscrew the top mounting nut of the same device a few turns in the engine compartment. Not at all
Don't remove the clasp completely, just loosen it until it turns freely.
Requires a small push to remove the alternator
engine, but do not do this with bare hands. Then remove the belt. Start with the top pulley and then the others. Only in this order will it be easy to pull out the item. On attachment models, the vehicle will also need to remove the crankshaft position sensor or it will not allow the belt to be removed.
To adjust the blade tension, place a previously saved knife or flat piece of crowbar between the engine and the generator using a lever. Thus, while moving the generator, without releasing the blade and holding it in this position, tighten the nuts of the upper and lower holders, after which you can release the “lever”. It will be easier if you help someone with this.
After completing the manipulation, check the belt tension in accordance with the described method.
To get a new belt
, you need to know some of the nuances of this process. For example, one of the most important points: you must wear the belt starting with the crankshaft pulley, then on the alternator pulley and only at the end. on the pump.
With the help of video tutorials you can understand more and more clearly how to change or tighten the alternator belt
if you are planning to do it yourself for the first time.
There is a special offer on our website. You can get a free consultation with our corporate lawyer by simply submitting your question in the form below.
You also need to check
On a VAZ 2114, replacing the alternator belt takes no more than half an hour, but you also need to check how the new spare part will work. Part.
— turn on the ignition and start the fourteenth.
— turn on all the electronics that are in the car.
— look at the reaction of the belt: it should not whistle or make noise at maximum load on the generator.
- everything you included should work!
If you install something incorrectly, it can have serious consequences: incorrect operation of the components and those parts on which it is attached, and even disruption of the smooth operation of the engine!
Simple zap. part may whistle - this means that the voltage drop is not well adjusted (for this you need to check the condition of the generator).
A lot of things in a car depend on a properly functioning unit, including a properly functioning alternator belt. You can check your generator quickly, without putting in titanic work and enormous experience:
You need a tester and a faithful friend who will help you press your slippers into the floor while you carry out the measuring work:
- We turned on the ignition - checked the electronics, started it - checked the instrument panel.
- When the engine warms up, turn on everything you can at fourteenth gear: high beams, heater to maximum, and so on.
- The tester is set to voltmeter mode, a friend revs in the range from 3000 to 3500 rpm, you measure, if the device is working properly, the tester will produce a minimum of 13 volts. If it is less, there is a possibility that the belt is loosely tensioned (or there are other breakdowns in the generator circuit or itself, which is not new).
It may make noise due to improper tension (the noise is similar to squeaking).
Naturally, you need to maintain a golden mean in tensioning the belt on the unit. A good indicator is considered to be one that falls within the deflection interval from a centimeter to one and a half, as mentioned above, but this is not for all types of generator, but only for model 37.3701, a smaller range interval - from six millimeters to a centimeter - is typical for the generator model 9402.3701 (the test is passed if you apply approximately ten kilograms of force).
Fighting methods
If you are thinking about fighting saffron milk caps on your own vehicle, you need to know about the existing options.
Essentially, all available methods are divided into 2 main categories.
- Mechanical method. This is a set of special measures, the task of which is to clean damaged surfaces, perform priming, puttying and painting of the vehicle body;
- Chemical method. Here we are talking about a slightly different approach. The method is based on special converters and kits aimed at treating damaged areas with anti-corrosion agents.
There is a lot of debate and talk regarding these two methods.
Some adhere exclusively to the mechanical method of processing. Others are sure that there is nothing better than chemical control of saffron milk caps.
In fact, both methods are really good. Moreover, each of them is relevant for certain situations.
It is only important to understand which category your situation falls into.
- Mechanical restoration methods are relevant in situations where corrosion has managed to penetrate quite deeply into the metal elements of the machine. That is, you will have to completely remove all traces, clean the surface and get to clean, intact metal. Here you will need the appropriate tools and devices;
- Chemical options are best used when it is not possible to use the mechanical method. When the area is treated, the rust turns into foam. To remove it, just apply water pressure. Some products help the corrosion harden, after which the area can simply be covered with a layer of paint.
Before choosing one option or another, be sure to study the nature of the damage and its depth. Simple chemistry is not always enough to cope with the problem.
Practice clearly shows that in case of serious metal defects, the use of chemicals gives only a temporary effect, after which rust appears again. Therefore, the optimal solution would be to use a mechanical processing method.
Repair of generator on VAZ 2104
In fact, repairing a car generator is not the most difficult task.
It is important to properly remove and disassemble the device, and replacing burnt out or worn parts is done intuitively. That’s why car enthusiasts say that repair work on the G-222 is quite feasible even for a driver who has never disassembled generators
Removing the generator from the car
To work, you will need to prepare a minimum set of tools in advance:
- open-end wrench 10;
- open-end wrench 17;
- open-end wrench 19.
After the car has cooled down, you can begin dismantling work. The procedure is relatively simple and does not require specific knowledge in the field of electrical equipment:
- Remove the wheel from the right front side of the vehicle.
- Make sure the car is securely on the jack.
- Climb up on the right side and find the generator housing.
- Loosen the lower mounting nut, but do not unscrew it yet.
- Loosen the nut on the stud from the top side, also without unscrewing it yet.
- After this, you can slide the generator housing onto the engine - this way the belt is loosened and can be removed from the pulley without damage.
- Disconnect the wire coming from the generator terminal.
- Disconnect the wiring from the winding.
- Remove the wire from the brushes.
- Unscrew the lower and upper nuts.
- Pull the generator towards you and remove it from the engine bracket.
Video: dismantling instructions
The device can be very dirty, so it is recommended to wipe the case before disassembling it. After all, during disassembly, dust can get on internal parts and lead to a short circuit.
How to disassemble a generator
The next stage of work requires changing tools:
- open-end wrench 19;
- socket wrench 19;
- ratchet (you can add an extension);
- head at 8;
- head at 10;
- small hammer.
Before disassembling the generator housing, you must also prepare containers in which you will put small parts (nuts, washers, screws). You can even sign from which mechanism certain parts were removed, so that later it will be easier to put the generator back together:
- The first step is to unscrew the four nuts on the back cover.
- Next, remove the pulley; to do this, you will need to unscrew the nut securing it.
- Afterwards the body can be divided into two parts. One part comes out easily from the other. As a result, the generator breaks up into a stator with a winding and a rotor.
- Remove the pulley from the rotor - it usually comes out easily. If you have any difficulties, you can tap it with a hammer.
- Remove the rotor and bearings from the housing.
- Disassemble the stator into parts, being careful not to touch the winding.
Video: instructions for disassembling the device
How to repair a generator
After disassembling the device, you will need to carefully inspect every part. The part needs to be replaced if:
- it is covered with a coating of burning and soot;
- heavy wear is visible;
- there are cracks and nicks on the surface;
- There is a deformation in appearance.
Accordingly, in order to carry out a full repair, it is necessary to replace the failed generator mechanisms with new ones. It is now quite difficult to find suitable elements on the VAZ 2104, so it is worth immediately assessing the feasibility of repair work. Maybe it’s easier to buy an original generator than to waste time searching for the necessary spare parts?
In most cases, it is advisable to replace rather than repair the generator.
If you have chosen to repair the device, you will need to make sure that all components are identical to the standard elements. Even a slight difference between a part and the original one can lead to incorrect operation of the generator and even to its breakdown.
Replace the mechanisms while assembling the device in the reverse order.
WHAT IS A GENERATOR?
The VAZ 2114 generator can be imagined as an electric three-phase alternating current machine. It has a built-in rectifier unit that converts alternating current to direct current. The device consists of the following parts:
- Front and back cover made of aluminum alloy. Each of them has slots for installing bearings. On the back cover body there is a battery connection terminal and a connector for supplying voltage to the excitation winding. There is also a capacitor installed on the back cover, which suppresses radio interference; there is a place for installing and fastening the brush assembly;
- Stator core cylinder made of transformer iron. Inside it there are grooves for laying the power windings of the generator. They have leads for connection to the rectifier block. Both covers are attached to the stator with four bolts;
- Excitation winding on the rotor shaft. It is connected with its leads to slip rings made of copper, which are installed on the same shaft. The front of the shaft has a keyway to accommodate the drive pulley;
- The brushes of the VAZ 2114 generator are a non-separable unit combined with an electronic relay controller. The relay in a metal case is riveted to the brush holder;
- A block of power and additional diodes is attached to the back cover from the inside. It contains six power and three additional diodes. To cool semiconductor devices, they are mounted on horseshoe-shaped aluminum alloy plates.
Generator set design
SOME OF ITS TECHNICAL CHARACTERISTICS
The generating set provides the following parameters:
- The excitation winding is powered by an adjustable voltage from 13.2V to 14.7V;
- The current strength of the voltage generated by the generator is 80 A;
- The belt deflection should not exceed 8 mm with a load of 10 kg.
The generator is installed on the engine on its left side in the direction of travel of the machine. The rotor rotates right, which it receives using a drive belt from the engine crankshaft.
We change the alternator belt on an 8-valve Lada Kalina with our own hands: prices and belt size
Determining whether a belt needs to be changed is quite difficult, but some signs may indicate this:
- when the engine is running, the headlights become weak and dim;
- extraneous noises, whistling when starting the car.;
- After a mileage of 30 - 50 thousand on Kalina, it is worth checking the serviceability of the belt. It may have cracks, broken teeth, cuts, oiling or delamination of rubber, which can lead to belt breakage. In this case, it is better to replace it.
What is it needed for?
As mentioned above, any vehicle is equipped with such an important device as a generator. If it fails, the operation of the vehicle will be impossible.
Therefore, special attention should be paid to the performance of all elements of the device, be it a Lada Kalina with a 16- or 8-cl. engine, with or without air conditioning
What is the component size? How is the roller strap adjusted and replaced? How to tighten up? You can find out the answers to these questions in the article.
Car Lada Kalina tuning
Before answering questions that interest Lad Kalin owners, you should understand why this component is needed. Not every motorist knows what role he plays in the functioning of the car.
In modern cars, this belt is the only element that allows you to transmit crankshaft rotation to the generator. When the crankshaft transmits rotation to the device pulley, energy appears in the vehicle's electrical network, thanks to which all electrical equipment operates.
Belt and roller selection
Several types of belts are used on Lada Kalina cars.
The type of element depends on the engine model and its equipment:
- The motor version without air conditioning and tensioner has a belt length of 823 mm. Gates (number 6PK823) is standardly used, but such a part is not supplied as spare parts. To replace it, a slightly different strap is used - Gates 6PK823SF.
- The version of the unit with a belt tensioner, but without air conditioning is 882-884 mm. Standard part manufactured by Gates (article 6PK882). In addition to it, straps are often used - Finwhale BP6883, Dayco 6PK888 or the cheapest Balakovo belt BRT882.
- Engine with air conditioning and belt tensioner (motor 11183) - 1018 mm. Standard element manufactured by Gates (number 6PK1018). Alternative options are Dayco 6PK1018 or Continental 6PK1015.
- The 21127 16-valve engine with air conditioning and tensioner uses a 995 mm belt. The Gates part (6PK995) is supplied from the factory, and it is also used as a spare.
Belt selection and price
If the generator design has a tensioner, then the belt length is 883 mm. In the vast majority of cases, Kalina has 8 valves. If the generator is like on Grant, the length is 823mm.
When choosing a manufacturer, you should take into account that the official supplier of these belts for AvtoVAZ is GATES, so preference should be given to its products. Belts are also produced by BTR (lots of bad reviews), Continental, Finwhale, and ANDYCAR. It is better to buy Dayco 825 (manufacturer GATES), elastic belts are marked Poly-V, if not, then the belt is rigid. The price of belts is approximately from 500 to 1000 rubles.
Prices for alternator belts vary on average from 300 to 400 rubles, depending on the manufacturer, which is not affordable.
When is it time to change?
On Lada Kalina cars, the manufacturer does not regulate the replacement of this part. However, its failure is a common problem. In particular, we are talking about Lada Kalina cars. This applies to both 16-cl and 8-cl engines.
This is what a deformed element of a Kalina generator with an 8-cyl internal combustion engine looks like
Therefore, let’s look at the signs that indicate that the belt may fail in the near future:
- Whistle when moving. As a rule, this whistle appears when the electrical appliances of the vehicle begin to load. For example, if you start the car, and when you press the gas, a loud whistle is heard from the engine compartment, this indicates that the belt is loose. In this case, it must be tightened using a tensioner or replaced.
- Cracks on the strap. If you open the hood, look at the belt and see cracks on it, then you know that it’s time to change the element. Neither tensioning nor adjusting the rollers will help here. The component can be tightened, but this will not be enough for a long time. The only option left is replacement.
- Deformation. As in the previous case, neither tightening the tensioner nor adjusting the rollers will give much effect. You just need to change the element.
- Noise when the engine is running. If the element has already served its service life, this can be understood by the noise that appears when the motor is running. For example, some Lad Kalin car owners report loud knocking and even impacts when the engine is running.
Price issue
Despite the fact that replacement is a simple spare part. Generator parts are not a troublesome task, and can be done by mere mortals who want to figure it out; many car owners take their car to a service center. How much does it cost to change an alternator belt is a frequently asked question; the price ranges from 200 to 400 rubles, almost identically coinciding with the price of the spare part for the car itself. Interesting fact: almost all work on replacing, repairing or installing small parts of a VAZ costs the price of these parts.
You don’t have to wait until the strap wears itself out, bursts, or something else happens to it. For example, if you have decent mileage or spare. some cost more than 2 years. In general, a sudden breakdown of the generator does not bode well, especially if you are stuck on the highway. So, timely tech. Inspection and self-diagnosis of the machine’s condition is the best prevention of such dangerous moments.
Source
Checking the tension of the generator belt
Each make and model of car has its own optimal alternator belt tension values. In the repair and operating instructions for a particular machine you can find information on what value to use to set the correct tension. There are plenty of manuals in electronic form, for those who don’t have the book.
Not only the operation of the generator, but also additional equipment, for example, air conditioning, power steering, etc., depends on the tension of the belt.
Why does the belt whistle?
Many people have probably heard the sound coming from under the hood of a car. This is exactly the same sound that the generator belt makes when slipping along the grooves of the pulleys. Some cars will notify the vehicle with signals on the instrument panel, for example, a low battery light may come on.
From time to time you need to open the hood and inspect the condition of the engine and other structural elements in the car body. By visual inspection and by touch, if the belt is hanging or overtightened, depending on the make and model of the car, you need to correctly tension the belt yourself using an adjusting bar or an adjusting bolt.
How to tighten the belt with the adjusting bar
The unit design with a bar is an outdated model. Old VAZ cars have such a bar for tensioning the belt.
In this case, the generator is secured using an arc-shaped strip. This bar has a slot, allowing it to move relative to the bolt.
Sequencing:
- Loosen the nut.
- Using a pry bar or something like that, we move the generator.
- After setting the desired tension, tighten the nut and the arc-shaped bar is fixed.
- After tightening the nut, check the tension again.
How to tension a belt with an adjusting bolt
This is the most common design for mounting the generator and belt tension. The work sequence is as follows:
- Loosen the upper and lower fastenings of the generator.
- By unscrewing or tightening the adjusting bolt, we move the generator and set the desired belt tension.
- Tighten the generator mounting bolts.
- Check the tension again.
How to tension a belt with an adjusting roller
Some designs have a special roller for adjusting tension. It makes adjustments faster.
As an example, let's look at how to tighten the belt on a Lada Priora with air conditioning and power steering.
Tools:
- An open-end or socket wrench size 17 is required to loosen and tighten the roller.
- Special key. Who has seen how the separator cones are unscrewed to separate milk from sour cream, the key is exactly the same in shape. The distance between the teeth of a special curved key is 18 mm.
First, use a 17mm wrench to unscrew the bolt and loosen the roller. Then use a special wrench to loosen or tighten the belt. Then we fix the video.
After adjusting the tension of the generator belt, you need to start the engine, turn on the car electronics and observe whether there is a whistling sound from the belt, whether all devices are working (is there enough current being generated by the generator).
SIGNS OF GENERATOR SET PROBLEMS
- The charging indicator lamp lights up constantly or flashes while the engine is running;
The battery is not charging
- Undercharging or overcharging of the battery;
- Poor headlights when the engine is running, unsatisfactory performance of wipers and other consumers of electricity;
- A strong increase in the brightness of the headlights, boiling of the electrolyte in the battery;
- Presence of extraneous noise from the generator set.
- Low on-board voltage;
- Lack of battery charging;
- Charging voltage surges.
MALFUNCTIONS OF THE BRUSH UNIT
This unit may have problems with the electronic regulator and brushes. Replacing the brushes of the VAZ 2115 generator can be done without removing it from the engine. It is impossible to check this unit without removing it from the generator, so if there is such an opportunity, you can simply change the brushes. You can check its operation; there is an adjustable power supply and a control light. Connect the power to the “+” and “-” of the regulator, and the light bulb to the brush. It should glow, and when the input voltage increases to 15-16 volts, the light goes out. If this does not happen, then the tablet needs to be replaced. Let's look at the signs of brush wear. This will be indicated by:
Brushes in a free state must have a length of at least 0.5 cm. If the length is shorter, they must be completely replaced. Check the condition of the brushes and their free movement in the grooves. If there is a hang, it can be eliminated by dropping a drop of oil into the grooves. Check the slip rings and their surface for wear. If present, you need to sand the surface of the rings with fine sandpaper. When the brushes of the VAZ 2114 generator are replaced, performance will be restored in a few minutes, after grinding in the brushes and slip rings.
Brush unit
DIODE BRIDGE AND ITS PROBLEMS
Signs of a faulty generator diode bridge may be as follows:
- Complete lack of charging;
- The charging voltage is significantly higher than normal.
All this can cause great negative consequences for the entire electrical system of the car. Repairing a generator with your own hands is possible, but only if you have experience and equipment for working with electrical equipment. For example, signs of a broken diode bridge have been identified and require repair.
Most often, in this case, a breakdown of the “horseshoe” power diodes occurs. Replacing them is not very difficult, the problem is that they are not available in spare parts. You can look for repairmen who repair electrical equipment of cars. It will be easier and cheaper to purchase a new unit with a diode bridge and install it to replace the failed one. The diode bridge is replaced in the following order:
- Mount a contact bolt with insulating bushings and nuts in the block and tighten it;
- Correct and reinstall the leads of the stator windings and screw in the nuts at their connection points;
- Replace the bolts securing the rectifier unit and tighten them;
- I install the brush assembly with the regulator in its place, and secure it with screws on the back cover body;
- Install a protective plastic casing and secure it with three clips.