The dashboard in any car is one of the main components of the electrical circuit, used to monitor the condition of the main units. Since the tidy is practically the only component with which the driver most often visually interacts, many car owners are thinking about improving it. How to tune the VAZ 2109 dashboard and what is the pinout of the control panel, read below.
Types of panels
Instrument panels on the VAZ 2109 are of at least three types:
- Low panel;
- High panel;
- Electronic panel on nines with Europanel.
On versions with a low panel, failure of the entire panel is extremely rare. This is due to the fact that here the speedometer and econometer are equipped with mechanical drives. Therefore, it is unlikely that they will fail along with the electrical component.
Why doesn't it light up?
- First, remove the cover of the mounting block and make sure that the fuse is intact. The fuse markings are located on the inner surface of the cover. You should look for fuse F16 or F5, depending on the year of manufacture of your VAZ 2109.
- If the fuse is intact, be sure to check whether the contacts of the fuse you are looking for have not oxidized. It is not uncommon for shields to fail due to broken contact.
- Check if there is power to the dashboard. To do this, you will need a warning light and the ignition on. Disconnect connector X4 in the mounting block and check for voltage at pin 3. The disadvantage of the VAZ 2109 design is that when it rains, the mounting block immediately becomes wet. This causes oxidation of the contacts in the pads, which causes the electrics to stop working. Sometimes not only the contact is oxidized, but also the board of the Nine mounting block.
If none of the above actions yielded results, you will have to be disappointed. After all, now you need to remove the dashboard and check the condition of the wiring, contacts, and negative connections. Here it is better to trust a professional electrician or set aside a whole day to troubleshoot problems yourself. There is no need to rush here.
Instructions for installing a new panel
If you want to replace a low tidy with a more advanced, high one, then in any case you will have to change the entire center console.
Removal and installation instructions look like this:
- First, you need to turn off the power to the on-board network; to do this, disconnect the battery, remove the steering wheel, as well as the steering column switches and the ignition switch. You will also need to disconnect the ignition relay.
- Next, unscrew the two bolts that secure the control panel visor and remove it.
- Now you need to compress the spring and remove the shield itself from the center console. Disconnect all wires and connectors connected to the dash, including the speedometer cable, the econometer hose, and the odometer cable. After this, the tidy can be moved to the side.
- Then remove the regulator from the hydrocorrector of the optics light, the tidy light switch knob, as well as the interior heater and fan regulators. To do this, pull the controls towards you.
- After this, unscrew the two bolts securing the center panel trim on the sides; the trim itself can be moved towards you. Then you need to disconnect the connectors.
- Now the key in the lock should be turned to position “0”, this will disable the anti-theft system. A connector with wires is connected to the lock itself; it must be disconnected. Next, unscrew the two nuts and two bolts, after which you can remove the steering column pipe with the switch.
- Remove the choke handle located under the instrument panel. Pull it towards you so that you can feel the pull. You need to unscrew the two bolts that secure the damper guide rod, after which the choke can be removed.
- Now you can unscrew four more screws that secure the heater control panel in the car. Unscrew the bolts located on the side of the shield on both sides. Also unscrew the lower console mounting bolts with nuts that secure the control panel lighting switch and the optics hydraulic corrector. To do this you will need a 22mm socket wrench, it must be high.
- After completing these steps, you need to unscrew the bolt that secures the center console in the glove compartment. Then all you have to do is unscrew one bolt at a time on each side securing the center console. The console itself can then be dismantled.
- As for installing a new high panel with tidy, this process does not present any particular difficulties. All dimensions at the mounting points on the body are the same, but this procedure also has its own characteristics. To install your new console, you will need the appropriate wiring harness. If you use an existing harness, then you will need to rearrange the terminals in it, taking into account the connection diagram. In addition, it will be necessary to change the cables leading to the heater to longer ones, the same applies to the speedometer cable. If you are installing a new console, you will also need other roof pillar side trims, these must be installed before you install the console. Since the new dashboard will not use a flow meter, the tube from it will need to be plugged. In addition, the signal to the tachometer will need to be supplied from wire K on the coil, which is connected to the speed sensor cable bracket.
- Immediately before installation, you should reassemble the new console, and wrap the connection points of the blowers with electrical tape and, preferably, glue them with foam rubber or anti-creaking agent. It is also necessary to change the foam rubber of the heater, since the old one will no longer be able to perform its functions. Also make sure that the choke can close completely and remember that the cable from the new speedometer should be installed before you install the console. The assembly procedure begins with laying a new wiring harness and connecting all connectors. Before you finally assemble everything, turn on the dashboard and check how all the indicators and gauges work. After this, the console can be put back in place.
Popular faults
If we talk about the dashboard of VAZ 2109 cars, then they are characterized by certain problems. We will tell you about them, and also tell you how to act correctly in a given situation.
| Fault type | Your actions |
| Gasoline level and temperature indicator does not work | In most percent of cases, this situation occurs due to breakdown of devices, sensors of these devices, or an open circuit of the power supply. Therefore, first check the circuit for continuity, make sure that the fuses have not blown. If this is not the case, check whether the gas level and temperature sensors are working. Only if none of the actions allowed you to get rid of the breakdown, you can begin to replace the devices themselves. No options, the problem lies in them |
| When the fuel tank is full, the arrow points to zero | If you have worked on the fuel level sensor, the fault most likely lies with you. When manipulating this device, the float limiter is often knocked down. Either the limiter is installed incorrectly or adjusted, causing the resistor winding to end. To resolve the problem, remove the sensor and then adjust the limiter again |
| The fuel gauge needle regularly jumps and ends up at zero | Here, most likely, the resistor has weak contact with the current collector. Another possible option is that there is a break in the resistor. To resolve this situation, we recommend replacing the hot level sensor with a new measuring device |
| The fuel level lamp is constantly on | If this lamp is constantly on, there is probably a short circuit in the fuel level sensor supply wiring to ground. Another option is that the sensor’s flexible bus is shorted to the fuel intake pipe. You will have to disassemble the device to align the bus and get rid of the resulting short circuit |
| Indicator lamps do not work on the dashboard | There is a high probability that the light bulbs have simply burned out, or they are poorly held in their seats due to loose contact. Replace the bulbs, but first try tightening the contacts. Traces of oxidation may be detected. When cleaned, the light bulbs can work normally again. Also, do not exclude the possibility of wiring breakage or oxidation of the tips of the supply wiring. Try going over the wires with a tester, cleaning the contacts if necessary. |
| The speedometer does not work, the flexible shaft is noisy | In such a situation, you will have to change the speedometer drive cable or replace the entire speedometer assembly. But before you bother so much, check that the fastening nuts of the tips are tightened correctly and properly. The flexible shaft may make noise during operation due to deformation or violation of the permissible bending of the shell of less than 10 centimeters during installation |
VAZ 21099 (carburetor) panel flashing
#1 Nikolay1493760682
- Author
- Posts: 0
- Top
- Name or Quote
#2 Slaven
- Name: Vladislav
- City of Yaroslavl
Very little input. You need to look for the reason somewhere in the wiring. Moreover, it is quite likely that the problem is completely trivial, maybe a mass is leaking somewhere, and this is what results in such a garland followed by stopping the engine.
- Top
- Name or Quote
#3 Igor1957
- Name: Igor
- Rostov-on-Don
Most of all, it looks like either a mass is coming off somewhere or some kind of contact, but I’m leaning towards the fact that the mass is coming off. So it’s worth looking under the dash first, there should be several ground wires there. I won’t tell you the exact location, since I don’t remember now.
- Top
- Name or Quote
#4 Anton
it happened, the shitty armor wires pierced and touched the connector on the distributor, everything blinked and died))
- Top
- Name or Quote
#5 Tezipe
- Name: Andrey
- City Novosibirsk
Was the dash blinking because of the explosive wires?
This is the first time I've heard of this, to be honest.
- Top
- Name or Quote
#6 Tiran90
- Name: Anatoly
- Vladivostok city
There is no ground somewhere or there is a problem with the connectors on the fuse block, most likely they have oxidized. That's why the car behaves this way.
- Top
- Name or Quote
#7 Padik
- Name: Igor
- Moscow city
VAZ 21099 (carburetor) on bumps the panel flashes and the car stalls. Please tell me where to look for the reason?
There are a lot of people walking around somewhere – that’s 90%. This happened to me on 2108, somehow the mass began to come off, but I don’t remember where. As a result, I had to reconsider all the braids of the mass and decided that there was a problem with it. The dashboard was also flashing, the car was also stalling.
- Top
- Name or Quote
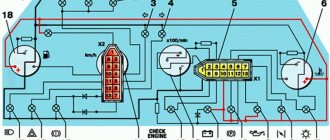
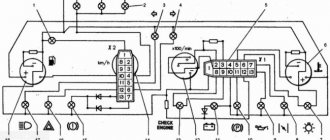
Designation of icons on the VAZ 2109 dashboard
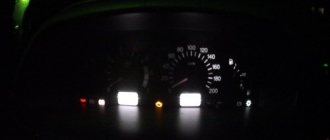
The indicator panel can be divided into 2 parts. The smaller half of the bulbs are mounted centrally at the top of the board. There are indicators on the bottom line of the instrument panel.
- The meaning of the light is simple - the indicator indicates that self-monitoring diagnostics of the alarms are being performed.
- Indicates that there are problems in the power plant. If the lamp is constantly on, you need to diagnose the motor.
- The brake system is in disrepair. Usually the light indicates a drop in fluid in the expansion tank or critical wear of the pads.
- Coolant level sensor lamp. If it lights up constantly, you need to add antifreeze to the system.
- The windshield washer fluid has run out.
- External lighting lamps are damaged. The thread may have burned out or the contact may have broken.
- The front brake pads are worn to the limit.
- The oil level in the engine crankcase has dropped. It may also indirectly indicate a malfunction of the oil pump.
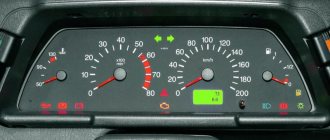
The photo below shows the sequence of light bulbs at the bottom of the dashboard.
| Number | Purpose |
| 2 | High beam indicator. |
| 3 | External lights are turned on and operating normally. |
| 4/6 | Turn signal indicators. On some car trim levels, when the hazard lights are turned on, they light up simultaneously. |
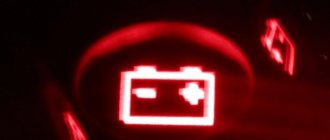
| 5 | The battery is not charging. It is necessary to check the wear of the battery itself and the wiring of the generator. |
| 7 | The engine oil pressure has dropped below normal. It is recommended to perform diagnostics. |
| 8 | The fuel level in the tank has dropped to a critical level. You will need to refuel immediately. |
| 9 | Standard engine fault indicator. |
| 10 | The parking brake is activated. |
Replacing dashboard light bulbs
The first and quite logical problem due to which the instrument lights do not light up is the failure of all or just a few light bulbs at once. In this case, the only solution would be to replace them. It is performed as follows:
- The most difficult task will be dismantling the entire dashboard, which, unfortunately, is necessary to install new lamps. This, in turn, requires disconnecting all electrical connectors, the econometric hose and disconnecting the speedometer cable. You will also have to remove an additional panel, under which there are connectors for the cigarette lighter and the lighting system;
- We install new products that are selected according to the characteristics specified in the vehicle specification.
we unscrew the failed control and illumination lamps;
If you intend to replace the torpedo backlight bulbs, you should know that there are only four of them. They are located in pairs at the top and bottom of the dashboard. In addition, control indicators are located under it, which allow you to see:
- fuel and battery charge level;
- indication of the inclusion of high beams and side lights, activation of the handbrake;
- indication of turn signal activation;
- lubricant pressure in the engine.
Tidy 21099 injector: icon designations
There are more lights and indicators here than on the carburetor. Additional light bulbs available:
- requirement to check the engine;
- STOP light.
Tidy 21099 carburetor: designations
The decoding described at the beginning of the article can be fully used as an example for this point.
Stop light on the dash 2109
The lamp signals the driver about the presence of unexpected problems in the on-board circuits. When such an inscription is activated on the device, it is recommended to immediately go to a service station and look for the cause.
Messages 11
1 Topic by Andrey08 2009-12-16 13:01:12
- Registered: 2010-08-11
- Posts: 91
- Reputation:
Topic: Not Working: All Tidy, Wipers, Fern Guard on VAZ 21099
My friend has a VAZ 21099 injector.
And recently the following happened: all the instrumentation stopped working (speedometer, tachometer, etc.), the wipers and ferns do not work. the headlights seem to come on
Today I talked to him, they say in the morning everything worked fine, but in the afternoon it immediately turned off right on the go.
I advised him to pay attention to the fuse box (they say the frost has hit, condensation is forming or it’s just wet). I would like to hear your opinion, what do you think about this? mb has this happened to anyone?
I would like to hear your opinion, what do you think about this? mb has this happened to anyone?
2 Reply from maik 2009-12-16 19:38:20
- maik
- User
- Offline
- Registered: 2008-11-25
- Posts: 187
- Reputation:
Re: Not working: All tidy, wipers, fern on VAZ 21099
My friend has a VAZ 21099 injector.
And recently the following happened: all the instrumentation stopped working (speedometer, tachometer, etc.), the wipers and ferns do not work. the headlights seem to come on
Today I talked to him, they say in the morning everything worked fine, but in the afternoon it immediately turned off right on the go.
I advised him to pay attention to the fuse box (they say the frost has hit, condensation is forming or it’s just wet). I would like to hear your opinion, what do you think about this? mb has this happened to anyone?
I would like to hear your opinion, what do you think about this? mb has this happened to anyone?
You can also check the ground on the tidy. (mass is strength))) all troubles come from it.
3 Reply from ils 2009-12-17 06:58:25
- ils
- User
- Offline
- Registered: 2009-06-16
- Posts: 540
- Reputation:
Re: Not working: All tidy, wipers, fern on VAZ 21099
I agree with maik - most likely the mass has moved away. It is attached under the dashboard above the place where the steering shaft is screwed to the body. The second place is the ignition switch relay. I’ve seen two types of such relays - some have a tongue that needs to be screwed to the body (there is one in the engine compartment - it looks like a starter relay), the second has a black wire - it should go somewhere to the body. I checked it on the pile - as soon as the mass disappeared from this relay, the entire tidy died, the wipers also did not work.
4 Reply from SokolOFF 2009-12-17 08:38:33 (2009-12-17 08:42:23 edited by SokolOFF)
- SokolOFF
- User
- Offline
- Registered: 2008-12-25
- Posts: 624
- Reputation:
Re: Not working: All tidy, wipers, fern on VAZ 21099
Judging by the quantity of everything at once, I dare to guess:
- ignition switch contact group
- one of the pads (it seems red) flew out of the block on the passenger compartment side
-a flooded block is also an option
PS I would check in just this order)) Well, first, of course, a visual inspection of the block. As for the mass, IMHO, it’s unlikely. After all, the headlight switch in the same place takes a lot of weight.
By the way, I just remembered another question: are “headlights” HEADLIGHTS (low beam, high beam) or dimensions? And does the car even start? Simply, if the lights are on, but the car does not start, then 90% of the ignition relay is either a contact group (or their wiring). I had such a case.
- Registered: 2010-08-11
- Posts: 91
- Reputation:
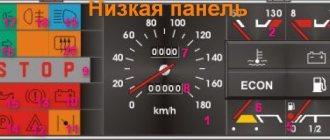
High and low panel VAZ 2109 - the difference
Depending on the year and modification of the car, two types of devices are applicable. The first is considered a low panel, used mainly on carburetor nines and modifications with an injector.
A more advanced version was brought to market in the last years of production. Here there are all the symbols used initially and several indicators of the engine fuel injection system have been added. The dashboard looks more modern, which makes it attractive to car enthusiasts.
Errors on the panel
VAZ versions of on-board computers have a self-diagnosis option, which allows you to read codes yourself without the use of additional equipment. The following is a list of common problems encountered on cars.
| Number | Decoding |
| 1 | Motor control unit malfunction. |
| 2 | The voltage in the on-board circuit is too high. Usually occurs during short circuit. |
| 3 | Fuel level sensor - open circuit or damaged wiring. |
| 4 | The antifreeze level controller is faulty. |
| 5 | The external temperature controller is faulty. |
| 6 | The engine has overheated, you should stop and let the engine cool. |
| 7 | Engine oil pressure is less than minimum. There may be two reasons for this. Loss of lubricant level or pump failure. |
| 8 | Critical voltage drop in the on-board network. |
| 9 | The battery is low. The serviceability of the generator and its mains should be checked. |
| E | EEPROM data packet error |
| 12 | The diagnostic lamp is faulty. |
| 13 | Lambda probe circuit open. |
| 14 | Increased signal coming from the antirfiz temperature sensor. |
| 15 | The coolant temperature controller is faulty. |
| 16/17 | Incorrect voltage in the on-board network. |
| 19 | DPKV refused. |
| 21 | The throttle position control is faulty. |
| 24 | The speed sensor is faulty. |
| 27/28 | The exhaust gas system sensors are sending incorrect signals. |
| 35 | Idle speed is set incorrectly. |
| 41 | The phase regulator is not working correctly. |
| 44/45 | Excessively lean or rich mixture in the cylinders. |
| 49 | Loss of tightness in engine lines. |
| 61 | Lambda probe is faulty. |
How to remove the instrument panel
It's okay if the testing mode does not produce results. On some cars it is not there at all, and therefore there are other ways to repair the speed sensor. Here is one of them: drive the car into the garage, set it to the parking brake. After opening the hood of the car, disconnect the battery from the wire with the minus sign . This will allow you to avoid short-circuiting the on-board network. Now you need to pull out the instrument panel. Remove the trim, and then carefully unscrew the steering wheel. After this, you need to remove the switches that are located under the steering control. Having done the above, you need to unscrew all the self-tapping bolts that hold the instrument panel in place.
Having completed all the above steps, you can remove the dashboard on which the instrument panel is mounted. To do this, you need to grab it by the edges and then pull it slightly in your direction. Now disconnect all the wires attached to the dashboard. But before you disconnect them, label each wire. This is necessary in order to avoid mistakes when putting the entire structure back together. After disconnecting the wires, pull out the dashboard.
The instrument panel is attached to the dashboard with several bolts. Unscrew them to disconnect it. Now you need to remove the glass, which is held in place with glue-sealant. The place that connects the glass and plastic needs to be heated with a hair dryer. After completing these steps, you can easily detach the glass.